Dreamy Room Level 794
Dreamy Room Level 794 guide - Dreamy Room 794 Walkthrough & Solution.
Important Notice Regarding Level Numbering
Due to frequent changes in Dreamy Room's level numbering and differences between platforms (Android/iOS) – for example, level 794 on Android might not be the same as level 794 on iOS – the text guide below may not always match the images and video above. Please prioritize the image and video guides. If you find that the guide content doesn't match your current level, please visit the All Level Walkthroughs page to find the correct guide based on level images. Thank you for your understanding.
Dreamy Room Level 794 Walkthroughs & Guide
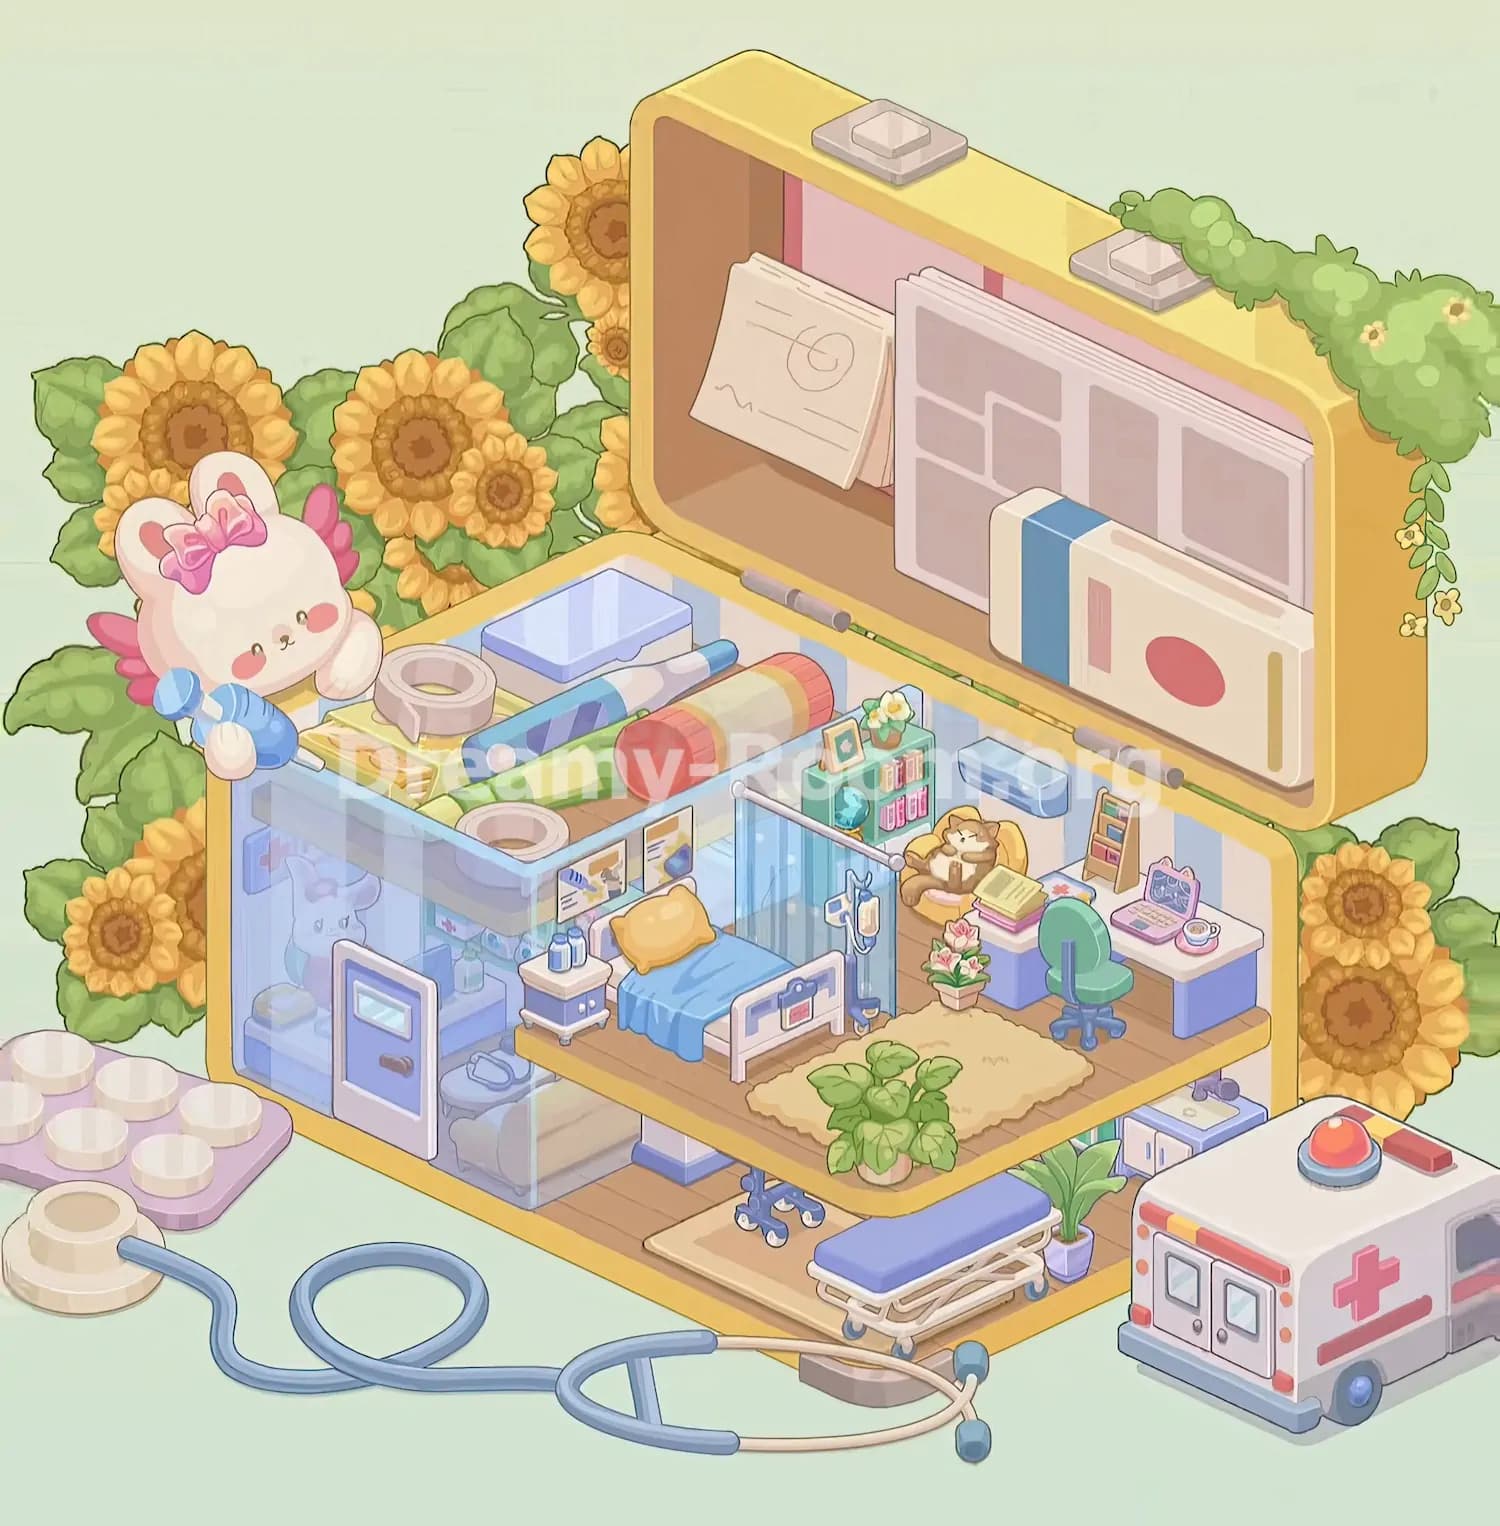
Step 1. Build the yellow medical case and upper lid around the room
Begin Dreamy Room Level 794 by establishing the oversized yellow case that frames the entire miniature hospital. The room itself sits in the lower half, while a tall hinged yellow lid rises behind it. Position the lid vertically along the rear edge of the room so that its rounded yellow border surrounds a brown-and-pink inner panel. Two pale rectangular latch pieces belong along the top edge of the lid, one near the middle-left and another toward the upper-right. On the inside of the lid, place the loose cream-colored sketch or medical note toward the upper-left. The large pale pink-and-white chart or folder occupies most of the center-right area. In front of it, add the blue-and-white vertical binder and the cream rectangular item with a pink oval marking. Finally, allow the leafy green vine to drape over the upper-right corner and trail down the case's right side. Getting this shell correct gives you reliable boundaries for everything that follows.
Step 2. Arrange the medical supplies across the upper storage ledge
The next part of Dreamy Room Level 794 is the crowded supply area above the left side of the hospital room. Treat this space like an open storage tray rather than part of the living floor. Put the shallow light-blue rectangular tray near the back. A large gray roll of tape sits closer to the front-left, while a smaller pale roll belongs near the front edge. Lay the long blue-and-white instrument or pen horizontally through the supplies. Nearby, place the striped blue-and-purple cylindrical item, the green packet or tube, and the larger cream cylinder with the bright red end. A thin blue tool and several flat yellow packets also fit into this cluster. The objects deliberately overlap, so do not try to line them up neatly. The correct arrangement looks like a well-used collection of bandages, tape, medicine, and hospital tools resting on the top rim of the room.
Step 3. Place the bunny decoration and complete the left exterior
On the upper-left exterior of Dreamy Room Level 794, place the large white bunny figure so that it leans over the corner of the medical-supply area. The bunny has long ears, rosy cheeks, a large pink bow, small pink wing-like decorations behind it, and a blue medical-looking object held in its paws. Its body should remain outside the main room rather than sitting on the hospital floor. Position it directly in front of the sunflower backdrop, with its face angled toward the room and its lower body overlapping the edge of the storage section. This is an easy object to misplace because its size suggests that it may belong inside the room, but it is actually part of the decorative exterior. The surrounding sunflower heads and broad green leaves already create a dense floral frame, so leave them visible around the bunny rather than covering them with later objects.
Step 4. Construct the glass bathroom area on the left side
Now move to the lower-left corner of Dreamy Room Level 794 and build the enclosed bathroom or washing area. Install the translucent pale-blue wall panels along the left and rear boundaries, creating a small glass cubicle beside the bed. The outer front wall includes a purple-gray door with a light rectangular window near the top and a darker inset panel below it. The transparent walls should still allow you to see muted shapes and small decorations behind them. Inside the enclosure, place the pale bathroom fixture and the small blue floor item toward the bottom. The enclosure extends from the room's left edge to just before the bedside table, so it should not overlap the bed itself. Pay close attention to the door orientation: its frame faces outward toward the viewer. Once placed correctly, the bathroom creates a distinct private area while preserving the soft, transparent appearance that lets the hospital remain visually open.
Step 5. Assemble the hospital bed and bedside area
The hospital bed is one of the most important anchors in Dreamy Room Level 794. Place it slightly left of center, running from the back-left toward the front-right. The frame is white with pink and blue accents, including a raised footboard at the front. Spread the blue blanket neatly across the mattress, allowing it to hang over the sides, and put the mustard-yellow pillow at the head of the bed near the rear wall. Immediately to the left of the bed, add the small white-and-blue bedside cabinet. Two tiny blue bottles sit on top of this cabinet. On the wall above the pillow, position the two small rectangular medical posters or charts side by side. The bed should sit partly on the beige rug rather than against the bathroom door. Because the room is compact, even a slight shift can make later furniture appear crowded, so use the bed as your main reference point for the rest of the interior.
Step 6. Add the privacy curtain, IV stand, and bedside medical equipment
Continue Dreamy Room Level 794 by filling the narrow space immediately to the right of the bed. Install the light-blue privacy curtain vertically between the sleeping area and the desk section. Its silver rail stretches horizontally above it, beginning near the bed and extending toward the back wall. Next to the bed, place the slim IV stand with its small hooks and hanging medical bags or containers. The stand belongs beside the bed's right edge, not near the bathroom or desk chair. The curtain should appear partially open, allowing the room behind it to remain visible. This arrangement creates a believable hospital recovery zone without completely separating the patient from the work area. Small items in this section are easy to lose behind larger furniture, so make sure the IV stand remains visible in front of the curtain and that none of its hanging pieces are accidentally placed on the desk or bedside cabinet.
Step 7. Build the rear-right storage and patient corner
The back-right portion of Dreamy Room Level 794 contains several compact decorative and storage pieces. Begin with the narrow turquoise shelving unit beside the curtain. Place the small blue globe-like object in its lower section, arrange the colorful little containers or bottles in the upper compartments, and add the tiny framed picture and small flower decoration on top. Beside this unit, position the soft brown-and-cream plush figure on the yellow chair or cushion against the rear wall. A short stack of pastel books rests immediately in front of it. Above this area, attach the small pale-blue rectangular wall shelf. Farther right, place the slim ladder-shaped organizer vertically against the wall. These objects create a cozy personal corner that contrasts with the clinical bed and equipment. Keep the shelving unit close to the curtain so that enough space remains for the desk and rolling chair on the far-right side.
Step 8. Set up the desk, laptop, chair, flowers, and work area
The desk occupies the far-right interior of Dreamy Room Level 794. Position the white-topped desk against the right wall, with its purple-blue cabinet base underneath. Set the small pink laptop on the rear portion of the desktop, open so its decorated screen faces toward the viewer. Beside it, add the tiny matching cup and saucer. Pull the green-and-teal rolling office chair in front of the desk, with its rounded backrest facing the work surface and its caster wheels visible underneath. Between the desk and the bed area, place the small potted pink flowering plant on the floor. The stack of books remains closer to the plush figure rather than on the desk. When correctly arranged, this section should feel like a compact nurse's workstation or study corner. Avoid pushing the chair too far beneath the desk, because its green seat and blue wheeled base are clearly visible in the completed arrangement.
Step 9. Finish the central floor with the rug and large leafy plant
The warm beige rug provides visual structure to the main floor of Dreamy Room Level 794. Lay it across the center-right portion of the wooden platform so that it runs beneath the bed area and stretches toward the desk. Its edges are softly irregular or scalloped rather than perfectly rectangular. In the foreground center, place the large leafy green plant in its light pot. This plant sits directly along the front edge of the raised room, partially overlapping the visual line of the rug. Its broad leaves fan upward and outward, making it one of the strongest foreground decorations. Keep enough room around it to preserve a clear view of the bed frame and desk chair behind it. The plant should not move to either corner; its central placement helps balance the dense hospital furniture. Once the rug and greenery are correct, the upper room should already resemble the completed cozy treatment space.
Step 10. Add the lower platform, gurney, equipment, and potted plant
Below the main room is another important medical section in Dreamy Room Level 794. Position the wheeled hospital gurney toward the lower-right foreground, underneath the raised room. It has a purple-blue mattress, a pale frame, and visible wheels. Place the small purple flowerpot with tall green leaves immediately to its right. Behind the gurney, against the inner wall, add the compact white-and-blue medical cabinet or equipment unit. The lower wooden platform remains visible beneath these pieces, especially toward the left side. Be careful not to confuse this gurney with the bed upstairs: the upper bed has a pillow, blanket, and decorative head and foot boards, while this lower stretcher is longer, flatter, and supported by a folding wheeled frame. Correctly placing both beds is one of the main spatial challenges of the level because they occupy similar visual areas but serve different parts of the miniature hospital.
Step 11. Place the stethoscope and medical tray across the foreground
The foreground accessories make Dreamy Room Level 794 especially distinctive. Start on the lower-left with the pale medical chest piece connected to a thick blue stethoscope tube. The tubing travels across the entire bottom foreground, forming several large loops before ending near the center-right in the two small earpieces. Do not coil it tightly beside the chest piece; the correct shape is deliberately spread across the scene. Behind the chest piece, position the purple rectangular tray containing several round white cups or wells arranged in rows. These pale circular containers sit above and to the left of the main room. The stethoscope partially crosses the open space in front of the hospital rather than remaining inside it. Because it is long and flexible, it is easy to place in the wrong orientation, so use the completed shape of the loops and the location of the earpieces as your guide.
Step 12. Park the miniature ambulance at the lower-right corner
Complete the large exterior objects in Dreamy Room Level 794 by adding the small white ambulance at the lower-right. It should sit outside the room and slightly in front of the gurney area, facing toward the lower-left side of the image. The vehicle has red trim, a prominent red medical cross on its side, double rear doors, blue wheels, and a rounded red-and-blue emergency light on the roof. A small red rectangular light or fixture sits behind the main roof beacon. Keep the ambulance fully outside the yellow room frame; none of it belongs on the wooden floor or beige rug. The right-side sunflowers remain visible behind it, framing the vehicle with yellow petals and green foliage. The ambulance's position visually completes the hospital theme and also balances the bunny decoration on the opposite side of the scene.
Notes and Precautions
The central challenge of Dreamy Room Level 794 is identifying the precise home of each item rather than simply grouping similar objects together. Several pieces can be misleading: the gurney and hospital bed are both blue, multiple rolls and cylindrical supplies appear in the upper storage area, and many tiny accessories could plausibly fit on either the desk, bedside table, or shelving unit.
Pay particular attention to layering. The bathroom panels sit behind the bed, the privacy curtain stands between the bed and rear shelving, the large foreground plant overlaps the front edge of the room, and the stethoscope stretches across the exterior foreground. If one large object is positioned incorrectly, later small pieces may appear to have nowhere to go.
Also remember that the surrounding sunflower garden acts as a visual frame. Do not try to cram decorative flowers into the hospital interior. The bunny, ambulance, medical tray, and stethoscope are intentionally outside the primary room, while the furniture and personal items occupy the miniature case itself.
Tips and Tricks from top player
For the fastest solution, divide Dreamy Room Level 794 into clear zones instead of placing objects in the order they appear. First complete the yellow case and lid, then the bathroom, hospital bed, rear-right workstation, lower gurney area, and finally the exterior accessories. This prevents small objects from blocking the placement points for larger furniture.
Use distinctive shapes as anchors. The bed belongs slightly left of center, the desk fills the far-right wall, the glass bathroom occupies the far-left, and the gurney sits below the raised floor. After those four anchors are correct, most remaining items have only one logical space available.
When dealing with tiny objects, compare their color with nearby furniture. Blue bottles belong on the bedside cabinet, the pink laptop belongs on the white desk, pastel books sit beside the plush figure, and multicolored containers belong in the turquoise shelving unit. Leave the long stethoscope until near the end because it spans such a large portion of the foreground and can visually obscure other placement clues.
Final Scene
Once Dreamy Room Level 794 is complete, the once-empty striped room has transformed into a tiny, cheerful hospital tucked inside a giant yellow medical case. A blue-covered patient bed, bedside cabinet, IV stand, privacy curtain, glass bathroom, workstation, rolling chair, books, flowers, shelving, and personal decorations fill the upper room without making it feel crowded. Below, a second wheeled gurney and potted plant extend the medical setting onto the lower platform. The open lid displays papers, charts, binders, and medical materials, while extra supplies are packed across the upper ledge. Outside the case, an adorable bow-wearing bunny watches over the room from the left, an ambulance waits at the right, and a large blue stethoscope winds across the foreground beside a tray of small containers. Surrounded by oversized sunflowers and soft green foliage, the finished scene feels warm, caring, playful, and wonderfully complete.