Dreamy Room Level 903
Dreamy Room Level 903 guide - Dreamy Room 903 Walkthrough & Solution.
Important Notice Regarding Level Numbering
Due to frequent changes in Dreamy Room's level numbering and differences between platforms (Android/iOS) – for example, level 903 on Android might not be the same as level 903 on iOS – the text guide below may not always match the images and video above. Please prioritize the image and video guides. If you find that the guide content doesn't match your current level, please visit the All Level Walkthroughs page to find the correct guide based on level images. Thank you for your understanding.
Dreamy Room Level 903 Walkthroughs & Guide
Step 1. Build the Main Treehouse Platforms, Railings, and Ladders
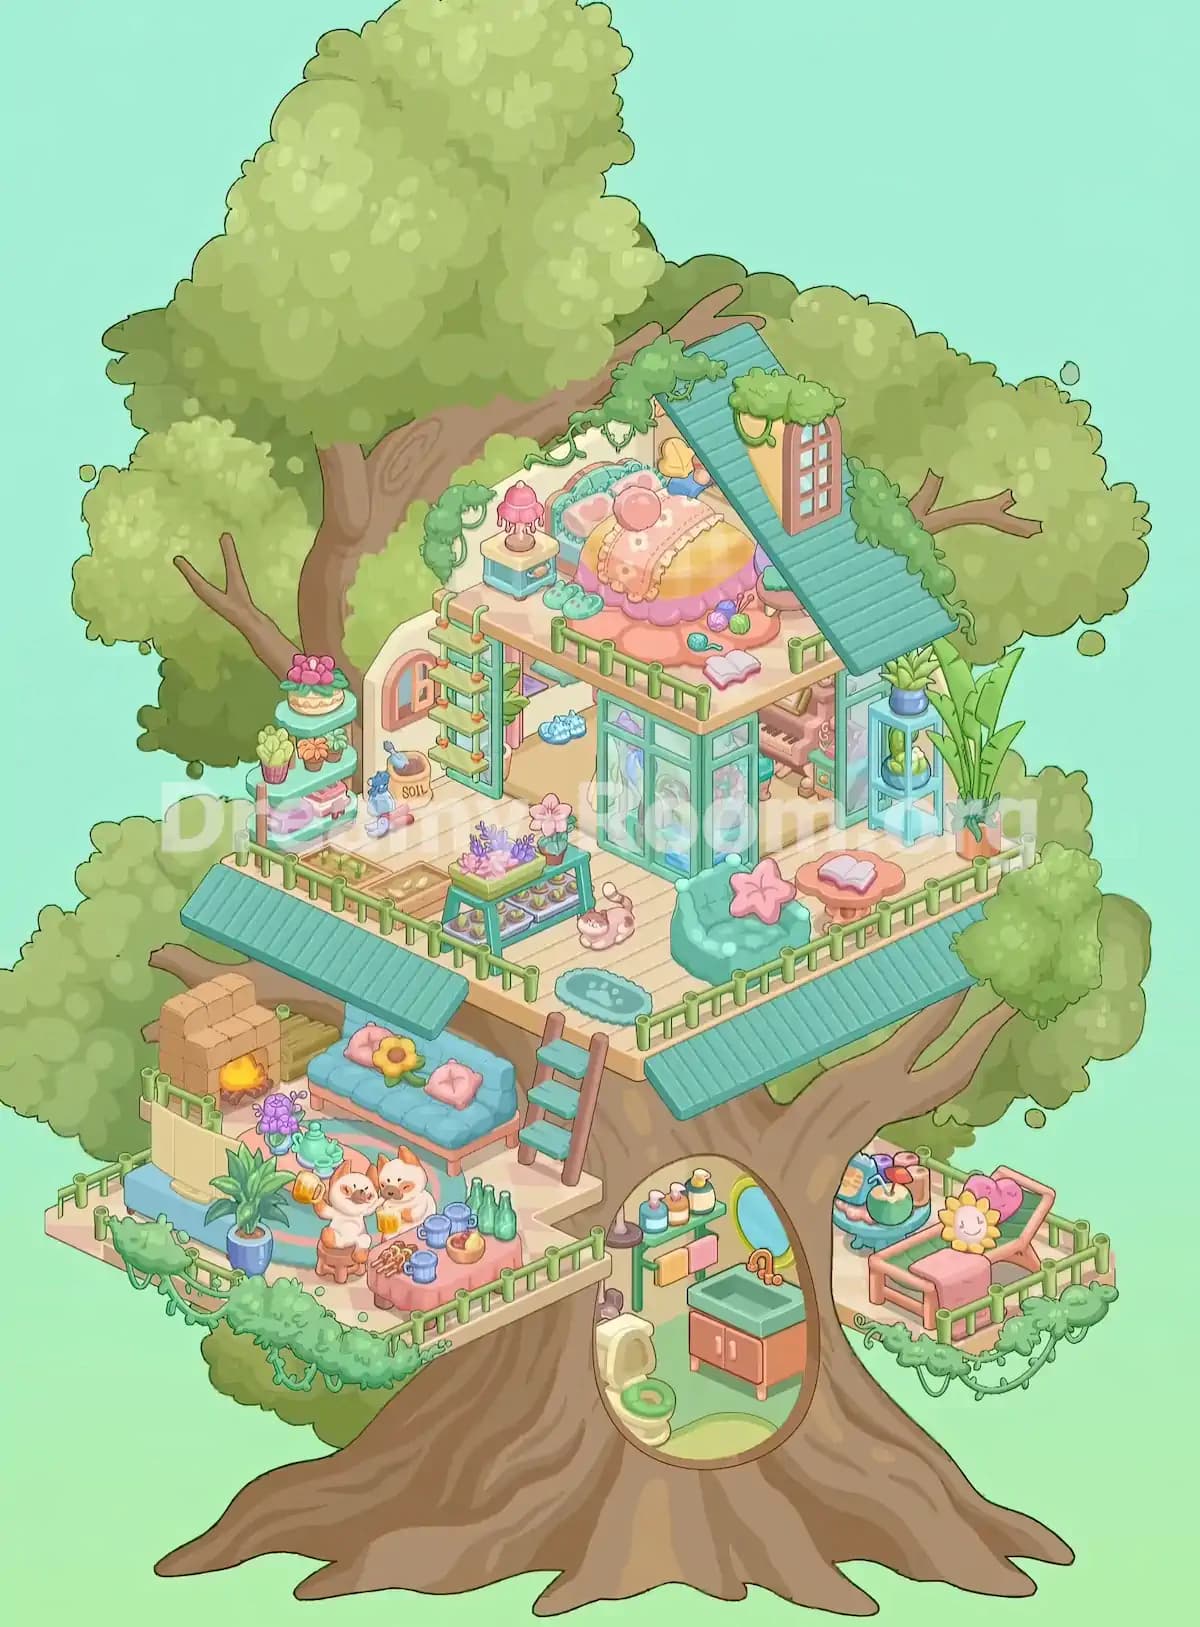
Begin Dreamy Room Level 903 by identifying the large wooden platform positioned near the upper-middle section of the tree. This is the foundation for the main living space. The completed arrangement uses this platform to support an enclosed room, an elevated bedroom, and several outdoor decorating areas.
Place the green wooden railings along the exposed edges of the main platform. They should follow the front and side boundaries while leaving openings where the ladders provide access between levels.
Next, position the ladder with turquoise steps and brown side supports against the front edge of the main platform, slightly right of center. A second green ladder belongs toward the back-left side, connecting the main floor to the elevated sleeping area.
Add the turquoise sloping awnings along the visible front edges. These create the distinctive layered appearance of Dreamy Room Level 903.
Keep the lower-left balcony and small right-side platform separate from the main deck. Correctly distinguishing these areas is essential because Dreamy Room Level 903 contains several different seating arrangements that look similar but belong on different levels.
Step 2. Install the Turquoise Roof and Create the Upper Bedroom Structure
The most recognizable feature of Dreamy Room Level 903 is the charming bedroom built high among the tree branches. Start by placing the large turquoise sloping roof over the right side of the upper platform. Its ridge should rise toward the back, while the visible roof surface slopes downward toward the front-right corner.
Position the small brown-framed window with pale blue glass panes on the roof's front-facing surface. Behind the roof, arrange the soft cream and yellow wall sections that form the sheltered sleeping space.
Add the green climbing vines around the upper roof edges, allowing their leaves to curl over the ridge and hang down the sides. Additional greenery belongs around the cream-colored wall on the left.
The roof in Dreamy Room Level 903 should only partially cover the bedroom. The front portion of the sleeping platform remains open, making the bed and surrounding accessories visible.
Check the alignment carefully. A misplaced roof can make it difficult to recognize the correct positions for smaller bedroom items later in Dreamy Room Level 903.
Step 3. Position the Bed, Nightstand, Rug, and Bedroom Accessories
Now furnish the upper sleeping area of Dreamy Room Level 903. Place the large rounded bed against the back wall, slightly left of the turquoise roof. The bed features a decorative teal headboard, soft pink heart-shaped cushions, a yellow quilt, a floral pink coverlet, and a purple ruffled bed skirt.
Arrange the round pink cushion near the upper center of the bedding. The bed should face the open front edge of the platform.
On the left side of the bed, position the small turquoise nightstand with its cream-colored top. Place the pink decorative table lamp directly on it.
Next, set the peach-colored flower-shaped rug across the floor at the foot of the bed. Arrange the colorful yarn balls and crafting accessories toward its right side. The turquoise slippers belong near the left-front corner of the bed, close to the ladder opening.
Place the open book near the front-right edge of the upper platform, just inside the railing. A small stool or side seat sits partially beneath the roof on the right.
These carefully positioned decorations complete the cozy atmosphere of Dreamy Room Level 903. Check their spacing before moving down to the next floor.
Step 4. Arrange the Enclosed Living Area and Music Corner
Move down to the main interior beneath the bedroom. In Dreamy Room Level 903, this section combines a sheltered living area with a small music corner.
Start with the pale cream walls and the rounded brown-framed window on the back-left side. The window should sit behind the green ladder that leads upstairs. Position the interior furnishings behind the front glass structure so that they remain visible through the transparent panels.
On the right side of the enclosed room, place the brown upright piano. Its keyboard should face toward the front-left of the room, allowing the keys to be seen through the open section. Arrange the small decorative objects and framed accessory around the piano area, keeping them close to the back-right wall.
The turquoise-framed glass door on the right should open outward toward the adjacent outdoor terrace.
Dreamy Room Level 903 relies on carefully layered furniture, so place the back-wall items before installing larger foreground pieces. Once the music corner is positioned correctly, the lower interior of Dreamy Room Level 903 should resemble a compact woodland cottage tucked beneath the bedroom.
Step 5. Create the Gardening Station Along the Left Side
The left side of the main platform becomes a charming gardening station in Dreamy Room Level 903. Begin by placing the tall turquoise plant shelf against the far-left edge, near the tree branches.
The top shelf holds a decorative arrangement of pink flowers in a rounded planter. On the middle shelf, place the small potted plants, including a light-green succulent and an orange flowering plant. The bottom shelves contain neatly stacked pastel storage boxes and gardening supplies.
To the right of the shelving unit, position the tan bag labeled "SOIL." Its opening should face upward, with a small blue gardening scoop resting inside.
Arrange the red-handled tools and small blue watering accessories on the floor beside the soil bag. These objects belong between the shelf and the green ladder.
Along the front-left railing, place the two rectangular wooden planting boxes. One contains small green seedlings, while the other shows light-colored bulbs or freshly planted vegetables.
This arrangement makes the gardening space in Dreamy Room Level 903 appear practical and organized. Pay attention to the relative positions of the supplies, as the small tools in Dreamy Room Level 903 are particularly easy to confuse.
Step 6. Install the Central Glass Cabinet and Flower Display
Continue decorating the main platform by creating the central storage and flower display area. This portion of Dreamy Room Level 903 sits between the gardening corner on the left and the reading area on the right.
Position the large turquoise-framed glass cabinet or enclosed display structure slightly behind the front-center of the platform. Its transparent panels should face forward and toward the right, with the pastel-colored belongings visible inside.
Next, arrange the low turquoise flower display stand in the foreground, slightly left of center. The stand contains multiple rows of small decorative pots on its lower shelves.
Fill the top planter with pink and purple blossoms. At the right end of the stand, place the taller pink flowering plant in its small turquoise pot.
Position the small cream-and-brown cat figurine on the wooden floor just to the right of the flower display. Its tail curls upward as it faces toward the front of the platform.
Add the small turquoise paw-print rug near the front-center railing.
These objects give Dreamy Room Level 903 its playful garden-inspired personality. The key is maintaining enough separation between the glass cabinet, flower display, and cat so each decoration remains recognizable in the finished Dreamy Room Level 903 scene.
Step 7. Decorate the Upper Terrace Reading Nook and Plant Corner
The front-right section of the main platform becomes a peaceful reading nook. Start Dreamy Room Level 903's outdoor seating arrangement by positioning the rounded turquoise armchair near the front-right corner, just inside the green railing.
Place the large pink star-shaped cushion against the chair's backrest. The chair should face slightly toward the center of the platform rather than directly outward.
To the right and slightly behind the chair, add the small round peach-colored wooden table. Place the open book on its surface.
Next, furnish the far-right side of the platform. Position the tall leafy plant in its orange pot close to the outer railing. Beside it, place the narrow turquoise display cabinet with transparent sides.
The display cabinet holds a blue flowerpot on top and additional small green decorative objects inside its compartments.
Check that the turquoise glass door from the interior room remains visible just behind this plant display.
The reading nook in Dreamy Room Level 903 should feel open, bright, and comfortable. For accurate placement, keep the chair nearer the front edge while the larger plants occupy the outer-right side of Dreamy Room Level 903.
Step 8. Build the Lower-Left Fireplace and Sofa Lounge
Next, move to the separate balcony extending from the left side of the tree trunk. This area forms the cozy entertainment lounge of Dreamy Room Level 903.
Place the small brick fireplace toward the back-left corner of the balcony. The fireplace features a rounded stack of tan bricks and a glowing orange fire inside its opening. Arrange the bundle of wooden logs immediately to its right.
Next, position the long turquoise sofa along the back edge beneath the projecting turquoise awning. The sofa should face the front of the balcony, with its pink wooden base clearly visible.
Decorate the sofa with two square pink cushions, one near each end. Place the large yellow sunflower cushion between them, allowing its bright petals to stand out against the blue upholstery.
Set the oval rug in front of the sofa, using its peach, turquoise, and cream bands to define the sitting area.
Add the pale cream folding screen near the left-front side of the fireplace area, standing behind the nearby decorative plants.
Dreamy Room Level 903 uses this lower balcony to contrast the indoor bedroom with an outdoor relaxation space. Ensure the fireplace, sofa, and rug are correctly aligned before adding tabletop decorations.
Step 9. Arrange the Tea Table, Cat Figures, Flowers, and Refreshments
The lower-left lounge in Dreamy Room Level 903 contains several tiny decorations that give the scene its cheerful personality.
Begin with the low pink table near the front-right corner of the balcony, directly in front of the sofa. Decorate its surface with blue cups, small dishes, a bowl of fruit, skewered snacks, and several green bottles.
Place the two white-and-orange cat characters between the sofa and the table. They should sit close together, facing slightly forward, with their happy expressions clearly visible. Their small drinks add to the friendly picnic atmosphere.
Position the little brown stools beneath or beside the cats, matching the placement shown in the finished arrangement.
On the left side of the table, add the blue flowerpot filled with purple blossoms and the small turquoise teapot. Place the taller leafy plant in its blue-and-white pot near the balcony's front-left corner.
Complete this area with the green railing and hanging leafy vines along the exposed front edge.
In Dreamy Room Level 903, these small accessories must be arranged tightly without overlapping incorrectly. The finished tea area is one of the busiest sections of Dreamy Room Level 903, so check the positions of cups, snacks, and plants carefully.
Step 10. Furnish the Small Right-Side Balcony with a Lounge Chair
The small platform extending from the right side of the tree becomes another charming resting area in Dreamy Room Level 903. This balcony is separate from the larger upper reading nook and sits lower against the trunk.
Start by placing the pink wooden lounge chair toward the right edge of the platform. Its backrest angles upward, and the long seat points toward the lower-left corner.
Add the soft pink cushion to the seat and the heart-shaped pink pillow near the upper end of the backrest. Place the smiling yellow sunflower cushion in front of the heart pillow.
To the left of the lounge chair, position the small round turquoise side table or tray. Arrange the green tropical drink with its straw and colorful garnish on top, alongside the other small refreshments.
Keep the pastel gingham floor covering visible beneath the furniture.
Finish by placing the green railings around the exposed edges, then add the leafy vines hanging below the front of the platform.
This little balcony gives Dreamy Room Level 903 a relaxing vacation atmosphere. Make sure the chair faces inward and the drinks sit on its left side, matching the completed layout of Dreamy Room Level 903.
Step 11. Complete the Bathroom Inside the Tree Trunk
The final major room in Dreamy Room Level 903 is hidden inside the oval opening near the bottom of the massive tree trunk. Unlike the exterior balconies, this space is compact and requires precise placement of its bathroom fixtures.
Start by placing the pale cream toilet against the left interior wall. Its lid is raised, revealing the distinctive green toilet seat.
On the right side, position the peach-colored vanity cabinet with two doors and short wooden legs. The cabinet supports a rectangular turquoise sink with a curved orange faucet.
Above the sink, attach the oval mirror with its bright green frame to the upper-right wall.
Install the narrow green wall shelf on the left side, above and behind the toilet. Arrange the three pastel-colored bottles across its top surface. Hang the folded yellow and pink towels from the bar beneath the shelf.
Add the small purple bathroom accessory near the toilet and the light green oval floor mat toward the front of the room.
The bathroom should remain fully visible through the tree's oval opening. This completes the essential furniture arrangement for Dreamy Room Level 903 and brings the woodland home together.
Notes and Precautions
Dreamy Room Level 903 has a surprisingly complex layout despite its calm and colorful appearance. Most placement mistakes happen when players confuse objects that belong on different platforms.
- Distinguish the three outdoor levels. The main terrace, lower-left lounge, and small right-side balcony have separate furniture arrangements. Avoid putting the two sunflower cushions in the same location.
- Work from the back toward the front. Install walls, the piano, and large furnishings before placing glass panels, railings, and small accessories.
- Be careful with ladders. The green ladder connects the main level to the bedroom, while the brown-sided ladder with turquoise steps connects the main terrace to the lower-left balcony.
- Check the roof alignment. The turquoise sloping roof covers the upper-right portion of the bedroom rather than the entire upper platform.
- Watch for small accessories. Yarn balls, gardening tools, flowerpots, cups, bottles, and books are easy to overlook.
- Do not mix up the reading areas. Dreamy Room Level 903 has an upper turquoise armchair with a star cushion and a lower-right pink lounge chair with a flower cushion.
There is no need to rush through Dreamy Room Level 903. Its challenge is finding the intended position of every item, not completing the arrangement as quickly as possible.
Tips and Tricks from top player
Experienced players approach Dreamy Room Level 903 by dividing the treehouse into smaller decorating zones rather than trying to memorize the entire finished scene.
1. Place the largest pieces first. Start with the roof, walls, cabinets, fireplace, sofa, and bed. These large objects establish the boundaries for all the smaller items.
2. Use architectural details as landmarks. The tree trunk, ladders, oval bathroom opening, and platform corners are reliable references when deciding where an object belongs.
3. Complete one zone before switching floors. Finish the bedroom, gardening station, reading nook, and lower balconies separately. This reduces confusion when working through Dreamy Room Level 903.
4. Match objects using color and function. Pink flower cushions belong with their matching furniture, garden tools belong beside the soil bag, and bathroom supplies belong inside the trunk.
5. Leave foreground objects until last. The glass display, front flower stand, small pets, and refreshments can obscure other decorations if placed too early.
6. Inspect the edges of every balcony. Hanging vines, railings, and smaller plants may be partially hidden by the larger furniture.
The most useful strategy for Dreamy Room Level 903 is to treat the completed picture as a collection of small arrangements. Once every zone matches, the entire treehouse will naturally come together.
Final Scene of Dreamy Room Level 903
The completed Dreamy Room Level 903 reveals a magnificent woodland retreat built around an enormous old tree. Its sprawling branches and lush green canopy surround a delightful multi-story home filled with pastel furniture, flowering plants, and charming decorative details.
At the highest level, a cozy bedroom nestles beneath a turquoise roof, featuring a floral bedspread, pink lamp, colorful cushions, and crafting supplies. Below, a bright garden-inspired living space combines an elegant glass cabinet, a small piano, vibrant flower displays, and a peaceful reading nook.
The lower-left balcony offers a welcoming gathering area with a glowing brick fireplace, comfortable blue sofa, delicious refreshments, and two cheerful cats. On the opposite side, a pink lounge chair creates a secluded spot for enjoying a tropical drink.
Even the tree trunk contains a fully equipped miniature bathroom.
Together, these carefully arranged spaces make Dreamy Room Level 903 a beautiful, imaginative treehouse full of warmth, comfort, and personality.