Dreamy Room Level 867
Dreamy Room Level 867 guide - Dreamy Room 867 Walkthrough & Solution.
Important Notice Regarding Level Numbering
Due to frequent changes in Dreamy Room's level numbering and differences between platforms (Android/iOS) – for example, level 867 on Android might not be the same as level 867 on iOS – the text guide below may not always match the images and video above. Please prioritize the image and video guides. If you find that the guide content doesn't match your current level, please visit the All Level Walkthroughs page to find the correct guide based on level images. Thank you for your understanding.
Dreamy Room Level 867 Walkthroughs & Guide
Step 1. Build the two-story laboratory structure and decorate the upper roof
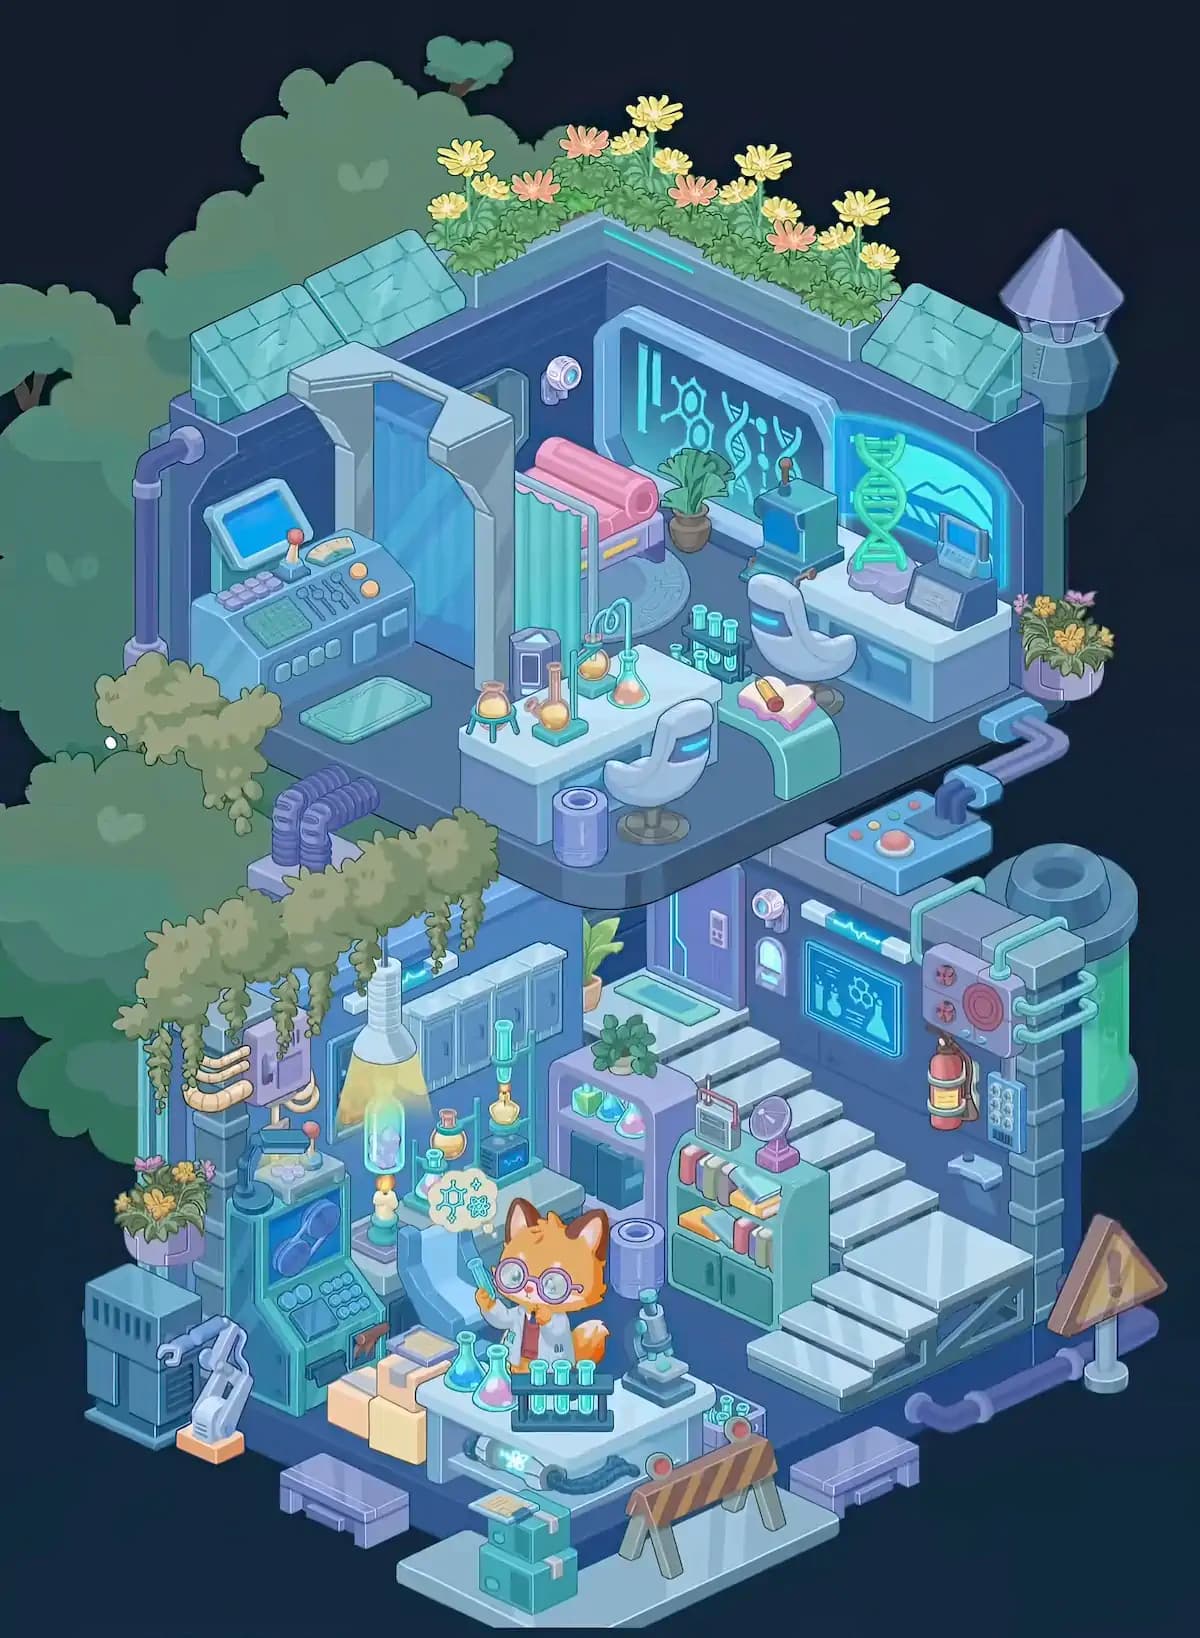
Begin Dreamy Room Level 867 by establishing the large structural pieces that turn the original blue room into a compact two-level research facility. The upper laboratory occupies the original room area, while the second workspace expands underneath it toward the foreground. Keep the dark blue wall panels and matching blue-gray flooring aligned with the isometric edges. Along the upper rear rim, place the long raised planter filled with dense green foliage and alternating yellow and peach flowers. Large translucent turquoise roof blocks sit near both ends of this upper edge, with two clusters on the left and another group on the right. At the far upper-right exterior corner, install the tall ventilation chimney with its faceted purple conical cap. These large pieces establish the silhouette of the completed laboratory and make positioning the smaller scientific equipment much easier.
Step 2. Set up the upper-left control station and decontamination chamber
The left side of Dreamy Room Level 867 contains a compact control and decontamination area. Against the left wall, position the large blue-gray console with its tilted bright-blue screen. Its upper surface contains the red-topped control lever, rows of purple buttons, several dark sliders, two round orange controls, and a green display panel. Connect the purple pipe running vertically along the outside left wall and bending into the laboratory near the console. Immediately to the right, install the tall decontamination or scanning chamber. It has a pale angular frame surrounding a translucent blue interior panel, with the opening facing toward the foreground. Put the flat turquoise floor mat directly in front of this station. Near the back wall, add the small round white-and-purple surveillance camera or sensor. Keeping the bulky chamber and console in place first prevents the nearby smaller objects from becoming difficult to position.
Step 3. Complete the upper laboratory’s rear research wall
Next, concentrate on the back-right research area. The most recognizable object in Dreamy Room Level 867 is the large glowing cyan scientific display mounted on the rear wall. Position it centrally, showing its DNA strand, molecular shapes, circles, and other biological symbols. A leafy green plant in a brown pot belongs directly in front of the display toward its lower-left corner. To the display’s right is the large curved cyan observation window containing a simple mountain-like outline. Place the bright green DNA double-helix model on its purple base in front of this window. Below the window and screen, install the long white-and-blue laboratory desk. The small dark terminal and its pale-blue display belong on the right side of this desk, while the curved white laboratory chair sits in front. This arrangement forms the high-tech genetics workstation visible at the upper-right of the completed room.
Step 4. Arrange the upper central experiment table and specimen equipment
The center of the upper floor in Dreamy Room Level 867 is occupied by another white laboratory table. Position it slightly toward the foreground, leaving enough room for a white swivel chair with a cyan accent on its back. Across the tabletop, distribute the glassware carefully: place the small orange-liquid flask toward the left, the taller round-bottom flask and connected tubing near the middle, and the triangular flask containing peach-colored liquid toward the right. A slender curved glass or metal apparatus rises behind these vessels. Set the dark test-tube rack with several pale cyan tubes behind the table, nearer the back wall. A small gray scientific instrument also sits close to this workstation. Near the table’s right side, place the mint-green pedestal or cabinet topped by the open pink-edged book and its small tan specimen. Finally, position the cylindrical lavender waste bin near the table’s front-right corner.
Step 5. Finish the upper floor with curtains, rolled equipment, pipes, and controls
Several secondary objects complete the upper room. Behind the central experiment table, toward the left side of Dreamy Room Level 867, position the small curtained storage or privacy unit. Its mint curtain hangs vertically beneath a pale frame, while several rolled pink mats or padded laboratory materials rest horizontally across the top. A pale circular floor rug is partially visible behind this area and should curve around the nearby furniture. At the far-right edge of the upper platform, route the thick dark-purple utility pipes around the outer floor. These pipes pass through bright cyan coupling sections and continue toward the lower machinery. On the small projecting platform outside the right edge, position the rectangular blue controller. It contains a prominent large red button plus several smaller colored indicator buttons. Add the small flower planter on the upper-right wall near the workstation to soften the mechanical appearance of this part of the laboratory.
Step 6. Build the lower-left chemistry and machinery section
Move down to the lower level of Dreamy Room Level 867, starting along the left wall. Hang the long trailing green vines from the underside of the upper platform, allowing several strands to descend in front of the pale blue wall cabinets. Install the row of rectangular storage lockers against the rear wall. Toward the upper-left corner, add the vertical machinery column with the tan coiled tubing wrapped around it and the nearby purple electrical boxes. The most striking object here is the oversized suspended laboratory flask: position its narrow neck upward and let the wide glass body hang over the work area, filled with glowing yellow liquid and a luminous blue-purple experiment inside. Below it, place several smaller bottles and laboratory vessels on their stands. At the far left, add the flower planter, dark floor machinery cabinet, and white articulated robotic arm mounted on its orange base.
Step 7. Position the lower-left analyzer, boxes, and fox scientist
The large turquoise analyzer sits toward the lower-left center of Dreamy Room Level 867. Place the machine facing diagonally toward the foreground. Its upper section contains the large circular viewing window with two purple-blue shapes inside, while its control surface includes buttons, knobs, a small joystick, and a keyboard-like panel. Put the beige cardboard storage boxes immediately to the right of this machine. The orange fox scientist belongs at the visual center of the lower laboratory, standing behind the curved pale-blue workstation. The fox wears a white laboratory coat and large round purple goggles and holds a small orange object in one paw. Position the white thought bubble beside its head, displaying blue scientific symbols. Behind and around the fox, add the small chemical bottles, glass containers, stands, and glowing samples that make this portion of the laboratory feel like an actively used research station.
Step 8. Assemble the lower central experiment bench and microscope area
Now furnish the foreground workstation in Dreamy Room Level 867. Place the large white-and-blue laboratory bench across the lower center, directly in front of the fox. On the left side of the tabletop, arrange several flasks containing cyan, pink, and green liquids. The black test-tube rack belongs near the center and holds a row of upright tubes filled with different colored solutions. Additional narrow tubes and small containers fit around the right edge. Underneath the bench, install the long horizontal glowing experimental cylinder. Its center emits a cyan-white glow, while dark cables connect it toward the right-hand controls. To the fox’s right, place the compact microscope on its separate square pedestal. Keep enough space between the microscope and the staircase so neither overlaps. This bench is one of the busiest placement zones in the level, so using the table edges as alignment guides helps considerably.
Step 9. Construct the staircase, storage shelf, door, and wall electronics
The lower-right interior of Dreamy Room Level 867 revolves around the white staircase. Place the stairs diagonally from the lower-right foreground upward toward the back, eventually meeting the upper platform. Beside the stairs, install the mint-green bookcase. Fill its upper shelves with the red, cream, green, and pink books, and place the orange item on the middle shelf; the lower section contains two cabinet doors. A small radio-like device and a round purple clock or gauge sit on top. Behind the shelving, position the purple laboratory door with glowing cyan trim, its small wall control, and the round surveillance sensor above it. A green potted plant fits close to the doorway. On the right wall, mount the glowing blue scientific monitor with its molecule and flask graphics, then position the slim white light fixture horizontally above it.
Step 10. Install the lower-right utility tank and laboratory safety equipment
The far-right side contains the industrial equipment that gives Dreamy Room Level 867 its experimental-facility appearance. Place the tall translucent green cylindrical tank vertically against the outer right wall. In front of it goes the large gray mechanical housing. Its face includes small circular components and a prominent red circular mechanism, while pale mint pipes loop around the top and side before connecting back toward the tank. Mount the red fire extinguisher on the wall beneath this machinery, and position the narrow gray keypad or control panel nearby. A small pale wall fixture sits farther down. Along the outside base, continue the dark-purple piping toward the foreground. Finally, erect the triangular yellow warning sign with the dark exclamation mark at the lower-right exterior corner. Its separate post and round base should stand just beyond the stairs rather than inside the main laboratory floor.
Step 11. Add the foreground barricade, crates, benches, and finishing details
Finish Dreamy Room Level 867 by completing the outer foreground area. Directly in front of the central experiment bench, place the striped safety barricade. Its horizontal orange-and-dark warning board rests on two gray angled legs, visually blocking access to the glowing machinery underneath the table. Two low lavender-blue rectangular benches or blocks sit outside the platform, one toward the lower-left and another toward the lower-right. On the pale foreground landing, stack the turquoise equipment cases: the larger box sits below, a smaller box rests above it, and a light-colored document or flat item lies across the top. Check the right side of the central bench for the tiny tubes, round red control, cables, and attached equipment. Also verify the exterior pipes, flower planters, hanging vines, floor mats, waste bins, wall sensors, and small tabletop bottles before declaring the room complete.
Notes and Precautions
The difficulty of Dreamy Room Level 867 comes from the unusually high number of small objects packed into two levels. Several bottles, flasks, control panels, and blue-green pieces have similar colors, so matching an item only by color can easily lead to a wrong placement. Use the object’s silhouette and its relationship to nearby furniture instead. For example, distinguish the upper central experiment table from the larger foreground bench, and do not confuse the upper DNA workstation with the lower wall display.
Pay particular attention to depth. Objects that appear close together in the final image may actually occupy different floors. The surveillance cameras, pipes, plants, safety equipment, and exterior decorations also have very specific attachment points. Place large furniture before small accessories so that you retain clear reference points. If an object refuses to snap into position, check the opposite floor or an exterior wall before repeatedly trying the same area.
Tips and Tricks from top player
A reliable strategy for Dreamy Room Level 867 is to work from largest to smallest. Begin with the staircase, large machines, laboratory tables, wall screens, tank, decontamination chamber, and shelving. These items divide the room into obvious zones and dramatically reduce the number of possible locations for everything else. Next, place medium-sized items such as chairs, the DNA model, analyzer, robotic arm, potted plants, storage boxes, and laboratory equipment.
Save the tiny test tubes, bottles, books, controls, gauges, and decorative flowers for the end. Another useful shortcut is to complete one visual zone at a time rather than opening objects randomly: upper-left controls, upper-right genetics station, lower-left chemistry area, lower-center fox workstation, then lower-right stairs and machinery. In Dreamy Room Level 867, pipes are especially useful orientation markers because they reveal which machines belong on the room’s outer edges. Whenever placement becomes confusing, compare an object with the nearest wall, table edge, staircase, or large machine rather than judging its position in isolation.
Final Scene of Dreamy Room Level 867
The completed Dreamy Room Level 867 becomes a charming nighttime laboratory hidden among dense trees. The upper floor combines futuristic genetics equipment with a surprisingly cozy rooftop garden: glowing scientific displays, a DNA model, experiment tables, computers, flowers, and a decontamination chamber all fit neatly together beneath the dark sky. Pipes and control units connect this clean research area to the much busier laboratory below.
On the lower floor, the goggle-wearing fox scientist stands proudly amid colorful chemicals, test tubes, microscopes, glowing machinery, robotic equipment, hanging vines, cabinets, and stacks of books. A huge suspended flask illuminates the left side, while the green utility tank, staircase, fire extinguisher, warning sign, and barricade create an industrial feel on the right. The final result is dense but carefully organized, turning the empty blue shell into a lively secret research facility full of personality and tiny scientific details.