Dreamy Room Level 824
Dreamy Room Level 824 guide - Dreamy Room 824 Walkthrough & Solution.
Important Notice Regarding Level Numbering
Due to frequent changes in Dreamy Room's level numbering and differences between platforms (Android/iOS) – for example, level 824 on Android might not be the same as level 824 on iOS – the text guide below may not always match the images and video above. Please prioritize the image and video guides. If you find that the guide content doesn't match your current level, please visit the All Level Walkthroughs page to find the correct guide based on level images. Thank you for your understanding.
Dreamy Room Level 824 Walkthroughs & Guide
Step 1. Place the giant striped balloon over the house in Dreamy Room Level 824
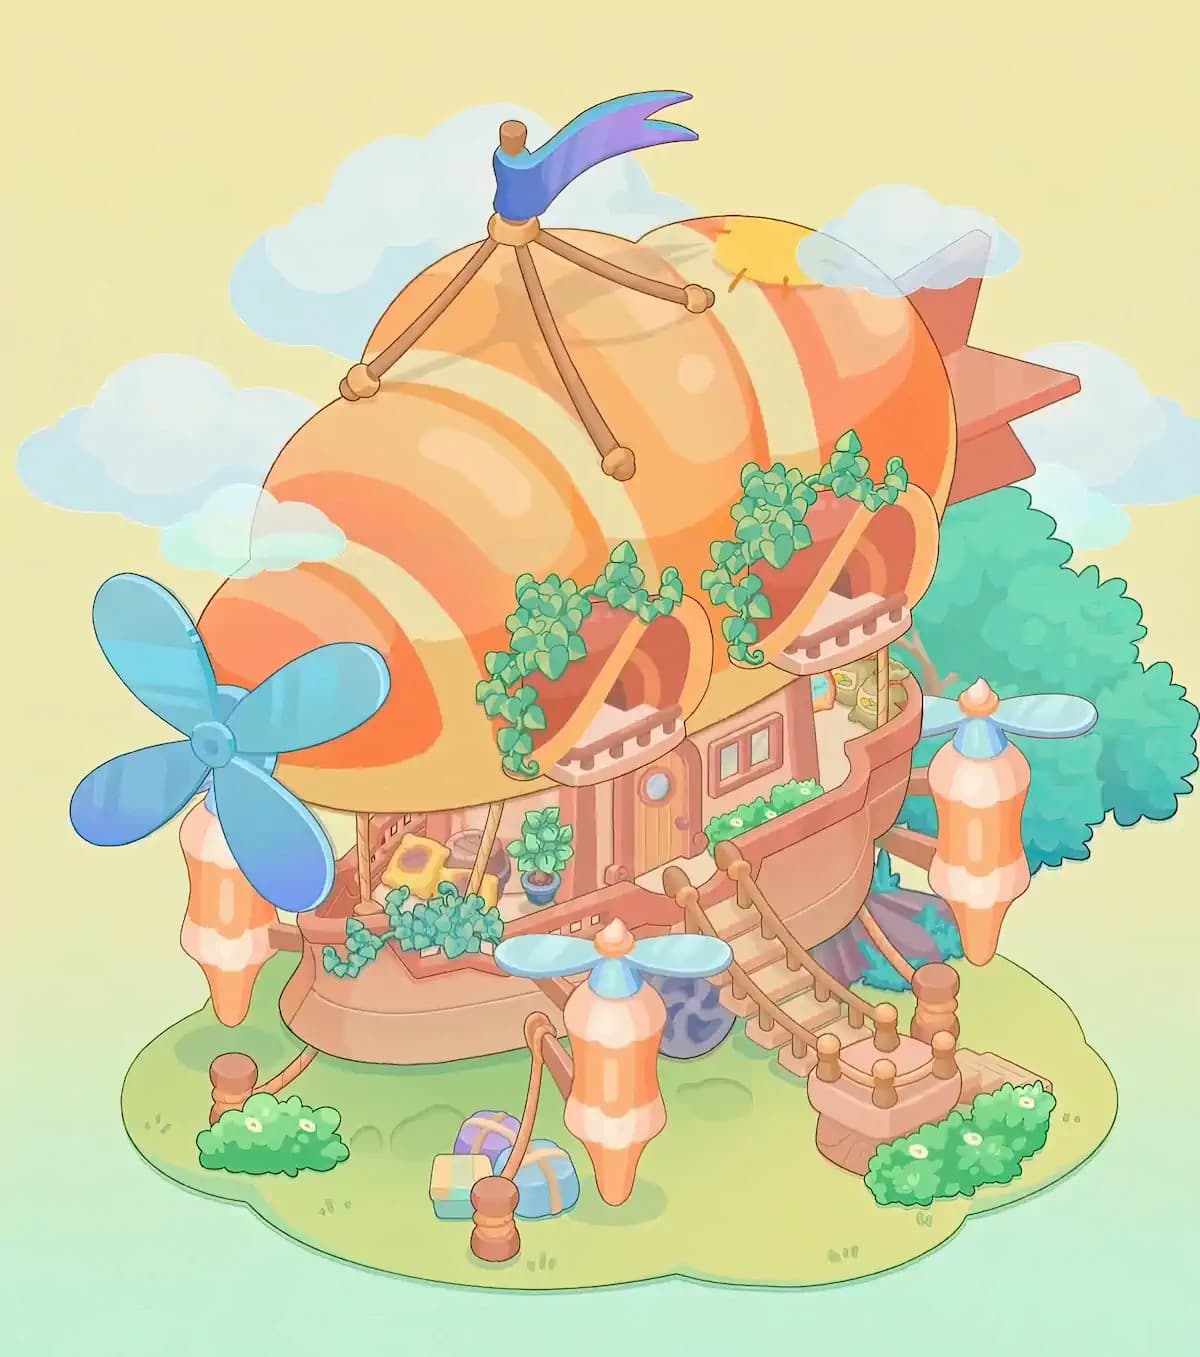
Begin Dreamy Room Level 824 with the largest and most obvious object: the enormous rounded balloon that forms the upper body of the flying house. It belongs directly above and behind the central room, filling most of the upper half of the structure. Its surface has broad orange, peach, cream, and pale-yellow stripes that curve around the balloon. Make sure the narrow end points toward the rear-right side of the airship while the broad rounded end extends toward the left.
At the very back-right of the balloon, attach the large coral-colored tail fins. They should project outward behind the balloon rather than sitting against the front façade. On top, place the small mast and the blue-to-purple windsock or ribbon. Several brown support rods stretch downward from this mast across the balloon's surface. When these pieces are correctly positioned, Dreamy Room Level 824 immediately changes from an empty shell into a recognizable fantasy airship. Getting this major structure right first also provides reliable reference points for every smaller object in Dreamy Room Level 824.
Step 2. Install the three propeller assemblies around Dreamy Room Level 824
The next major task in Dreamy Room Level 824 is placing the propulsion equipment around the outside of the house. Start with the most noticeable piece: the large four-bladed blue propeller on the far left. Its round center hub sits beside the left side of the airship, with the four broad blue blades spreading diagonally outward. Below it is a long tapered orange-and-cream striped pod that hangs vertically beside the hull.
Next, move to the lower front-center area of Dreamy Room Level 824. Place the second striped hanging pod near the grass in front of the staircase. This one has a smaller pale-blue two-bladed rotor positioned horizontally across its top, with a tiny peach-colored cap above the hub. The third matching engine pod belongs on the far right side of the house, slightly behind the staircase. It also hangs vertically and carries a small light-blue propeller at the top. These three assemblies are easy to confuse because their colors are similar, so use their propeller sizes and their left, center, and right positions to distinguish them. Correct placement gives Dreamy Room Level 824 its balanced airship silhouette.
Step 3. Build the front entrance and windows in Dreamy Room Level 824
Now concentrate on the main living area in the middle of Dreamy Room Level 824. The front door belongs in the central section of the pink façade, facing toward the viewer. It is a warm wooden-orange door with vertical panel lines, a round blue porthole-style window near the upper section, and a small darker knob on the right side. The doorway should sit above the staircase rather than on either extreme side of the balcony.
Immediately to the right of the door, install the horizontal rectangular window frame. Its warm coral trim contains several pale-blue glass panes and should sit level with the upper portion of the doorway. Do not accidentally place this window in one of the curved openings higher on the balloon section.
The completed façade of Dreamy Room Level 824 has a compact, symmetrical feel even though its decorations are intentionally playful and uneven. Once the door and rectangular window are in place, the center of Dreamy Room Level 824 becomes an excellent landmark for positioning the awnings, greenery, balcony railings, and stairs in the following steps.
Step 4. Add the upper awnings, openings, and cascading vines in Dreamy Room Level 824
The upper front of Dreamy Room Level 824 contains two rounded recessed openings tucked beneath the huge striped balloon. Place one on the upper-left portion of the façade and the other farther to the upper-right. Each is framed by a curved coral/orange canopy that projects slightly outward, with pale trim along its lower edge. The right recess sits closer to the rear of the house, while the left one is positioned above the main front balcony.
Green vines are essential to completing this area of Dreamy Room Level 824. Let thick clusters of small rounded leaves spill over the top and sides of both curved awnings. The left greenery cascades downward toward the front deck, while the right cluster stretches across the balloon-side façade and hangs around the right opening. There is also a longer trailing strand near the center-right that curls downward between the two areas.
These plants are not interchangeable background decorations. Their exact overlap with the awnings and wall edges matters. In Dreamy Room Level 824, watch the direction of every trailing stem and use the curved window frames as anchors before releasing each vine.
Step 5. Furnish the left balcony and front deck in Dreamy Room Level 824
The left-front balcony is one of the busiest small areas in Dreamy Room Level 824, so work on it after the larger structural pieces are settled. Inside the sheltered left deck, place the small yellow chair or lounge seat toward the back-left portion of the balcony. It should face outward rather than being hidden behind the wall. Nearby, position the small leafy plant in its blue-and-purple pot close to the wall, just left of the central doorway area.
Next, decorate the outer edge of the deck with the remaining greenery. A cluster of vines spills over the front-left railing, while another group sits along the balcony edge and hangs toward the coral hull. The original hull's small rectangular decorative openings remain visible underneath these plants, so avoid covering the entire front edge.
The front balcony of Dreamy Room Level 824 should look deliberately packed but still readable: furniture stays inside the deck, potted greenery stays close to the wall, and trailing plants cross the railing. This distinction is important because the placement challenge in Dreamy Room Level 824 often comes from determining which plants belong on the balcony and which belong on the grass below.
Step 6. Complete the right balcony, flower box, staircase, and railings in Dreamy Room Level 824
Next, assemble the main access route on the right side of Dreamy Room Level 824. Directly outside the central door is a narrow deck that connects to the staircase. Along the outer edge of this deck, place the long planter filled with bright green foliage and tiny white flowers. It should run horizontally beneath the façade rather than sitting on the lawn.
The staircase descends diagonally from the middle-right balcony toward the lower-right foreground. Place the pale wooden steps first, then add the warm brown handrails and their rounded posts along both sides. The upper ends of the rails connect near the balcony, while the lower ends terminate beside a small raised landing. Additional rounded posts continue around this landing to create a little fenced entrance.
Under and beside the stairs in Dreamy Room Level 824, a blue-purple patterned container or barrel-like decoration occupies the shaded space. The completed staircase should never float separately from the door or lower landing. Aligning these pieces carefully is one of the easiest ways to avoid placement mistakes in Dreamy Room Level 824.
Step 7. Position the luggage, ground posts, and ropes in Dreamy Room Level 824
Once the house itself is assembled, turn your attention to the lawn surrounding Dreamy Room Level 824. Two pieces of travel luggage rest near the front-center of the island, slightly left of the staircase and below the middle propeller pod. The larger bag is blue with warm orange straps, while the smaller case beside it uses lighter yellow-green and peach tones. A purple handle or upper section is visible behind the larger piece, giving the group the appearance of luggage waiting to be loaded aboard the airship.
Several short wooden posts also decorate the grass around Dreamy Room Level 824. One stands near the lower-left side, another is placed near the luggage at the front, and multiple posts surround the lower-right stair landing. Orange-brown ropes connect some of these posts, forming loose barriers and visual links back toward the airship. Pay attention to which side of a post each rope exits; simply placing the correct post in approximately the correct area may not satisfy the puzzle. These ground details complete the travel theme of Dreamy Room Level 824 and help frame the staircase without blocking it.
Step 8. Finish the bushes, flowers, and large right-side greenery in Dreamy Room Level 824
The last decorative pass in Dreamy Room Level 824 focuses on the plants around the grass. Place a low rounded green bush in the lower-left foreground near the left rope post. Small white blossoms are scattered across its top, making it easy to distinguish from the larger background foliage. A matching flowering shrub belongs at the lower-right edge beside the staircase landing and perimeter posts. Its foliage spreads horizontally and contains several visible white flowers.
Behind the house on the right side of Dreamy Room Level 824, position the much larger blue-green leafy tree or bush. It rises behind the right engine pod and reaches roughly halfway up the balloon, filling the empty space between the house and the background clouds. This plant belongs behind the structure rather than on the front lawn.
Finally, check that all remaining small vine clusters are attached to the balcony and upper awnings instead of being mixed with the ground bushes. When the flowering shrubs, large rear greenery, vines, and potted plant are all in their proper locations, Dreamy Room Level 824 should closely match the completed reference image.
Notes and Precautions
The biggest difficulty in Dreamy Room Level 824 is determining the exact placement intended for objects that share similar shapes or colors. The three orange-and-cream engine pods are particularly easy to mix up, as are the many green plant pieces. Remember that the giant four-blade propeller belongs on the left, while the two smaller horizontal rotors belong at the front-center and right side. Similarly, the large blue-green bush belongs behind the right side of the house, while the two white-flowered shrubs stay on the foreground lawn.
Do not judge placement solely by color. In Dreamy Room Level 824, shape, orientation, and attachment points are stronger clues. The vines need to follow specific balcony and awning edges, and the staircase railings need to align with particular posts. If an item refuses to settle, move it slightly rather than assuming it belongs somewhere completely different. Dreamy Room Level 824 has no reason to be rushed; checking neighboring objects usually reveals the correct position.
Also keep an eye on layering. Objects behind the house should be placed visually behind it, while luggage, posts, and bushes occupy the foreground. Correct layering is a useful clue whenever Dreamy Room Level 824 presents two plausible locations.
Tips and Tricks from top player
A reliable strategy for Dreamy Room Level 824 is to work from largest objects to smallest details. Place the giant balloon, tail, and propeller assemblies first. These pieces occupy unique spaces and dramatically reduce the number of possible locations for everything remaining. Next complete the door, windows, awnings, stairs, and railings. Save luggage, ropes, pots, flowers, and vines until the end.
Another useful technique in Dreamy Room Level 824 is to group items mentally by height. Balloon pieces belong at the top, façade objects occupy the middle, and travel items or bushes belong at ground level. This prevents you from repeatedly testing small decorations across the entire scene.
For similar-looking greenery, compare its silhouette instead of its color. Long drooping pieces in Dreamy Room Level 824 generally attach to awnings or balcony edges, compact flowering clusters go on the lawn or planter, and the largest dense foliage belongs behind the right side of the airship. Finally, build outward from the central door. The doorway, balcony, and staircase form the strongest positional reference system in Dreamy Room Level 824.
Final Scene of Dreamy Room Level 824
The completed Dreamy Room Level 824 becomes a cheerful fantasy airship home perched on a soft green island. A huge orange-and-cream striped balloon rises above the coral hull, crowned by wooden supports and a flowing blue-purple windsock. The large blue propeller dominates the left side, while two smaller propeller pods hang at the front and right. Beneath the balloon, a cozy façade features a wooden porthole door, framed windows, curved awnings, abundant trailing vines, a flower-filled balcony, and a staircase descending toward the lawn.
At ground level, Dreamy Room Level 824 adds travel-story details through the blue and yellow luggage, wooden rope posts, flowering shrubs, and the large leafy plant behind the house. Every decorative object contributes to the impression that this tiny home is ready for another journey. Once every item has been placed correctly, Dreamy Room Level 824 feels colorful, adventurous, cozy, and completely lived in.