Dreamy Room Level 861
Dreamy Room Level 861 guide - Dreamy Room 861 Walkthrough & Solution.
Important Notice Regarding Level Numbering
Due to frequent changes in Dreamy Room's level numbering and differences between platforms (Android/iOS) – for example, level 861 on Android might not be the same as level 861 on iOS – the text guide below may not always match the images and video above. Please prioritize the image and video guides. If you find that the guide content doesn't match your current level, please visit the All Level Walkthroughs page to find the correct guide based on level images. Thank you for your understanding.
Dreamy Room Level 861 Walkthroughs & Guide
Step 1. Build the natural base and waterfall area in Dreamy Room Level 861
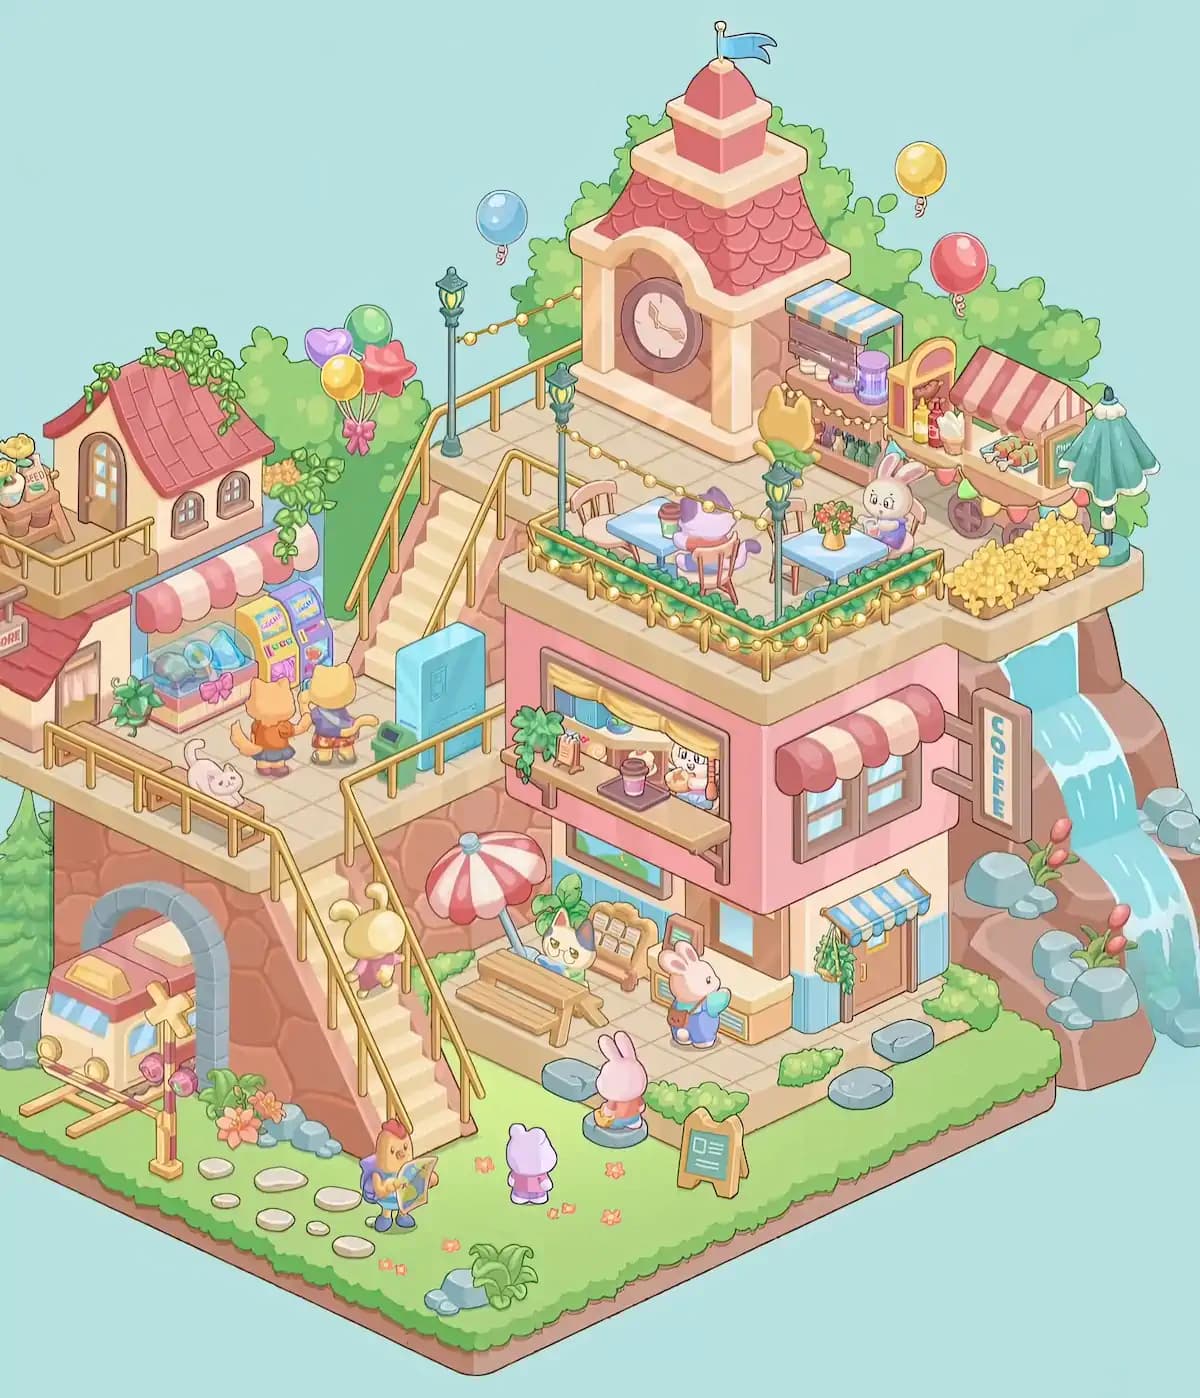
Start Dreamy Room Level 861 by treating the existing terrain as your reference frame. The large reddish stone structure occupies the back-left half of the grassy island, with the pale exterior staircase descending diagonally toward the lower front. Keep the gray-trimmed arched tunnel at the bottom-left face of this rock wall. On the far right, the tall reddish-brown rocky waterfall formation rises separately beside the grass. Its small turquoise pool sits at the top, ringed by rounded pale gray stones and tiny green plants. Water spills over the front in two visible drops before disappearing beside the island. Arrange additional gray rocks on the waterfall ledges and place the pink-red flowering plants between them. The main grass surface of Dreamy Room Level 861 should remain open through the center and front because later characters, stepping stones, stairs, and signs occupy this area. Small pink-orange flowers are scattered lightly through the grass rather than grouped into formal flowerbeds.
Step 2. Place the railway, tunnel train, and front garden details
Move to the lower-left corner of Dreamy Room Level 861 and complete the railway scene around the existing stone arch. Two short wooden rails should emerge from inside the tunnel and continue diagonally toward the front-left edge. Place the tiny cream-and-pink train partly inside the tunnel so its front faces outward. The train has blue windows, round front lamps, a yellow roof detail, and a small propeller-like decoration on its side. Next to the rails, position the tall yellow railway post with its round signal fittings. Add the orange-and-pink flower cluster beside the tunnel entrance, then scatter several rounded gray-blue rocks nearby. Create a loose stepping-stone trail across the grass using the small cream oval stones. In the final Dreamy Room Level 861 layout, these stones curve from the railway side toward the central lawn instead of forming a perfectly straight line. Finish the front edge with the leafy green plant and another small gray stone cluster near the bottom center.
Step 3. Complete the lower staircase, railings, and lawn characters
The staircase is one of the most useful landmarks in Dreamy Room Level 861. Add the slim golden handrails along both sides of the pale stairs that descend from the middle walkway toward the grass. At the upper part of the stairs, place the small yellow rabbit-like visitor holding a pink item, facing toward the café level. On the lawn below, position the brown-and-yellow character near the stepping stones at the lower-left, holding an unfolded map or guide. A tiny lavender character stands nearer the middle of the grass and faces the buildings. Slightly to the right, place the pink rabbit seen from behind on a blue-gray stepping stone. A small freestanding green information board with a tan wooden frame belongs farther right, angled toward the front. These figures are important in Dreamy Room Level 861 because their placement makes the lower lawn feel like the entrance to a busy little tourist district rather than unused scenery. Keep the central walking space reasonably open.
Step 4. Construct the main pink coffee shop on the right
Now build the largest occupied structure in Dreamy Room Level 861. The café fills the center-right area directly below the rooftop terrace and immediately left of the waterfall. Its upper wall is pink, while the lower façade uses cream and warm brown panels. On the upper-right wall, install the pair of square windows beneath the wide pink-and-cream striped awning. Hang the vertical COFFE sign on the outer right wall beside the waterfall. At ground level, place the brown entrance door near the right corner and cover it with the small blue-and-cream striped awning. A hanging bunch of green herbs or trailing foliage sits just to the left of that doorway, while a tall pale-blue panel forms the corner trim. Add low green shrubs around the base of the building and leave the gray stepping stones on the grass outside. Getting this shell correct early makes the many smaller Dreamy Room Level 861 café decorations much easier to position.
Step 5. Decorate the ground-floor café patio
The patio at the front-left side of the coffee shop is packed with recognizable objects. In Dreamy Room Level 861, place the large red-and-white striped parasol beside the building, tilting its pole slightly toward the wooden picnic table underneath. The long wooden table and benches sit parallel to the front wall. Behind the table, place the cream-colored cat with green and dark blue markings so it peeks over the bench. Against the café wall nearby is a tan display rack filled with several pale rectangular items resembling bread or packaged treats. To its right, add the small upright framed menu or display unit. A pink rabbit wearing blue clothes stands in front of this fixture while carrying a large turquoise-blue round object and a small brown shoulder bag. Keep another pink rabbit on the grass just in front of the patio. This compact group is easy to misalign in Dreamy Room Level 861, so use the building corners and parasol as anchors.
Step 6. Fill the serving window with the barista and counter accessories
Above the ground patio is the large open serving window, an important focal point of Dreamy Room Level 861. Fit the window into the pink wall and dress it with blue curtains and a soft yellow valance along the top. The wide wooden serving ledge projects outward underneath it. On the left side of this ledge, place the leafy potted plant so some greenery spills over the edge, followed by the small standing menu card. Near the center, put the pink takeaway drink on its dark tray. Behind the opening, arrange the cakes, pastries, dishes, and other small café items on the interior shelf. The cheerful white animal barista stands behind the counter toward the right, holding a pastry or drink. Small containers line the far-right interior edge. Dreamy Room Level 861 uses very tight snapping positions here, so if one tiny counter item refuses to settle, check that the larger window, shelf, and character were placed correctly first.
Step 7. Build the left-side shop and upper garden platform
The left half of Dreamy Room Level 861 contains another miniature commercial area built into the rock. On the upper platform, place the small cream cottage with its tall arched brown door facing front-left. Two small arched windows sit along the right wall, and the cottage is capped by a red tiled roof. Trail leafy green vines across the roofline and down its right side. At the far-left edge of the same platform, add the wooden plant-and-seed display containing flower pots and a clearly visible seed bag. Surround this level with golden railing. Below the cottage, install the pink-and-cream striped shop awning. A smaller red roof section and shop sign project from the extreme left side. The greenery behind and around this structure should appear lush without covering the windows. This portion of Dreamy Room Level 861 is vertically layered, so make sure the cottage belongs above the arcade machines rather than on the middle walkway.
Step 8. Arrange the capsule machine, arcade cabinets, and visitors
Directly beneath the striped awning, finish the entertainment corner of Dreamy Room Level 861. Place the large glass-front capsule or prize machine on the left; it contains several rounded pastel objects in blue, green, and purple and has a prominent pink bow on the front. Immediately to its right stand two narrow arcade or vending cabinets, one yellow and one purple-blue, both facing toward the walkway. Position the orange fluffy-tailed character in front of the machines with its back to the viewer, then place the yellow cat character beside it, also facing the cabinets. A leafy potted plant belongs on the left side of the prize machine. Near the front railing, the tiny white cat or rabbit-like animal peeks upward from beside the bench. On the right side of this walkway in Dreamy Room Level 861, place the tall rectangular blue utility cabinet with the small green bin tucked near its base.
Step 9. Connect the middle walkway to the clock-tower terrace
Next, complete the vertical circulation in Dreamy Room Level 861. The pale staircase rising behind the blue utility cabinet leads from the arcade level to the clock-tower terrace. Install thin golden railings along the exposed stair edges and around the upper platform. At the top, arrange the vintage green-black streetlamps with glowing yellow centers: one stands near the left approach, while additional lamps help frame the dining area and upper walkway. String the round golden fairy lights between posts and railings so they sweep gently across the terrace instead of forming stiff straight lines. Continue the lights around the café rooftop fence. Dense leafy trees and shrubs fill the background behind this entire upper section. On the far left, add the balloon cluster—purple heart, green round balloon, yellow balloon, and red star-like balloon—tied together with a pink bow. This lighting-and-railing layer gives Dreamy Room Level 861 much of its festive atmosphere.
Step 10. Assemble the large clock tower and rooftop flag
The clock tower is the highest architectural object in Dreamy Room Level 861, so position it at the back-center of the upper terrace. The base is warm peach and cream, with the large circular clock mounted on the front. Above it sits the wide red scalloped roof framed by cream trim. Add the smaller square upper tier and its red pyramidal cap, then finish the tower with the thin flagpole and waving blue flag. The tower should rise above the background greenery without leaning toward either side. A blue balloon floats independently to the left of the tower, while separate yellow and red balloons float over the greenery on the right. These should not be confused with the tied balloon cluster from the previous step. Because the tower is such a strong visual anchor, an incorrect placement here can make other Dreamy Room Level 861 objects seem wrong even when their individual positions are correct.
Step 11. Set up the rooftop café tables and seated guests
The main dining terrace occupies the upper-right center of Dreamy Room Level 861, directly in front of the clock tower. Create its boundary using the low green planter strip, golden railing, and strings of glowing bulbs. Place two square light-blue café tables inside. The left table has pink wooden chairs and a takeaway cup or drink on top; seat the lavender-purple cat at this table facing toward the right. Its tail should remain visible behind the chair. The second blue table sits farther right with a small yellow vase of orange-red flowers in the middle. Seat the white rabbit in purple clothing behind this table, facing slightly toward the front-left. Additional chairs complete the arrangement without blocking the walkway. One tall green streetlamp stands between the two seating areas. Correct spacing matters in Dreamy Room Level 861 because the tables, characters, railing, light strings, and cart all occupy neighboring snap points.
Step 12. Complete the food cart and rooftop market corner
At the far-right side of the terrace, construct the small snack cart that gives Dreamy Room Level 861 its miniature market feel. The cart has a pink-and-cream striped canopy, wooden body, dark wheels, and colorful triangular bunting along the lower edge. Fill the serving shelves with condiment bottles, a container of white napkins or paper goods, and small prepared foods. The right display tray contains several colorful snack pieces arranged in rows. Just behind and to the left of the cart, add the compact shelf unit with a blue-and-cream top and jars or containers underneath. Position the yellow cat vendor in front of this section, facing the shelves and cart. A large teal closed parasol or umbrella stands at the extreme right edge. Finally, place the dense rectangular patch of yellow flowers along the terrace edge beside the cart. This market cluster is one of the most crowded object groups in Dreamy Room Level 861.
Step 13. Finish the waterfall-side details and vegetation
With the buildings in place, return to the right side of Dreamy Room Level 861 and check how the café connects visually to the waterfall. The turquoise water should remain clearly visible behind the coffee-shop wall as it drops between the reddish rock formations. Add rounded blue-gray stones on the ledges to both sides of the falling water. The small reddish-pink flowers with green leaves belong in the gaps between these rocks, including one group around the middle-right ledge and another lower down. Keep the waterfall edge unobstructed by café furniture. On the grass below, arrange the low rounded shrubs along the building foundation, especially around the right doorway and near the stepping stones. Additional greenery belongs behind the clock tower and left-side cottage, creating a continuous leafy background. These small natural pieces are easy to overlook in Dreamy Room Level 861, yet they are often the items that remain unpacked after all major furniture has been placed.
Step 14. Add the remaining signs, flowers, stones, and visual finishing touches
For the final placement pass through Dreamy Room Level 861, compare every open patch of ground against the completed picture. The front lawn needs several tiny pink-orange flower clusters scattered between the map-reading character, lavender visitor, rabbit, and green information sign. Keep the cream oval stepping stones concentrated toward the left foreground and the larger blue-gray stones around the café side. Confirm that the golden railings continue around every elevated walkway and staircase without gaps. Check the trailing vines on the left cottage, potted greenery around the arcade machine, plants on the café service ledge, hanging herbs beside the ground-floor door, rooftop flower vase, yellow flower bed, and all waterfall plants. Finally, verify the decorative balloons, lamp posts, fairy-light strands, striped awnings, shop signs, and café accessories. The central challenge of Dreamy Room Level 861 is precise placement, so one tiny overlooked decoration can prevent the scene from matching the finished layout.
Notes and Precautions
Dreamy Room Level 861 is unusually dense because several usable areas overlap visually. A rooftop object may appear close to a ground-floor object even though it belongs to a completely different elevation. Use staircases, railings, rooflines, and terrace edges to determine the intended level before trying to place an item.
The café is the most crowded section of Dreamy Room Level 861. If a cup, plant, sign, character, or piece of food will not fit, avoid repeatedly moving it around the same area. Place its larger supporting structure first—the serving window, table, cart, shelf, or display—and then retry the accessory.
Pay special attention to repeated design elements. Dreamy Room Level 861 contains several striped awnings, multiple lamps, many railings, different groups of balloons, and numerous small plants. Their colors may be similar, but their locations are not interchangeable. The blue-and-cream doorway awning belongs downstairs, while the pink-and-cream awnings belong around the upper windows and shops.
Also keep characters until after their nearby furniture whenever possible. Their correct slots in Dreamy Room Level 861 are often defined by benches, arcade machines, tables, or stairs.
Tips and Tricks from top player
The fastest approach to Dreamy Room Level 861 is to work by elevation rather than unpacking objects randomly. Finish the lower lawn and railway, then the arcade walkway, then the main café, and finally the rooftop. This dramatically reduces the number of plausible locations for each new item.
Another strong Dreamy Room Level 861 strategy is to place objects from largest to smallest. Buildings, staircases, tables, machines, and carts establish the layout; characters and decorative accessories can then be matched to those landmarks. When dealing with several similar plants or signs, compare their silhouette rather than only their color.
Use the waterfall and clock tower as fixed orientation points. In Dreamy Room Level 861, “right” almost always means toward the waterfall, while the arcade and railway occupy the left. If you become stuck, scan for an unfinished cluster instead of searching the whole scene. A bare table probably needs a vase or drink, an empty railing may need lights, and an isolated storefront often indicates that one nearby accessory or character has not yet been placed.
Final Scene in Dreamy Room Level 861
The completed Dreamy Room Level 861 becomes a lively pastel hillside destination wrapped around a sparkling waterfall. A tiny train emerges from the stone tunnel below while visitors wander through flowers, stepping stones, stairways, shops, and café patios. To the left, a vine-covered cottage overlooks a colorful prize machine and arcade cabinets. In the center, the pink coffee shop is busy on every level, from the parasol-covered picnic area and service window to the rooftop dining terrace. Above everything, a red-roofed clock tower and blue flag rise over glowing streetlamps, strings of golden lights, trees, and floating balloons. A snack cart, yellow flower bed, seated rabbit, purple cat, café workers, shoppers, and wandering animal characters fill the scene with activity. The finished Dreamy Room Level 861 transforms the initially sparse rocky platform into a cozy miniature town where every staircase, plant, sign, character, and decorative object has a carefully chosen place.