Dreamy Room Level 862
Dreamy Room Level 862 guide - Dreamy Room 862 Walkthrough & Solution.
Important Notice Regarding Level Numbering
Due to frequent changes in Dreamy Room's level numbering and differences between platforms (Android/iOS) – for example, level 862 on Android might not be the same as level 862 on iOS – the text guide below may not always match the images and video above. Please prioritize the image and video guides. If you find that the guide content doesn't match your current level, please visit the All Level Walkthroughs page to find the correct guide based on level images. Thank you for your understanding.
Dreamy Room Level 862 Walkthroughs & Guide
Step 1. Build the Ground-Floor Structure and Exterior of Dreamy Room Level 862
Begin Dreamy Room Level 862 with the largest structural elements because they establish the boundaries for everything else. Place the cream-colored ground-floor walls on the rear portion of the circular wooden platform, leaving the front open so the kitchen and dining area remain visible. The pale wooden flooring fills most of this lower room. Position the long green ladder against the far-left edge, leaning from the ground floor toward the upper teal bedroom platform. It should sit immediately beside the left wall rather than in the center of the room.
Next, decorate the exterior foreground of Dreamy Room Level 862. The narrow blue stream belongs at the front-left edge of the stump, surrounded by dark gray stones and low green grass. Put the small pink-topped step stool at the front center, directly below the raised interior floor. A leafy flower patch with pink and yellow blossoms goes farther right along the curved foreground path. On the far-right side, place a cut-tree-stump pedestal with a gray lantern sitting on top and a little greenery around its base. These outdoor pieces are important landmarks for Dreamy Room Level 862, so establishing them first makes later placement much easier.
Step 2. Arrange the Refrigerator, Plants, Counters, and Kitchen Layout in Dreamy Room Level 862
The kitchen fills the rear half of the lower floor in Dreamy Room Level 862. Start with the tall yellow refrigerator at the back-left corner beneath the upper level. Its front faces toward the viewer, and the refrigerator sits just to the right of the long green ladder. Place the large blue-green leafy plant in a reddish-brown pot immediately in front-left of the refrigerator, with a smaller green plant tucked beside it near the wall.
Build the tan L-shaped kitchen counter along the rear and right walls of Dreamy Room Level 862. The preparation counter runs behind the rabbit character, while the separate right-hand cabinet supports the toaster area. The counter beneath the upper platform should remain open enough for the central character to stand in front of it. On the rear wall at the upper-right, install the narrow wooden shelf. Place the purple grape-like container or bunch on its left end and the two small pale condiment jars with brown tops to its right. Correctly anchoring the refrigerator, counters, wall shelf, and plants in Dreamy Room Level 862 gives you reliable reference points for all the tiny cooking objects that follow.
Step 3. Place Every Kitchen Accessory in Dreamy Room Level 862
The large number of food and cooking accessories makes this one of the trickiest parts of Dreamy Room Level 862. On the back counter, place the small row of three pale bottles or containers toward the left. Set the round red-orange lidded cooking pot near the center. Immediately to its right goes the large green bowl filled with yellow food, with the long blue spoon angled upward from the bowl.
On the right worktop in Dreamy Room Level 862, place the blue fish on its tan cutting board and position the gray knife across or beside the fish. Two slim green-blue bottles stand upright behind this preparation area. The large light-green toaster belongs on the far-right cabinet, facing forward. Two small lidded cups or jars sit on the counter in front-left of the toaster. These objects are easy to confuse because they occupy a very compact section of Dreamy Room Level 862, so match them by both shape and relative position rather than simply placing all food items together. Finally, put the standing rabbit character in the center of the kitchen, facing forward between the dining table and the cooking counters.
Step 4. Complete the Dining Area and Kitchen Island in Dreamy Room Level 862
The dining arrangement occupies the front-left half of the kitchen in Dreamy Room Level 862. Place the oval wooden dining table slightly left of center and cover it with the reddish-orange striped tablecloth. Arrange four wooden chairs around it: two are most visible along the front, while the others sit along the back and side edges. The blue vase containing pink-orange flowers belongs on the left side of the tabletop. Put the slice of layered yellow cake on its blue plate closer to the middle-front portion of the table.
Now move to the green kitchen island at the front-right of Dreamy Room Level 862. A tan checked cloth hangs over its right side. Place the small blue vase filled with yellow flowers toward the front-left corner of the island and the rounded fruit bowl, containing red and green produce, toward the back-right. Directly in front of this island, set the brown umbrella basket on the floor and insert the purple and blue umbrellas with their curved handles pointing upward. The dining table, island, chairs, flowers, cake, fruit, and umbrellas make this portion of Dreamy Room Level 862 unusually dense, so use the edge of the floor and the rabbit as alignment guides.
Step 5. Construct the Middle Floor and Relaxation Corner in Dreamy Room Level 862
The middle level of Dreamy Room Level 862 is a teal-tiled bedroom terrace supported above the kitchen. Place the teal floor so it stretches from the left wall across to the aquarium on the right, then attach the matching green railing along its exposed front and right edges. The long green ladder from the lower floor should meet this platform on the far left.
At the front-left side of this floor in Dreamy Room Level 862, position the round pink lounge chair with its cream cushion facing toward the center of the room. A small stack of books belongs immediately in front of or beside the chair. Near the center-front, place the leafy potted plant and the purple mug on the small low surface or mat close to the railing. On the extreme right edge, install the rectangular aquarium with its green lid and base. The tank contains pale fish and underwater plants, and it projects slightly beyond the bedroom wall. The aquarium is one of the strongest visual landmarks in Dreamy Room Level 862, so if the railing or surrounding objects refuse to fit, verify the aquarium’s position before moving smaller items.
Step 6. Furnish the Bedroom in Dreamy Room Level 862
The bed dominates the rear center of the middle floor in Dreamy Room Level 862. Place its curved wooden headboard against the back wall. Add the green dotted duvet, with the pale yellow blanket edge curving across the upper portion, and arrange the green-and-yellow striped pillows at the head of the bed. The bed should extend toward the viewer but leave enough space for the lounge chair and railing in front.
To the left of the bed in Dreamy Room Level 862, put the small yellow bedside table and set the white pleated lampshade on top. Lean the tall brown-framed full-length mirror against the left wall, immediately beside the table. The mirror tilts slightly backward and has a small decorative cluster of greenery near its top. To the mirror’s left stands the wooden coat rack, holding a brown hat and a draped pink scarf or garment. These three items—the coat rack, mirror, and lamp—form a tight dressing corner, and switching their order is a common placement mistake in Dreamy Room Level 862.
Step 7. Add the Bedroom Shelves, Books, Window Nook, and Ladders in Dreamy Room Level 862
Several smaller wall decorations complete the bedroom in Dreamy Room Level 862. Above the left portion of the bed, attach the narrow wall shelf and fill it with the row of brightly colored books and the round green decorative object. On the wall to the right of the headboard, create the recessed green window or shelf nook. The yellow scalloped awning belongs across its top edge. Inside the recess, put the small white and pink containers on the left and stack the pastel blue, green, and purple books toward the lower-right.
Next, position the short wooden ladder on the bedroom’s right side in Dreamy Room Level 862. It rises from the teal floor to the small wooden balcony above and should lean diagonally against the structure. On that upper landing, place another wooden ladder leading upward toward the attic platform. Keep both ladders aligned vertically through the right side of the house. Their similar appearance makes them easy to swap, but the lower ladder is associated with the bedroom floor while the upper ladder connects the landing to the attic. Correct ladder placement is especially important in Dreamy Room Level 862 because it defines how the miniature home visually connects its three levels.
Step 8. Decorate the Right Balcony and Upper Attic in Dreamy Room Level 862
The small right-hand balcony in Dreamy Room Level 862 sits between the bedroom and the top attic. Give its exposed edge the green railing. At the far-right corner, place the woven basket filled with colorful food or fruit. The pair of small purple slippers or rounded purple accessories belongs immediately to the left of the basket. Keep the wooden ladder rising from this balcony toward the top platform.
On the highest platform of Dreamy Room Level 862, place the second white rabbit beneath the roof opening, facing forward. The rabbit holds a red object with white spots, resembling a small mushroom. Set the pair of soft cushions or folded bedding just to the rabbit’s left. To the rabbit’s right goes the short tree-stump side table, with its green top detail and purple orb-like ornament. A small gray lantern sits nearer the left/front edge of the attic platform, close to the wall and upper ladder. These tiny objects occupy very limited space in Dreamy Room Level 862, so place the large rabbit and stump table first and fit the lantern and cushions around them afterward.
Step 9. Install the Purple Roof, Chimney, Dormer, and Greenery in Dreamy Room Level 862
Once the interior is stable, finish the house silhouette in Dreamy Room Level 862. The large purple roof slopes downward from the center toward both sides, with its longest lower section stretching toward the left above the bedroom. Fit the small gray chimney near the top ridge. A tiny dormer window is embedded in the upper roof slope; its triangular purple frame surrounds a pale blue window.
Large patches of bright green ivy or moss spread over the roof in Dreamy Room Level 862. One thick patch surrounds the dormer, partially covering its top and sides, while additional greenery trails along the lower roof edge and toward the massive tree on the left. Do not spread these pieces evenly: the completed Dreamy Room Level 862 layout intentionally looks overgrown, with vegetation bunching around the window and cascading onto the roof. The roof should frame the attic rabbit on the right while remaining partially hidden behind foliage on the left. Because roof decorations overlap one another, establish the purple roof and dormer before trying to position the ivy pieces.
Step 10. Finish the Tree, Bird Nest, and Golden Garlands in Dreamy Room Level 862
The enormous tree canopy is the signature feature of Dreamy Room Level 862. Place the rounded dark-green foliage behind and to the left of the purple roof, allowing the branches and leaves to appear integrated with the house. Position the bird nest in the center-left portion of the canopy, just above the roofline. The nest contains several small yellow chicks, making it one of the most recognizable details in the completed scene.
Finally, drape the decorative golden garlands through the greenery of Dreamy Room Level 862. The garlands contain alternating round golden ornaments and small star or flower shapes. One strand crosses the upper canopy, another curves beneath the bird nest, and a longer section follows the lower-left greenery near the purple roof. Avoid placing all three strands at the same height; their layered curves are what give the finished Dreamy Room Level 862 tree its festive appearance. With the nest centered among the branches and the garlands following the natural shape of the leaves, the upper portion should match the completed image and visually balance the heavily furnished floors below.
Notes and Precautions for Dreamy Room Level 862
The greatest difficulty in Dreamy Room Level 862 is distinguishing between objects that belong to the same general area but occupy slightly different slots. The two wooden ladders on the right, for example, connect different levels, while the much longer green ladder belongs exclusively on the far left. Similarly, the numerous food pieces should not simply be grouped together: the cake belongs on the dining table, fruit belongs on the green island, the fish belongs on the right preparation board, and the red cooking pot and green bowl belong on the rear counter.
Watch the layering carefully in Dreamy Room Level 862. The roof must be placed before much of the ivy can look correct, and the tree canopy needs to sit behind the nest and golden garlands. Place larger furniture before tiny accessories whenever possible. The bed should precede the bedside lamp and wall decorations, while the kitchen cabinets should precede the toaster, bottles, fish, and containers.
Also remember that some exterior scenery around Dreamy Room Level 862, including the surrounding pink-purple mushrooms and the glass cloche, visually frames the room rather than functioning like ordinary furniture. Concentrate on objects that visibly snap into the miniature home. If an item repeatedly refuses a position, compare its silhouette with another floor before assuming the game is being unresponsive.
Tips and Tricks from top player for Dreamy Room Level 862
A reliable strategy for Dreamy Room Level 862 is to work from large objects to small objects and from bottom to top. First establish the ground floor, kitchen, and long green ladder. Then complete the teal bedroom platform, followed by the right balcony, attic, roof, and tree. This reduces the number of possible locations for every remaining item.
Use permanent landmarks to solve difficult placements in Dreamy Room Level 862. The yellow refrigerator marks the lower-left kitchen, the aquarium identifies the upper-right edge of the bedroom, and the purple roof separates the bedroom from the attic. When you pick up a tiny object, ask which landmark it appears next to in the completed scene rather than trying random positions.
Another useful Dreamy Room Level 862 shortcut is to finish related clusters together. Place the dining table, four chairs, flowers, and cake as one cluster; then solve the toaster, fish board, bottles, and cups as another. Do the same with the mirror, coat rack, lamp, and bed upstairs. For the roof, save the golden garlands until after all foliage is installed. This approach turns Dreamy Room Level 862 from a room full of dozens of isolated objects into a manageable sequence of recognizable mini-scenes.
Final Scene: Dreamy Room Level 862 Completed
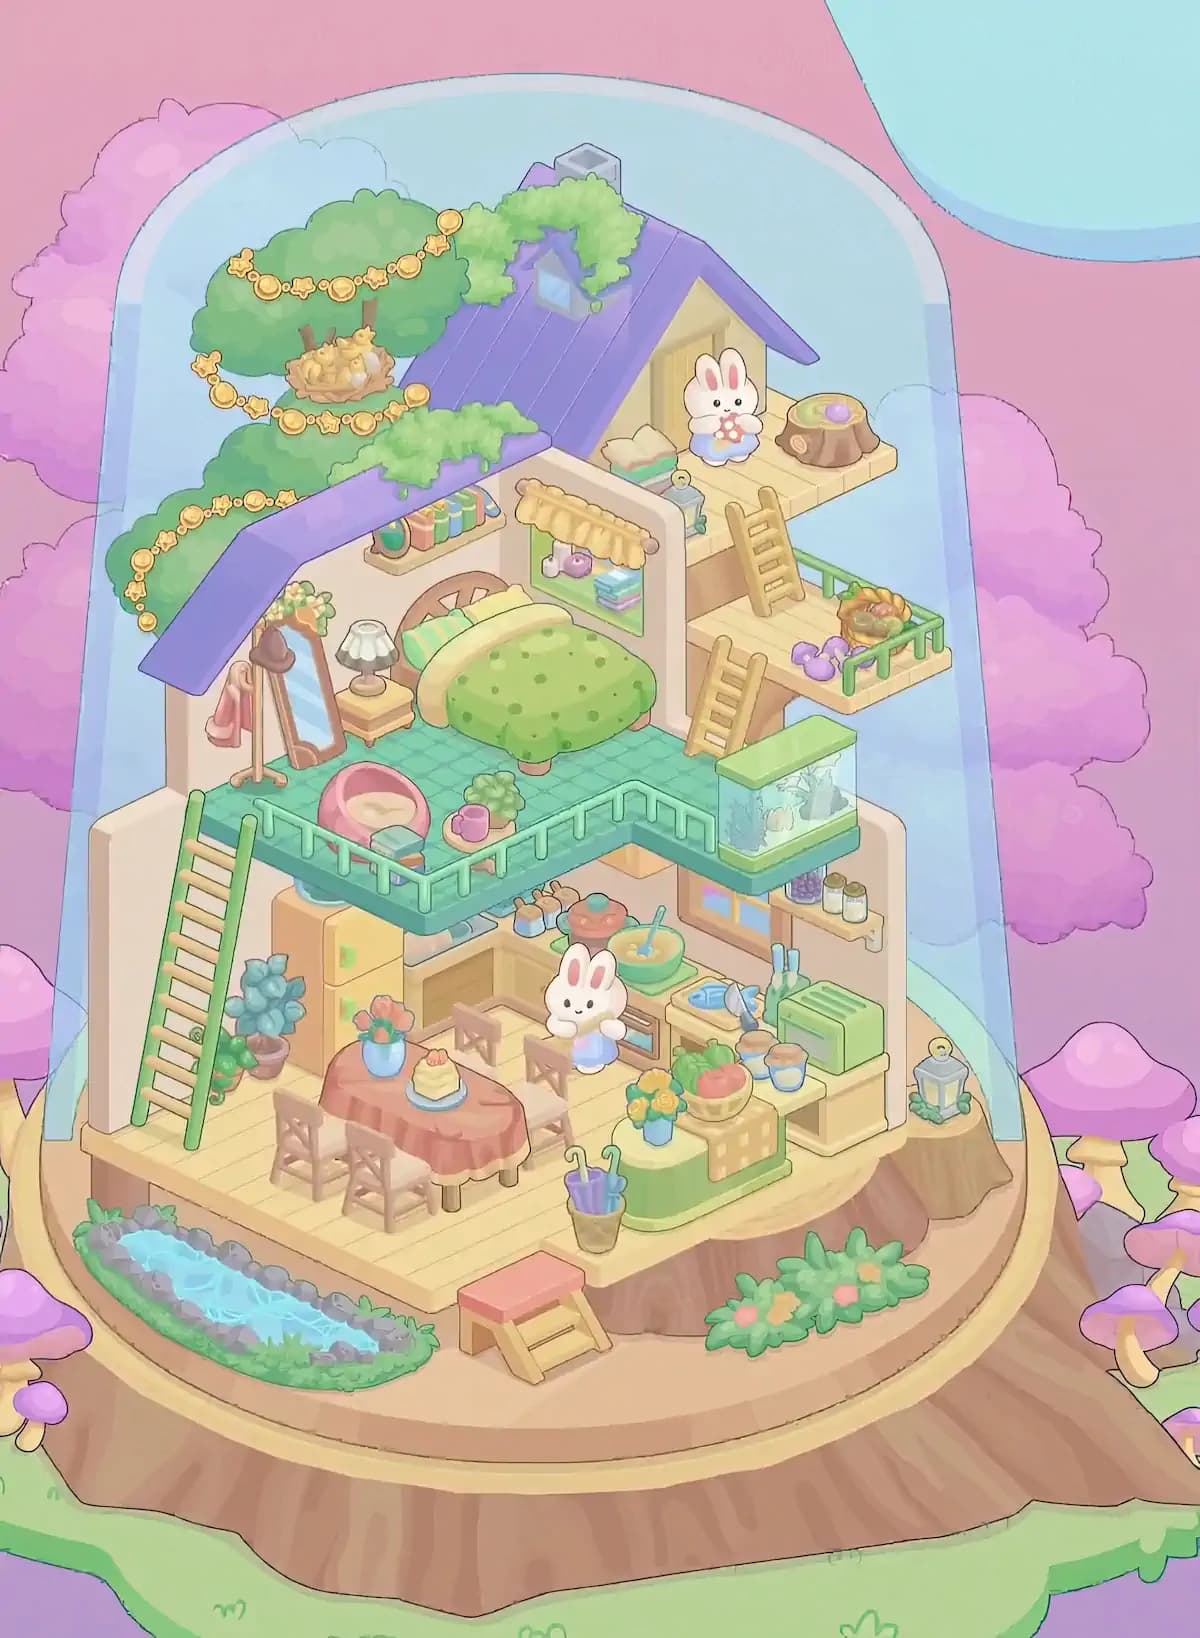
The completed Dreamy Room Level 862 becomes a charming miniature woodland home preserved beneath a pale-blue glass dome. At ground level, the rabbit cooks beside a fully stocked kitchen while a flower-covered dining table, fruit-filled island, umbrellas, plants, stream, lantern, and garden flowers create a lively cottage atmosphere. Above, Dreamy Room Level 862 shifts into a peaceful bedroom with a green bed, mirror, lamp, books, mug, lounge chair, aquarium, and neatly placed personal belongings. Wooden ladders lead to a tiny balcony and then to the attic, where another rabbit sits beside cushions and a stump table. The purple roof disappears beneath thick greenery, while a bird nest full of chicks rests inside the enormous tree canopy. Golden ornament garlands curve through the leaves, completing Dreamy Room Level 862 with a warm, magical tree-house feeling in which every tiny item contributes to the finished scene.