Dreamy Room Level 871
Dreamy Room Level 871 guide - Dreamy Room 871 Walkthrough & Solution.
Important Notice Regarding Level Numbering
Due to frequent changes in Dreamy Room's level numbering and differences between platforms (Android/iOS) – for example, level 871 on Android might not be the same as level 871 on iOS – the text guide below may not always match the images and video above. Please prioritize the image and video guides. If you find that the guide content doesn't match your current level, please visit the All Level Walkthroughs page to find the correct guide based on level images. Thank you for your understanding.
Dreamy Room Level 871 Walkthroughs & Guide
Step 1. Place the clock tower and large house at the back of the island
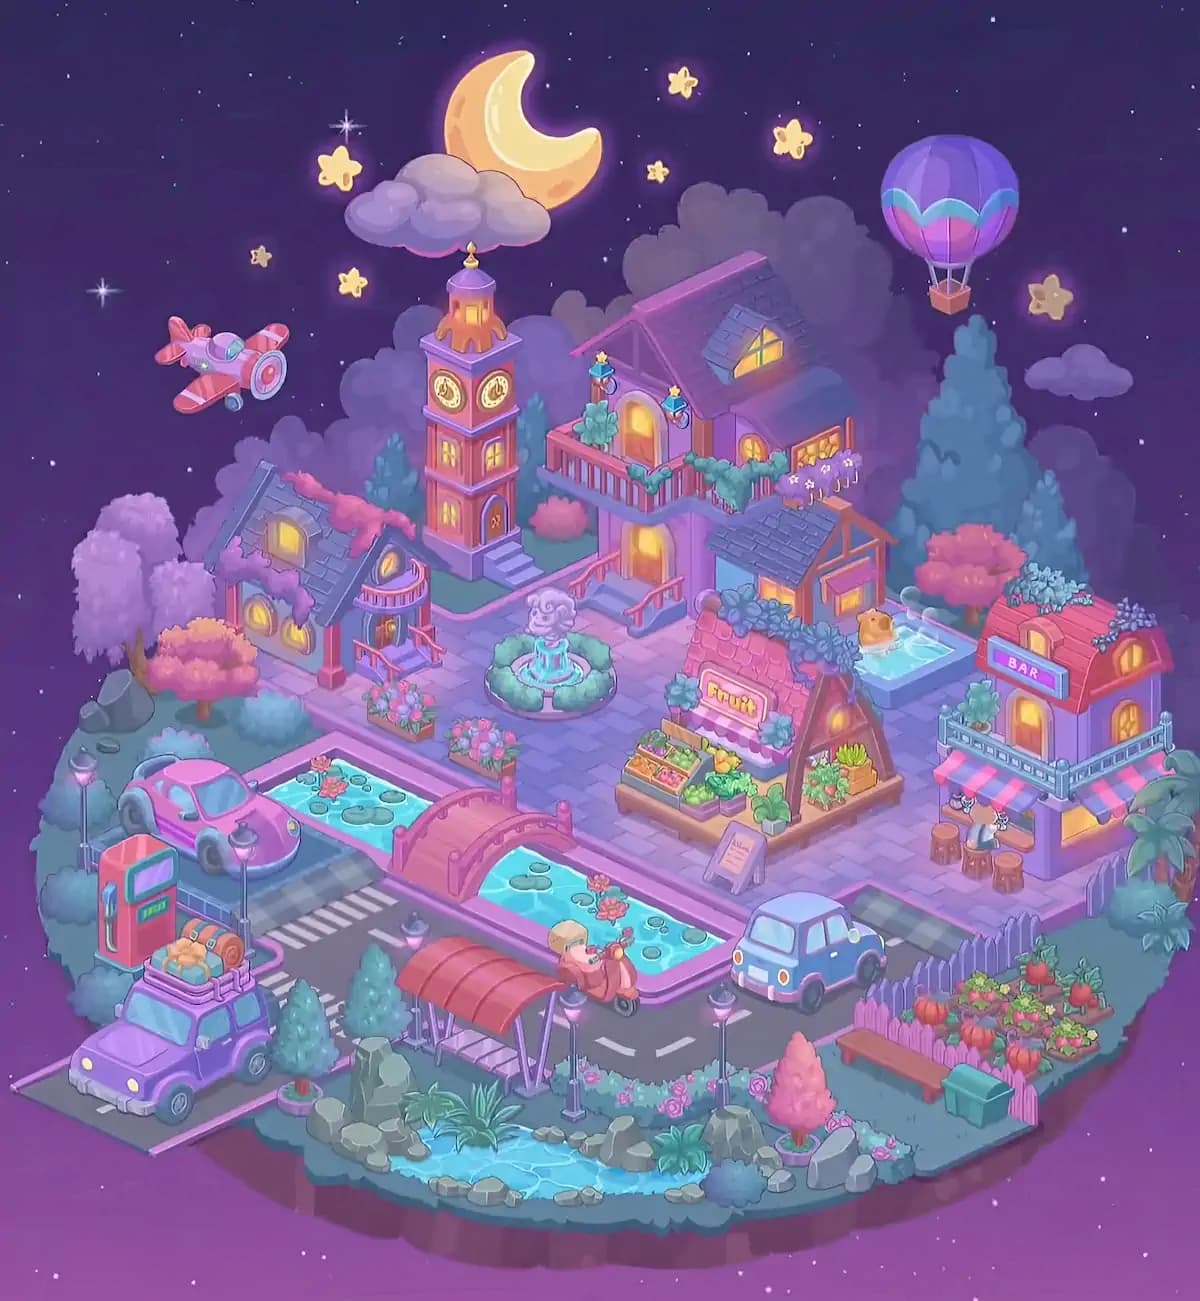
Begin Dreamy Room Level 871 with the two tallest ground structures because they establish the center of the entire village. Place the tall purple-pink clock tower slightly left of the island's upper center, directly below the crescent moon. The tower has a pointed golden ornament on top, a small illuminated upper chamber, two circular clock faces, several glowing rectangular windows, and a short set of steps descending from its lower-right side. Immediately to the right of the tower, place the large two-story purple house. Its steep roof should rise toward the center of the background, with a triangular glowing attic window facing forward. The upper floor has a balcony bordered by pink railings, lanterns near the doorway, green vines, and flower boxes. The lower level extends toward the central plaza. Getting these two structures correct early makes the remaining Dreamy Room Level 871 placements much easier.
Step 2. Build the left cottage area beneath the clock tower
Next, work on the upper-left side of Dreamy Room Level 871. Place the smaller cottage below and slightly left of the clock tower. The cottage has a dark bluish-purple sloped roof, pink walls, and several warm yellow windows. Its roofline should angle diagonally toward the center of the island. Attach the small covered entrance or gazebo-like porch to the cottage's front-right side; this structure has a rounded decorative roof and narrow supporting posts. Add the purple flowering tree immediately behind and to the left of the cottage, then place the shorter pink-orange tree in front of that area near the road. Fill the remaining background gaps with tall blue-green conifer trees and smaller shrubs. In the completed Dreamy Room Level 871 scene, the cottage is tucked into vegetation rather than standing alone, so pay attention to how trees partly overlap its edges without hiding its illuminated windows.
Step 3. Complete the central plaza and fountain
The paved plaza is the visual center of Dreamy Room Level 871. Lay the lavender and gray paving stones across the open space between the cottage, the large rear house, and the fruit market. Position the circular fountain almost exactly in the middle of this plaza, but slightly left of center. It consists of a low round green hedge-like border, bright turquoise water, and a pale ornamental sculpture rising from the middle. Arrange the water jets around the central sculpture so the fountain reads as one complete object. Add small green shrubs around its perimeter. On the left and lower-left edges of the plaza, position rectangular flower boxes containing clusters of pink, blue, and purple flowers. More planters sit beside the canal and around nearby paths. In Dreamy Room Level 871, these flower boxes are important alignment clues: they create a decorative transition between the fountain plaza and the waterway running across the lower half of town.
Step 4. Finish the lower section of the large house and its garden details
Return to the large rear house in Dreamy Room Level 871 and complete everything beneath its balcony. The lower portion extends downward toward the central plaza, with a glowing orange doorway facing forward. Place the short staircase and pink handrails leading from the plaza to this entrance. To the right, position the attached low structure with a dark bluish tiled roof and warm orange window. Green vines and blue-purple shrubs should cluster along this roofline and around the walls. Above, decorate the upper balcony with greenery and a row of tiny purple flowers near the right side. Several turquoise shrubs should soften the corners where the building meets the plaza. The finished arrangement should look layered: tall main house in back, balcony in the middle, lower extension in front. Correct depth is especially important in Dreamy Room Level 871, because placing one house section too far forward can make later market and pool pieces appear to have nowhere to fit.
Step 5. Place the fruit market in the center-right plaza
Now build one of the most distinctive businesses in Dreamy Room Level 871. Place the fruit market immediately right of the central plaza and fountain. Its main stall has a reddish-orange tiled canopy with a glowing Fruit sign on the front. Arrange the produce displays underneath and in front of the canopy: wooden crates contain green vegetables, orange and yellow fruit, leafy produce, and other colorful groceries. A second angled wooden display sits on the market's right side and should contain additional green and red produce. Add the small standing signboard on the pavement just in front and slightly right of the market. Blue-green bushes belong behind the stall, helping separate it from the small pool farther back. In Dreamy Room Level 871, avoid moving the fruit shop too close to the canal; there must be enough paved space for customers to stand in front of the displays and enough room for the signboard.
Step 6. Build the bar and small pool on the right side
Move to the far-right area of Dreamy Room Level 871. Place the two-story purple bar close to the island's right edge. It has a reddish roof, a bright purple BAR sign, a glowing upper window, and a pale blue railing wrapping around the upper level. The ground-floor service area faces toward the lower-left and is covered by striped pink-and-blue awnings. Place the small stools directly outside the counter, keeping them aligned beneath the awning. A palm tree stands just beyond the bar along the right edge of the island. Behind and left of the bar, place the small rectangular turquoise pool. It has a light border and a tiny yellow duck-like figure or float near the back edge. Surround this section with pink trees, blue-green shrubs, and flowers. The compact spacing here is one of the trickier parts of Dreamy Room Level 871, so anchor the bar first and fit the pool between the bar, market, and rear vegetation.
Step 7. Create the canal and install the arched bridge
The turquoise canal is one of the strongest horizontal landmarks in Dreamy Room Level 871. Position it across the middle-lower portion of the island, running from the left side near the pink car toward the right side near the blue car and market. The water should form a long, narrow channel bordered by pink-purple edging. Add lily pads, small stones, and pink water flowers throughout the canal, making sure the decorations remain inside the water rather than on the pavement. Place the large arched pink bridge at approximately the center of the channel. Its curved deck connects the central plaza above the canal with the road below it, and its matching side rails should face outward on both sides. There is also a small water section visible behind the pink car on the left. Once the canal and bridge are correctly positioned, much of Dreamy Room Level 871 becomes easier because they define the boundary between the pedestrian village center and the vehicle-filled foreground.
Step 8. Lay out the road, crossing, gas pump, and bus shelter
Build the transportation area across the lower half of Dreamy Room Level 871. The dark gray road curves from the lower-left edge, passes beneath the canal and bridge, then bends toward the right side. Add the white dashed lane markings along its central section. On the left, install the short striped pedestrian crossing near the pink car. Place the retro red gas pump beside the road on the far-left side, just below the canal; its green display panel should face inward toward the cars. Near the lower center, add the bus shelter with its curved reddish roof, pale supports, and bench underneath. Position several lavender streetlamps beside the roads, canal, and shelter. Their glowing tops create a repeated visual pattern around Dreamy Room Level 871. Be careful with the lamps because several look nearly identical, but each belongs at a specific roadside or path position and should not block vehicle spaces.
Step 9. Position the four vehicles and the scooter
With the road established, place the vehicles in Dreamy Room Level 871 according to their distinctive parking spots. The bright pink rounded car belongs in the upper-left road area beside the canal, angled slightly toward the viewer. The purple vehicle goes at the extreme lower-left edge and should face left-front; place the packed luggage or picnic bundle securely on its roof rack. The small blue compact car belongs on the right side of the canal, parked on the road below the market and bar area. Near the lower-middle portion of the canal, place the red scooter and its rider so they are traveling along the road toward the right. Leave the central road markings visible around the scooter. These vehicles provide useful confirmation that the road has been assembled correctly. In Dreamy Room Level 871, if a car seems to overlap a lamp, canal border, garden, or shelter, one of the surrounding pieces is probably slightly misplaced.
Step 10. Build the vegetable garden, bench, fence, and utility area
The lower-right corner of Dreamy Room Level 871 contains a compact community garden. Place the pink picket fence around the vegetable plot, keeping its open side oriented toward the road and foreground. Inside the fence, arrange the dense rows of crops: large orange pumpkins, red produce resembling tomatoes, leafy green plants, and smaller pink-red fruits or flowers. Position the simple wooden bench immediately outside the fence along its lower-left side. A green rectangular utility bin or trash container belongs nearby, slightly to the right of the bench and closer to the island's front edge. Add surrounding bushes and the small flowering plants where the garden meets the road. Behind this area stands additional greenery that connects visually to the bar. This corner is easy to overcrowd during Dreamy Room Level 871, so place the fence first, then crops, then the bench and bin, and finally fill any remaining spaces with the smaller foliage pieces.
Step 11. Create the rock pond and foreground garden
The entire front edge of Dreamy Room Level 871 is dominated by a decorative natural pond. Position the long turquoise water feature across the lower center of the island beneath the bus shelter and road. Surround it with irregular gray rocks of different sizes, using the largest boulders near the left-center and right-center edges. Add broad-leaf tropical plants between the rocks, especially around the pond's middle and right side. Small blue-green bushes fill the gaps between boulders. Near the right end, place the pink ornamental tree in its round pot, with additional pink and blue flowers around its base. On the left side, add the small circular planter close to the parked purple vehicle. The water should remain clearly visible between the stones and plants. This landscaping gives Dreamy Room Level 871 its layered foreground, so avoid covering the pond with too many decorative pieces or placing rocks on the road above it.
Step 12. Add all remaining trees, shrubs, flowers, and small decorations
Once the major structures of Dreamy Room Level 871 are fixed, fill the remaining gaps with vegetation. Tall blue-green conifers belong primarily behind the buildings, particularly behind the clock tower, large house, and bar. Rounded pink and purple trees should appear along the left cottage, beside the pool, and around the right side of town. Low turquoise shrubs line the road edges, building walls, canal, and foreground rocks. Add the remaining flower beds to the plaza, bridge approaches, balcony, roadside, and lower garden. The completed scene deliberately alternates cool blue-green foliage with warmer pink-purple trees, so avoid clustering every plant of the same type together. Also check that decorative foliage does not cover the Fruit or BAR signs. In Dreamy Room Level 871, small plants are often the final objects left in the box because their correct spots depend on the buildings, roads, water, and larger trees already being settled.
Step 13. Place the airplane and hot-air balloon in the sky
Finish the most obvious floating objects in Dreamy Room Level 871 by decorating the open sky. Place the small pink-red airplane on the far upper-left side of the scene, roughly level with the lower edge of the crescent moon. Its nose points toward the right, with the propeller at the front and striped wings clearly visible. On the upper-right side, place the purple hot-air balloon above the tall background trees and behind the bar area. The balloon has bands of purple, turquoise, and pink, with a small brown basket hanging underneath. Keep both objects well above the rooftops so they appear to be flying rather than touching the village. The crescent moon, surrounding glowing stars, small golden star shapes, purple clouds, and dark star-filled sky were already visible in the starting scene and should remain unobstructed. These aerial objects complete the whimsical atmosphere of Dreamy Room Level 871.
Step 14. Perform the final placement check
Before considering Dreamy Room Level 871 complete, scan the island systematically from back to front. At the rear, verify the clock tower, large balcony house, conifers, hot-air balloon, and surrounding trees. Across the middle, confirm the left cottage, central fountain, lower house extension, fruit market, pool, bar, plaza flower boxes, and shrubs. Check that the canal flows continuously across the scene and that the pink bridge sits directly over its center. In the foreground, confirm the gas pump, pedestrian crossing, pink car, purple luggage-topped vehicle, blue car, scooter, bus shelter, streetlamps, road markings, fenced vegetable garden, bench, green bin, rock pond, tropical plants, flowering tree, and all small bushes. The fundamental puzzle of Dreamy Room Level 871 is exact object placement, so an item that looks visually reasonable may still belong a few pixels or one slot away from where the game accepts it.
Notes and Precautions
The safest approach in Dreamy Room Level 871 is to avoid placing tiny decorations before their surrounding structures are established. The clock tower, large house, cottage, bar, fountain, fruit market, canal, bridge, road, and foreground pond form the level's main skeleton. Once those anchors are correct, smaller items have far fewer plausible locations.
Pay special attention to overlapping scenery. Several trees sit partially behind buildings, while shrubs and flowers sit partly in front of them. The pool behind the market is especially easy to confuse with the canal because both use bright turquoise water. Similarly, the foreground rock pond is a separate decorative water feature and should remain below the road.
Repeated streetlamps, shrubs, flower boxes, trees, and rocks can also cause mistakes because they look similar. In Dreamy Room Level 871, use surrounding landmarks instead of judging an object's position in isolation. Finally, keep the original moon, clouds, and stars visible; they are part of the permanent background and serve as orientation points rather than objects that need rearranging.
Tips and Tricks from top player
A reliable shortcut for Dreamy Room Level 871 is to work in layers. Start with the back row, then the central buildings and plaza, followed by the canal, road, vehicles, and finally foreground landscaping. This reduces trial-and-error because each completed layer becomes a reference for the next.
Use unique objects as anchors. The clock tower immediately identifies the upper-left center, the Fruit stall fixes the center-right plaza, the BAR building fixes the far-right edge, and the pink bridge identifies the midpoint of the canal. After these are placed, repeated objects such as trees and lamps become much easier to sort.
Another useful Dreamy Room Level 871 strategy is to temporarily ignore tiny flowers and bushes when unpacking. Put recognizable large pieces away first, then return to the decorative pieces once only a few possible gaps remain. For vehicles, follow the road geometry rather than nearby buildings: pink car upper left, purple luggage car lower left, scooter lower center, and blue car on the right. This sequence greatly reduces incorrect placements.
Final Scene
The completed Dreamy Room Level 871 becomes a miniature nighttime village glowing beneath a crescent moon. A tall illuminated clock tower and cozy balcony house rise at the back, framed by purple clouds, conifers, a passing airplane, and a colorful hot-air balloon. Below them, a cottage, fountain plaza, fruit market, small pool, and two-story bar create a lively town center filled with flowers and greenery. A turquoise canal with lily pads cuts through the middle, crossed by a rounded pink bridge. Roads wind around the water with a pink car, purple luggage-loaded vehicle, blue compact car, red scooter, gas pump, lamps, crossing, and sheltered stop. The foreground finishes Dreamy Room Level 871 with a rock-lined pond, tropical plants, flowering trees, a fenced vegetable garden, bench, and utility bin. Every area feels busy yet carefully balanced, turning the once-empty island into a charming, self-contained community.