Dreamy Room Level 896
Dreamy Room Level 896 guide - Dreamy Room 896 Walkthrough & Solution.
Important Notice Regarding Level Numbering
Due to frequent changes in Dreamy Room's level numbering and differences between platforms (Android/iOS) – for example, level 896 on Android might not be the same as level 896 on iOS – the text guide below may not always match the images and video above. Please prioritize the image and video guides. If you find that the guide content doesn't match your current level, please visit the All Level Walkthroughs page to find the correct guide based on level images. Thank you for your understanding.
Dreamy Room Level 896 Walkthroughs & Guide
Step 1. Build the haunted castle towers around the top of Dreamy Room Level 896
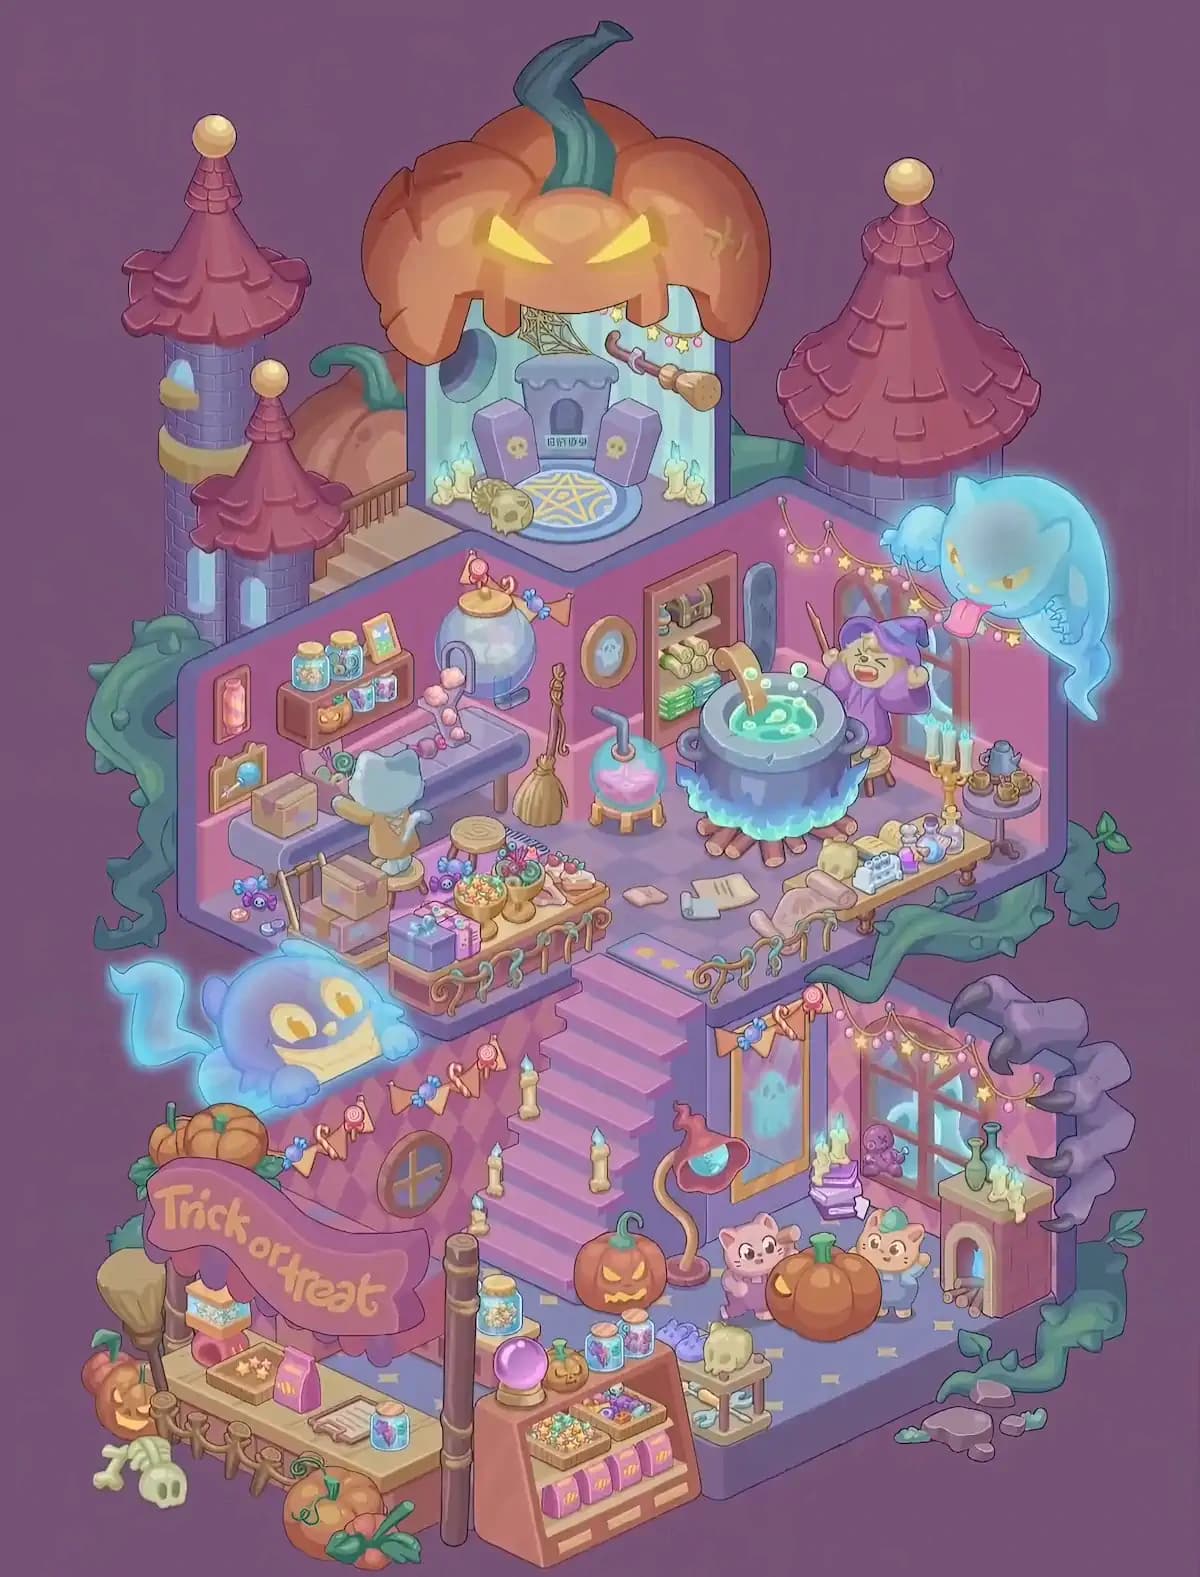
Begin Dreamy Room Level 896 with the largest structural decorations because they establish the outer silhouette of the building. Place the two narrow purple-brick towers along the far left side of the upper level. The taller rear tower belongs at the upper-left corner and has a dark pink pointed roof topped by a gold sphere, plus a yellow band around its middle. The shorter tower sits immediately in front of it and uses the same pink conical roof and gold finial. Next, place the much larger matching round tower at the upper-right corner of Dreamy Room Level 896. Its wide scalloped pink roof should extend over the right edge of the building. These three towers frame the central rooftop area. Make sure they sit outside the usable interior floor rather than occupying the workshop itself; incorrect depth placement is one of the easiest mistakes in Dreamy Room Level 896.
Step 2. Assemble the giant pumpkin shrine on the rooftop
The central roof of Dreamy Room Level 896 becomes a dramatic Halloween shrine. Position the enormous orange jack-o’-lantern canopy above the small rooftop room, centered between the left and right towers. Its glowing yellow eyes face forward, while its long curved green stem rises high above the roof. Additional pumpkin forms should extend behind the little room on both sides, making the structure appear embedded inside a giant pumpkin patch. Inside the open-front shrine, place the gray tomb-like monument against the rear wall. Set one purple coffin with a skull emblem diagonally on each side of it. A circular blue rug with a yellow magical-star pattern belongs directly in front. Put the skull on the floor toward the front-left of the rug and arrange clusters of candles around both sides. Finish this Dreamy Room Level 896 rooftop scene with the spiderweb above, the small hanging lights, and the broom suspended toward the upper-right interior wall.
Step 3. Create the left-side potion workstation on the upper floor
Move into the upper interior floor of Dreamy Room Level 896 and work from left to right. Against the left wall, install the wooden wall shelf and fill it with the small potion jars, candy-colored containers, and the tiny framed picture. A narrow framed bottle decoration belongs farther left on the wall, with another small framed object positioned below it. Place the long gray workbench beneath the shelf. The large round glass potion vessel belongs on the rear portion of this bench, with its curved outlet facing toward the basin so that the pink bead-like ingredients appear to tumble down into it. In front of the bench, place the small pale-blue character facing the workstation. Boxes and loose magical supplies fill the floor around its feet. This dense cluster is important in Dreamy Room Level 896, because several small objects look interchangeable until the furniture establishes their correct positions.
Step 4. Fill the upper-left floor with boxes, ingredients, gifts, and magical supplies
Once the workstation is established, complete the crowded left foreground of Dreamy Room Level 896. Stack several cardboard boxes close to the left wall and around the pale-blue character, keeping the larger boxes toward the back and smaller packages closer to the front. Scatter the tiny colorful magical creatures, candies, berries, or ingredient pieces along the floor beside the boxes. Place the short round wooden stool near the workbench. Along the front edge of the upper floor, install the wooden preparation or sales table. Cover it with baskets of colorful ingredients, flowers, wrapped goods, small bowls, and a rectangular tray of food or potion materials. Add the blue and pink wrapped gift boxes at the left end. A decorative rope-and-vine railing runs along the front edge of this platform. In Dreamy Room Level 896, this front table should remain left of the main staircase so the center path stays clear.
Step 5. Arrange the broom, wall cabinet, clock, and bubbling side potion
The center wall of Dreamy Room Level 896 contains several smaller details that can easily be misplaced. Lean the full-size straw broom upright against the wall just to the right of the main workstation. Beside it, position the squat round pink potion container on its tiny stand; the dark curved pipe rises from the top and bends toward the wall. Above these pieces, hang the oval framed picture or clock. Farther right, insert the recessed wooden wall cabinet and fill its compartments with rolled scrolls, bundled ingredients, and neatly stacked green books. A tall narrow gray wall recess belongs immediately to the cabinet’s right side. These items form the transition from the left laboratory to the main cooking area. Correct spacing matters in Dreamy Room Level 896 because the broom should not overlap the cabinet and the small pink vessel must remain on the floor rather than appearing to float against the wall.
Step 6. Build the giant bubbling cauldron and witch scene
The main focal point of the upper room in Dreamy Room Level 896 is the enormous cauldron. Position the gray-black pot slightly right of center. Stack the firewood directly underneath it and add the bright blue supernatural flames around its base. The cauldron should be filled with glowing green liquid, pale bubbles, and a long wooden stirring spoon leaning into the mixture. Behind and slightly to the right of the cauldron, seat the witch character wearing the oversized purple hat. She should appear to be reacting dramatically to the potion, with one arm raised and her face visible above the rim. Add the small stool beneath or behind her. Strings of yellow star-shaped lights hang across the upper-right wall over this area. Completing the cauldron correctly makes Dreamy Room Level 896 immediately recognizable and also provides a reliable anchor for positioning the remaining right-side objects.
Step 7. Decorate the upper-right laboratory and floating ghost area
Complete the right half of Dreamy Room Level 896 by placing the long narrow worktable along the right wall. Arrange the loaf or pale bundled ingredient, small white containers, colorful potion bottles, glassware, and miscellaneous alchemy supplies across its surface. To the far right, add the small round side table with candles and tiny vessels. Tall gold candlesticks stand nearby and add another cluster of glowing flames. Above this corner, position the huge translucent blue ghost outside the building, floating beside the right tower with its tongue extended toward the witch. The ghost should hover partly beyond the wall instead of resting inside the room. Keep the star-light garland visible behind both the witch and ghost. When everything is correct, Dreamy Room Level 896 should look intentionally crowded but layered: worktable in front, lights against the wall, witch near the cauldron, and ghost floating furthest back and outward.
Step 8. Finish the upper floor with papers, railing, stairs, and creeping vines
Before moving downstairs in Dreamy Room Level 896, finish the architectural details around the upper floor. Place the loose parchment sheets and papers on the floor near the front of the cauldron and right-side worktable. Continue the curling rope-and-vine railing across the entire exposed front edge, including both sides of the central staircase opening. Large dark green vines wrap around the exterior edges of the building; one thick curling vine rises on the far left, while another creeps around the right side and beneath the upper platform. Install the broad pink staircase directly in the center, descending from the upper workshop to the lower room. The top stair aligns with the gap between the two railing sections. This transition is particularly important in Dreamy Room Level 896, because the stairs visually connect the two floors and help confirm whether nearby furniture has been positioned too far inward.
Step 9. Decorate the staircase and lower walls with Halloween lights
The lower section of Dreamy Room Level 896 begins with the staircase and wall decorations. Place several tall candles along the stair edges, spacing them at different heights so their pale blue flames guide the path downward. Across the left lower wall, stretch the Halloween candy garland made of wrapped sweets and lollipops. A round wooden-framed window belongs under this garland. Another strand of star lights stretches across the lower-right wall near the large window. Set the tall framed panel or mirror beside the staircase on the right; it contains a ghostly blue figure. A curved floor lamp with a reddish shade stands in front of this panel. Outside the left side, position the large glowing blue ghost with its broad yellow grin and raised tail. The ghost should float above the exterior shop area rather than standing on the floor. These lighting details give Dreamy Room Level 896 its layered haunted-house appearance.
Step 10. Create the lower-right fireplace, window, pumpkins, and cat characters
Turn the lower-right corner of Dreamy Room Level 896 into a cozy haunted sitting area. Install the large red-framed window on the back-right wall and place the little purple creature or plush near its lower-left panes. To the right, build the narrow brick fireplace with a glowing blue opening. Put a green bottle and several dripping candles on its mantel, then attach the dramatic purple smoke or magical chimney plume curling upward outside the wall. Stack the purple books and candles on the floor between the window and framed panel. In front of this backdrop, position the two small cat characters side by side: the pink cat stands on the left, while the orange-and-cream cat in blue clothing stands on the right. Place the large round orange pumpkin directly in front of them. A smaller carved jack-o’-lantern belongs nearer the staircase. This grouping forms the lower character scene of Dreamy Room Level 896.
Step 11. Build the Trick-or-Treat counter along the lower-left edge
The lower-left foreground of Dreamy Room Level 896 becomes a miniature Halloween candy stall. Install the long cream-colored counter parallel to the front-left edge of the floor. Behind it, attach the large pink awning-style sign reading “Trick or Treat.” Place pumpkins around the left end and rear of the sign, and lean the large straw broom vertically nearby. On the counter, arrange the small star-topped box, pink package, bone-shaped candy or accessory, and the glass jar filled with colorful sweets. Add the little raised display at the far-left rear of the counter. A rope barrier runs around the front perimeter, with a skull and crossed bones resting on the ground outside the left corner. Another large pumpkin lies near the front-right end of this stall. In Dreamy Room Level 896, keep the shop structure entirely below the upper platform so it does not overlap the floating blue ghost.
Step 12. Complete the front candy display and final small props
Finish Dreamy Room Level 896 by filling the central foreground with the final merchandise. Place the freestanding wooden display cabinet immediately to the right of the Trick-or-Treat counter. The glowing purple crystal ball sits on its upper-left corner, accompanied by a tiny pumpkin and several jars of candy or potion ingredients. Arrange two shallow trays of colorful sweets across the top and middle shelves. Four matching pink packages line the lower shelf. Immediately to the right, position the tiny wooden side table with the pale skull on top. Add the little blue-purple cloth bundle or magical object behind it. A tall dark post stands between the shop counter and display cabinet. Finish the outside edges with creeping green vines, the scattered gray rocks at the lower-right corner, pumpkins near the foreground, and all remaining tiny candy jars. With these pieces installed, Dreamy Room Level 896 should register as a complete, densely decorated Halloween environment.
Notes and Precautions
The hardest part of Dreamy Room Level 896 is distinguishing between objects that belong inside the two floors and decorations attached to the outside of the building. The castle towers, huge blue ghosts, curling vines, giant pumpkin structure, rocks, and purple chimney smoke all extend beyond the floor boundaries. Do not force them into open interior spaces simply because they appear near furniture.
Small props are another source of mistakes in Dreamy Room Level 896. Potion jars, candy containers, candles, boxes, books, ingredients, and wrapped gifts often have only one accepted position. Establish their supporting furniture first, then add the items on top. The cauldron should be positioned before the witch; shelves should be installed before their jars; the lower shop counter should be placed before its merchandise.
Pay close attention to depth in Dreamy Room Level 896. The floating ghosts overlap walls without actually sitting against them, while the witch is behind the cauldron and the cat characters are behind the large pumpkin. Likewise, the giant rooftop pumpkin canopy sits above the shrine rather than inside it.
The central staircase should remain unobstructed throughout Dreamy Room Level 896. If a table, vine, box, or decorative object appears to block the steps, that item is probably one grid position away from its intended location.
Tips and Tricks from top player
For Dreamy Room Level 896, place objects from largest to smallest. Start with the three towers, rooftop pumpkin shrine, staircase, cauldron, major tables, fireplace, windows, and Trick-or-Treat stall. These pieces act like landmarks and dramatically reduce the number of possible positions for smaller decorations.
A second useful strategy for Dreamy Room Level 896 is to complete one region at a time rather than unpacking randomly. Finish the rooftop first, then the upper-left laboratory, upper-right cauldron area, lower-right room, and finally the lower-left shop. This prevents similar-looking potion bottles and candles from becoming mixed between areas.
Use silhouettes as clues in Dreamy Room Level 896. Tall objects such as the broom, candles, towers, lamp, and post generally belong against walls or edges, while low boxes, skulls, papers, and ingredient piles sit on floors or tables.
Finally, treat overlapping characters as placement clues. In Dreamy Room Level 896, the witch belongs behind the cauldron, the cats belong behind the large pumpkin, and both blue ghosts float beyond the building boundaries. If those relationships look wrong, adjust the larger anchor object before repeatedly moving the smaller character. This approach makes Dreamy Room Level 896 much faster to solve.
Final Scene in Dreamy Room Level 896
The completed Dreamy Room Level 896 becomes a charming two-story Halloween fantasy shop wrapped in a miniature haunted castle. Three pink-roofed towers surround a glowing jack-o’-lantern shrine, complete with coffins, candles, a skull, spiderwebs, and a magical floor symbol. Below it, the upper workshop is packed with potion bottles, ingredients, gifts, boxes, scrolls, a broom, bubbling equipment, and a huge green cauldron tended by a purple-hatted witch while a mischievous blue ghost floats outside. The central pink staircase descends into the cozy lower room, where candles, candy garlands, ghostly windows, a smoking fireplace, pumpkins, and two little cats create a playful Halloween scene. At the front, a Trick or Treat counter, crystal ball, candy displays, bones, skulls, pumpkins, vines, and potion jars turn Dreamy Room Level 896 into a richly layered magical marketplace where virtually every visible corner contains a tiny storytelling detail.