Dreamy Room Level 856
Dreamy Room Level 856 guide - Dreamy Room 856 Walkthrough & Solution.
Important Notice Regarding Level Numbering
Due to frequent changes in Dreamy Room's level numbering and differences between platforms (Android/iOS) – for example, level 856 on Android might not be the same as level 856 on iOS – the text guide below may not always match the images and video above. Please prioritize the image and video guides. If you find that the guide content doesn't match your current level, please visit the All Level Walkthroughs page to find the correct guide based on level images. Thank you for your understanding.
Dreamy Room Level 856 Walkthroughs & Guide
Step 1. Build the flower garden around the bottom of Dreamy Room Level 856
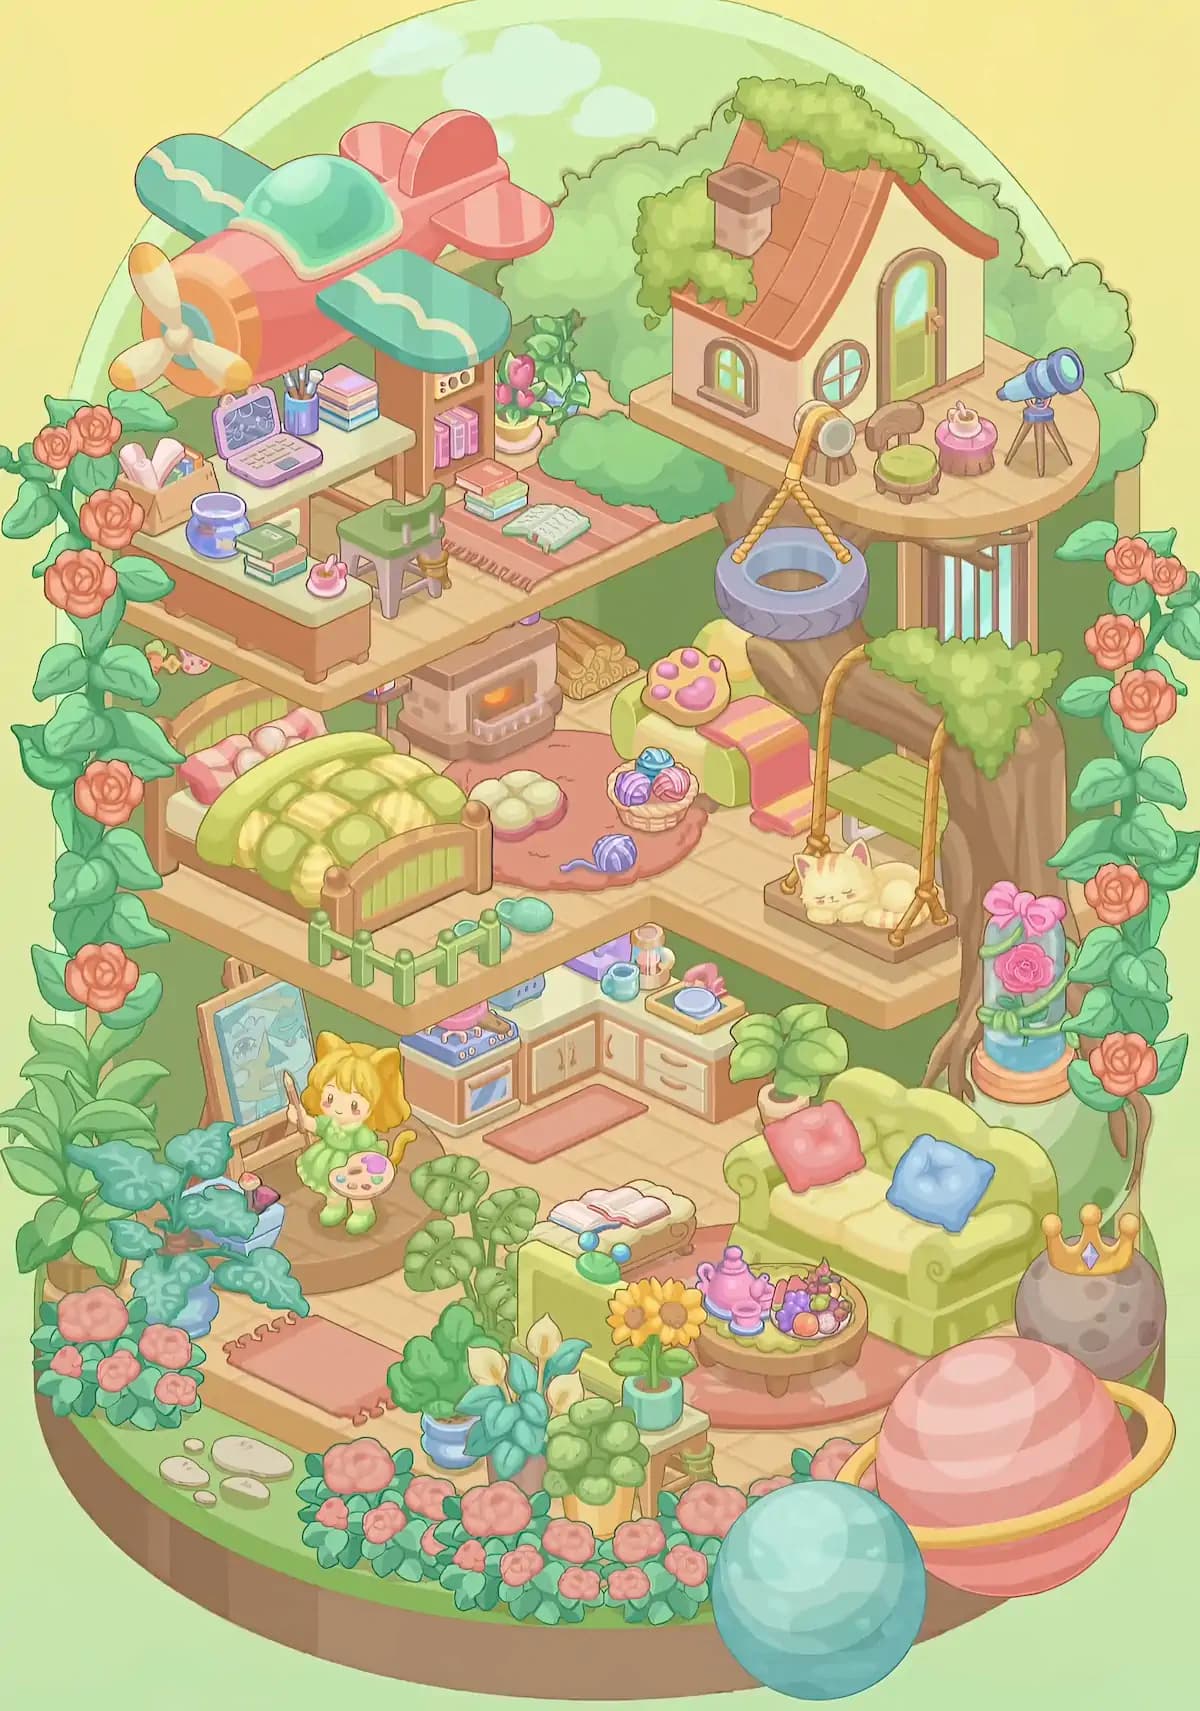
Begin Dreamy Room Level 856 around the outside edge of the wooden room rather than immediately filling the interior. The finished design has a lush garden wrapping around almost the entire lower half. Along the front edge, place a continuous bed of rounded green foliage covered with many coral-pink flowers. Larger leafy plants rise behind this flower bed, especially on the lower-left side, where broad blue-green leaves nearly hide part of the room.
Continue the vegetation toward the center with several individual potted plants. There is a blue pot containing pale cream flowers, a yellow pot with a round leafy plant, and another small turquoise pot holding bright yellow sunflowers. These sit along the front edge of Dreamy Room Level 856, directly in front of the indoor lounge area.
Do not forget the pale stepping stones on the grass at the bottom-left. The most unusual decorations are at the bottom-right: position the large pink striped Saturn-like planet with its golden ring partly outside the room and place the large turquoise-blue planet immediately in front of it. These oversized celestial objects establish the whimsical scale of Dreamy Room Level 856.
Step 2. Arrange the lower-right sofa and tea area
The main sitting area of Dreamy Room Level 856 belongs in the lower-right section. Place the large light-green sofa against the right side, angled naturally into the corner. The sofa has rounded arms and a soft yellow-green seat. Put the coral-pink square cushion on its left side and the sky-blue square cushion toward the right.
In front of the sofa, spread the rounded coral-colored rug. Center the low round wooden tea table over the rug. The table in Dreamy Room Level 856 is packed with tiny details: place the pink teapot toward the left, small drinking pieces nearby, and the fruit plate toward the right. The plate contains colorful fruit, including purple grapes and warmer orange-pink pieces.
Set the small sunflower pot close to the left side of the table. Behind and slightly left of the sofa is a large broad-leaf potted plant. At the sofa's right, place the gray cratered moon-like sphere topped with a gold crown and purple jewel. This crowned ornament should sit near the outer edge of Dreamy Room Level 856, just above the giant pink planet.
Step 3. Create the art corner on the lower-left side
Next, fill the lower-left interior of Dreamy Room Level 856 with the art area. Place the wooden easel close to the left wall, leaning slightly backward. Its displayed artwork is a pale blue illustration, so make sure the picture faces toward the center of the room rather than toward the wall.
In front of the easel, set the round wooden platform. The small blonde doll or artist character stands on this platform wearing a green outfit. Place the painter's palette in the character's hands, with the tiny brush positioned as shown in the completed scene. This figure is one of the easiest landmarks for checking your Dreamy Room Level 856 layout.
Surround the platform with the large tropical leaves visible at the front-left. A small blue art box or supply container is partially concealed among the foliage beside the platform. Place the coral runner rug along the nearby floor, extending from the garden side into the room. In Dreamy Room Level 856, the heavy vegetation intentionally overlaps this art nook, so do not try to leave a wide empty border around the easel.
Step 4. Assemble the compact kitchen in the lower center
The kitchen of Dreamy Room Level 856 fits tightly behind the art nook and to the left of the sofa. Start with the L-shaped cream-and-wood cabinets against the rear wall of this lower floor. The cooking unit and oven belong on the left portion, with the pale oven door facing forward. Continue the cabinets to the right to form the short counter.
Place the small kitchen objects across the countertop in Dreamy Room Level 856. The finished arrangement includes cups and dishes near the corner, small containers and utensils, and a flat plate or tray toward the far-right end. Keep the items grouped closely because the counter is intentionally busy rather than minimalist.
Lay the narrow pink floor mat directly in front of the cabinets. To the right of the counter, place the large leafy plant in its pale pot, positioned between the kitchen and the green sofa. In front of the kitchen, add the small low cushioned bench or footstool with an open book resting across its top. The open pages should face upward and toward the viewer. Completing this cluster makes the lower floor of Dreamy Room Level 856 much easier to recognize.
Step 5. Build the bedroom and fireplace on the middle floor
The middle-left floor contains the bedroom, one of the largest furniture arrangements in Dreamy Room Level 856. Position the wooden single bed horizontally along the left side. Its head area sits toward the back-left, while the curved wooden footboard faces the center. Cover the bed with the green-and-yellow checkered quilt and arrange the pale pillows near the head. Pink-and-cream striped cushions can be seen behind the blanket.
Spread the soft coral-pink rug beside and partially in front of the bed. Against the back wall, place the small stone fireplace. The orange fire should remain visible through the front opening. Stack the cut firewood immediately to the fireplace's right.
The right half of this Dreamy Room Level 856 floor becomes a cozy craft area. Put the light-green footstool there and drape the striped pink-and-yellow blanket down its front. Set the large paw-print cushion on top. Arrange the basket of colorful yarn in front, then add the loose blue and purple yarn balls across the rug. The tiny trailing strand from one ball should extend onto the floor.
Step 6. Add the giant tree, bench, swings, cat, and rose display
The central-right tree is the structural centerpiece of Dreamy Room Level 856. Position its thick brown trunk along the right side so it rises through multiple floors. Green foliage grows over the upper parts of the trunk and surrounding branches. A slim green bench should sit behind the lower swing area, tucked partly beneath the tree.
Hang the rectangular wooden swing from two long golden-brown ropes on the right side of the middle floor. Place the sleeping cream-colored cat directly on the swing board. The cat lies lengthwise with its head toward the left. Getting this position right is important because the cat swing is one of the most distinctive objects in Dreamy Room Level 856.
Higher up, suspend the blue-purple tire swing from the upper structure. Its ropes form a triangular shape above the tire, and the tire hangs roughly between the bedroom level and the upper treehouse deck.
Finally, place the glass display dome at the lower-right side of the trunk. Inside is a large pink rose with green leaves, finished with a bright pink bow at the top. This floral case fills the narrow space between the tree and outer rose vines of Dreamy Room Level 856.
Step 7. Furnish the upper-left study area
Move to the upper-left platform of Dreamy Room Level 856 and place the large study desk against the left side. The desktop is pale mint green with warm wooden supports. Put the open pink laptop on the rear-left portion of the desk, making sure its screen faces into the room. Beside it goes the blue-purple pencil cup filled with writing tools, followed by the small stack of pastel books.
At the far-left end of the desk, position the open storage box containing rolled papers and stationery. A rounded blue decorative cup or container sits toward the front-left portion. More books are stacked along the front edge of the desk, while a tiny pink cup and saucer sits nearby.
Place the green chair directly in front of the desk. The chair's back faces outward toward the viewer in Dreamy Room Level 856. To the right, spread the muted coral runner rug and place several books on and around it, including an open mint-green book. Add the potted pink flowers behind these books near the wall. This entire study arrangement should feel crowded but carefully organized.
Step 8. Install the giant toy airplane above the study
The enormous airplane is one of the first things players notice in completed Dreamy Room Level 856, so its placement must be precise. It occupies the upper-left corner above the study desk. Position the coral-red fuselage diagonally from the front-left toward the back-right. The rounded turquoise canopy sits on top of the body.
Attach or place the turquoise wings across the airplane, with the pale wavy cream stripe running along each wing. The rear tail section is coral-pink and rises behind the body. At the nose, position the cream-and-yellow propeller so that it faces the left/front side of Dreamy Room Level 856.
The aircraft should appear to hover immediately above the desk rather than sitting on the floor. Its left wing nearly reaches the rose-covered outer frame, while its right side extends toward the central wall and greenery. Because the airplane is so large, incorrect placement can visually block several study objects. In Dreamy Room Level 856, establish the plane only after the desk pieces are correctly positioned so you can clearly see which objects belong underneath it.
Step 9. Construct the upper-right treehouse and observation deck
The highest furnished section of Dreamy Room Level 856 is the round wooden deck at the upper-right. Place the small cream-colored cottage toward the back of this platform. Its tall green arched door faces forward-right, while the smaller windows appear on the front and side walls. Add the warm terracotta roof with its small chimney, then cover portions of the roofline with soft green moss and leafy growth.
Bushes fill the space behind the cottage and around the deck, making the building look embedded in a miniature treetop garden. On the open part of the deck, place the brown chair and the small round green stool. Set the tiny pink-covered side table nearby with its cup and saucer on top.
The blue telescope belongs at the far-right edge of the platform in Dreamy Room Level 856. Angle its barrel upward and outward, with its three slender tripod legs spread beneath it. Below the platform, keep the vertical wooden supports visible. The tire swing from the previous step hangs just left of these supports, connecting the upper and middle sections visually.
Step 10. Complete the rose-covered frame and final foliage
Finish Dreamy Room Level 856 by filling the remaining perimeter with climbing roses and foliage. The left border is covered by a tall vine with broad green leaves and repeated coral-orange roses from near the airplane all the way down to the front garden. The right border mirrors this idea, with roses climbing from the lower planetary area past the glass flower dome and toward the treehouse.
Add the larger leafy clusters around the central tree, underneath the study platform, behind the bedroom, and around the treehouse. The greenery is not distributed evenly in Dreamy Room Level 856; instead, it is deliberately concentrated around platform edges to make the entire miniature home feel grown into a garden.
Check the front once more for the dense flower border, potted cream flowers, rounded green shrubs, sunflower pot, stepping stones, and tropical leaves. Also confirm that the large turquoise planet overlaps the front-right edge while the ringed pink planet remains behind it. These final layers are important because Dreamy Room Level 856 should look almost completely enclosed by vegetation when everything is correct.
Notes and Precautions
The biggest difficulty in Dreamy Room Level 856 is determining the exact placement of objects in an unusually crowded scene. Several pieces sit extremely close together, so an object that looks correct may actually belong slightly farther forward, farther back, or on another floor. The study books, kitchen accessories, yarn pieces, plants, and tea-table decorations are especially easy to confuse.
Work with large landmarks first. In Dreamy Room Level 856, the airplane, treehouse, tree trunk, bed, desk, kitchen, sofa, planets, and major plants define the layout. Once those are correct, the remaining spaces effectively tell you where the small decorations must go.
Pay attention to vertical layers. The blue tire belongs above the cat swing, the treehouse stands above both, and the airplane is above the study rather than part of the desk. Likewise, some greenery in Dreamy Room Level 856 is outside the room frame while other plants are furniture-level decorations.
Do not rush. Dreamy Room's design specifically encourages careful organizing without a timer or pressure. dreamy room instruction That makes Dreamy Room Level 856 much easier if you periodically compare the overall silhouette rather than repeatedly testing random positions.
Tips and Tricks from top player
For Dreamy Room Level 856, use a top-down placement strategy for each floor but solve the floors from bottom to top. First identify the footprint of every large item. Once the sofa occupies the lower-right, for example, the tea table, crowned moon, plant, book bench, and rug become much easier to locate. The same principle works with the bed, fireplace, desk, airplane, and treehouse.
Another useful technique in Dreamy Room Level 856 is to group objects by visual theme before placing them. Keep study objects such as books, laptop, stationery, and chair together; keep bedroom objects such as yarn, blanket, paw cushion, and fireplace together; and keep garden objects separate from indoor plants. This prevents similar small pieces from being dragged to the wrong floor.
When a piece refuses to lock into position, do not keep moving it by tiny amounts. Compare its size and color with the empty spaces elsewhere in Dreamy Room Level 856. A surprisingly large number of mistakes happen because an object has been assigned to the correct theme but the wrong level.
Finally, save the tiny decorative pieces for last. In Dreamy Room Level 856, cups, books, individual yarn balls, small flowerpots, and tabletop items are far easier to recognize once the major furniture already recreates the completed outline.
Final Scene of Dreamy Room Level 856
The completed Dreamy Room Level 856 becomes a miniature fantasy retreat overflowing with color and personality. At the top, a coral-and-turquoise airplane floats above a cozy study while a moss-covered cottage and telescope occupy the opposite treetop deck. The middle level combines a warm bedroom, glowing fireplace, yarn-filled craft corner, hanging tire, and a sleeping cat relaxing on a wooden swing. Below, Dreamy Room Level 856 opens into an art nook, compact kitchen, green sofa, tea table, books, flowers, and dozens of leafy plants. Climbing roses frame both sides of the entire structure, while a glass-covered rose, crowned moon ornament, stepping stones, and dense flower beds add storybook details. The giant pink ringed planet and turquoise sphere at the bottom complete the dreamy theme. Once every item is placed correctly, Dreamy Room Level 856 feels less like a room and more like a tiny self-contained world.