Dreamy Room Level 895
Dreamy Room Level 895 guide - Dreamy Room 895 Walkthrough & Solution.
Important Notice Regarding Level Numbering
Due to frequent changes in Dreamy Room's level numbering and differences between platforms (Android/iOS) – for example, level 895 on Android might not be the same as level 895 on iOS – the text guide below may not always match the images and video above. Please prioritize the image and video guides. If you find that the guide content doesn't match your current level, please visit the All Level Walkthroughs page to find the correct guide based on level images. Thank you for your understanding.
Dreamy Room Level 895 Walkthroughs & Guide
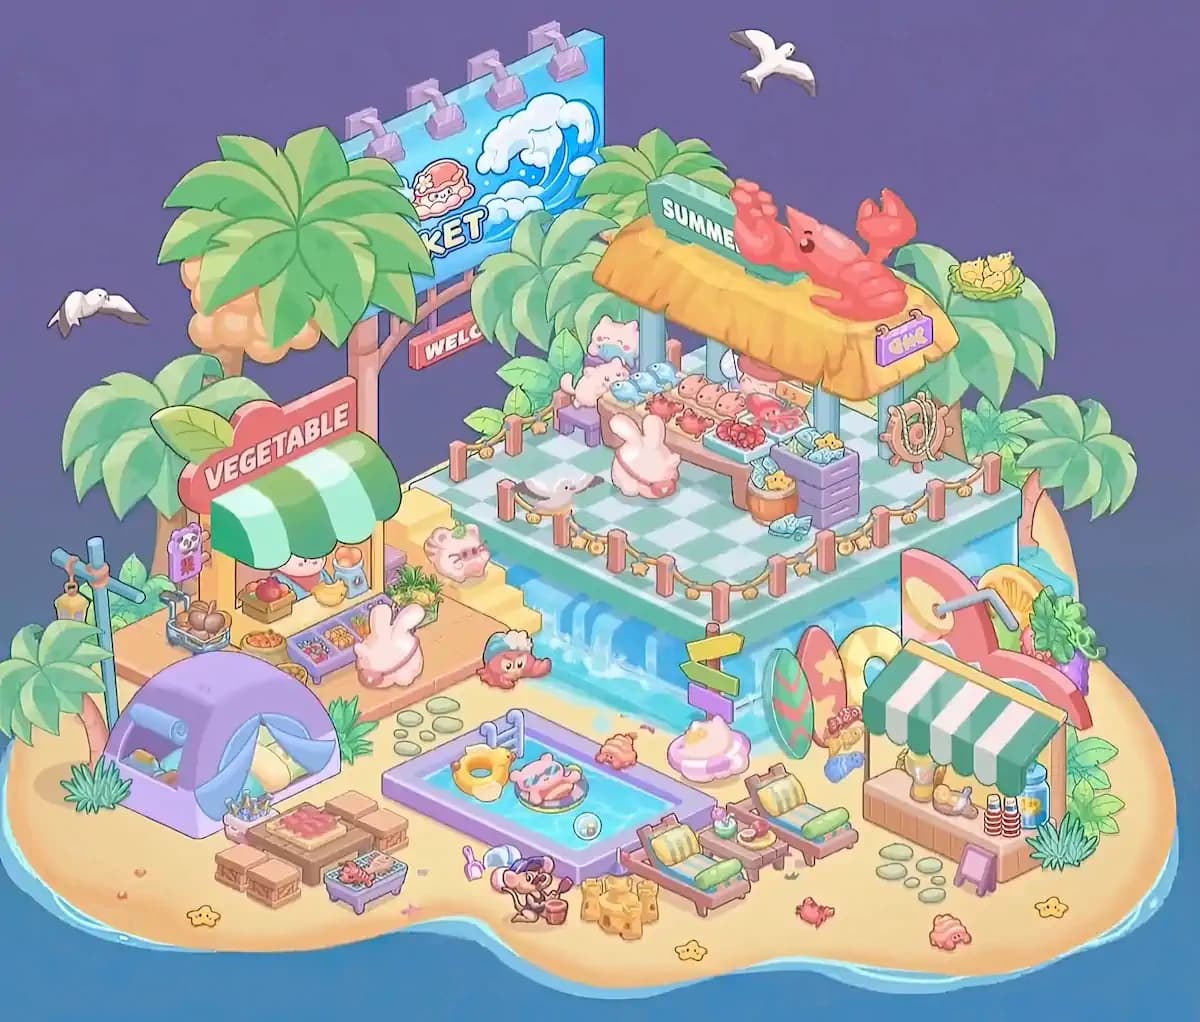
Step 1. Build the raised tropical market in the back of the island
Begin Dreamy Room Level 895 with the large elevated market platform occupying the upper-right half of the sandy island. The platform has a mint-and-white checkerboard floor and a thick turquoise front wall. Position its staircase on the front-left corner so the yellow steps descend toward the vegetable market. Along the front face, place the bright blue water feature so it resembles a small waterfall spilling down toward the lower beach. Surround the platform perimeter with short coral-colored posts linked by rope, adding the little yellow shell or float decorations along the ropes.
Behind the platform, add the dense tropical palms. Several large palm crowns overlap one another, especially behind the seafood stall and across the upper-left background. These palms create the layered jungle-like silhouette visible in the completed Dreamy Room Level 895 scene. Do not leave the raised platform isolated; the ropes, palms, staircase, and water wall are all important visual anchors for later placements.
Step 2. Install the market billboard, welcome sign, and background details
The next major landmark in Dreamy Room Level 895 belongs behind the raised platform toward the upper-left. Place the tall wooden billboard structure there, partially hidden by the large palm trees. The billboard itself is bright blue and decorated with a curling ocean wave and a cute seafood mascot. Its large market lettering sits across the lower portion, while several chunky pink lamps are attached along the top edge. Directly below the billboard, attach the small red WELCOME plaque to the wooden support.
Continue filling the high background by placing one white seagull flying near the upper-right of the billboard and another toward the far-left side of the island. Palm leaves should partially overlap the sign rather than sitting completely behind it. This layering is useful when checking whether objects have snapped into their correct positions. In Dreamy Room Level 895, background items can be deceptively difficult because several large leaves obscure their exact bases, so use the visible tops and edges as alignment references.
Step 3. Assemble the vegetable stall on the lower-left terrace
Move to the left side of Dreamy Room Level 895 and place the vegetable market immediately below the billboard area. The stall has a distinctive green-and-white striped canopy with a red VEGETABLE sign across the top and a large green leaf decorating the sign. Set the stall against the rear edge of the lower wooden market terrace, with the shopkeeper visible underneath the awning.
Arrange the produce carefully around the counter. The fruit box with red produce belongs toward the left side, while the yellow banana and drink container sit closer to the center and right. Place the basket or tray of round brown vegetables to the left of the stall, followed by the small prepared-food dish. In front, position the long purple produce rack filled with several colorful sections of fruit and vegetables. The white rabbit shopper stands directly in front of this display. Add the leafy produce bundle near the stairs on the right. A small hanging sign goes beside the stall, while the blue pole with a hanging yellow lantern sits at the far-left edge of this market area.
Step 4. Complete the seafood stall on the upper checkerboard deck
The seafood counter is the visual centerpiece of Dreamy Room Level 895, so place it near the back-right of the checkerboard platform. Its roof is a thick golden-yellow thatched canopy supported by blue posts. On the roof, position the enormous red lobster decoration with both claws raised. Behind it sits the green SUMMER sign, while a small purple seafood sign hangs from the front-right corner.
Fill the counter beneath the canopy with the many seafood trays. Blue fish are grouped toward the left, while the central and right sections contain pink fish, shellfish, red seafood, and other small catches. A shopkeeper stands behind the display. At the front-left of the stall, add the small seated characters on the purple bench and place the pale rabbit customer facing the seafood counter. On the right, set the purple drawer cabinet beside the display, the wooden bucket containing a yellow fish or seafood piece in front of it, and the loose blue fish on the floor. Finally, hang the coiled rope-and-float decoration on the stall's right post.
Step 5. Finish the upper deck with characters, fence details, and tropical foliage
After the seafood stall is secure, complete the remaining details on the upper level of Dreamy Room Level 895. Place the small white seabird on the checkerboard floor near the front-left rope railing. The rabbit customer should remain closer to the seafood counter, while the small seated animal characters belong farther toward the back-left beside the stall. These characters are easy to confuse because several occupy the same general area, but their orientation matters: the customer faces the counter, while the seated figures remain near the plants and bench.
Fill gaps behind the stall with overlapping green tropical leaves and palm fronds. On the upper-right side, place the small yellow nest-like decoration among the leaves behind the lobster roof. Continue the rope barrier around all exposed edges of the platform, including the front and right sides. The repeated coral posts and hanging golden ornaments form a continuous border. When this part of Dreamy Room Level 895 is correct, the upper deck should look crowded and lively without anything extending into the staircase or waterfall opening.
Step 6. Set up the purple tent, picnic table, and camping corner
The lower-left beach becomes the camping area in Dreamy Room Level 895. Place the large purple dome tent on the sand beneath the vegetable terrace. Its opening faces diagonally toward the center of the island. Attach the light-blue curtains around the entrance and put the pale yellow bedding or cushion inside. A rolled blue sleeping mat rests across the upper-left portion of the tent, while small camping supplies sit near the entrance. Add spiky beach plants beside the tent, particularly along its left and right edges.
In front of the tent, arrange the low brown picnic table with the four blocky bench seats around it. The rectangular tray or food mat with reddish contents sits on top of the table. Slightly to the right, add the small purple grill or cooler containing seafood. Keep this entire group close together. In the finished Dreamy Room Level 895 layout, the camping objects occupy the lower-left corner without blocking the nearby market terrace or central swimming pool.
Step 7. Build the central swimming pool and place its water toys
The rectangular pool sits in the lower-middle portion of Dreamy Room Level 895, slightly right of the tent. Place the pool with its long sides running diagonally across the island and its purple rim clearly visible on all four sides. The small metal ladder or pipe fixture belongs along the rear edge. Inside the blue water, put the yellow duck-shaped float toward the upper-left portion and the pink character-shaped inflatable closer to the center-right. A small translucent beach ball or bubble rests near the lower-right side of the water.
Do not confuse the pool with the larger blue water feature beneath the upper market. They are separate structures: the market waterfall runs horizontally behind the pool, while this smaller purple-framed pool sits entirely on the sand. Place the large pink shell decoration just beyond the pool's rear-right corner and the small orange shell near the upper edge. These landmarks help lock in the remaining furniture. Correct spacing is crucial in Dreamy Room Level 895, particularly because the pool, lounges, signpost, and market waterfall almost touch one another.
Step 8. Arrange the lounge chairs, side table, sandcastle, and beach character
Create the relaxation area immediately to the right of the swimming pool in Dreamy Room Level 895. Place two wooden lounge chairs parallel to each other, both facing diagonally toward the pool. Each chair has a pale striped yellow-and-green cushion and a cylindrical green bolster at the foot. Between the loungers, place the small wooden side table. Its tabletop carries a green drink and a small plate of snacks or dessert.
In front of this seating area, build the chunky yellow sandcastle close to the shoreline. Beside it, position the small beachgoing character kneeling on the sand with a red bucket and nearby beach toys. Additional tiny accessories, including a small shovel-like piece, belong around this character. The loungers should never overlap the sandcastle or pool border. Dreamy Room Level 895 uses these small gaps deliberately, and objects that seem visually close may still have only one valid snap point. Match the angle of both chairs before worrying about the smallest toys.
Step 9. Place the surfboards, directional sign, and outdoor shower area
The center-right side of Dreamy Room Level 895 contains a dense collection of colorful beach equipment. Start with the tall directional signpost just behind the lounge chairs. It carries several chunky arrows in yellow, green, and purple, stacked vertically at different angles. To its right, lean the surfboards upright against the back section of the beach. The narrow green board with red markings stands toward the front, the red-orange board with the yellow star sits beside it, and the larger pink board occupies the rear-right position. A yellow circular float is visible among them.
The gray shower pipe rises above the large pink board and bends downward at its tip, forming the outdoor rinse station. Keep the boards tightly grouped because they form a single visual cluster in the completed room. Nearby tropical leaves and a purple container or bag fill the remaining space toward the right. The rounded pink shell-shaped platform remains closer to the signpost. Correctly placing this cluster is one of the trickier parts of Dreamy Room Level 895 because the pieces overlap heavily in the final view.
Step 10. Build the striped refreshment kiosk on the right beach
Place the second green-and-white striped canopy at the lower-right side of Dreamy Room Level 895. Unlike the vegetable stall, this one sits on a simple wooden refreshment counter and has no large red sign. The striped awning stretches above the countertop while wooden supports rise at either end. Arrange the drink and snack accessories across the counter: a tall orange-colored beverage container goes toward the left, food or bread pieces occupy the middle, stacks of small red-and-white cups sit toward the right, and the blue drink jug belongs at the far-right end.
Set the short purple stool in front of the counter, slightly right of center. Add the large leafy plant behind or beside the stand and another spiky green plant at the front-right corner. Several flat oval stepping stones lie in the sand immediately in front of the kiosk. Once completed, this portion of Dreamy Room Level 895 should form a compact refreshment station backed by the surfboard and shower area rather than appearing as an isolated stall.
Step 11. Add the remaining paths, shoreline decorations, shells, and small characters
Finish the object placement in Dreamy Room Level 895 by working through the open patches of sand. Place the line of pale oval stepping stones between the vegetable market and pool, then add another group in front of the refreshment kiosk. Near the base of the market waterfall, position the small red character wearing its light-colored cap. The sandy pathways should remain open enough to visually connect the tent, pool, stalls, and staircase.
Next distribute the tiny decorative shells and starfish around the shoreline. Yellow starfish appear along the lower-left and lower-right sand, with another near the central bottom edge. Pink and peach shells sit predominantly on the lower-right beach, while several smaller pieces are scattered beside the pool and picnic area. Keep the decorations sparse rather than clustering them together. Dreamy Room Level 895 deliberately uses these tiny objects to fill otherwise empty sand, and they are often the final pieces preventing completion even after every large structure appears correct.
Notes and Precautions
The biggest difficulty in Dreamy Room Level 895 is the number of overlapping objects. The seafood stall, palms, surfboards, market billboard, and upper platform all partially hide neighboring pieces. When an item refuses to lock into place, compare its visible edges against the finished scene rather than repeatedly dropping it into approximately the right region.
Large structures should always be solved before tiny props. The elevated checkerboard market, vegetable terrace, seafood stand, tent, pool, refreshment kiosk, and surfboard cluster divide Dreamy Room Level 895 into clear zones. Once those anchors are correct, smaller items become much easier to position.
Be especially careful with the two green-and-white awnings. The left one belongs to the vegetable stall and carries the large red VEGETABLE sign. The right one is the beach refreshment stand and sits much lower on the sand.
Also check every shell, starfish, rope decoration, stool, loose fish, beach toy, and plant before assuming the level is finished. Dreamy Room encourages careful organization rather than speed, so there is no need to rush through these final placements. dreamy room instruction
Tips and Tricks from top player
For Dreamy Room Level 895, use a large-to-small placement strategy. Start with pieces whose silhouettes are unmistakable: the checkerboard deck, billboard, lobster-roof seafood stall, vegetable stand, purple tent, pool, surfboards, and drink kiosk. These objects effectively create a map for everything else.
Next place items according to clusters rather than unpacking randomly. Finish the vegetable market completely before moving to the seafood market; complete the camping section before tackling the pool; and finish the surfboard area before arranging the refreshment counter. This prevents similarly colored objects from becoming confusing.
Use fixed landmarks as reference points. The waterfall marks the center, the yellow staircase separates the two market levels, the pool sits directly below it, and the directional sign separates the pool zone from the surfboards. For tiny pieces in Dreamy Room Level 895, zoom in and compare relative gaps. A shell may need to sit only a short distance from a chair or shoreline, but that exact gap can reveal its intended snap point.
Final Scene: Dreamy Room Level 895 Completed
The completed Dreamy Room Level 895 becomes a cheerful miniature tropical resort surrounded by blue water. Towering palms frame a busy two-level market, with the colorful market billboard and WELCOME sign rising behind the green vegetable stall. Above it, the checkerboard terrace holds the lively seafood shop beneath its golden roof and giant red lobster. A waterfall spills from the raised deck toward the sandy recreation area below.
Across the beach, a purple tent and picnic table form a cozy campsite beside the bright swimming pool. Duck and character floats bob in the water while striped loungers, refreshments, a sandcastle, and a tiny beach visitor fill the foreground. On the right, colorful surfboards gather around an outdoor shower and directional sign, with a striped drink kiosk nearby. Palm leaves, stepping stones, shells, starfish, seabirds, characters, plants, and small food displays complete the densely decorated seaside atmosphere of Dreamy Room Level 895.