Dreamy Room Level 857
Dreamy Room Level 857 guide - Dreamy Room 857 Walkthrough & Solution.
Important Notice Regarding Level Numbering
Due to frequent changes in Dreamy Room's level numbering and differences between platforms (Android/iOS) – for example, level 857 on Android might not be the same as level 857 on iOS – the text guide below may not always match the images and video above. Please prioritize the image and video guides. If you find that the guide content doesn't match your current level, please visit the All Level Walkthroughs page to find the correct guide based on level images. Thank you for your understanding.
Dreamy Room Level 857 Walkthroughs & Guide
Step 1. Build the main multi-level house in Dreamy Room Level 857
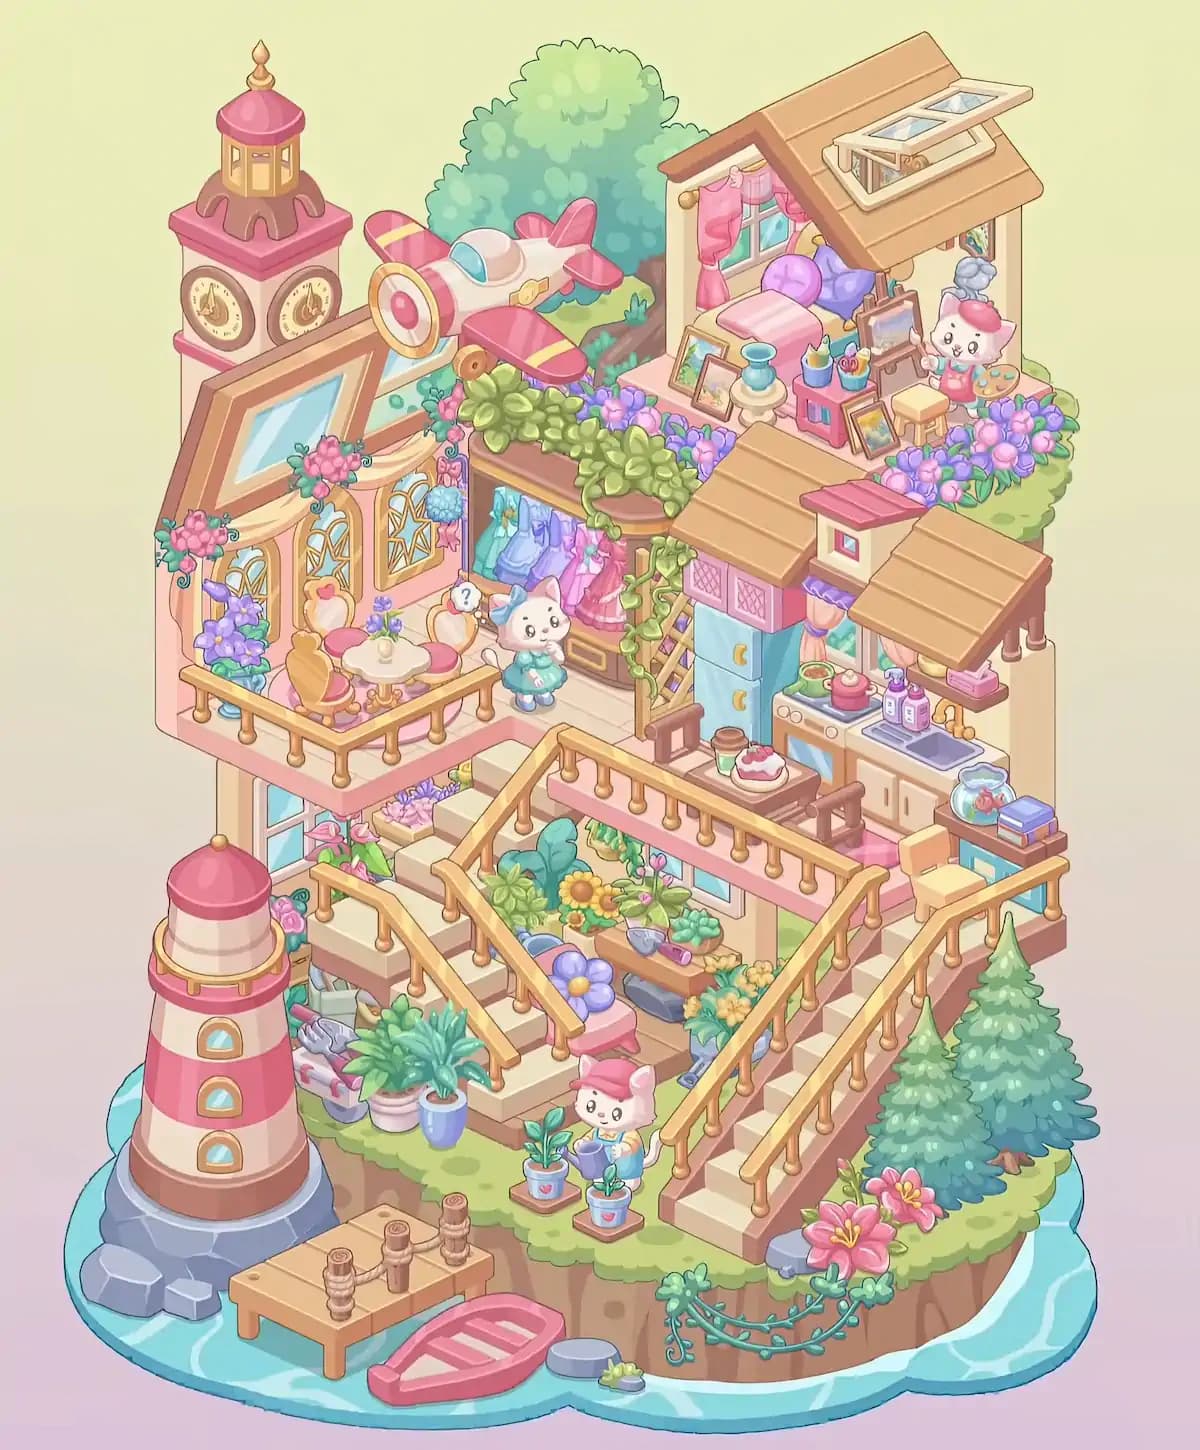
Begin Dreamy Room Level 857 by concentrating on the large architectural sections rather than any small decoration. The main building occupies almost the entire lower grassy island, with several open terraces climbing toward the upper-right cliff. Place the cream-and-pink walls across the middle of the island and establish the broad upper floor first. The upper-left section should create an open balcony room, while the right side becomes the kitchen and the highest platform supports the art studio.
In Dreamy Room Level 857, the house is deliberately irregular rather than forming one simple rectangular building. Leave open spaces where the staircases and garden terraces will later fit. The beige floors should step upward from the lower foreground toward the central living area and then continue toward the upper-right studio. Correctly placing these large sections gives you the framework for almost every remaining object in Dreamy Room Level 857, so avoid filling the scene with furniture until the building footprint looks like the completed image.
Step 2. Place the lighthouse and waterfront dock in Dreamy Room Level 857
The lighthouse is one of the easiest landmarks to recognize in Dreamy Room Level 857. Position it on the far lower-left edge of the main island, directly beside the surrounding blue water. Its broad gray rock foundation sits at water level, while the tower rises vertically beside the lower terrace. The lighthouse has alternating cream and pink horizontal sections, three small blue windows, a circular golden railing near the top, and a rounded pink roof with a gold finial.
Next, place the small wooden dock immediately to the right of the lighthouse in Dreamy Room Level 857. The dock extends outward over the water near the front edge and contains several short rope-wrapped posts. Put the pink rowboat in the water just in front and slightly to the right of the dock. A small gray stepping stone sits nearby. These objects define the nautical foreground of Dreamy Room Level 857 and should be positioned before you start adding the nearby plants.
Step 3. Complete the lower shoreline garden in Dreamy Room Level 857
Now decorate the bottom edge of Dreamy Room Level 857. On the grassy area above the water and to the right of the lighthouse, arrange the collection of large leafy potted plants. One broad green plant sits in a pale striped pot, while another stands in a tall blue pot. These should cluster near the base of the left staircase rather than being spread across the lawn.
Move to the lower-right side of Dreamy Room Level 857 and place the two tall evergreen trees close together along the cliff edge. The larger tree stands toward the front-right corner, with the second tree slightly behind it. Add the bright pink flowers around their bases and along the nearby grass. A trailing blue-green vine hangs over the front cliff face, with additional pink blossoms positioned above it. These shoreline decorations are useful orientation points because Dreamy Room Level 857 later becomes crowded, and the trees clearly mark the right boundary of the lower island.
Step 4. Assemble the main staircase system in Dreamy Room Level 857
The staircases are among the most important placement puzzles in Dreamy Room Level 857. Start with the large staircase on the right. It begins near the lower-right grass beside the evergreen trees and climbs diagonally upward toward the middle terrace. Add the golden-brown handrails on both sides, with evenly spaced rounded balusters. The pale stair treads should remain fully visible between them.
Next, build the central and left stair sections in Dreamy Room Level 857. Another staircase descends from the upper-left terrace toward the garden level, while a shorter central flight connects the lower garden to the upper living platform. The railings form a zigzag pattern through the center of the scene. Make sure they follow the edges of the stairs rather than cutting across planting areas. Correct stairs are essential in Dreamy Room Level 857 because many plants, windows, benches, and characters sit immediately beside them, and incorrect railing placement can make otherwise correct objects appear wrong.
Step 5. Fill the central garden terrace in Dreamy Room Level 857
The space enclosed by the staircases becomes the lush central garden of Dreamy Room Level 857. Begin with the larger green shrubs and leafy plants along the rear portion of the garden. Add the prominent yellow sunflower near the middle-left, then place the smaller pink, purple, yellow, and blue flowers around it. Several plants sit in pots while others appear to grow directly from the garden bed.
A small bench or low seating area occupies the central portion of this garden in Dreamy Room Level 857, surrounded by oversized decorative flowers and cushions. Place the large purple-blue flower close to the front and keep the smaller blossoms around the edges. Additional potted greenery belongs beside the windows beneath the upper terrace. This area should look intentionally packed and colorful. The main difficulty in Dreamy Room Level 857 is distinguishing these similar plant pieces, so compare their leaf shapes and flower colors rather than simply placing every green object in the first open garden slot.
Step 6. Create the lower character gardening area in Dreamy Room Level 857
At the front-center of Dreamy Room Level 857, place the small white cat character wearing a pink hat. The character stands on the grassy level directly below the central stairs, facing the two small potted plants. Position the pots in a neat row in front of the character. Each pot contains a leafy green plant, and one has a heart-like decorative marking on its container.
The cat appears to be tending or watering the plants, so keep the gardening accessories close rather than scattering them across the island. In Dreamy Room Level 857, this little scene sits between the lighthouse area on the left and the large staircase on the right. A few small plants and decorative stones can be placed nearby, but the character and two pots should remain the visual focus. Once completed correctly, this gardening vignette makes the lower foreground of Dreamy Room Level 857 feel occupied rather than simply serving as the entrance to the larger house.
Step 7. Decorate the upper-left sitting balcony in Dreamy Room Level 857
Move to the upper-left living area of Dreamy Room Level 857. This open balcony contains a small round cream table surrounded by cozy seating. Place the table near the center of the balcony and put its tiny decorative item on top. Arrange the cushioned chairs around it, including the warm brown chair and the pink heart-shaped seat. Keep the furniture inside the golden balcony railing.
Behind the seating area in Dreamy Room Level 857, install the decorative windows. They have cream frames with ornate geometric panes, and soft draped curtains stretch beneath the large slanted window section above. Add clusters of pink and purple flowers along the windows and balcony edges. One tall blue vase filled with purple blossoms belongs near the left side. The completed balcony in Dreamy Room Level 857 should feel like a small tea nook framed by flowers, with enough open floor around the table for the furniture to remain visually distinct.
Step 8. Install the wardrobe and fashion area in Dreamy Room Level 857
The central upper section of Dreamy Room Level 857 contains an open wardrobe tucked between the sitting balcony and kitchen. Place the tall wooden closet against the rear wall beneath the greenery-covered roof. Inside it, arrange the hanging dresses in their visible sequence of cool blue, violet, pink, and brighter pink tones. The clothing should face outward so that all of the dresses can be seen from the front.
Add the leafy vines that trail around the wardrobe in Dreamy Room Level 857, including the climbing greenery running down the right side. A short ladder-like decorative structure appears beside the closet near the blue refrigerator. Place the white cat character wearing the turquoise dress in front of the wardrobe, slightly toward the left. The character should stand near the junction between the balcony and kitchen. This fashion corner is relatively small, so Dreamy Room Level 857 may reject pieces that are only a little too far left or right; use the wardrobe frame as your positioning guide.
Step 9. Furnish the kitchen in Dreamy Room Level 857
The kitchen occupies the middle-right floor of Dreamy Room Level 857. Start with the tall blue refrigerator, placing it immediately to the right of the wardrobe. Its doors face forward, with a small gold handle or decorative mark visible. To the right, install the countertop, stove, oven, sink, and cream lower cabinets beneath the window. The kitchen window uses soft pink-and-purple curtains that frame the outdoor view.
Now add the smaller kitchen objects in Dreamy Room Level 857. Put the green kettle or pot on the stove, the two small purple bottles near the sink, and the faucet above the basin. Place the fishbowl on the far-right counter extension, with the small stack of colorful books nearby. A yellow chair belongs on the outer right terrace. On the small counter or table closer to the refrigerator, place the takeaway cup and the pink-and-white cake. Because these tiny pieces look interchangeable at first glance, the kitchen is one of the trickier sections of Dreamy Room Level 857.
Step 10. Build and decorate the upper-right art studio in Dreamy Room Level 857
The highest occupied room in Dreamy Room Level 857 is the open art studio on the upper-right cliff. Place the small cream-and-pink room structure first, with the back wall and large window facing the viewer. Hang the pink curtains on either side of the window and place the cushioned pink sleeping or lounging area directly beneath it. Purple round cushions sit nearby.
Arrange the art supplies throughout this section of Dreamy Room Level 857. The easel with its dark drawing surface stands near the center-right. Place framed paintings around the floor, including one leaning near the left side and another near the stool. Add the blue vase, paintbrush cups, pencils, and containers to the small pink storage unit. The yellow stool belongs in front of the easel. Finally, place the white artist character at the far right with the colorful painter's palette. In Dreamy Room Level 857, this studio should look crowded but organized, with art materials filling almost every open spot.
Step 11. Finish the studio roof and skylight in Dreamy Room Level 857
Once the studio interior is correct, complete the roof in Dreamy Room Level 857. The large tan roof slopes downward toward the viewer and extends over the right side of the upper room. Its roofline should align with the walls below rather than floating too far forward. The most distinctive feature is the rectangular raised skylight near the top-right portion of the roof.
Position the skylight in Dreamy Room Level 857 so that its cream frame follows the same diagonal perspective as the roof. It contains multiple blue-tinted glass panes and sits slightly above the roof surface. A darker rectangular structure is visible beneath part of the frame, giving the window depth. This is a good section to finish before placing the remaining decorations because the roof establishes the highest-right boundary of the completed composition. When the studio and skylight are aligned properly, Dreamy Room Level 857 starts to resemble the final layered house rather than a collection of separate terraces.
Step 12. Add the clock tower to Dreamy Room Level 857
Place the clock tower at the extreme upper-left of Dreamy Room Level 857. It rises above the large slanted window and visually balances the studio roof on the opposite side. The lower tower is cream with pink trim, while two circular clock faces are visible on adjoining sides. Align the clocks so that both faces sit clearly above the pink ledge.
The top of the clock tower in Dreamy Room Level 857 consists of a darker pink base supporting a lantern-like cupola. Place the small illuminated window panels around the cupola, then cap it with the rounded pink dome and golden pointed ornament. The tower should not sit directly on the lighthouse; these are two completely separate vertical landmarks, with the lighthouse at the lower-left shoreline and the clock tower high above on the house. Getting this distinction right is important in Dreamy Room Level 857, because their similar pink-and-cream coloring can make their parts easy to confuse during unpacking.
Step 13. Position the airplane and rear trees in Dreamy Room Level 857
One of the most distinctive decorations in Dreamy Room Level 857 is the small pink-and-cream airplane flying across the upper-left portion of the house. Place it horizontally between the clock tower and the upper studio, with the nose pointing toward the left. The circular propeller sits prominently at the front, surrounded by alternating cream, gold, and pink rings. The wings extend diagonally, with deep pink tips and yellow accents.
Behind the airplane in Dreamy Room Level 857, add the large rounded green trees. Their foliage rises above the roofline and fills the otherwise empty space behind the aircraft. Additional shrubs and greenery should extend behind and around the upper structures, connecting the clock tower side with the studio side. The airplane should remain in front of this foliage rather than disappearing behind it. This upper silhouette is important because Dreamy Room Level 857 uses the aircraft, trees, tower, and studio roof together to create the busy skyline seen in the completed scene.
Step 14. Add the remaining flowers, vines, frames, and tiny accessories in Dreamy Room Level 857
Finish Dreamy Room Level 857 by working systematically through every remaining small object. Add the thick green foliage across the roof above the wardrobe, letting leafy branches spill over the front edge. Surround it with the purple and pink flower clusters that continue toward the studio. Fill any obvious gaps beside the balcony windows with smaller blossoms and vines.
Check the decorative frames in Dreamy Room Level 857, especially around the art studio and upper floor, and confirm that none remain unpacked. Look for tiny pots, cups, paint containers, cushions, books, kitchen bottles, flowerpots, and tabletop decorations. These objects are often the final reason the level will not register as complete. The main challenge of Dreamy Room Level 857 is determining the one intended position for each item, so do not assume an object is correct merely because it visually fits. If something refuses to lock into place, compare its shape with the surrounding furniture and search for a tighter matching outline.
Notes and Precautions for Dreamy Room Level 857
Dreamy Room Level 857 contains far more overlapping objects than the empty starting island suggests. The safest strategy is to avoid placing tiny accessories before the large structures underneath them are established. A flower that belongs beside a window, for example, is much easier to position after the wall and window have been installed.
Pay particular attention to the two tall structures in Dreamy Room Level 857. The lighthouse belongs at the lower-left waterfront, while the clock tower belongs at the upper-left roof level. Their similar cream, pink, and gold colors can make their pieces surprisingly easy to confuse.
The stair railings are another common source of mistakes in Dreamy Room Level 857. Several rail sections look almost identical, but their angles correspond to specific stair flights. Place the stairs before testing the railings.
Finally, check crowded areas such as the kitchen, art studio, central garden, and wardrobe carefully. Dreamy Room Level 857 includes many tiny items whose correct positions are separated by only a short distance. If the level is almost complete but one object remains, inspect countertops, shelves, flower beds, tables, and the studio floor before moving major furniture.
Tips and Tricks from top player for Dreamy Room Level 857
The fastest way to solve Dreamy Room Level 857 is to treat the scene as several smaller zones instead of one enormous puzzle. Complete the lighthouse and dock first, then the lower garden, staircases, upper balcony, wardrobe, kitchen, studio, and finally the skyline. Working zone by zone prevents similar objects from becoming mixed together.
Use distinctive anchor pieces whenever Dreamy Room Level 857 becomes confusing. The lighthouse identifies the lower-left corner, the evergreen trees identify the lower-right corner, the blue refrigerator marks the center-right kitchen, the clock tower identifies the upper-left, and the skylight identifies the upper-right. Once those five anchors are placed, almost every other object can be positioned relative to them.
For tiny items in Dreamy Room Level 857, drag slowly over the expected area rather than repeatedly dropping them at random. Pay attention to contextual clues: paint supplies belong near the easel, bottles belong near the kitchen sink, dresses belong in the wardrobe, and gardening objects belong near the plants. This simple category-based approach makes the final phase of Dreamy Room Level 857 substantially easier.
Final Scene of Dreamy Room Level 857
When Dreamy Room Level 857 is complete, the once-empty cliffs have become a whimsical coastal retreat overflowing with detail. A pink-and-cream lighthouse guards the water beside a wooden dock and tiny rowboat, while a gardening cat tends plants above the shoreline. Golden-railed staircases climb through a flower-packed central garden toward a cozy balcony, open wardrobe, and fully equipped kitchen. Higher up, another cat stands beside colorful dresses, while an artist character works among canvases, paints, cushions, and an easel inside the rooftop studio. A skylight crowns the tan roof, lush trees rise behind the building, and a playful pink airplane passes beside the ornate clock tower. Evergreen trees, lilies, vines, potted greenery, paintings, flowers, and dozens of miniature accessories fill every remaining corner. The completed Dreamy Room Level 857 transforms two bare grassy platforms into a lively, layered seaside home that feels both fantastical and wonderfully cozy.