Dreamy Room Level 829
Dreamy Room Level 829 guide - Dreamy Room 829 Walkthrough & Solution.
Important Notice Regarding Level Numbering
Due to frequent changes in Dreamy Room's level numbering and differences between platforms (Android/iOS) – for example, level 829 on Android might not be the same as level 829 on iOS – the text guide below may not always match the images and video above. Please prioritize the image and video guides. If you find that the guide content doesn't match your current level, please visit the All Level Walkthroughs page to find the correct guide based on level images. Thank you for your understanding.
Dreamy Room Level 829 Walkthroughs & Guide
Step 1. Place the palace walls, exterior windows, hedges, and corner structures
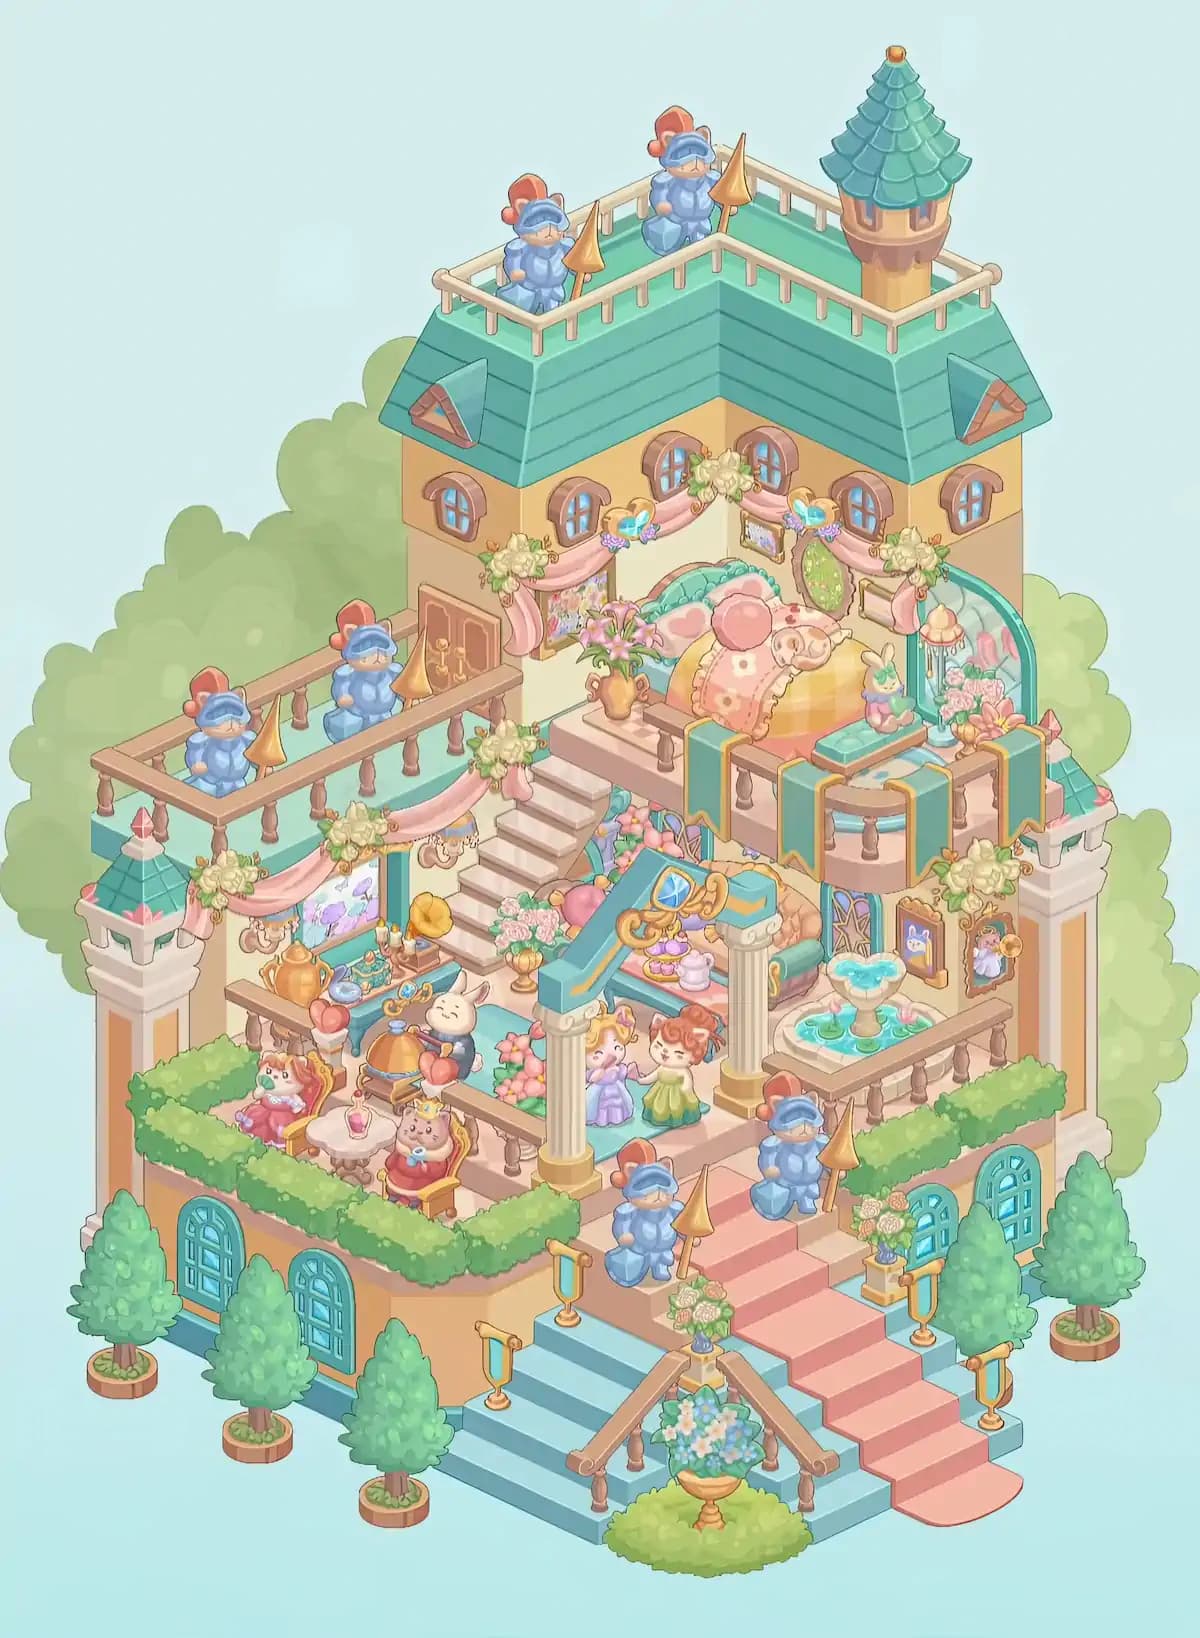
Begin Dreamy Room Level 829 by establishing the large lower palace structure on the raised base. Place the peach and cream exterior walls around the left, rear, and right sides, leaving the front center open for the grand staircase that will be added later. The long left wall receives several tall turquoise-blue arched windows with decorative frames, while matching arched windows belong along the visible right side. Run thick green hedges along the exposed upper edges of the lower terrace, particularly across the front-left and front-right sections. Add the tall decorative corner structures at the outer sides; the left one has a small teal pointed roof with pink accents, while the right forms a pale architectural pillar beside the staircase. Correctly establishing this footprint is crucial because almost every later object in Dreamy Room Level 829 aligns with these walls, hedges, and terrace boundaries. If the shell looks symmetrical and leaves a large open central floor, the foundation of Dreamy Room Level 829 is correct.
Step 2. Build the upper palace façade, teal roof, dormers, and rooftop tower
Next, build upward at the rear of Dreamy Room Level 829. Position the large golden-peach upper palace section across the back half of the room and line its façade with small brown-trimmed arched windows containing bright blue panes. Fit the broad teal-green roof around this structure, making sure its stepped slopes wrap around the left, front, and right sides. A triangular dormer belongs on each visible outer roof slope. Above the roof, create the flat turquoise rooftop terrace and surround it with a cream-colored railing. The most distinctive object in this part of Dreamy Room Level 829 is the round tower at the rooftop’s back-right corner: it has a warm gold body, small windows, a teal layered conical roof, and a tiny golden finial. This tall turret should be the highest architectural feature in Dreamy Room Level 829, making it a useful reference point for checking every roof piece.
Step 3. Arrange the rooftop and left terrace guards with their golden spears
The palace needs its royal guards next. On the highest terrace of Dreamy Room Level 829, place two blue-armored guards wearing red plumes and visors. Both stand along the left and central portions of the rooftop, inside the pale railing, and each is paired with a tall pointed golden spear. Keep the round tower clear at the back-right. Then move down to the broad balcony on the upper-left side of Dreamy Room Level 829. This terrace has a turquoise floor and a brown balustrade around its exposed edges. Arrange three more matching guards here: one near the far-left/front corner, another farther back toward the center, and another near the right side beside the palace doorway and staircase area. Their red crests and gold weapons make their locations easy to compare. Because several guards look nearly identical, Dreamy Room Level 829 can trick you into filling one terrace too heavily; use the railings and door as landmarks before confirming each placement.
Step 4. Decorate the upper bedroom with the bed, curtains, flowers, and rabbit figure
Now concentrate on the luxurious bedroom occupying the upper-right interior of Dreamy Room Level 829. Place the large bed against the rear wall, with its rounded turquoise headboard facing forward. Layer it with the yellow-orange bedding, large pink cushions, decorative floral pillows, and the oversized patterned pink bolster draped prominently across the front. Around the rear wall, install the sweeping pink fabric curtains and floral swags. Cream bouquets sit at the upper curtain points, while colorful butterfly-like decorations accent the drapery. Add the small framed picture and the oval green decorative panel among the wall details. At the bed’s right side, place the turquoise bench or stool with the small pale rabbit figure sitting on top. Pink flowers fill the right corner behind it. The bedroom is one of the most crowded placement puzzles in Dreamy Room Level 829, so complete the large bed first and fit the smaller ornaments around it. When finished, this should become the visual centerpiece of Dreamy Room Level 829.
Step 5. Complete the bedroom balcony, central staircase, floral swags, and columns
Build the transition between the upper and lower floors of Dreamy Room Level 829 next. The bedroom sits on a raised brown balcony bordered by a balustrade, with several turquoise fabric banners edged in gold hanging over the front. A curved central balcony projection sits beneath the bed area, while the main staircase descends diagonally toward the lower-left portion of the room. Place the pale steps in a straight run from the bedroom level down to the salon. Along the surrounding walls and railings, add the pink draped garlands and cream flower clusters that repeat throughout Dreamy Room Level 829. Small wreath-like decorations and framed floral artwork fill the spaces beneath them. Two tall cream classical columns with gold-toned bases and capitals rise near the center and help visually support the upper floor. On the right side of the staircase, place the turquoise sloped decorative structure topped with ornate golden scrollwork. Accurate stair and column placement is especially important in Dreamy Room Level 829, because these pieces define the room’s different depth layers.
Step 6. Furnish the lower-left tea area and arrange the seated royal characters
The lower-left salon of Dreamy Room Level 829 contains many of the smallest decorative objects. Position the long wooden serving table along the left side beneath the floral wall decorations. Cover it with the ornate tea service: the large golden teapot, smaller blue and gold pots, cups, dishes, candles, fruit, sweets, and other tiny serving pieces. Nearby, add the round dining table with its dessert or cake centerpiece and place the richly decorated chairs around it. One small crowned animal-like royal character sits prominently in the chair facing forward, while another dressed character belongs nearby at the left edge of the sitting area. Add the pale rabbit-like figure closer to the tea setting and distribute the pink floral arrangements around the furniture. The temptation in Dreamy Room Level 829 is to drop these miniature accessories wherever there is space, but each has a fixed spot. Use the large serving table and chairs as anchors, then fill in the smaller pieces. This method makes the crowded lower-left corner of Dreamy Room Level 829 much easier to solve.
Step 7. Place the central princess figures, sofa, portraits, and fountain terrace
Move to the center and right side of Dreamy Room Level 829. Two doll-like royal figures stand near the middle of the lower floor: place the pink-and-purple dressed figure slightly left of center and the green-dressed figure just to her right. Surround them with the nearby bouquets and pastel decorations. Behind and to the right, position the ornate turquoise-and-cream sofa beneath the raised bedroom section. The wall farther right receives the framed portraits and decorative pictures seen behind the fountain area. The fountain itself occupies the open right balcony of Dreamy Room Level 829. Set the square basin or table against the railing and place the pale sculpted centerpiece in the middle so turquoise water surrounds it. Complete the terrace with the brown balustrade and nearby flowers. Keep the fountain unobstructed; it should remain clearly visible from the front. These central furnishings connect the two halves of Dreamy Room Level 829, so matching their depth relative to the columns and stairs is more important than simply matching their colors.
Step 8. Finish the grand entrance with split stairs, guards, flowers, railings, and trees
Complete Dreamy Room Level 829 from the front outward. Create the grand split staircase leading from the palace terrace to the ground: the left flight uses cool blue steps, while the longer right flight is pink and ends in a rounded bottom step. Add brown handrails around the inner blue staircase and place the gold-and-turquoise decorative posts along both approaches. Set two additional blue-armored guards with red plumes and golden spears on the upper entrance landing, one toward each side of the central path. Position the small flower urns beside the steps, then place the large gold planter overflowing with blue, white, and yellow flowers at the very front center on its green patch. Finally, surround Dreamy Room Level 829 with the separate conical trees in round brown planters, spacing them along the left front, lower-left edge, and right side of the palace. Check the hedges, exterior windows, railings, and landscaping one last time. These finishing pieces complete the recognizable silhouette of Dreamy Room Level 829.
Notes and Precautions
The biggest difficulty in Dreamy Room Level 829 is the amount of vertical overlap. The rooftop, upper guard terrace, bedroom balcony, staircase, lower salon, fountain terrace, and entrance all occupy different layers, so an object that appears visually close to another may actually belong on a different floor. Always determine the floor first and the exact position second.
Pay particular attention to the repeated guards in Dreamy Room Level 829. They share almost identical armor, red plumes, and spears, but they are distributed between the rooftop, left balcony, and lower entrance rather than forming one group. The same warning applies to flower arrangements, railings, curtains, and turquoise architectural pieces.
Do not use the decorative background trees as placement references. Focus instead on fixed palace geometry such as the roof edges, windows, columns, staircase, and balcony railings. In Dreamy Room Level 829, larger structural items should always be placed before tiny tea accessories, portraits, flowers, and ornaments. This prevents larger pieces from making the correct position of smaller objects harder to judge.
Tips and Tricks from top player
A reliable strategy for Dreamy Room Level 829 is to solve the room from back to front and from large objects to small ones. Finish the upper palace, roof, tower, and terraces before touching the miniature decorations. Then complete the bedroom, staircase, and lower furniture. Leave cups, flowers, framed pictures, food items, and other tiny props until the surrounding furniture has already established their correct boundaries.
Another useful shortcut in Dreamy Room Level 829 is to use color zones. Teal pieces usually belong to roofs, balcony floors, upholstery, or blue-side entrance elements; pink fabric is concentrated around the bedroom, decorative swags, and right entrance staircase; brown pieces usually form railings, furniture, or frames. This does not determine placement by itself, but it quickly narrows the possibilities.
For duplicate objects, compare silhouettes rather than details. In Dreamy Room Level 829, the guards, floral clusters, rail sections, and planters can look nearly interchangeable at first glance. Use neighboring fixed structures as coordinates. Solving Dreamy Room Level 829 this way dramatically reduces unnecessary dragging and makes the final miniature accessories much easier to place.
Final Scene of Dreamy Room Level 829
The completed Dreamy Room Level 829 becomes an extravagant pastel fairy-tale palace rising through several beautifully decorated levels. A teal roof and tall turret crown the building, while armored guards patrol the rooftop, side terrace, and grand entrance. Below them, the luxurious bedroom glows with pink curtains, abundant flowers, colorful pillows, a large royal bed, and a tiny rabbit companion. The central staircase flows into a lively salon filled with tea sets, desserts, ornate furniture, flowers, portraits, royal animal characters, and two elegantly dressed figures. On the right, a turquoise fountain adds another decorative focal point beneath the bedroom balcony. Outside, trimmed hedges, arched blue windows, symmetrical stairways, golden posts, flower urns, and neat potted trees frame the palace. Every crowded detail finally fits together, making Dreamy Room Level 829 feel like a miniature royal estate rather than the simple empty platform where the level began.