Dreamy Room Level 893
Dreamy Room Level 893 guide - Dreamy Room 893 Walkthrough & Solution.
Important Notice Regarding Level Numbering
Due to frequent changes in Dreamy Room's level numbering and differences between platforms (Android/iOS) – for example, level 893 on Android might not be the same as level 893 on iOS – the text guide below may not always match the images and video above. Please prioritize the image and video guides. If you find that the guide content doesn't match your current level, please visit the All Level Walkthroughs page to find the correct guide based on level images. Thank you for your understanding.
Dreamy Room Level 893 Walkthroughs & Guide
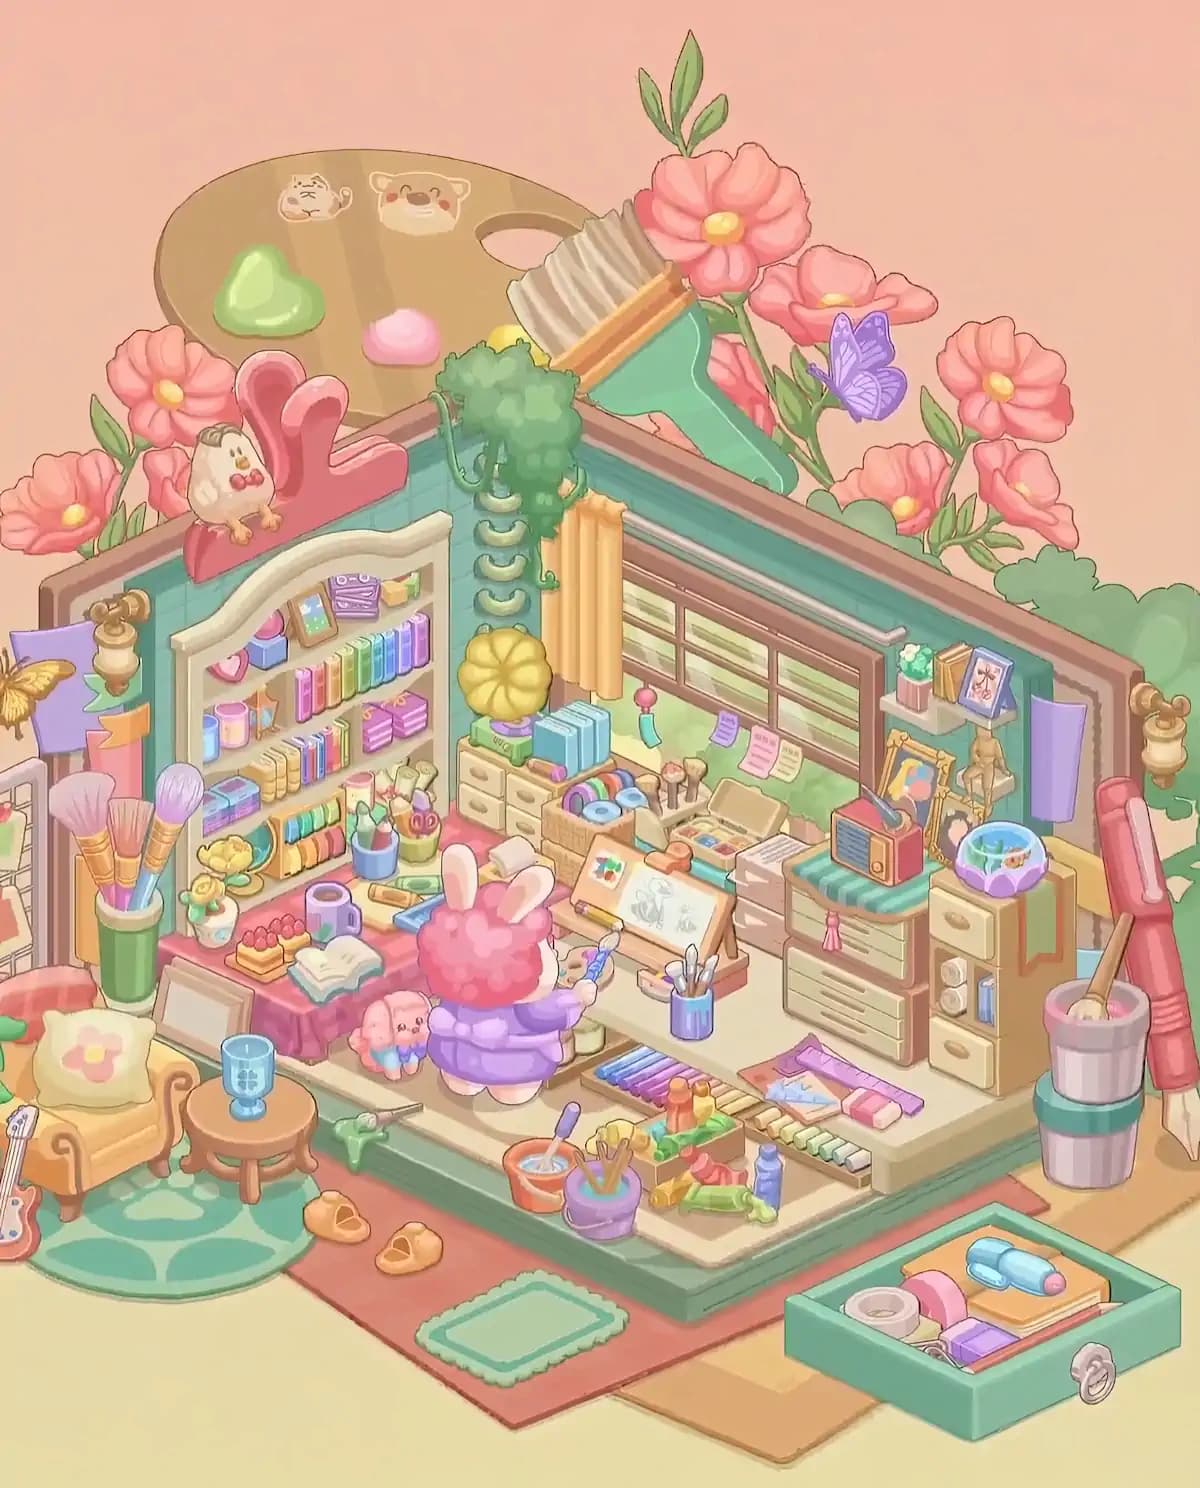
Step 1. Build the giant palette and flower display above Dreamy Room Level 893
Begin Dreamy Room Level 893 with the oversized decorations outside and above the rear walls because they form the visual backdrop for everything else. Place the huge tan artist’s palette behind the upper-left wall, tilted so most of the oval palette rises above the room. Its thumb hole belongs toward the palette’s upper-right area. Put the green paint blob on the lower-left portion of the palette and the small pink paint blob closer to its lower-middle area. Two tiny animal-face decorations sit near the palette’s upper center.
Next, lay the enormous mint-green paintbrush diagonally across the palette. The pale bristles point up and left, while the mint handle slopes down toward the right side of Dreamy Room Level 893. Surround this display with the large coral-pink flowers with yellow centers and their green leaves. Flowers extend behind both walls, with the densest cluster across the back-right side. Add the purple butterfly among the flowers just to the right of the giant brush. These pieces sit outside the usable room rather than on the interior floor, so avoid trying to force them onto furniture.
Step 2. Decorate the rear corner and upper-left wall in Dreamy Room Level 893
The inner rear corner is one of the best landmarks in Dreamy Room Level 893. The existing cream-colored curved loops stay aligned vertically down the corner. Add the trailing green plant at the top so its foliage spills downward and wraps around several of those loops. The leafy mass should sit just below the giant palette and brush, making the original corner fittings look like a decorative climbing support.
On the top edge of the left wall, position the large pink bunny-eared decorative piece. It stretches horizontally along the wall cap, with its two tall rounded projections pointing upward. A tiny cream-colored chick ornament with a red bow sits directly on this pink object. Farther down the left wall, hang the purple art sheet/poster near the brass wall fixture; it shows colorful layered shapes and a butterfly motif. Several framed artworks lean against the far-left side below it. Completing these elevated decorations early keeps Dreamy Room Level 893 manageable because later furniture partially blocks access to this corner.
Step 3. Install the window, curtain, notes, and back-wall details
Move to the right half of the back wall in Dreamy Room Level 893. Install the wide brown-framed horizontal window high on the wall. It stretches from near the rear corner toward the right side and contains several rectangular panes. The pale outdoor view should remain visible through those panes. Hang the golden-yellow curtain immediately to the left of the window, dropping vertically from near the top wall edge.
Beneath the window is a pale green working-wall section. Place the small pinned notes across it: a purple note closest to the middle, followed by pink and pale yellow notes farther right. Another tiny hanging item with a pink round top and blue lower strip belongs to the left of these notes. This wall becomes the organizational center of Dreamy Room Level 893, so keep the notes below the window rather than placing them on desks. At the far ends of the walls, retain the small brass-colored decorative fixtures. Correctly positioning the window first also gives you reliable alignment points for the storage units that will sit underneath it.
Step 4. Fill the large left bookshelf in Dreamy Room Level 893
Place the tall cream-colored bookshelf against the left interior wall. It belongs slightly forward of the rear corner and should stand behind the pink-covered craft table. Dreamy Room Level 893 uses this shelf for a dense assortment of colorful supplies, so filling it in the correct order is important.
Across the upper shelves, arrange the small boxes, notebooks, framed or packaged items, and the long row of rainbow-colored books. Additional shelves hold a pink cylindrical container, small jars, upright books in warm and cool colors, and a stack of purple notebooks. Lower shelves contain groups of beige and tan books or paper bundles. Along the bottom, arrange the bright rolled materials or thread/fabric bundles in multiple colors. The shelf should look deliberately packed rather than randomly cluttered. In Dreamy Room Level 893, several similarly sized books and boxes can appear interchangeable, but they only settle correctly when placed on their intended shelf. Use the color groupings visible in the completed room as your guide.
Step 5. Create the left craft table and cozy reading corner
Set the rectangular table with the pink tablecloth directly in front of the bookshelf in Dreamy Room Level 893. On its far-left edge, place the tall green cylindrical holder containing three oversized paintbrushes with pink, peach, and lavender bristles. Beside it goes the small white vase holding a yellow flower and tiny green-blue decorative detail. Across the tabletop, add the berry-topped pastry, the open book, a purple tape roll, the blue rectangular supply case, a small orange tool, and the cups containing brushes, scissors, paint tubes, and other stationery.
Now create the sitting area immediately in front-left of the table. Put the golden-yellow armchair on the green patterned rug with the cream flower cushion centered against its back. A small round wooden side table sits to the chair’s right, topped by the blue goblet-shaped cup. Lean the small guitar against the far-left side beside the chair. This cozy corner is visually separate from the main painting station, and in Dreamy Room Level 893 the rug, chair, side table, cup, cushion, and guitar should all remain clustered together.
Step 6. Arrange the gramophone cabinet and supplies beneath the window
The next area of Dreamy Room Level 893 occupies the back-center space below the curtain. Place the short cream drawer cabinet against the back wall. On top, put the green gramophone base with its large golden-yellow horn facing upward and slightly forward. Next to the gramophone, stand the three light-blue books or binders upright in a neat row.
Immediately to the right of this cabinet, position the woven basket filled with colorful rolls of tape or ribbon. The rolls are visible in purple, blue, teal, pink, and other pastel tones. Add the small upright brush or stamping tools nearby. An open watercolor set with multiple colored pans belongs just to the right, followed by the pale stack or box of papers. These objects create a bridge between the storage furniture and the central desk. Correct placement here matters in Dreamy Room Level 893 because the gramophone, books, basket, and paint box occupy a very compact strip, and moving one item too far forward can prevent later desk pieces from snapping into position.
Step 7. Assemble the central artist desk and character in Dreamy Room Level 893
The center of Dreamy Room Level 893 is dominated by the low cream-colored worktable and drawing board. Position the angled wooden drawing board roughly in the middle, facing toward the front-left. The sheet displayed on it contains light pencil-style sketches and a small patch of colored squares near the upper-left corner. Place the pencil or tool along the lower edge of the board. A small paint palette rests beside the drawing surface, while the blue cylindrical cup filled with brushes and drawing tools stands near the front-right corner of the desk.
The pink rabbit-like artist character belongs directly in front of this board. The character has a fluffy round pink head, long white ears, a purple padded outfit, and holds its painting tools toward the artwork. Put the small pink plush companion just behind and to the character’s left. Dreamy Room Level 893 should look as though the character is actively working rather than simply standing in an empty space. Keep enough room around the artist for the foreground paint supplies added later.
Step 8. Build the right-side storage and display area
For the right wall of Dreamy Room Level 893, start with the wide stacked drawer unit below the window. Its upper surface has a teal-striped cushion or mat. Place the red-and-blue vintage radio on this surface, with its antenna angled upward. A small pink tassel hangs from the front of the drawer unit.
Behind the radio, lean the decorative framed artworks against the wall. Above them, mount the small white shelf holding the pink flowerpot with tiny white blossoms, several upright books, and the small framed picture. Directly below that shelf, place the wooden artist’s mannequin on its tiny platform. To the immediate right of the drawer unit stands the taller narrow cabinet. A rust-orange cloth drapes down its outer side. Put the round purple-trimmed aquarium bowl on top, complete with its green aquatic plants and tiny orange fish. Inside the cabinet’s open middle cubby, place the two pale circular rolls and the slim blue container. This entire cluster should tightly fill the back-right corner of Dreamy Room Level 893.
Step 9. Place the rulers, pastels, paint containers, and foreground art supplies
Now fill the lower working surfaces of Dreamy Room Level 893. Along the front edge of the main desk, arrange the shallow tray of purple and blue drawing sticks or markers. To its right is another long tray filled with cream, yellow, green, and other pastel-colored pieces. Above these trays, position the long purple ruler, the small blue-and-white drawing sheet, and the rectangular pink-and-white eraser.
On the floor-level ledge in front of the artist, place the orange paint pot with its mixing tool and the purple paint pot holding several brushes. Beside them goes the open supply box packed with bright yellow, orange, red, and green bottles or paint tubes. A green tube lies partly outside the box, and a small upright blue bottle stands nearby. Dreamy Room Level 893 intentionally makes this foreground feel busy, but the individual supplies still have fixed homes. Keep these containers on the raised green floor edge directly in front of the desk instead of scattering them near the seating area.
Step 10. Finish the right edge, rugs, slippers, and open supply drawer
Complete Dreamy Room Level 893 by handling the loose objects around the outer edges. On the far right, lean the long red case vertically against the wall. In front of it stands the tall pink cylindrical bucket with a teal band and a large wooden-handled brush protruding from the top. A purple hanging cloth or paper panel is fixed to the right wall just above this area.
At the lower-right outside edge, place the open teal storage drawer or tray with its silver ring pull facing forward. Inside are pale and pink rolls of tape, a purple rectangular block, an orange notebook or pad, and the pair of sky-blue cylindrical tools resting across the top. Across the front floor, lay the large muted red rug beneath the workspace and the small mint-green rectangular mat near its center. Put the pair of orange slippers side by side between the armchair area and the central workspace. Once these final pieces are positioned, Dreamy Room Level 893 should have no awkward empty gaps except those intentionally left as walking space.
Notes and Precautions for Dreamy Room Level 893
The biggest difficulty in Dreamy Room Level 893 is distinguishing between decorative objects that belong on a wall, supplies that belong on furniture, and objects that sit outside the room boundary. The enormous palette, giant brush, flowers, and butterfly are background decorations; do not waste time trying to fit them onto the floor. Likewise, the climbing plant belongs at the rear corner around the existing cream loops rather than in a pot.
Several pieces in Dreamy Room Level 893 are very small. The sticky notes beneath the window, miniature shelf objects, tape rolls, erasers, paint tubes, and tiny desk tools are easy to overlook. If the level does not register as complete, inspect these densely packed areas first.
Also watch for depth. The gramophone cabinet sits behind the central desk, the bookshelf is behind the pink craft table, and the radio cabinet is behind the rulers and pastel trays. Placing large foreground pieces too early can hide the correct drop zones. When something refuses to settle, move it toward the matching visual cluster instead of repeatedly dropping it in the same place.
Tips and Tricks from top player
The fastest way to solve Dreamy Room Level 893 is to treat the scene as five zones: upper background, left craft area, rear-window storage, central painting desk, and right storage area. Finish one zone before moving to the next. That prevents similar art supplies from becoming mixed together.
Use large anchor objects first. In Dreamy Room Level 893, the giant palette, bookshelf, window, pink table, central desk, gramophone cabinet, wide drawer chest, armchair, and tall right cabinet establish almost every smaller placement. Once those are correct, cups, books, brushes, notes, paint tubes, and decorations become much easier to identify.
Another useful Dreamy Room Level 893 shortcut is to match objects by function. Books usually remain on shelves, brushes go into cylindrical holders, painting materials surround the central desk, and relaxation items stay around the armchair and green rug. Save the tiny pieces for last, but do not forget to scan beneath larger objects. Finally, compare the silhouette of the finished room: the left side should be dominated by the tall bookshelf and brush holder, the middle by the rabbit artist and easel, and the right by stacked drawers, radio, aquarium, red case, and brush bucket.
Final Scene in Dreamy Room Level 893
The completed Dreamy Room Level 893 becomes a charming, maximalist art studio overflowing with creative personality. A giant palette, oversized mint paintbrush, coral flowers, leafy greenery, and a purple butterfly form a whimsical backdrop above the turquoise walls. Inside, a packed bookshelf and pink craft table fill the left side, while a flower-cushioned armchair, round table, blue cup, guitar, patterned rug, and slippers create a cozy break area. Beneath the window, the gramophone, books, ribbon basket, watercolor set, notes, and storage drawers turn the back wall into an organized supply station. At the center of Dreamy Room Level 893, the fluffy pink rabbit artist works at a sketch-covered drawing board surrounded by brushes, paints, markers, rulers, pastels, and a tiny plush companion. The radio, framed art, mannequin, aquarium, cabinets, large brush bucket, red case, and open supply drawer complete the wonderfully busy studio.