Dreamy Room Level 907
Dreamy Room Level 907 guide - Dreamy Room 907 Walkthrough & Solution.
Important Notice Regarding Level Numbering
Due to frequent changes in Dreamy Room's level numbering and differences between platforms (Android/iOS) – for example, level 907 on Android might not be the same as level 907 on iOS – the text guide below may not always match the images and video above. Please prioritize the image and video guides. If you find that the guide content doesn't match your current level, please visit the All Level Walkthroughs page to find the correct guide based on level images. Thank you for your understanding.
Dreamy Room Level 907 Walkthroughs & Guide
Step 1. Prepare the Wooden Platform and Identify the Main Building Areas
Begin Dreamy Room Level 907 by examining the empty scene. The starting area features a long, L-shaped wooden platform with reddish-brown rectangular floor tiles. Behind it stand three tall, golden-orange trees, while a flowing blue ribbon winds horizontally across the background. The ground is a warm sandy yellow, decorated with small patches of grass.
The wooden platform forms the foundation for the miniature marketplace. Its broad rear section supports the main shop structures, while the longer section extending toward the lower right becomes the front display and seating area.
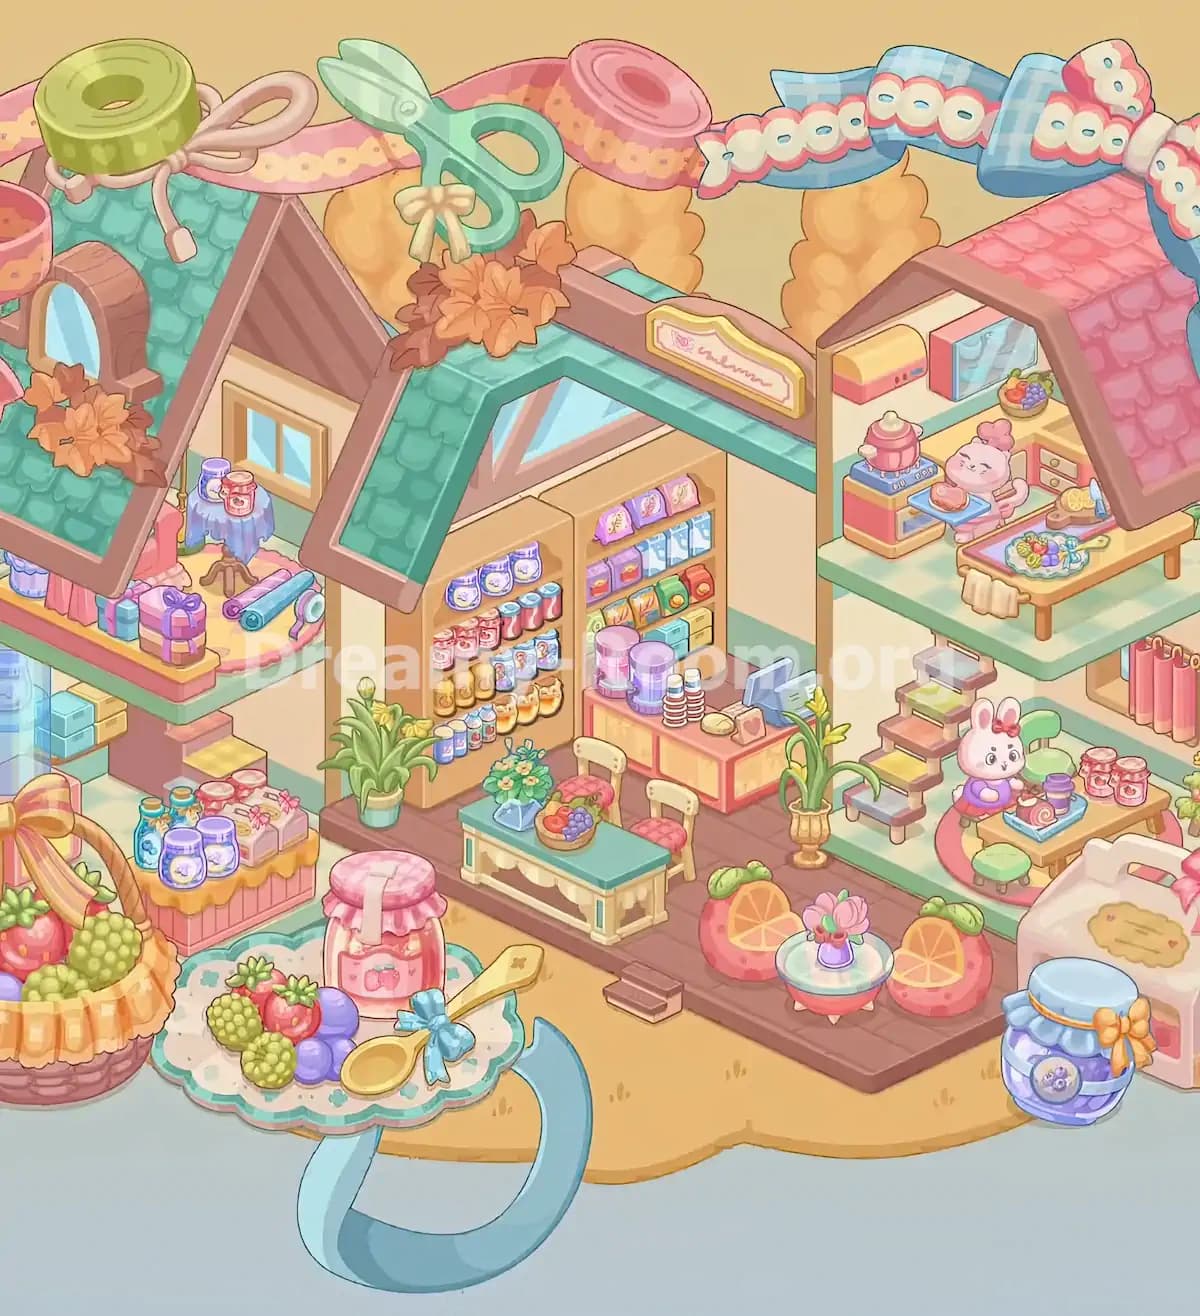
Before placing smaller decorations, identify three major building zones: the gift and craft shop on the left, the main grocery shop in the center, and the pink-roofed bakery on the right.
Pay attention to the isometric perspective. Objects positioned toward the back may appear higher in the image, even when they belong to the same building level. Establishing the correct architectural positions first makes the remaining Dreamy Room Level 907 placements much easier.
Step 2. Build the Central Grocery Shop with Its Teal Roof
The central grocery shop forms the most prominent structure in Dreamy Room Level 907. Position this building in the middle of the arrangement, slightly behind the front edge of the wooden platform.
Its tall cream-colored walls support a steep, teal-green tiled roof with brown trim. The roof slopes downward toward the left front, while a large triangular blue window appears beneath the upper section. A cluster of orange autumn flowers and reddish leaves decorates the upper-left roof junction.
Place the small decorative shop sign along the upper-right roofline. It has a brown frame, golden border, and pale pink interior, resembling a handmade label for the store.
The front of the building remains open so the grocery shelves and interior furnishings are visible. Keep the roof correctly aligned above this open shop area rather than covering the merchandise.
In Dreamy Room Level 907, this central building acts as the main visual anchor. Once its roof, walls, triangular window, decorative flowers, and sign are positioned, the smaller market displays can be arranged accurately beneath it.
Step 3. Fill the Central Grocery Shelves with Colorful Products
Once the central shop is standing, begin filling the two tall wooden shelving units against its rear interior wall. These shelves contain some of the smallest objects in Dreamy Room Level 907, so arrange them carefully.
The left shelving unit holds several rows of miniature food products. Place three purple-and-white packages across the top shelf. Below them, arrange red jars and containers with pale blue lids. The next rows contain additional colorful packaged goods, including small blue packets, yellow containers, and cream-colored bags. Position the small blue-and-white bottles along the lowest visible shelf.
The right shelving unit contains a different assortment of groceries. Place three decorative pastel packages across its top shelf. Underneath, arrange light blue cartons, purple boxes, and other rectangular products. Lower rows should contain orange, green, red, yellow, and turquoise packages.
Keep both shelving units flush against the rear wall, with their products facing outward. Their wooden frames should remain visible between the merchandise rows.
The goal in Dreamy Room Level 907 is to reproduce the organized, colorful appearance of a fully stocked neighborhood shop, rather than placing products randomly.
Step 4. Arrange the Checkout Counter and Shop Equipment
Next, create the checkout area immediately to the right of the grocery shelves. This counter is a rectangular piece of furniture with a pink frame, cream-colored front panels, and a reddish-brown countertop.
Position the counter against the back-right side of the central shop interior. Place two large cylindrical containers with pastel purple and pink tops on its left side. They resemble decorative dispensers or large containers used for storing sweets and other goods.
Beside them, arrange two neat stacks of small striped cups. The cups have light-colored interiors and darker pink stripes, making them easy to recognize.
At the right end of the countertop, place a compact blue-gray checkout terminal with its screen angled slightly upward. Add the small pale yellow item and pink heart-decorated package near the register.
An important detail in Dreamy Room Level 907 is the spacing between the countertop objects. The larger containers occupy the left, the cup stacks sit in the middle, and the register and small accessories belong on the right.
This arrangement completes the grocery store's working checkout area.
Step 5. Set Up the Front Grocery Display Table and Chairs
Move to the front section of the central shop and place the mint-green display table directly in front of the shelves. This rectangular table has cream-colored carved legs and a scalloped decorative pattern across its front, giving it the appearance of handmade furniture.
Position the table so its longer edge runs horizontally across the front of the shop. On the left side of the tabletop, place a small blue vase or wrapped flower arrangement filled with yellow blossoms and leafy green foliage.
Next, place the shallow fruit basket near the middle-right side of the table. The basket contains colorful fruit, including purple grapes and reddish-orange produce.
Behind the table, arrange two pale wooden chairs with rounded backrests and pink checkered cushions. The chairs should sit side by side, facing the open shop area.
The exact position of this furniture matters in Dreamy Room Level 907 because the display table occupies a limited space between the grocery shelves and the front edge of the platform.
Finally, place the tall green potted plant with yellow flower buds against the outside left wall of the central store. Its mint-colored pot should rest on the wooden floor near the front corner.
Step 6. Assemble the Left Gift Shop and Its Decorative Roof
The next major structure in Dreamy Room Level 907 is the charming gift and craft shop on the left side of the marketplace. This section is partially hidden behind the central grocery shop, but its distinctive roof and upper display area remain clearly visible.
Position the building to the left of the grocery store, with its teal-green tiled roof rising above a small elevated gift-display platform. The roof features brown wooden trim and a prominent triangular section that slopes toward the front.
Attach the small rounded dormer window to the left roof slope. It has a brown wooden frame and a bright blue glass pane. Surround the lower side of this window with a cluster of orange autumn flowers and brown leaves.
Beneath the roof, position the cream-colored rear wall and its rectangular window with two blue glass panels and a light wooden frame.
The arrangement in Dreamy Room Level 907 should create a cozy upper alcove where the gift-wrapping accessories can be displayed. Leave the center of this alcove unobstructed so the miniature table, presents, and ribbons can fit naturally.
Step 7. Decorate the Upper Gift-Wrapping Platform
Now fill the little gift-wrapping area beneath the left shop's steep roof. Place the small round table toward the back of the alcove, beneath the rectangular window.
The table has a slender brown pedestal base and a blue-purple cloth draped over its circular top. Arrange two decorative containers on the tabletop: a purple jar on the left and a smaller pink-red jar on the right.
Lay the rolled craft materials on the floor to the right of the table. These include a turquoise roll and a pink-purple roll positioned diagonally, along with another small pale-colored wrapping accessory nearby.
On the front-left edge of the elevated platform, arrange several brightly wrapped presents. The boxes vary in size and feature pink, lavender, purple, and turquoise colors, with prominent ribbons and bows. Behind them, include the pink vertical gift bags or upright packages visible near the left wall.
A pale yellow rug with pink scalloped trim covers much of this small display floor.
For Dreamy Room Level 907, keep the larger presents toward the front railing while the jars and wrapping materials occupy the space closer to the back window. This produces the layered, carefully decorated appearance shown in the completed image.
Step 8. Complete the Lower Left Market Stall and Jam Displays
Below the upper gift area, create the lower market stall. This portion of Dreamy Room Level 907 is packed with miniature preserves, packaged gifts, and fruit-themed products.
Position the low pink display counter beneath the elevated gift platform, slightly toward the front-left area of the scene. The counter has vertically striped pink sides and a soft yellow fabric-like covering along its upper edge.
Arrange two small blue bottles with gold-colored caps toward the rear-left side of the counter. In front of them, place two rounded lavender jars with decorative labels.
On the right side of the display, add the rectangular cream-colored gift boxes tied with pink ribbons. Additional small reddish jars should be arranged near the back, behind the wrapped packages.
Behind the stall, the lower portion of the building contains pastel gift boxes and stacked turquoise-and-yellow packages. Make sure these items fit beneath the elevated upper platform without covering its supports.
The essential trick here is to organize the products into separate groups. Dreamy Room Level 907 rewards precise placement, so the bottles, preserves, and packages should reproduce the finished stall's arrangement instead of forming one crowded pile.
Step 9. Construct the Right Bakery with Its Pink Roof and Upper Kitchen
Now move to the right side of the scene and assemble the two-story bakery building. Its pink roof creates a strong contrast with the teal roofs of the central and left shops.
Position the structure at the rear-right side of the wooden platform. The upper room is open at the front, with a steep pink tiled roof sloping down along its right side. Brown trim outlines the roof and walls.
Inside the upper kitchen, place a small rectangular window or blue-glass panel against the rear wall. Along the back-left side, arrange a long yellow-and-pink storage box. Position another red-and-blue rectangular container beside the window.
Add a narrow shelf or back counter beneath these items. Place a small fruit basket on its right side, containing purple grapes and colorful round fruit.
The upper floor of Dreamy Room Level 907 has a mint-green surface that extends outward beneath the kitchen furniture. This open area accommodates the cooking character and preparation table.
Keep the front of the kitchen uncovered so the stove, character, cutting board, and colorful food remain visible from the isometric viewpoint.
Step 10. Arrange the Baking Station and Pink Chef Character
After constructing the upper bakery, decorate its kitchen workspace. Begin with the small stove positioned toward the left side of the upper floor.
The stove has a pink-and-yellow body, a blue burner surface, and a miniature oven compartment. Place the pink cooking pot with its pale lid directly on the burner.
Next, position the adorable pink animal chef beside the stove, slightly to its right. The character wears a pink chef's hat and stands holding a blue tray with a round brown baked treat. Its expression is cheerful, adding personality to the miniature cooking station.
In front of the chef, install the light wooden preparation table. Place a pink-edged rectangular work mat on the tabletop, along with the decorative plate of multicolored fruit and sweets. Add the small board holding yellow pastry slices, the blue utensil, and other tiny kitchen accessories near the right side.
Drape the folded cream-colored towel over the front edge of the preparation table.
When finishing this area of Dreamy Room Level 907, ensure that the character remains behind the front table but in front of the kitchen's rear counter. This depth relationship is essential to matching the completed arrangement.
Step 11. Furnish the Lower Bakery Seating Area with the Bunny Character
The lower level of the right bakery contains one of the cutest details in Dreamy Room Level 907: a small white-and-pink bunny enjoying sweets in a cozy café corner.
Start by positioning a compact wooden table in the lower room. The table should sit toward the front-right side, with its longer edge facing outward. Place a blue rectangular serving tray on the tabletop, containing a pink-red Swiss roll cake and a small purple drink container.
Arrange two red jam jars with decorative fabric covers on the right side of the table. Behind the table, position a pale green cushioned chair. Add a small matching green stool in front.
Place the bunny character to the left of the table. It has long upright ears, a tiny pink bow, and a purple outfit. The bunny should appear to be sitting comfortably beside its dessert.
Underneath the furniture, position the round pink rug. Along the back-right wall, install the short row of hanging pink curtains.
This arrangement completes the bakery's lower seating area. The table, bunny, chair, and stool should fit neatly beneath the upper kitchen without obstructing the staircase.
Step 12. Add the Colorful Staircase, Flower Pots, and Fruit Decorations
Connect the two bakery floors using the narrow staircase along the left side of the building. The staircase descends diagonally from the upper kitchen toward the front-left corner of the lower seating area.
Its individual steps have brown borders and colorful treads in pastel blue, yellow, pink, and green. Position the staircase carefully so its upper end meets the kitchen platform and its bottom step touches the lower floor.
Next, place the tall gold-colored plant stand near the base of the staircase, just outside the main grocery shop. The stand holds long green leaves and several small yellow flowers.
Across the front edge of the wooden platform, arrange two large citrus-fruit decorations. Each resembles a pinkish-red fruit cut in half to reveal a bright orange center, with rounded green leaves on top.
Between the two fruit halves, position the small round pedestal table. It has a mint-green top, a pink base, and short pointed feet. Place a tiny purple vase of pink flowers in its center.
These objects are important finishing details in Dreamy Room Level 907. The fruit halves should flank the little flower table, creating a balanced decorative grouping near the front of the marketplace.
Step 13. Place the Oversized Jam Jars, Fruit Baskets, and Picnic Accessories
The foreground contains several oversized decorative food items that make Dreamy Room Level 907 especially colorful.
Begin at the bottom-left corner by positioning a large woven basket filled with fresh fruit. The basket has a curved handle, a striped fabric bow, and a warm cream-and-orange lining. Fill it with red strawberries, green grapes, and other colorful fruit.
Immediately to its right, place a large scalloped serving mat with a mint-green border and cream-colored center. Arrange clusters of strawberries, green berries, purple fruit, and a large pink jam jar on top. The jar has a checkered pink fabric cover, a decorative label, and a pale ribbon hanging down its front.
Lay the golden spoon diagonally across the mat, with its handle pointing toward the upper right. Attach the prominent blue bow near the spoon's bowl.
At the lower-right foreground, position the large lavender preserve jar with its blue fabric lid and golden bow. Behind it, place the oversized cream-colored gift package decorated with a pink ribbon and a golden label.
Notice how these foreground objects extend beyond the central buildings. Their deliberately exaggerated size gives the completed scene its playful miniature-world appearance.
Step 14. Finish the Scene with Giant Sewing Supplies and Decorative Ribbons
The final major task in Dreamy Room Level 907 is arranging the oversized sewing-themed decorations above the buildings.
Start at the upper-left corner with the large green roll of ribbon or tape. Position it above the left shop roof, alongside a pale pink cord tied into a loose bow. A wide pink ribbon with yellow lace-like detailing stretches horizontally behind these objects.
Near the upper center, position the mint-green scissors diagonally above the central roof. Their pointed blades face toward the upper left, while their round handles remain near the middle. Attach the small cream-colored bow near the scissors' handles.
To the right of the scissors, place the large pink ribbon spool above the central building. Continue the decorative ribbon across the background toward the right.
The most prominent upper-right decoration is the giant blue checkered ribbon with white oval patterns outlined in pink. Arrange its looping sections over the bakery roof and across the upper-right edge of the scene.
Finally, check the flowing blue ribbon beneath the foreground display. Its large loop curves downward below the fruit tray and extends beyond the bottom edge.
These sewing supplies create the distinctive handcrafted theme of Dreamy Room Level 907, transforming the marketplace into a charming world made from ribbons, fabrics, presents, and delicious homemade treats.
Notes and Precautions
When completing Dreamy Room Level 907, pay attention to these important details:
- Follow the building layout first. The left craft shop, central grocery store, and right bakery occupy distinct areas. Incorrect building positions can interfere with smaller decorations.
- Respect the vertical levels. Both the left gift shop and right bakery have elevated sections. Items belonging upstairs must not be placed on the lower floors.
- Organize tiny shelf products carefully. The grocery shelves contain numerous similar-looking jars, boxes, and packets. Their color, size, and shelf position are important.
- Distinguish between similar food items. Small jam jars appear in several locations, including the left stall, grocery shelves, bunny's table, and foreground display.
- Check object orientation. The scissors, golden spoon, roof pieces, and decorative ribbons have specific directions.
- Do not overlook partially hidden objects. Some packages and furniture pieces are obscured by roofs, walls, or larger decorations.
- Use the surrounding scenery as a reference. The three orange trees and the original L-shaped platform help establish the overall composition.
The main difficulty in Dreamy Room Level 907 is finding each object's intended location, not simply deciding which decorations look attractive together.
Tips and Tricks from top player
A reliable strategy for Dreamy Room Level 907 is to complete the puzzle in distinct layers, working from the largest structures down to the smallest accessories.
1. Build from back to front. Start with the buildings and their roofs, continue with shelves and large furniture, and finish with tiny decorative objects.
2. Use recognizable landmarks. The central teal roof, right pink bakery roof, and miniature staircase help you identify the correct position for nearby objects.
3. Match colors and shapes. Purple jars, red preserves, blue cartons, and pink ribbon-wrapped gifts are easier to organize when you compare them with their neighboring items.
4. Complete one shop at a time. Finishing the grocery shop before switching to the gift store or bakery reduces confusion between similar products.
5. Save foreground decorations for last. The oversized fruit basket, jam jar, serving mat, and gift package can block your view of smaller furniture.
6. Pay special attention to depth. A correct object may appear misplaced if it belongs behind another piece rather than directly beside it.
7. Use a calm, systematic approach. Dreamy Room is designed around relaxed organization without a timer, so there is no need to rush.
The most effective shortcut is to use the completed Dreamy Room Level 907 image as a visual map and solve each section independently before checking the full arrangement.
Final Scene: A Magical Handmade Marketplace
The completed Dreamy Room Level 907 reveals a delightful miniature shopping village that combines autumn warmth, handmade crafts, and irresistible sweets.
Three adorable buildings create a lively marketplace. On the left, a teal-roofed craft shop displays colorful presents, rolled ribbons, and neatly arranged preserves. At the center, a cozy grocery store features fully stocked wooden shelves, a pastel checkout counter, fresh flowers, and a beautiful fruit display. On the right, a pink-roofed bakery houses a cheerful little chef preparing delicious treats, while a sweet bunny enjoys cake in the café downstairs.
Giant sewing scissors, ribbon spools, bows, and patterned fabric garlands decorate the sky above the shops. Oversized fruit baskets, decorative jam jars, golden utensils, citrus-shaped cushions, and delicate flowers complete the scene.
Surrounded by golden autumn trees and flowing blue ribbons, Dreamy Room Level 907 becomes a whimsical handcrafted world where every carefully placed object contributes to its cozy, magical atmosphere.