Dreamy Room Level 869
Dreamy Room Level 869 guide - Dreamy Room 869 Walkthrough & Solution.
Important Notice Regarding Level Numbering
Due to frequent changes in Dreamy Room's level numbering and differences between platforms (Android/iOS) – for example, level 869 on Android might not be the same as level 869 on iOS – the text guide below may not always match the images and video above. Please prioritize the image and video guides. If you find that the guide content doesn't match your current level, please visit the All Level Walkthroughs page to find the correct guide based on level images. Thank you for your understanding.
Dreamy Room Level 869 Walkthroughs & Guide
Step 1. Build the main lower house in the center of Dreamy Room Level 869
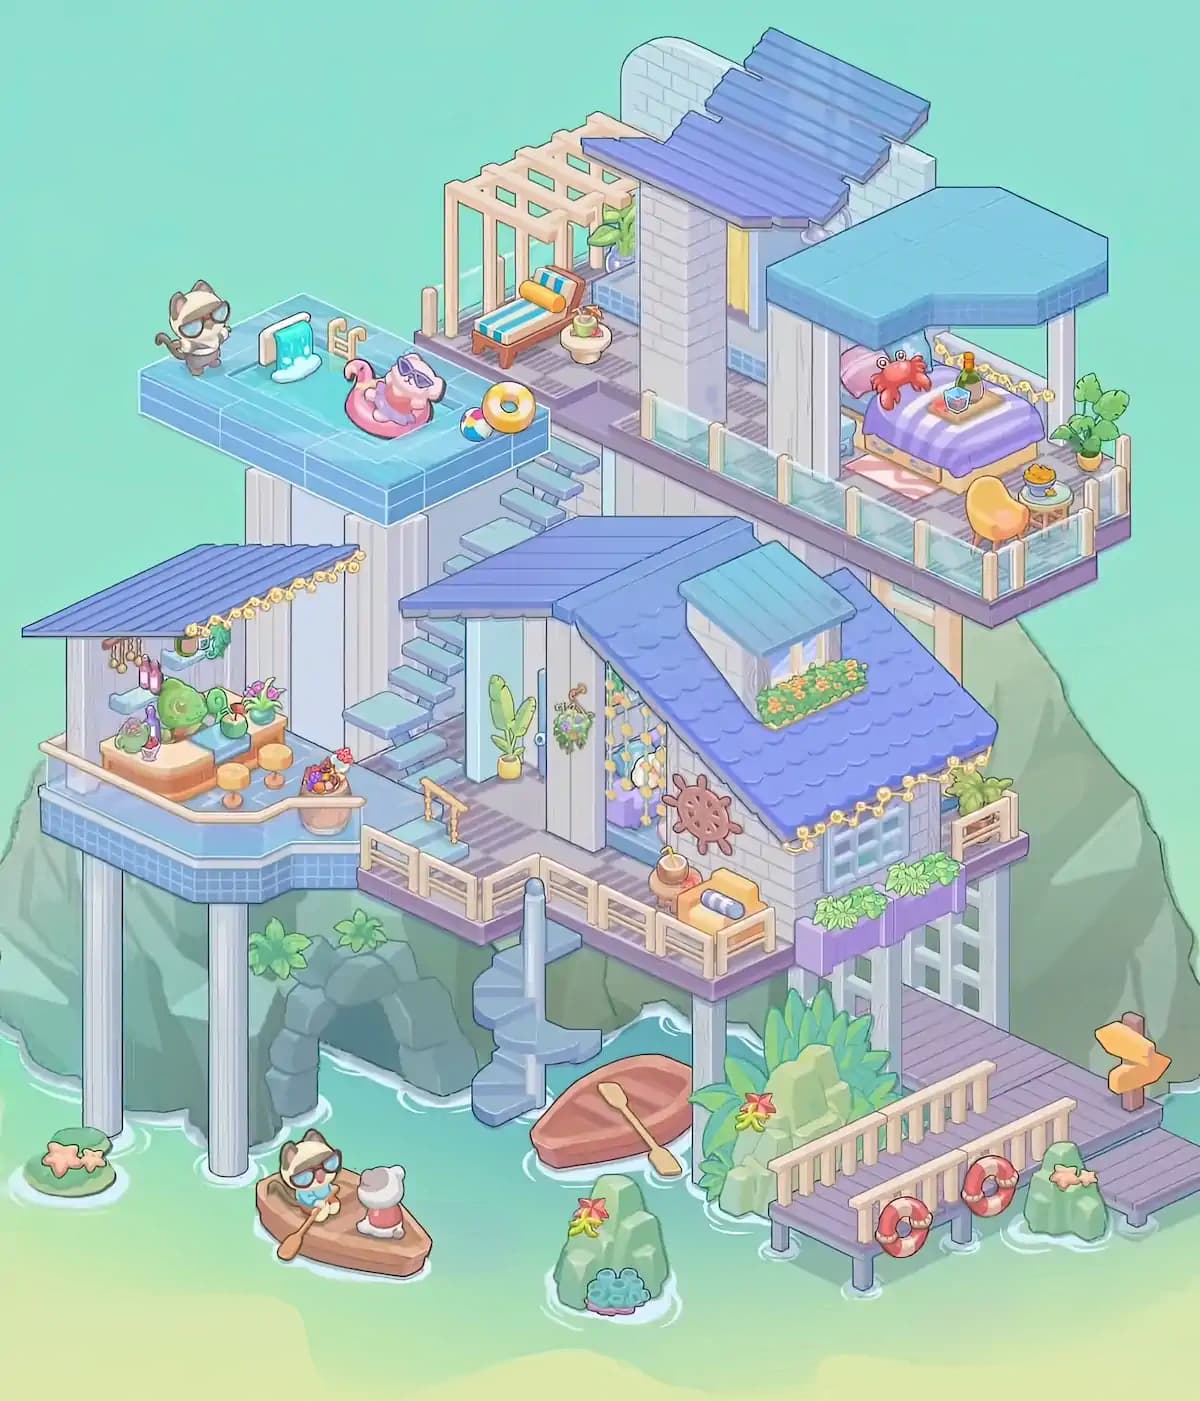
Begin Dreamy Room Level 869 with the largest structural pieces because they establish the position of everything else. Place the main house across the middle-right portion of the rocky island. Its pale walls sit slightly above the waterline, while the broad blue roof slopes toward the front-right. Add the smaller raised dormer near the upper-right section of this roof and place the long flower box filled with orange blossoms directly beneath its window.
At the front of the house, install the light-blue entrance door facing toward the central terrace. Put the tall leafy potted plant immediately to the left of the doorway. The wall section to the right of the entrance contains the decorative window or opening filled with hanging yellow, white, and blue ornaments. Attach the wooden ship's wheel to the wall farther right.
For Dreamy Room Level 869, check the roof orientation carefully. The larger blue roof must extend toward the right, while the entrance remains visible from the front-left side. Correctly placing this building makes the later decks, stairs, bedroom, and pier much easier to align.
Step 2. Complete the central terrace, railings, and waterfront staircase
Next, build the main walkway running across the front of the house in Dreamy Room Level 869. The terrace should stretch horizontally from the left-side platform to the right side of the building. Add the pale wooden railings along its exposed front edge, leaving the central opening required for the staircase.
Place the unusual blue spiral-style staircase at the middle-front edge. It begins at the terrace and curves downward toward the water below. The bottom steps should finish close to the small reddish-brown rowboat floating beside the rock. Put a wooden oar diagonally across or alongside that boat.
On the right end of the terrace, place the small orange bench or storage seat against the railing. Set the blue rolled item on top of it and position the brown drink cup just to its left. Above this area, add the purple flower boxes beneath the windows, filling them with green trailing plants.
These details are important in Dreamy Room Level 869 because several similarly shaped deck pieces can appear compatible. Use the spiral staircase, ship's wheel, and purple planters as landmarks for the correct arrangement.
Step 3. Create the lower-left covered bar and relaxation terrace
The next major section of Dreamy Room Level 869 occupies the left-middle side of the rock. Construct the elevated terrace projecting outward over the water and support it with the tall white pillars visible underneath. Add the blue-tiled trim around the platform and install the large dark-blue sloping awning above it.
Under the awning, arrange the compact seaside bar or refreshment counter. Place the wooden counter toward the back-left, then add the green fish-shaped decoration or plush on the counter area. Small potted plants, bottles, flowers, and other colorful accessories sit around it. Hang the small utensils and decorative items underneath the roof edge.
Put the round stools in front of the counter, spaced across the open floor. Near the terrace's right side, place the round basin or bowl, while a basket or bowl of fruit sits close to the stairs leading upward. A wooden railing borders the front and right edges.
When solving Dreamy Room Level 869, avoid moving tiny counter decorations too early. Establish the awning, counter, stools, and railings first, then fill the remaining matching spaces with the smaller accessories.
Step 4. Add the connecting stairs and decorate the main entrance area
Several staircases connect the different elevations in Dreamy Room Level 869, so their orientation is essential. Starting beside the lower-left terrace, install the first blue stair run climbing toward the central front entrance. Continue with the next stair section behind it so the path rises naturally toward the upper floors. Another staircase continues farther upward toward the swimming-pool level.
Around the main entrance, add the hanging floral arrangement beside the light-blue door. The long decorative section immediately to the right of the door should show the colorful hanging shell, citrus, or seaside ornaments visible in the completed scene. Place additional greenery around the doorway without covering the path.
The central landing in Dreamy Room Level 869 should remain relatively open because it acts as the circulation point between the lower bar, main house, upper deck, and staircase down to the water. If a railing blocks a staircase or the door appears inaccessible, one of the structural pieces is probably in the wrong slot.
Finishing this connective section early also gives you strong reference points for the much larger upper structures.
Step 5. Build the rooftop swimming pool on the upper-left platform
Now move to one of the most distinctive areas of Dreamy Room Level 869: the elevated pool deck in the upper-left corner. Place the large rectangular blue-tiled platform so it projects outward from the house and sits high above the lower terrace. Its outer edge should remain completely visible against the turquoise background.
Install the small curved waterfall or fountain fixture near the rear-left side of the pool. Beside it are two short tan fixtures resembling taps or shower posts. Place the sunglasses-wearing cat character near the far-left rear corner, facing inward toward the pool.
The pink flamingo-shaped float belongs near the middle of the pool, carrying the small lounging character wearing sunglasses. Add the multicolored beach ball near the front-right edge and place the yellow-orange swim ring immediately beside it.
In Dreamy Room Level 869, these pool toys are easy to confuse with objects intended for the waterfront below. Remember that the flamingo, beach ball, and ring all belong on this elevated swimming platform, while the actual wooden boats remain at water level.
Step 6. Assemble the upper pergola, sunbed, and roof structure
Behind the pool, Dreamy Room Level 869 includes a compact rooftop relaxation area. Add the pale wooden pergola at the upper-middle-left section, directly behind and slightly above the pool platform. Its open beams should run across the top while its posts form a small shaded nook.
Place the wooden sunbed underneath the pergola. The bed has a striped blue-and-white cushion and an orange cylindrical pillow positioned near its upper end. Nearby, place the small round table or planter holding the colorful drink, fruit, or plant arrangement. Add the leafy potted plants behind the sunbed close to the wall.
Next, construct the central upper roof. The pale brick wall rises behind this relaxation space, while overlapping blue-purple corrugated roof panels form the sloping roof above it. A narrow yellow window or illuminated opening appears on the right side of the central wall.
Correct layering matters in Dreamy Room Level 869. The pergola stays to the left of the tall central wall; the blue roof sits behind and above it rather than covering the lounge area.
Step 7. Furnish the open upper-right bedroom and balcony
The upper-right room is one of the most detailed sections of Dreamy Room Level 869. Build the open bedroom beneath the large cyan-blue canopy roof. The roof projects beyond the bedroom walls and is supported so that the room remains visible from the front.
Place the bed against the rear-left side of this room. Cover it with the purple-and-white striped or checked blanket, then add the pink pillow and the large red crab plush near the head of the bed. A small tray or decorative object sits on top of the blanket.
Put the compact table beside the bed and arrange the small drink, bottle, and flower decorations on it. At the front-right side, place the rounded orange chair facing inward. The tiny side table nearby holds a plate with a yellow snack or pastry. Add the large green potted plant at the far-right edge.
Finally, complete the glass-fronted balcony with pale posts and purple flooring. In Dreamy Room Level 869, this railing should continue across the front without hiding the bed or chair.
Step 8. Finish the lower-right exterior, plants, and cliffside garden
Return to the lower-right side of the house in Dreamy Room Level 869 and fill the spaces around the exterior walls. Under the purple flower boxes, place the tall white-framed doors or windows leading toward the narrow side deck. Above them, the green plants should spill over the purple planters.
At ground level, arrange the large cluster of tropical leaves between the main house and the pier. Several angular green rocks are mixed into this vegetation. Add the small red-and-yellow starfish to the front-facing rock in the cluster. Another rocky outcrop sits farther forward in the water and also carries a starfish, while a small bluish coral formation rests at its base.
The vegetation in Dreamy Room Level 869 helps visually connect the building to the natural cliff. Do not treat the plants as random fillers: the biggest leaf cluster belongs immediately beside the house, while smaller greenery remains on the surrounding rocks and upper balconies.
Once these pieces are placed correctly, the empty cave begins to look like a complete tropical residence rather than a collection of disconnected platforms.
Step 9. Construct the pier and add the nautical decorations
The wooden pier occupies the lower-right corner of Dreamy Room Level 869. Build the long purple-brown walkway extending outward over the water from the base of the house. Place the pale wooden railing along the upper side of the pier, leaving enough open space for the character path.
Attach the red-and-white lifebuoys along the outer edge of the dock. They are evenly distributed across the front-facing side and provide one of the clearest nautical visual cues in the completed level. At the far-right end of the walkway, install the orange arrow-shaped sign pointing outward.
Place the small green rock with the peach-colored starfish beside the pier. Additional low rocks and water details remain visible around the supports.
In Dreamy Room Level 869, the pier must sit lower than the house's main terrace but higher visually than the surrounding water. If the railings or lifebuoys appear to overlap nearby plants, double-check the dock orientation before continuing. The correct placement leaves the tropical rock cluster clearly visible behind it.
Step 10. Add the boats, characters, rocks, starfish, and final water details
Finish the lowest portion of Dreamy Room Level 869 by decorating the water around the house. In the lower-left foreground, place the small wooden boat containing the sunglasses-wearing cat and the little white character dressed in red. Position the wooden paddle diagonally through the boat so the scene looks as though they are rowing past the house.
Keep the second empty reddish-brown boat near the base of the blue spiral staircase, with its long wooden oar beside it. These two boats occupy separate areas and should not be swapped.
Add the tiny isolated rock toward the far lower-left with its peach-colored starfish. Place another green rock near the center-front with a red-and-yellow starfish and blue coral at its base. A third starfish-topped rock appears beside the right-hand pier.
Finally, check the small stone arch that was already visible in the original environment. In Dreamy Room Level 869, it remains at the lower-left base of the cliff, partly framed by greenery and the elevated structures rather than being covered completely.
Notes and Precautions
The most important point in Dreamy Room Level 869 is that many objects visually belong to the same seaside theme, which can make an incorrect location seem convincing. A swim ring, boat accessory, plant, railing, or drink may look suitable in several places, but Dreamy Room Level 869 expects each object in its intended position. Use large structures as anchors before placing tiny decorations.
Pay particular attention to vertical levels. The swimming pool is on the highest left platform, the pergola sits behind it, the bedroom occupies the upper-right level, the bar is on the middle-left terrace, and the main house spans the center. The dock and boats are at water level.
Also avoid blocking stairs with railings. Dreamy Room Level 869 contains several connected paths, and their alignment is a reliable clue to whether the architecture is correct.
There is no need to rush through the arrangement; the supplied game description emphasizes taking time to organize and decorate rather than dealing with a timer or pressure. dreamy room instruction This makes careful visual matching especially useful in Dreamy Room Level 869.
Tips and Tricks from top player
A reliable way to clear Dreamy Room Level 869 efficiently is to sort objects mentally into four groups: architecture, furniture, decorations, and tiny accessories. Place them in that order. Large roof sections, platforms, walls, stairs, pillars, and railings should always come first because they reveal the attachment points for everything else.
For Dreamy Room Level 869, use distinctive landmarks instead of trying to memorize every coordinate. The pink flamingo identifies the pool; the red crab identifies the upper bedroom; the green fish decoration identifies the lower-left bar; the ship's wheel identifies the front wall; and the lifebuoys identify the dock.
Another useful Dreamy Room Level 869 strategy is to complete one elevation at a time. Finish the lower waterfront, then the middle house and terrace, then the upper pool and bedroom. This reduces visual clutter.
Save identical-looking plants, cups, bottles, fruit, and flowers for last. Their intended locations become much more obvious once the larger furniture is locked into place. Before finishing Dreamy Room Level 869, scan from top-left to bottom-right and compare every open surface with the completed scene.
Final Scene of Dreamy Room Level 869
The completed Dreamy Room Level 869 turns the plain rocky island into an elaborate pastel seaside hideaway. At the top left, a playful swimming pool holds a flamingo float, beach ball, swim ring, and sunglasses-wearing characters. Behind it, a pergola shelters a striped sunbed beneath the blue roof. The upper-right bedroom feels cozy with its purple bed, red crab plush, drink table, orange chair, greenery, and open balcony.
Across the middle of Dreamy Room Level 869, stairways connect the shaded bar terrace, central entrance, flower-filled house, and upper floors. A ship's wheel, planters, hanging decorations, stools, drinks, and tiny ornaments give every area personality. Below, the spiral staircase reaches the water beside a rowboat. Tropical plants and starfish-covered rocks surround the house, while a lifebuoy-lined pier stretches from the right side. A second boat carrying two characters completes the cheerful waterfront scene, making Dreamy Room Level 869 feel like a fully inhabited tropical vacation home.