Dreamy Room Level 796
Dreamy Room Level 796 guide - Dreamy Room 796 Walkthrough & Solution.
Important Notice Regarding Level Numbering
Due to frequent changes in Dreamy Room's level numbering and differences between platforms (Android/iOS) – for example, level 796 on Android might not be the same as level 796 on iOS – the text guide below may not always match the images and video above. Please prioritize the image and video guides. If you find that the guide content doesn't match your current level, please visit the All Level Walkthroughs page to find the correct guide based on level images. Thank you for your understanding.
Dreamy Room Level 796 Walkthroughs & Guide
For the easiest solution to Dreamy Room Level 796, work from the largest structural pieces toward the smallest ornaments. Establish the stairs, raised areas, furniture, and large character pieces first. Once those anchors are correct, the remaining accessories in Dreamy Room Level 796 become much easier to match with their final positions.
Step 1. Build the raised levels and central staircase
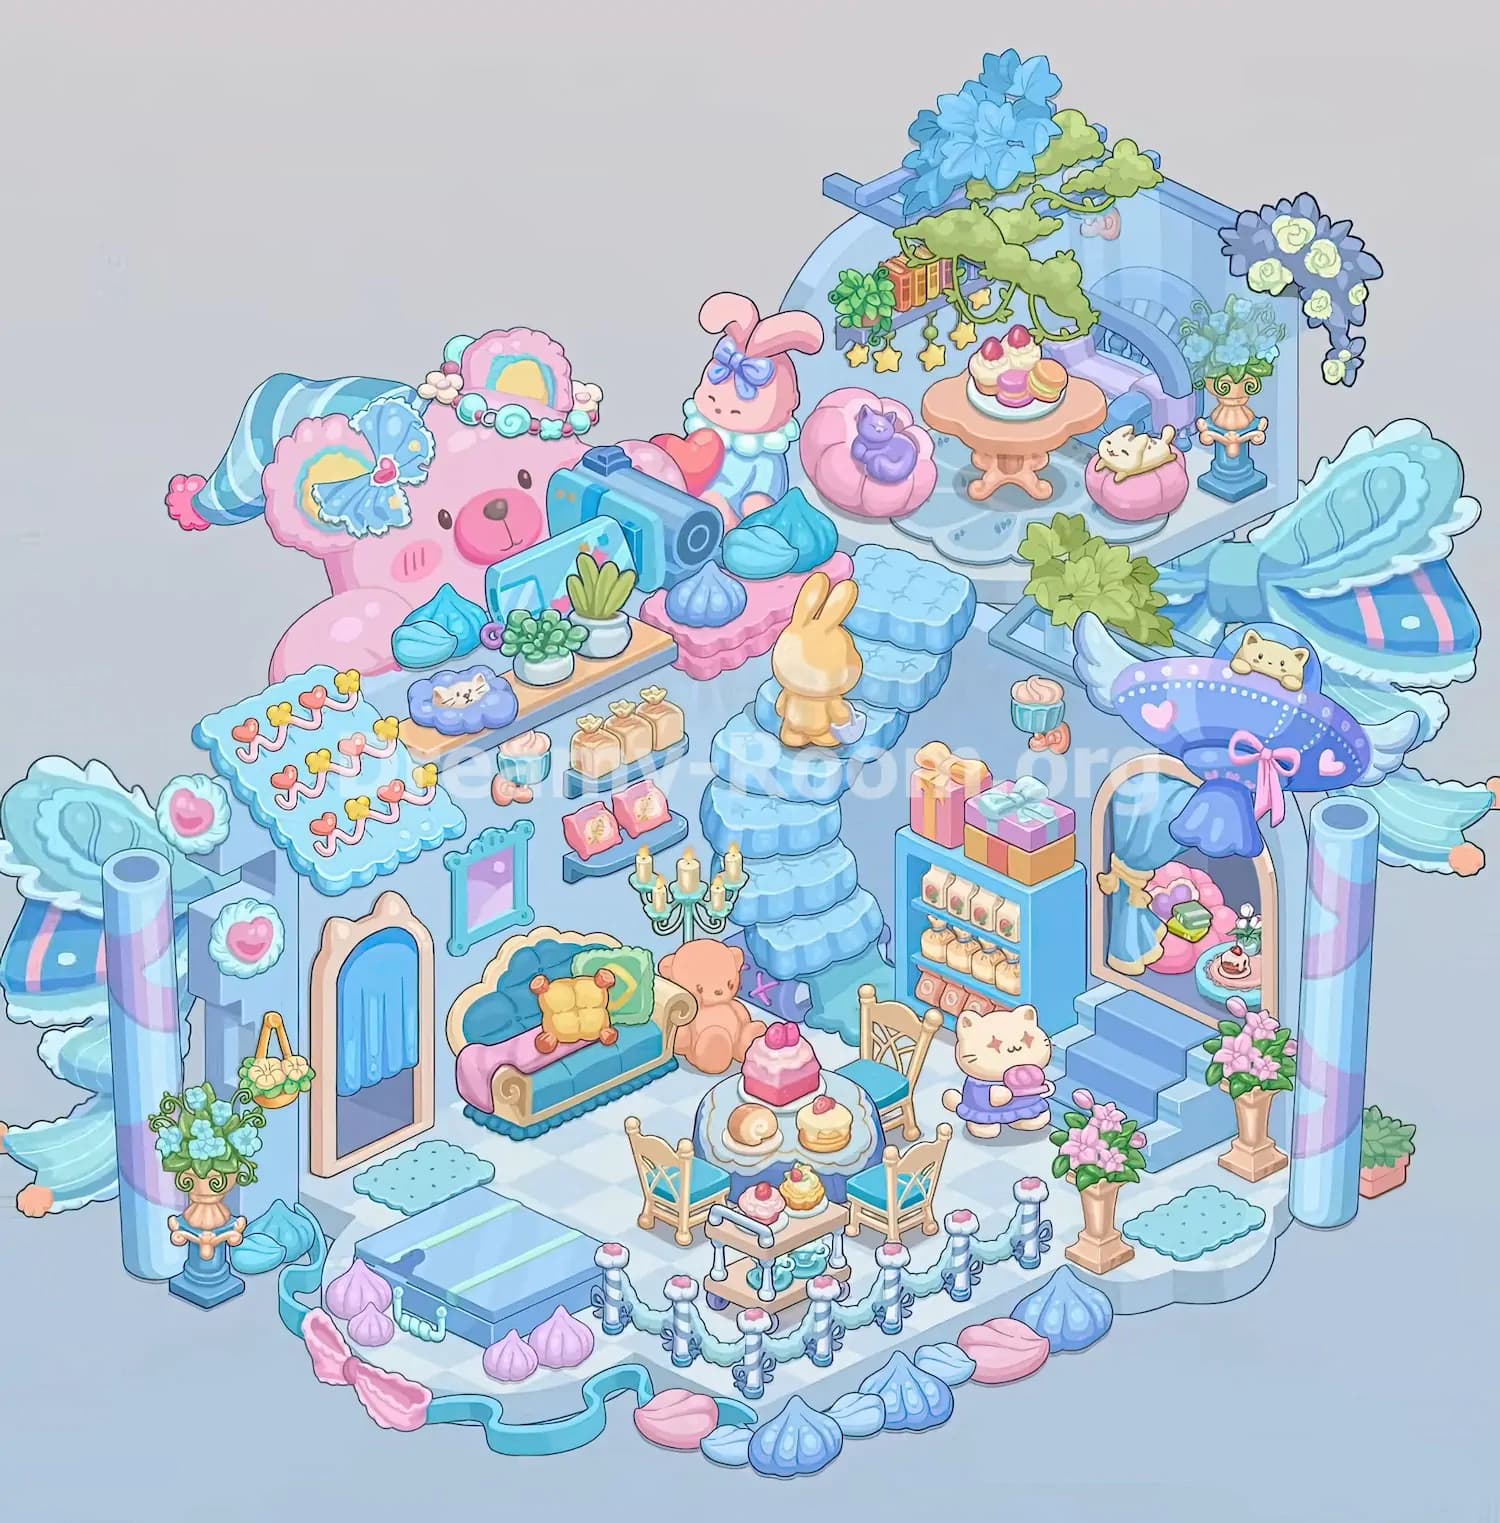
Begin Dreamy Room Level 796 by establishing the major structure because almost every decorative item depends on these larger pieces. Place the tall, scalloped light-blue staircase through the center of the room, rising diagonally from the lower middle toward the upper rear. The stairs are made from several rounded, cloud-like tiers and divide the lower living area from the elevated sections. At the upper-right side of Dreamy Room Level 796, create the raised garden alcove with its curved pale-blue wall and rounded floor platform. Add the short blue staircase on the right side leading into the arched dressing nook. Leave clear floor space in the lower center for the dining table. The arrangement should form three recognizable zones: a lower lounge and dining area, the central stepped path, and an elevated tea garden at the back. Getting these large anchors correct first is especially important in Dreamy Room Level 796, since smaller objects can otherwise appear to fit in several misleading locations.
Step 2. Complete the upper-right garden tea alcove
The elevated back-right corner is one of the most detailed sections of Dreamy Room Level 796. Place the blue overhead beams along the top of the rounded wall, then cover them with the large blue flower cluster and spreading light-green leafy vines. Under the greenery, position the little row of warm-colored hanging books, the trailing plant, and the dangling yellow star ornaments. Set the curved blue-and-lavender bench against the rear wall. In the middle of this Dreamy Room Level 796 alcove, place the round peach-colored pedestal table and add the dessert plate containing two cream cakes topped with red fruit plus colorful macarons. Put the pink pumpkin-shaped cushion with the curled purple cat on the table’s left and the smaller pink pouf with the reclining cream cat on the right. Finish this section with the ornate blue pedestal planter of blue flowers near the right wall and the dramatic dark-blue-and-cream cascading floral decoration on the upper-right corner. These pieces complete the enchanted garden atmosphere that defines the top section of Dreamy Room Level 796.
Step 3. Arrange the giant pink bear, bunny, camera, and upper-left display
Move to the upper-left and center-left portion of Dreamy Room Level 796, where the enormous pink sleeping bear becomes the main visual anchor. Position the bear behind the other decorations, facing toward the front-right. Its head should show the blue-and-white striped sleeping cap extending leftward, the ruffled blue ear coverings, pink cheeks, and the small rainbow decoration framed by pink trim near the top. In front of the bear, set the oversized blue camera so its circular lens faces toward the right-front side of Dreamy Room Level 796. Lean the blue framed picture or display board immediately in front of the camera and plants. Place the pink rabbit character slightly to the bear’s right, near the entrance to the upper garden. The rabbit wears a pale blue striped outfit and a blue bow between its long ears. Scatter the large turquoise and blue shell-like cushions around the nearby pink platform. The key in Dreamy Room Level 796 is keeping the bear in the rear layer while the camera, picture, plants, cushions, and rabbit occupy the foreground.
Step 4. Decorate the left-side house façade and cozy sofa area
The left-middle section of Dreamy Room Level 796 resembles a tiny pastel house beneath a decorative blue roof. Place the large scalloped light-blue rectangular roof/platform above the wall and arrange the repeating pink-and-yellow heart-and-ribbon decorations across its top. On the narrow shelf just behind it, place the small blue cat cushion and the potted greenery, including the rounded succulent and taller leafy plant. Below this display in Dreamy Room Level 796, add the two circular heart medallions to the outer wall, the tall peach-framed arched doorway with its blue curtain, the small turquoise-and-pink framed wall picture, and the hanging basket of yellow flowers. At floor level, position the teal sofa to the right of the doorway. Its left arm is wrapped in pink, while the seat holds a yellow tufted cushion and a green decorative pillow. Place the peach teddy bear beside the sofa near the central stairs, then set the tall green-and-gold multi-candle candelabra just behind it. An ornate blue-flower planter belongs outside the left façade. Correct layering is essential in this part of Dreamy Room Level 796.
Step 5. Fill the central staircase area with cushions, the golden rabbit, and small displays
Return to the middle of Dreamy Room Level 796 and use the tall blue staircase as your guide. Place the small golden-yellow rabbit figure on one of the upper-middle blue steps, facing away from the viewer and toward the elevated garden. Around the top and left side of the staircase, arrange the scalloped pink and blue ottoman-like cushions, along with the loose turquoise and lavender shell-shaped cushions. A leafy green plant sits in the rectangular planter immediately behind and to the right of the upper staircase. Several tiny decorative objects fill the open areas of Dreamy Room Level 796 nearby: place the small teal cupcake-shaped container with the pink swirl beside its orange accessories, arrange the three pale gift-like packages in a row on the narrow wall shelf, and put the two small pink framed pieces on the shelf below. Keep the cushions low and the staircase unobstructed. In Dreamy Room Level 796, these tiny pieces are particularly easy to confuse because their pastel colors resemble the surrounding furniture, so use the staircase and shelves as fixed reference points.
Step 6. Assemble the right-side gift cabinet and magical dressing nook
The right-middle portion of Dreamy Room Level 796 contains a compact shop-style cabinet beside a fantasy dressing alcove. Place the tall blue open-front cabinet immediately left of the short staircase. Set the two large wrapped presents on top: a tall pink-and-yellow box and a wider striped box with a pale blue bow. Fill the cabinet shelves in Dreamy Room Level 796 with the small boxed products on the upper row, cream-colored pouch or bottle shapes in the middle, and pink packages along the bottom. To the cabinet’s right, build the peach-trimmed arched nook. Hang the gathered blue curtain along its left interior edge and place the pink cushion, green book or box, tiny white flowers, and small cake display inside. The enormous purple-and-blue floppy hat sits over the arch, decorated with pale dots, pink hearts, a large pink bow, and a cream cat peeking from the top. At the bottom of the stairs, position the standing cream cat character in its purple outfit holding a pink-purple cushion. Finally, place matching peach pedestal planters filled with pink flowers on both sides of the lower right area. These precise relationships make the right side of Dreamy Room Level 796 snap together correctly.
Step 7. Create the lower dining and dessert area
The lower-center space becomes the sweetest part of Dreamy Room Level 796. Put the round pale-blue dining table slightly left of center, directly in front of the sofa and teddy bear. Arrange the desserts on top: the cream roll cake, the round layered cake topped with red fruit, and the square pink cake with cream icing and berry decoration positioned toward the rear side of the dining arrangement. Surround the table with the light wooden chairs with blue seat pads; their backs should angle naturally toward the table. In front of the dining table in Dreamy Room Level 796, place the small two-tier dessert trolley. The upper tray holds two miniature pastries, while the lower shelf contains the tiny tea service and accessories. Build the low decorative boundary around the front of this area using the short blue-and-white posts topped with pink caps and connect them with the pale aqua garlands. Add the small pale-blue floor mats on the left and right sides. When completed correctly, the lower dining zone of Dreamy Room Level 796 should remain open enough that every chair, pastry, and serving piece is clearly visible.
Step 8. Finish the perimeter with the trunk, columns, wings, flowers, ribbons, and pastel puffs
Use the final stage of Dreamy Room Level 796 for the large perimeter decorations that frame the entire scene. Place the rectangular blue trunk or low chest at the front-left edge, directly below the sofa area. Its lid has long mint stripes and its front edge carries a small pearl-like detail. Install the tall cylindrical pastel-striped columns at the far left and far right edges of Dreamy Room Level 796. Large layered blue wing decorations extend outward behind the structure on both sides, creating the impression that the whole room is floating. Check the remaining flower urns and ensure the blue-flower planter is on the left while the pink-flower pedestal arrangements frame the right-hand steps. Along the front edge, arrange the alternating pink, pale-blue, and deeper-blue shell or meringue-shaped puffs. Add the long turquoise ribbon that curls outward from the lower-left center and the pink ruffled ribbon pieces near the trunk. These finishing objects may seem ornamental, but Dreamy Room Level 796 still requires each one to occupy its intended position before the room is fully complete.
Notes and Precautions
The biggest difficulty in Dreamy Room Level 796 is distinguishing between objects that share almost identical pastel colors. Blue cushions, stair pieces, flower decorations, architectural trim, and shell-shaped perimeter ornaments can look interchangeable when they first appear. Always compare an item’s silhouette as well as its color. In Dreamy Room Level 796, large furniture and structures should be placed before tiny food, gifts, books, flowers, and accessories because those anchor pieces reveal the remaining open spaces.
Be especially careful around the upper-right garden. The purple cat belongs on the left pink pouf, while the cream sleeping cat belongs on the right one. The oversized hat belongs above the right dressing arch, not in the garden. Likewise, the golden rabbit stands on the central blue staircase, while the pink rabbit character stays near the upper garden entrance. Several decorative plants in Dreamy Room Level 796 have very specific locations, so matching only by color can send them to the wrong area.
There is no need to rush. Dreamy Room Level 796 rewards careful placement, and the main puzzle is identifying the exact home for each piece.
Tips and Tricks from top player
For a faster Dreamy Room Level 796 clear, use a large-to-small placement strategy. First place the central staircase, elevated alcove, giant bear, sofa, dining table, cabinet, dressing arch, columns, and wings. Those pieces divide Dreamy Room Level 796 into obvious zones and drastically reduce the number of possible positions for everything else.
Next, complete one zone at a time rather than grabbing objects randomly. Finish the upper garden completely, then the giant bear and camera section, the left house and sofa, the central stairs, the right shop and dressing nook, and finally the dining area. When a small item refuses to place in Dreamy Room Level 796, do not repeatedly drag it around the entire room. Look for the matching category: food goes near tables or shelves, cushions stay around seating, floral arrangements sit on pedestals or architectural edges, and character figures occupy prominent open spots.
Another useful Dreamy Room Level 796 shortcut is to use outlines. The distinctive cat-topped hat, camera, candelabra, gift boxes, star garland, flower urns, and dessert trolley each have unique shapes and can quickly establish the surrounding placements.
Final Scene
Once Dreamy Room Level 796 is complete, the empty blue shell has become a dreamy multi-level pastel retreat. A giant pink bear in a striped sleeping cap watches over the left side beside an oversized camera, plants, a curtained doorway, and a jewel-toned sofa. The center of Dreamy Room Level 796 rises through cloud-like blue stairs where a golden rabbit climbs toward an elevated garden. Above, a flower-covered pergola shelters two resting cats, a tiny dessert table, curved seating, hanging stars, books, vines, and ornate flowers. On the right, colorful gifts and a stocked cabinet lead toward an arched dressing nook crowned by an enormous heart-covered hat with another cat peeking out. Below, a cheerful cat stands beside a complete tea-and-cake dining setup. Wings, striped columns, flower urns, ribbons, shell-like pastel decorations, and tiny lights frame the scene, giving Dreamy Room Level 796 its finished magical storybook appearance.