Dreamy Room Level 916
Dreamy Room Level 916 guide - Dreamy Room 916 Walkthrough & Solution.
Important Notice Regarding Level Numbering
Due to frequent changes in Dreamy Room's level numbering and differences between platforms (Android/iOS) – for example, level 916 on Android might not be the same as level 916 on iOS – the text guide below may not always match the images and video above. Please prioritize the image and video guides. If you find that the guide content doesn't match your current level, please visit the All Level Walkthroughs page to find the correct guide based on level images. Thank you for your understanding.
Dreamy Room Level 916 Walkthroughs & Guide
Step 1. Build the Large Riverside House on the Left Side
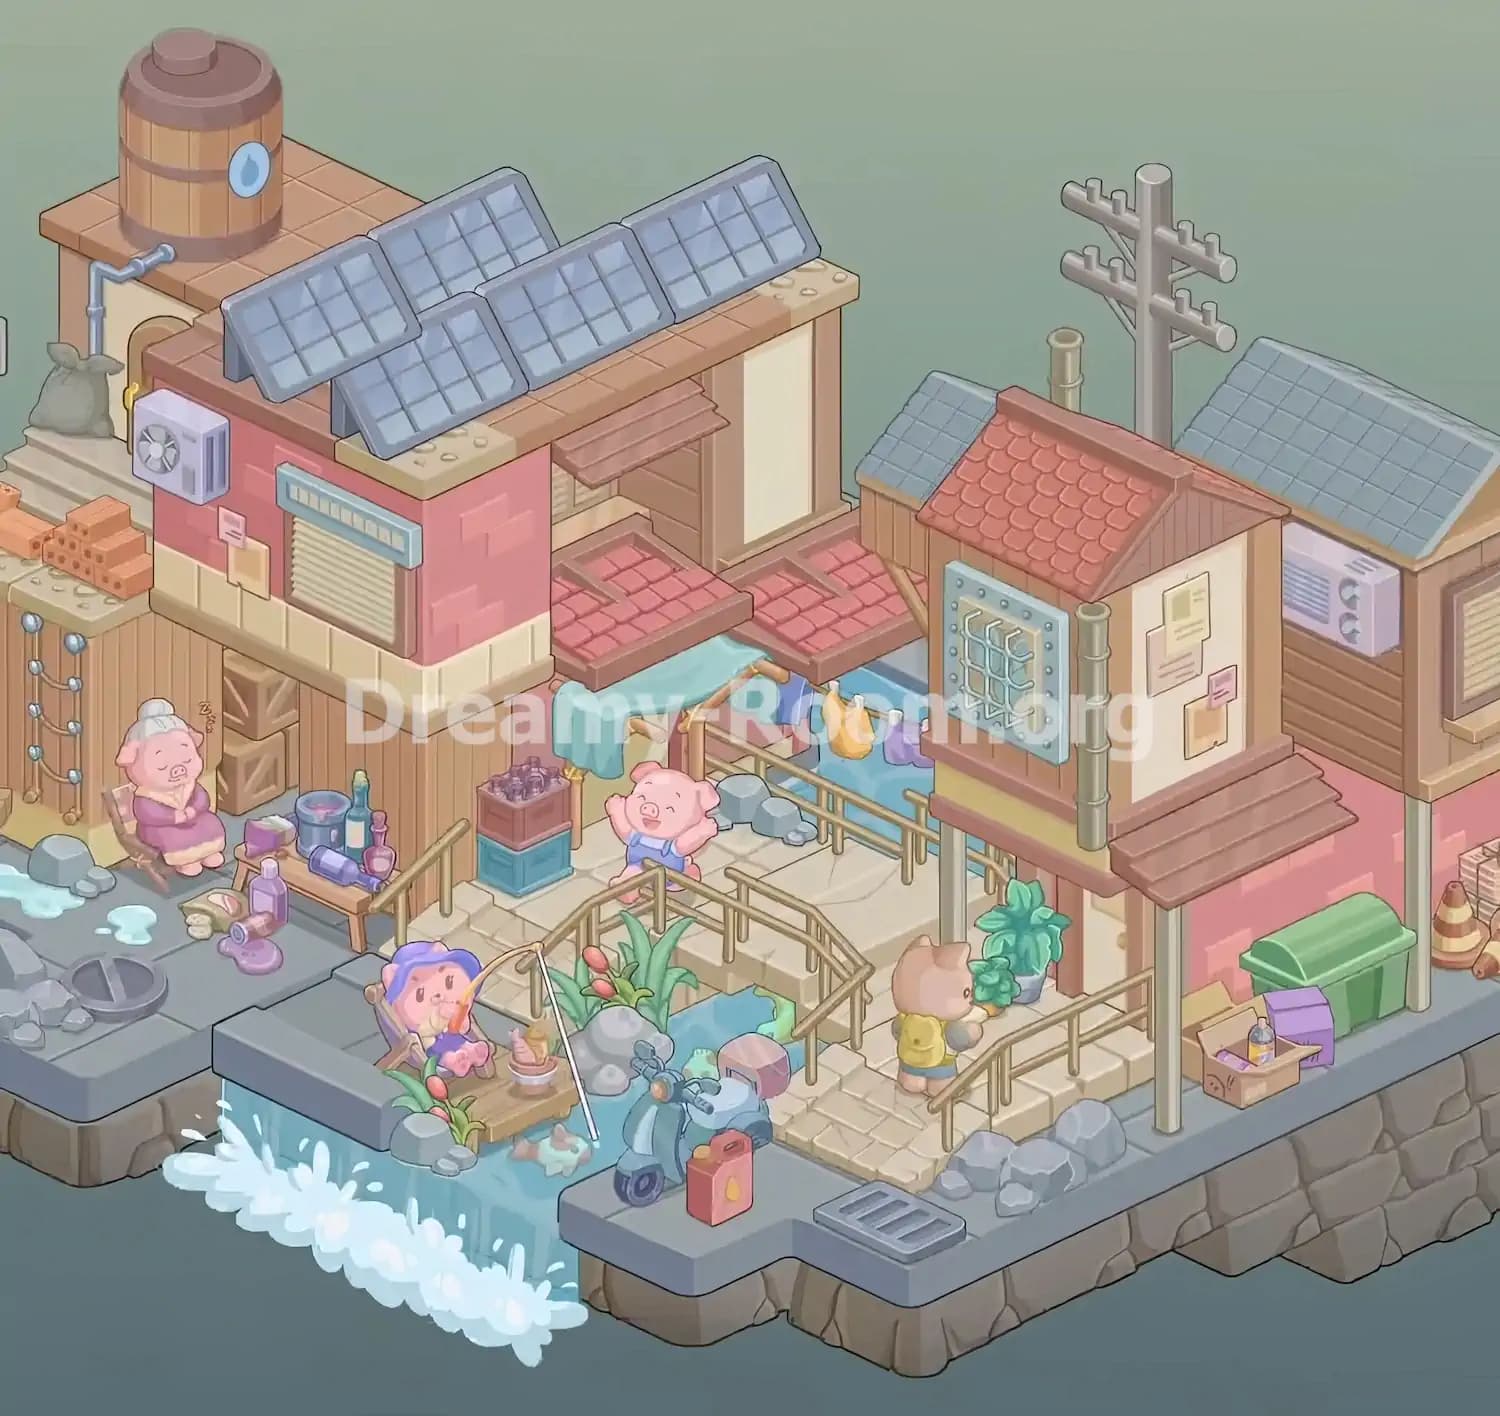
Begin Dreamy Room Level 916 by focusing on the large building occupying the left half of the scene. The existing platform features a water channel running diagonally toward the front waterfall, so keep this waterway visible as you establish the neighborhood.
Position the large building along the back-left section of the paved area. Its lower level features vertical brown wooden panels, while the upper section will support a pink storefront and rooftop structures. The building should sit behind the left-hand pedestrian area, leaving enough space in front for the characters and decorations.
Arrange the wooden wall sections neatly beneath the upper floor. Position the stacked wooden crates against the lower wall, close to the building's central section.
In Dreamy Room Level 916, these large architectural pieces establish the boundaries for the remaining decorations. Check that the building does not extend too far forward or interfere with the stream, bridge, or riverside seating area.
Step 2. Install the Pink Storefront and Its Exterior Decorations
The next task in Dreamy Room Level 916 is to complete the pink storefront on the upper level of the left building. Position the pink rectangular structure above the wooden ground floor, with its cream-colored lower trim facing the player.
Install the beige rolling shutter on the front-facing wall, slightly right of center. Attach the long, pale-blue rectangular sign directly above the shutter, keeping both components aligned. The sign has a darker blue border and a series of light-colored panels inside.
Place the square air-conditioning unit on the upper-left portion of the pink wall. Its circular fan should face outward. Below and slightly to the right of the unit, attach the small cream and pink notices.
The pink side wall should extend toward the center of the neighborhood. During Dreamy Room Level 916, pay attention to the storefront's height and orientation because its roof must accommodate several solar panels later. A correctly positioned storefront also leaves room for the narrow passage and tiled awnings behind it.
Step 3. Add the Wooden Water Tank, Pipes, and Rooftop Accessories
Continue Dreamy Room Level 916 by decorating the highest section of the left building. Start with the large cylindrical wooden water tank, which belongs on the flat roof at the far back-left corner. The tank has brown horizontal bands, a rounded lid, and a blue water-drop symbol on its side.
Attach the gray metal pipe to the lower-left side of the tank. The pipe bends outward before descending along the cream-colored wall below. Make sure the pipe follows the wall rather than floating beside the structure.
Next, place the small staircase or raised steps along the building's far-left rear edge. Position the tied gray sack near the bottom of the pipe, resting on the uppermost step.
These accessories give Dreamy Room Level 916 its authentic neighborhood atmosphere. The water tank should remain visible above the main rooftop, while the pipe and sack occupy the narrow gap behind the storefront.
Check the tank's orientation before continuing, as placing it too far forward could interfere with the rooftop solar panels.
Step 4. Arrange the Five Solar Panels Across the Main Rooftop
One of the most recognizable features of Dreamy Room Level 916 is the collection of five blue-gray solar panels covering the large building's roof. These panels should occupy the central and right portions of the rooftop, leaving the wooden water tank unobstructed at the far-left rear corner.
Begin by placing the rear panels near the back roof edge. Their rectangular surfaces should face diagonally toward the front of the scene. Next, position the remaining panels across the front roof edge, creating a compact, slightly overlapping arrangement.
Each panel has a dark frame and a grid of lighter blue solar cells. Keep their angles consistent, with the panels supported by small gray stands.
In Dreamy Room Level 916, the solar panels need to fit closely together without covering the water tank or extending too far beyond the roof.
Once they are positioned, complete the rooftop's right section with its cream wall panel, brown framework, recessed doorway, and small sloping wooden canopy. These features help connect the main building with the smaller structures behind it.
Step 5. Construct the Tiled Awnings and Covered Riverside Passage
The middle of Dreamy Room Level 916 features a narrow passage connecting the large left building with the smaller houses on the right. This area contains several overlapping roofing elements, a fabric-covered shelter, and an outdoor clothesline.
Start by placing two low pink-tiled awnings behind the main storefront. The left awning extends outward from the building, while the second sits slightly farther back and to the right. Their reddish tiles should overlap visually to create the appearance of a continuous residential alley.
Below these awnings, position the wooden shelter frame over the center-left walkway. Drape the turquoise fabric canopy across the top, allowing its edges to hang down naturally.
Behind the canopy, arrange the clothesline between the buildings. Hang the blue garments toward the center, followed by the yellow clothing item and purple garment toward the right.
These small decorations are important in Dreamy Room Level 916 because they create depth between the structures. Ensure the clothesline stays behind the bridge railings and the blue canopy remains below the tiled roofs.
Step 6. Build the Rear Houses and Install the Utility Pole
Move to the back-right section of Dreamy Room Level 916, where several compact buildings create a layered residential skyline. Begin with the small brown wooden structure immediately behind the central house. Its sloping blue-gray roof should be visible to the left of the red-tiled roof that will be installed later.
Next, position the larger rear building at the far-right edge. This structure has a broad blue-gray tiled roof, horizontal brown wooden walls, and a pink lower section.
Attach the light-purple air-conditioning unit beneath the roofline, facing the open space between the buildings. On the far-right wall, install the beige shuttered window with its brown frame.
Place the tall gray utility pole behind the central houses, slightly right of the middle. Its two horizontal crossarms and multiple short insulator posts should extend above the roofs.
The positioning in Dreamy Room Level 916 is especially important here because the buildings overlap. Keep the utility pole behind the structures rather than in front of their walls.
This creates the layered rooftop silhouette seen in the completed Dreamy Room Level 916 scene.
Step 7. Assemble the Red-Roofed House and Wall Notice Board
Now construct the smaller raised house near the center-right of Dreamy Room Level 916. This charming building stands prominently in front of the rear houses and above the right-hand walkway.
Position its wooden walls on the raised supports, leaving the passage underneath open. Install the sloping terracotta-red roof, with the tiled surface facing the viewer and the triangular wooden gable pointing toward the right.
Attach the large blue-gray metal window grille to the left-facing wall. The grille has a bolted rectangular border and curved decorative metal bars across the opening.
On the right-facing cream wall, arrange the small paper notices. Place the larger pale-yellow notice near the top, the pinkish paper toward the left-middle, and the smaller tan and pink notes below.
Add the vertical gray drainage pipes along the building's edges. Finally, install the broad brown sloping awning beneath the notice-covered wall.
In Dreamy Room Level 916, the building should remain elevated above the sidewalk. Make sure its support posts reach the ground and that the lower passage remains accessible.
Step 8. Place the Stone Walkway, Wooden Bridge, and Railings
The bridge is a major structural feature in Dreamy Room Level 916 because it connects the left and right sections of the neighborhood while allowing water to flow beneath it.
Begin by arranging the pale stone walkway across the middle of the scene, extending from the left building toward the right-side houses. The walkway should follow the edge of the narrow blue water channel without completely covering it.
Position the small arched bridge in the front-center area. Its walkway rises slightly in the middle, while the curved wooden railings descend toward both ends. The bridge should connect naturally to the paved path on either side.
Add the straight wooden railings along the elevated portions of the walkway. Extend one railing toward the back-right passage and another along the lower-right sidewalk.
The railings in Dreamy Room Level 916 use slender golden-brown posts and horizontal bars. Their delicate shape can make them difficult to position accurately.
Check that the arch remains visible above the water and that the bridge doesn't obscure the waterfall at the front edge. This arrangement creates the distinctive riverside crossing in Dreamy Room Level 916.
Step 9. Decorate the Left Alley with the Elderly Pig and Household Items
The left foreground of Dreamy Room Level 916 becomes a cozy neighborhood corner filled with small domestic objects.
Place the elderly pink pig character on a brown wooden chair against the lower-left wall of the large house. The pig wears a purple dress with cream trim and has white hair tied into a bun. Position the chair so the character faces slightly toward the front-right, with its feet resting on the pavement.
To the pig's right, add the small wooden table. Arrange a blue bucket, tall blue-green bottle, purple perfume bottles, and a purple cylindrical object on its surface.
Scatter the remaining small accessories in front of the table, including the purple slippers, bottles, a small container, and a few miscellaneous household items.
Next, add the vertical string of round blue lights to the wooden fence on the far-left side. Place the orange bricks on top of the fence and a few gray stones near the lower pavement edge.
Complete this Dreamy Room Level 916 corner by placing the circular dark-gray manhole cover near the front-left sidewalk, with pale-blue puddles nearby.
These tiny details are easy to overlook in Dreamy Room Level 916, so inspect the entire alley before moving on.
Step 10. Add the Waving Pig, Storage Crates, and Laundry Area Details
The central walkway of Dreamy Room Level 916 features an adorable pink pig standing beneath the turquoise canopy.
Position the small pig wearing blue overalls on the stone path near the left end of the bridge. Both arms should be raised, giving the character a cheerful, welcoming appearance. The pig should face toward the front of the scene, with the wooden bridge railings visible around its lower body.
Immediately to the left of the pig, place two stacked storage crates. The bottom crate is blue-green, while the upper crate is reddish-brown and filled with small purple items resembling bundled produce.
Arrange the wooden posts supporting the turquoise canopy behind the pig. The fabric should stretch across the shelter without obscuring the character's face.
Add a few gray rocks along the water channel behind the bridge, beneath the clothesline.
In Dreamy Room Level 916, this section connects several tightly packed decorations. The crates, canopy, railings, and character must all remain visible.
When arranging the objects, use the waving pig as your central reference point. This makes the middle of Dreamy Room Level 916 easier to organize without accidentally shifting the bridge or surrounding structures.
Step 11. Create the Fishing Spot beside the Front Waterfall
The fishing area is one of the most charming features of Dreamy Room Level 916. It occupies the front-left side of the water channel, immediately beside the waterfall.
Begin by placing the small rectangular wooden fishing platform over the water. Its back edge should meet the paved embankment, while the front portion extends outward toward the waterfall.
Add the reclining wooden chair on the left side of the platform. Seat the young pink pig character with blue-purple hair or a hood in the chair, facing slightly to the right. The character holds a long fishing rod that extends diagonally over the water.
Position the small bowl of food or bait on the wooden platform, to the pig's right.
Next, decorate the fishing spot with green aquatic plants, tall leaves, and pink flower buds. Arrange rounded gray rocks around the plants, especially where the platform meets the water.
Include the small submerged decorative shapes near the base of the fishing area.
In Dreamy Room Level 916, keep the fishing rod angled toward the water and ensure it doesn't cross awkwardly through the bridge. The fishing platform should feel like a peaceful retreat at the edge of the busy neighborhood.
Step 12. Park the Blue Scooter and Arrange the Waterfront Accessories
Continue decorating the front section of Dreamy Room Level 916 by placing the blue motor scooter on the paved area beside the water.
The scooter belongs immediately to the right of the fishing platform and slightly in front of the central bridge. Point its front wheel toward the lower-left corner of the screen, with the handlebars angled diagonally across the scene.
The scooter has a rounded blue body, a dark front wheel, and a pinkish rear storage compartment. Its position should allow the fishing platform and water channel to remain visible behind it.
Place the red-orange fuel canister directly in front of the scooter, slightly to its right. The canister has a yellow droplet symbol on its front.
Next, position the rectangular gray storm drain on the pavement farther to the right. Its parallel dark openings should face upward.
Add several clusters of gray rocks along the waterfront, particularly near the bridge and the right-hand sidewalk.
The details in Dreamy Room Level 916 should remain proportionate to one another. Avoid placing the scooter too close to the waterfall, as that would hide part of the fishing area.
This section of Dreamy Room Level 916 combines functional street objects with the tranquil riverside scenery.
Step 13. Complete the Right Side with the Walking Character, Plants, and Street Decorations
Finish the right-hand neighborhood of Dreamy Room Level 916 by arranging the remaining decorations along the raised sidewalk beneath the red-roofed house.
Position the small beige animal character on the stone walkway near the center-right. The character wears a yellow top and blue shorts and holds a gray object while facing the potted plants beside the building.
Place the two leafy green plants against the lower wall, just beyond the character. One plant has broad turquoise leaves, while the other is smaller and bushier. Keep them close to the wall without obstructing the walkway.
Move farther right and install the large green dumpster against the pink building wall. Its rounded lid should face upward, with the body parallel to the sidewalk.
Place the purple package or box immediately in front of the dumpster. Add the open cardboard box to the left, containing a small bottle and several colorful items.
At the far-right edge of Dreamy Room Level 916, arrange the orange-and-cream traffic cones beside the stacked bricks.
Complete the foreground with additional gray rocks, the drainage grate, and the exposed stone embankment.
These decorations make the final section of Dreamy Room Level 916 feel like a busy, lived-in street rather than an empty walkway.
Step 14. Check the Waterfall, Building Layers, and Final Object Positions
Before completing Dreamy Room Level 916, examine the entire neighborhood from the highest roof to the front waterfall.
Start at the back-left water tank and follow the rooftop line across the five solar panels, pink storefront, tiled awnings, red-roofed house, utility pole, and blue-roofed buildings on the right.
Then inspect the central passage. The turquoise canopy should sit beneath the tiled awnings, while the clothesline hangs behind the bridge. The waving pig and stacked crates should occupy the left side of the stone walkway.
Move to the foreground and verify that the elderly pig remains seated beside the cosmetic table, the fishing pig occupies the wooden platform, and the scooter is parked near the water.
Finally, inspect the right sidewalk for the yellow-shirted character, potted plants, green dumpster, boxes, traffic cones, rocks, and drain.
The flowing blue water and white splashes at the front are important visual landmarks in Dreamy Room Level 916. Keep the channel unobstructed so that the completed scene retains its distinctive cascading-water effect.
If an item has not registered correctly in Dreamy Room Level 916, compare its position with the surrounding objects and adjust it carefully.
Notes and Precautions
Dreamy Room Level 916 contains numerous overlapping objects, making accurate placement more challenging than it first appears.
- Watch the building layers. The pink storefront occupies the front-left upper level, while the smaller tiled houses sit behind and to the right. Incorrect layering can make later objects difficult to place.
- Keep the water channel open. The bridge and fishing platform should cross or border the water without completely hiding it.
- Pay attention to rooftop decorations. Dreamy Room Level 916 has five solar panels on the main building and a separate wooden water tank behind them.
- Do not overlook tiny street objects. The cosmetic bottles, purple slippers, cardboard boxes, plant decorations, and small paper notices are all part of the finished scene.
- Check the characters' positions. The elderly pig sits at the left, the waving pig stands near the center bridge, the fishing pig occupies the front platform, and the yellow-shirted animal stands on the right walkway.
- Use neighboring objects as references. In Dreamy Room Level 916, the precise relationship between objects matters more than their approximate screen position.
The order presented here is a practical approach based on the completed scene, rather than a verified mandatory placement sequence. If Dreamy Room Level 916 does not accept an object, try adjusting its position slightly while preserving the arrangement shown in the reference image.
Tips and Tricks from top player
To finish Dreamy Room Level 916 more efficiently, use a structured placement strategy rather than attempting to position every object randomly.
- Work from the back toward the front. Build the rear structures and rooftops first, followed by the central passage, bridge, and waterfront decorations. This reduces visual obstruction.
- Place large objects before tiny ones. In Dreamy Room Level 916, buildings, solar panels, roofs, and the bridge provide useful reference points for all remaining decorations.
- Group related accessories. Keep rooftop items, household objects, fishing accessories, and street decorations together mentally so that nothing is forgotten.
- Use the characters as placement anchors. The four animal characters mark the major activity zones in the completed neighborhood.
- Check overlapping objects carefully. The center of Dreamy Room Level 916 contains several overlapping roofs, cloth coverings, clothesline items, and bridge railings. Adjust the underlying structures before fine-tuning the accessories.
- Inspect the corners last. The far-left bricks and hanging lights, upper-right utility pole, and far-right traffic cones are easy to miss when concentrating on the main buildings.
The most effective strategy for Dreamy Room Level 916 is to finish one area completely before moving to another. This approach makes it easier to identify misplaced items and reduces unnecessary adjustments.
Final Scene: A Cozy Riverside Neighborhood in Dreamy Room Level 916
The completed Dreamy Room Level 916 transforms an empty stone platform into a delightful miniature riverside neighborhood bursting with personality.
On the left, a pastel-pink storefront sits beneath five solar panels, while a large wooden water tank rises behind it. An elderly pig rests peacefully outside the wooden ground floor, surrounded by colorful household accessories. Nearby, another cheerful pig waves beside a turquoise canopy and a collection of storage crates.
The central wooden bridge crosses the flowing blue stream, connecting the bustling neighborhood streets. At the front, a young pig enjoys a quiet fishing session beside the cascading waterfall, while a blue scooter waits nearby.
On the right, charming houses with colorful tiled roofs overlook narrow sidewalks decorated with plants, boxes, and a green dumpster. A small animal character explores the walkway beneath the raised red-roofed house.
Dreamy Room Level 916 captures the warmth of everyday neighborhood life through its carefully arranged details, completing a peaceful, colorful riverside scene.