Dreamy Room Level 912
Dreamy Room Level 912 guide - Dreamy Room 912 Walkthrough & Solution.
Important Notice Regarding Level Numbering
Due to frequent changes in Dreamy Room's level numbering and differences between platforms (Android/iOS) – for example, level 912 on Android might not be the same as level 912 on iOS – the text guide below may not always match the images and video above. Please prioritize the image and video guides. If you find that the guide content doesn't match your current level, please visit the All Level Walkthroughs page to find the correct guide based on level images. Thank you for your understanding.
Dreamy Room Level 912 Walkthroughs & Guide
Step 1. Build the Royal Castle Structure and Decorate the Upper Walls
Begin Dreamy Room Level 912 by transforming the plain upper room into an elegant royal castle chamber. The empty layout features three cream-colored walls and a blue checkered floor, providing the foundation for the elaborate decorations.
Position the tall Gothic stained-glass windows along the left and rear walls. These windows have pointed arches, blue frames, golden ornamental patterns, and small pink hearts. Their varying visible heights create the impression of a grand castle interior.
At the back-center, install the vertical column topped with an oversized golden crown featuring pink panels and a heart-shaped ornament. To its right, position the tall brown double doors within the purple-trimmed pointed arch.
Complete this architectural section of Dreamy Room Level 912 by arranging the green climbing vines and pink roses around the upper-right roofline. The flowers should cascade downward toward the entrance, while the crown remains clearly visible above the dining area.
These architectural pieces establish the royal atmosphere and help identify the correct positions for the remaining Dreamy Room Level 912 decorations.
Step 2. Position the Blue Piano and Furnish the Upper Terrace
Next, focus on the left side of the upper terrace in Dreamy Room Level 912. Place the light-blue grand piano directly in front of the stained-glass windows, with its keyboard facing diagonally toward the lower-left corner of the scene.
The piano's raised lid should lean toward the windows, leaving its white-and-dark keyboard visible from the front. Its placement is important because the nearby chairs, table, and balcony decorations occupy the remaining space.
Install the soft pink, rounded-back chairs around the central dining area. Their backs resemble stylized hearts or decorative animal ears, matching the romantic castle theme.
Position the small pink bear character on the cushioned seating near the front-left side of the dining terrace. The bear should face outward toward the viewer, just behind the golden balcony railing.
In Dreamy Room Level 912, the piano and bear provide useful reference points for placing the larger furniture. Keep enough visual separation between the piano, chairs, and front railing.
Once this area matches the reference, the upper-left portion of Dreamy Room Level 912 should feel like a cozy royal music lounge.
Step 3. Arrange the Royal Tea Party Table and Bunny Princess
The central dining table is one of the most important features of Dreamy Room Level 912. Position the long rectangular table in the middle of the upper terrace, slightly to the right of the blue grand piano. Cover it with the pink tablecloth, allowing its edges to hang over the front.
Place the decorative pink pedestal bowl in the center. Fill it with the yellow, green, and pastel-colored fruit arrangement, creating an elaborate centerpiece resembling a royal dessert display.
Arrange the blue teapot with gold detailing near the front-left corner of the table. Position the matching blue-and-gold teacups around the remaining available spaces, including the front edge and the right side.
At the far-right end of the table, seat the white bunny princess in the ornate golden chair. She wears a pink bow and faces the tea party.
In Dreamy Room Level 912, the table arrangement must fit between the piano and the right-side walkway without covering the surrounding chairs.
Finally, add the floral wall decoration and golden ornamental emblem behind the table. These details complete the royal dining atmosphere of Dreamy Room Level 912.
Step 4. Decorate the Upper Balcony and Position the Stroller
Continue Dreamy Room Level 912 by installing the golden balcony railing across the front of the upper terrace. The railing features elegant posts and decorative heart-shaped details that match the royal castle design.
Hang the colorful vertical banners from the front-facing railing. These banners have gold borders and alternating blue, pink, and yellow panels. Position them so that they hang downward over the castle wall without obstructing the seating area.
On the upper-right walkway, place the cream-colored cat wearing a dark-blue outfit. This character stands to the right of the tea party, facing slightly toward the left.
Next to the cat, position the small orange-and-gold wheeled stroller or covered carriage. Its rounded canopy should face toward the viewer, with the handle extending toward the character.
The correct arrangement in Dreamy Room Level 912 leaves the cat standing between the tea table and the wheeled carriage.
Add the small heart decorations around the furniture and railing. Keep the right-side walkway clear enough to distinguish the carriage, cat, and decorative castle tower.
Completing this section of Dreamy Room Level 912 creates a natural transition from the royal dining chamber to the amusement park attractions.
Step 5. Construct the Pink Castle Tower and Teacup Ride on the Left
The left side of Dreamy Room Level 912 features a striking pink castle tower that rises above a colorful teacup amusement ride.
Place the tall cylindrical tower at the upper-left edge of the castle. Its roof is a steep pink cone decorated with vertical golden stripes and a pointed gold finial. Arrange the smaller matching turrets around its base.
Install the blue-and-pink arched windows beneath the roof, then add the balcony with its cream-colored crenellated walls.
Position the smiling pink cat on the tower balcony. The cat wears a green outfit and appears to be waving toward visitors below.
Under the tower, assemble the circular teacup ride with its alternating pink and blue platform segments. The platform extends outward to the left and toward the center of the structure.
Place the orange kitten inside the large blue teacup at the front of the ride. The cup has golden handles, a golden rim, and a matching saucer-like base.
In Dreamy Room Level 912, keeping the teacup directly beneath the pink tower helps align the attraction correctly.
This colorful castle-and-teacup combination is one of the most recognizable features of Dreamy Room Level 912.
Step 6. Install the Curved Slides, Teacup Tracks, and Mechanical Gears
Now expand the amusement park features of Dreamy Room Level 912 by arranging the large curved slides and mechanical decorations around the castle.
Start with the prominent purple slide near the center-left of the structure. Its tall, curved form descends from beneath the upper terrace toward the lower platform. Position the opening so that its blue interior faces the viewer.
Add the decorative pink scroll-shaped elements above and beside the slide. These create a whimsical connection between the castle railing and the amusement attraction.
Attach the large golden gear to the slide's lower-right side, followed by the smaller blue gear beneath it. These mechanical details should remain visible beside the central terrace.
Continue with the colorful raised teacup track. Part of the track curves around the far-left tower, while another section rises along the upper-right side of the castle.
Position the large blue-and-gold teacup at the far upper-right end of the track, above the flowering vines.
Dreamy Room Level 912 also features smaller purple and blue curved structures on the walls below. Keep these aligned with the main slides.
The main difficulty in Dreamy Room Level 912 is fitting these overlapping attractions without obscuring the nearby characters and decorative objects.
Step 7. Build the Heart-Shaped Fountain Garden in the Middle
The middle terrace of Dreamy Room Level 912 is dedicated to a charming fountain garden decorated with flowers and a playful kitten.
Position the rounded, pale-purple fountain basin slightly right of center on the middle platform. The basin should contain clear turquoise water, small green lily pads, and delicate pink water flowers.
Install the elevated heart-shaped fountain bowl at the back of the basin. Its blue-green water should appear to flow into the larger pool beneath it.
Arrange the flowering plants behind and to the right of the fountain. Place the pink flowers in the purple planter against the back wall, then add the arrangement of turquoise-blue blossoms and pink rosebuds along the right edge.
Position the white kitten wearing a blue dress and red shoes at the front-left edge of the fountain. The kitten spreads its arms while holding a small decorative object in one hand.
Install the tall golden stand with its hanging pink ornament beside the kitten, toward the left edge of the fountain platform.
In Dreamy Room Level 912, the kitten belongs in front of the fountain rather than inside it.
These elements make the central garden one of the most colorful sections of Dreamy Room Level 912.
Step 8. Complete the Right Castle Tower and Flowing Water Feature
The right-middle section of Dreamy Room Level 912 contains a tall, narrow castle tower that visually connects the upper terrace with the carousel below.
Position the tower against the right edge of the structure. Its pointed pink roof should rise above the middle fountain area and feature golden vertical trim, small heart motifs, and a gold finial.
Beneath the roof, install the pale-cream tower body with its tall, narrow arched openings. These openings allow the turquoise interior to remain visible.
At the lower section of the tower, arrange the water basin so that the water flows from the right side and spills downward along the outside wall.
Make sure this waterfall aligns with the castle's vertical edge. Dreamy Room Level 912 uses several water features, so do not confuse this elevated waterfall with the stream running through the lower garden.
Add the small decorative flowers around the tower's neighboring terrace and keep the lower platform available for the carousel.
This section of Dreamy Room Level 912 should look like a miniature royal pavilion, complete with a pointed roof and a continuous stream of flowing blue water.
Step 9. Assemble the Pink-and-Gold Carousel and Place the Bunny Visitors
One of the largest attractions in Dreamy Room Level 912 is the beautiful carousel occupying the lower-right side of the castle.
Start by installing the round carousel platform just below the middle terrace. Its outer edge is decorated with pink ribbons, golden trim, and prominent pink bows.
Position the cylindrical central support and attach the large circular canopy above it. The canopy features alternating pink and cream-colored panels, creating a classic carnival appearance.
Add the decorative crown at the canopy's peak. The crown is embellished with turquoise jewels and a prominent pink heart.
Arrange the miniature carousel horses beneath the canopy. Their bodies are cream-colored, with blue manes, pink accents, and golden saddles. Several horses are visible around the central support.
Place the cheerful white bunny in green clothing on the grass immediately to the left of the carousel. Position the second white bunny, wearing a purple outfit and pink bow, near the lower-right edge.
Dreamy Room Level 912 also includes a wooden directional signpost beside the carousel. Position it between the ride and the central pathway.
In Dreamy Room Level 912, the carousel canopy must sit high enough to reveal the horses beneath it while leaving the two bunny visitors clearly visible.
Step 10. Decorate the Lower Balcony, Sweet Cart, and Flower-Covered Walls
Move to the lower-left portion of Dreamy Room Level 912, where the castle becomes a cozy garden filled with adorable decorations.
Begin with the small semicircular balcony attached to the left wall. Install its golden railing and blue bead-like ornaments along the front.
Position the cream-colored kitten wearing a pink outfit and blue bow on this balcony. The kitten sits comfortably while hugging a small brown teddy bear.
Next, arrange the tall pink flowers climbing along the outside wall to the left of the balcony. Their curved green stems and large blossoms should extend upward toward the upper platform.
Below the balcony, position the small blue snack cart with wheels and a silver bowl-shaped machine on top. Add the colorful treats and golden-yellow puff decoration beside it.
Install the row of leafy green bushes with pink roses beneath the upper walkway. The flowering greenery should stretch horizontally across the lower castle wall.
Dreamy Room Level 912 also has a purple heart-shaped architectural accent above this flower-covered section.
Finally, place the framed hanging decoration near the lower doorway, showing a tiny pale character inside an ornate brown border.
These objects give the lower castle walls of Dreamy Room Level 912 their charming, lived-in appearance.
Step 11. Create the Flowing Stream, Paper Boats, and Wooden Bridge
The waterway is an essential part of Dreamy Room Level 912 because it connects the castle's lower entrance with the garden at the front.
Begin by arranging the blue stream that emerges from the purple-framed doorway near the lower center of the castle. The water should flow diagonally toward the bottom-right edge of the grassy platform.
Position the cream-colored kitten wearing turquoise clothing beside the stream, near the left side of the doorway. This kitten appears to be playing with floating soap bubbles.
Place a pink paper boat on the water near the doorway. Add the other visible paper boat farther downstream, close to the curved bridge.
Install the small wooden bridge across the stream near the front-right side of the garden. Its pale wooden planks form a gentle arch, allowing the water to pass beneath.
At the front edge of the platform, continue the turquoise waterfall so that the stream appears to spill into the open space below.
Dreamy Room Level 912 also includes a wooden directional sign near the carousel, pointing toward different parts of the amusement park.
Check that the bridge, boats, and stream remain visible in Dreamy Room Level 912. These small details help distinguish the garden from an ordinary castle courtyard.
Step 12. Finish the Front Garden, Entrance Gate, Cats, and Final Decorations
Complete Dreamy Room Level 912 by decorating the grassy foreground and placing the remaining small objects in their correct locations.
Begin with the golden entrance gate at the lower-left front edge of the castle grounds. The gate features elaborate curling metalwork and two short cream-colored posts topped with pink hearts.
Position two neatly shaped green trees in round brown planters on either side of the entrance area. Add the small green bushes and gray stepping stones along the garden pathway.
Place the light-purple kitten near the front-center of the lawn, immediately left of the wooden bridge. The kitten wears a purple outfit and plays with a small blue toy car.
Arrange the larger green shrubs behind this kitten, then add the remaining gray stones around its feet and along the waterway.
At the far-left edge of Dreamy Room Level 912, position the oversized pastel puzzle pieces on the ground. The visible pieces are light blue and pink.
On the far-right ground, install the small decorative mechanical piece with blue gears, a narrow wooden platform, and a pink-red rounded end.
Finally, check the pink flowers, small bushes, heart decorations, ribbons, and remaining decorative pieces throughout the structure.
Once every item is aligned, Dreamy Room Level 912 becomes a complete miniature amusement kingdom, with no major empty spaces remaining.
Notes and Precautions
Dreamy Room Level 912 contains many overlapping objects, so careful placement is essential. The central challenge is not simply identifying the decorations but finding the specific location where each piece belongs.
Pay particular attention to these details:
- Upper-floor alignment: The piano, tea table, chairs, and characters must fit together without covering the stained-glass windows or royal doorway.
- Different elevations: Dreamy Room Level 912 has multiple levels. The dining room belongs at the top, the fountain occupies the middle terrace, and the carousel extends into the lower-right garden.
- Similar-looking objects: Several decorations use pink hearts, golden borders, and blue accents. Compare their shapes rather than relying on color alone.
- Teacup attractions: The upper-right teacup, left-side teacup ride, and tea party cups belong to different parts of the structure.
- Water features: Keep the right tower waterfall separate from the central fountain and lower stream.
- Small decorations: Paper boats, gears, banners, hanging ornaments, and flowers are easy to overlook.
- Character positions: Each cat, bear, and bunny has a designated location. Avoid placing characters according to appearance alone.
In Dreamy Room Level 912, a tiny misplaced decoration can prevent the arrangement from matching the completed reference. Check the entire structure before assuming the level is finished.
Tips and Tricks from top player
The most effective strategy for Dreamy Room Level 912 is to assemble the scene in layers, working from large architectural structures to small decorations.
Start with the largest objects. Install the castle roofs, stained-glass windows, crown, slide, towers, and carousel before handling the small decorative pieces. This gives you reliable landmarks for the rest of Dreamy Room Level 912.
Use recognizable landmarks. The giant golden crown marks the upper-center region, the pink tower identifies the left edge, the heart-shaped fountain marks the middle, and the carousel defines the lower-right area.
Group similar decorations mentally. Organize your placements into royal furniture, amusement rides, garden plants, water features, animal characters, and mechanical objects. This reduces confusion when working through Dreamy Room Level 912.
Place characters after their surroundings. For example, position the tea table before the bunny princess, assemble the fountain before placing the blue-dressed kitten, and finish the carousel before adding its two bunny visitors.
Check small objects last. Review the paper boats, signpost, gears, flower pots, banners, puzzle pieces, and hanging ornaments.
For Dreamy Room Level 912, this large-to-small approach helps avoid repeated repositioning and makes the completed reference easier to follow.
Final Scene: A Magical Cat Kingdom Full of Surprises
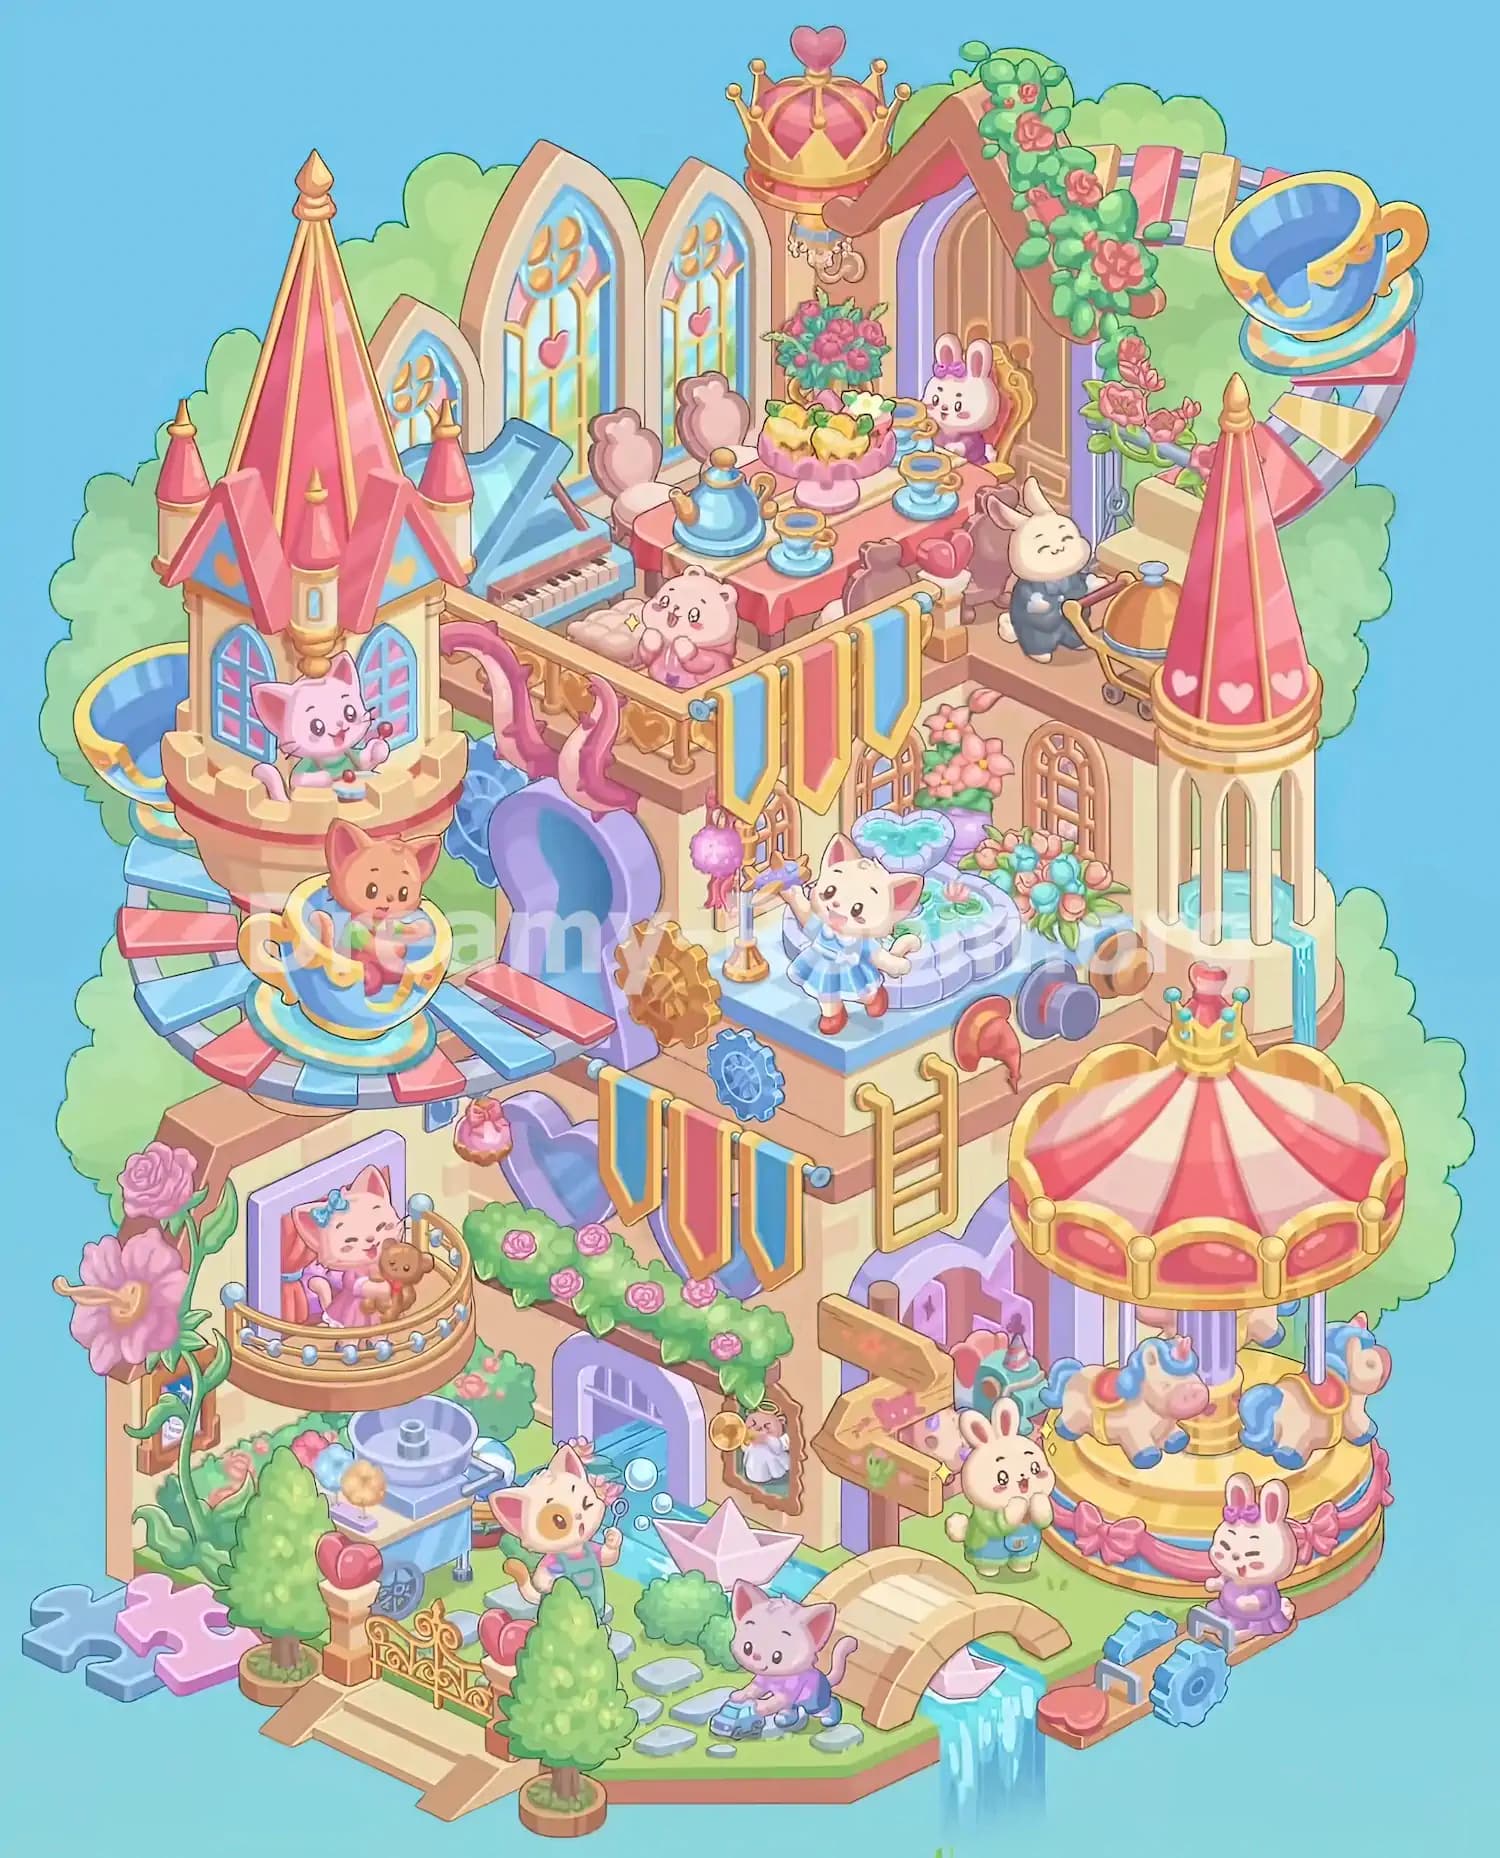
The completed Dreamy Room Level 912 reveals an enchanting miniature castle amusement park overflowing with color, character, and imaginative detail.
At the top, a magnificent royal dining terrace features heart-patterned stained-glass windows, a golden crown, a blue piano, and a delightful tea party hosted by a bunny princess. To the left, a tall pink castle tower overlooks a colorful spinning teacup attraction, where cheerful kittens enjoy their adventures.
The middle level of Dreamy Room Level 912 contains a beautiful heart-shaped fountain surrounded by blossoms, while a playful white kitten explores the garden. Nearby, flowing water and a graceful tower lead toward an elegant pink-and-gold carousel.
Below, adorable cats play with toys, bubbles, and paper boats beside a winding blue stream. Rose-covered balconies, miniature trees, golden gates, and an arched wooden bridge complete the grounds.
Dreamy Room Level 912 ultimately transforms a simple empty structure into a lively, fairytale-inspired world where every carefully placed decoration contributes to the magical atmosphere.