Dreamy Room Level 926
Dreamy Room Level 926 guide - Dreamy Room 926 Walkthrough & Solution.
Important Notice Regarding Level Numbering
Due to frequent changes in Dreamy Room's level numbering and differences between platforms (Android/iOS) – for example, level 926 on Android might not be the same as level 926 on iOS – the text guide below may not always match the images and video above. Please prioritize the image and video guides. If you find that the guide content doesn't match your current level, please visit the All Level Walkthroughs page to find the correct guide based on level images. Thank you for your understanding.
Dreamy Room Level 926 Walkthroughs & Guide
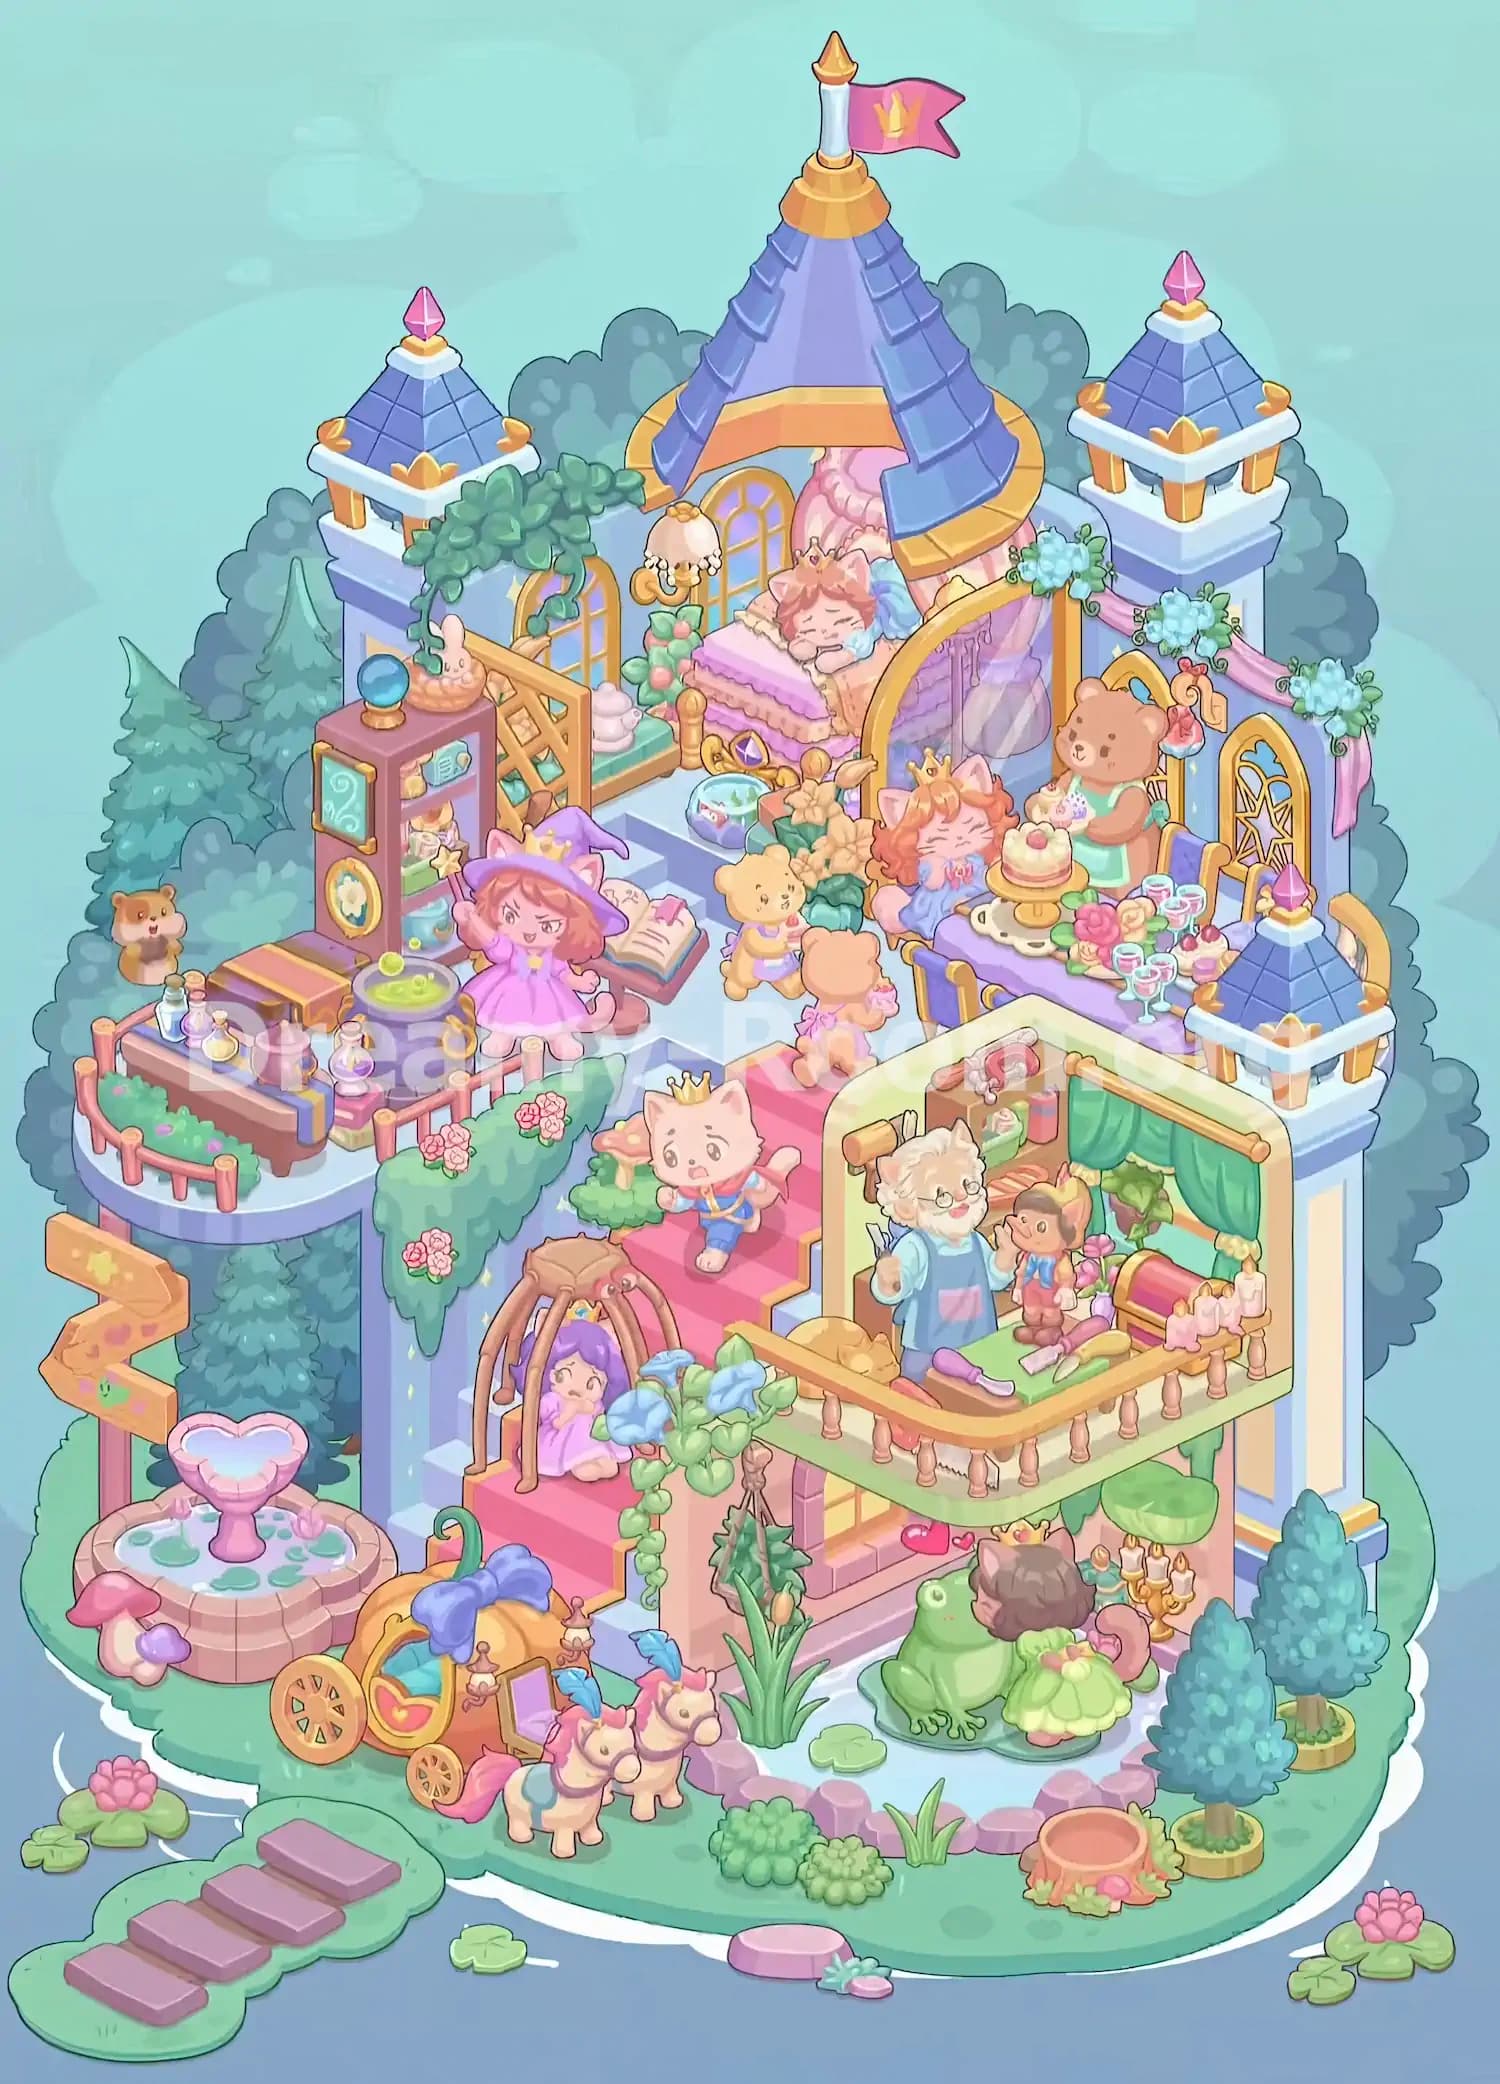
Step 1. Build the Royal Castle Rooftops and Decorative Towers.
Begin Dreamy Room Level 926 by completing the castle's most recognizable architectural features. Focus on the uppermost section of the empty structure, where the tall lavender walls form a raised platform surrounded by pale blue decorative columns.
Place the large, pointed blue-and-purple rooftop above the central rear bedroom area. This roof has overlapping blue tiles, a golden circular border, and an orange-gold trim underneath. Its tall, triangular silhouette should rise prominently above the rest of the castle.
Next, attach the golden spire to its peak and position the pink flag with the yellow crown emblem at the top. The flag extends toward the right.
In Dreamy Room Level 926, the smaller matching rooftops are equally important. Place one over the back-left tower and another on the back-right tower, each topped with a pink crystal-shaped finial.
Add the third small rooftop to the front-right tower beside the dining area. Check that all towers retain their white edging and golden accents. These structures establish the castle's distinctive silhouette and provide visual landmarks for the remaining decorations in Dreamy Room Level 926.
Step 2. Create the Sleeping Princess's Royal Bedroom.
The rear-center raised platform becomes the royal sleeping chamber in Dreamy Room Level 926. Begin by positioning the elaborate pink-and-purple bed directly beneath the tall central rooftop, with its headboard toward the back wall and its foot facing the open interior.
The bed features thick layered bedding, golden posts, and a decorative purple jewel near the footboard. Place the sleeping orange-haired cat princess on the pillows, wearing her little golden crown. Her closed eyes and relaxed posture make her the centerpiece of the bedroom.
Next, install the large golden arched canopy on the bed's right side. The curved frame supports translucent lavender curtains that descend behind the sleeping area.
Place the golden-framed arched windows along the rear wall, and add the hanging cream-colored chandelier near the left side of the bed.
Complete this part of Dreamy Room Level 926 with leafy plants, pink fruit decorations, pale flowers, and the small round decorative bowl near the bed's foot. The bedroom should look cozy and luxurious without blocking the neighboring dining space.
Step 3. Arrange the Royal Tea Party and Dessert Table.
Move to the upper-right section of Dreamy Room Level 926, where the royal dining arrangement sits beside the princess's bedroom.
Position the long rectangular dining table horizontally across the right-hand platform. Cover it with the purple tablecloth, allowing its golden trim to remain visible around the edges.
At the center-left of the table, place the golden pedestal cake stand holding a cream-colored cake decorated with fruit. Arrange the colorful pastries, pink flowers, small sweets, and several delicate stemmed glasses across the remaining tabletop, with most of the drinks gathered on the right.
Seat the orange-haired cat wearing a small crown and blue dress along the near side of the table, facing the desserts. Behind the table, place the brown teddy bear wearing a mint-green apron and holding a small dessert.
In Dreamy Room Level 926, the dining area is framed by golden arched windows and pink fabric swags adorned with light blue flower clusters. Add these decorations along the right wall to finish the tea party setting.
The completed arrangement should feel like a joyful royal celebration, with the bed behind it and the bear standing ready to serve the princess.
Step 4. Decorate the Magical Library and Witch's Corner.
The left side of the upper platform becomes a whimsical magical workspace in Dreamy Room Level 926. Start by positioning the tall brown magical cabinet near the back-left wall, just in front of the left tower.
Its shelves contain colorful jars and mysterious objects, while a circular golden emblem decorates the lower front. Place the blue crystal ball on the cabinet's top and add the small pink rabbit-shaped ornament beside it.
Install the wooden lattice screen behind this magical station, near the arched windows, and drape thick green vines over the top. Arrange the nearby potted greenery and pale pink decorative ornaments to create a soft garden atmosphere.
Next, place the orange-haired cat witch in a purple dress and pointed hat in front of the cabinet, facing toward the center of the room. Her raised wand should be clearly visible.
For Dreamy Room Level 926, place the large purple cauldron filled with bright green bubbling liquid just to her left. Set the open spellbook on its angled stand to her right.
These objects turn the upper-left corner into a lively magical laboratory and help distinguish it from the royal bedroom.
Step 5. Fill the Left Balcony with Potions, Flowers, and Magical Supplies.
Continue decorating the left-front balcony in Dreamy Room Level 926, directly in front of the witch's magical cabinet.
Place the long wooden worktable along the balcony's outer left edge. Its surface should hold an assortment of colorful potion bottles, including round pink, violet, and pale yellow flasks. Add the larger pink brewing pot and the rectangular orange-and-gold storage chest behind or beside these bottles.
Position the purple cauldron slightly farther inward, near the witch, so it remains part of the magical workstation rather than obstructing the balcony's railing.
Install the short reddish-brown fence around the exposed front and left edges. Inside the fence, place a low green planter with pink flowers. A small brown animal character stands behind the work area, near the back-left corner.
One particularly important detail in Dreamy Room Level 926 is the cascading greenery beneath this balcony. Attach the hanging green vines and clustered pink flowers along the front edge, where they fall toward the staircase below.
Check that the railing, flowers, potions, and furniture form a compact arrangement without hiding the witch or the open book.
Step 6. Position the Teddy Bears and Crowned Cat on the Central Staircase.
The connecting stairway brings the upper and lower sections together in Dreamy Room Level 926. The original pale blue steps become more colorful after you add the pink staircase decoration through the middle of the castle.
Begin by positioning the small yellow teddy bear on the upper landing, between the witch's station and the royal dining table. This bear wears a pastel outfit and stands facing the lower part of the castle.
Add the second small brown teddy bear to the top of the pink staircase, near the right side. It faces away from the viewer and carries a small pink decorative item. Its location connects the dining space with the lower level.
Next, place the white cat wearing a golden crown and blue outfit farther down the pink staircase. The cat should be facing forward, as though descending the steps toward the garden.
In Dreamy Room Level 926, leaving the staircase visually readable is essential. Position the characters so that each occupies a different section rather than piling them together.
Decorate the edges with small shrubs, pink flowers, and a mushroom-shaped ornament. The central staircase should now look like a cheerful procession through the royal castle.
Step 7. Build the Right-Side Craft Workshop and Balcony.
One of the most detailed areas in Dreamy Room Level 926 is the elevated workshop on the front-right side of the castle. It has a pale green floor, cream-and-gold framing, a wooden balcony railing, and green fabric curtains.
Begin by setting the workshop structure on the right-front platform below the dining room. Position its open front toward the viewer so the interior characters and tools remain visible.
Install the green curtains against the back wall, and place the shelving and craft supplies behind the work counter. These include colorful containers, rolled fabric, and small decorative materials.
Next, position the elderly white-furred character wearing glasses and a blue apron on the left side of the workshop. Place the smaller brown apprentice in a red outfit beside the older character, closer to the center.
Arrange the purple-handled tool, pink rolled material, small cutting implements, and flower decorations along the counter. Set the pink cylindrical device toward the right side, with several pale pink candle-like decorations farther along the balcony.
Finish this Dreamy Room Level 926 workshop by installing the gold-toned railing around the exposed edges. The completed room should resemble a cozy royal craft studio.
Step 8. Decorate the Lower Staircase, Wooden Arch, and Hidden Princess.
Below the central staircase, Dreamy Room Level 926 features another charming scene built around a wooden archway and a small purple-haired character.
Start by positioning the arched wooden structure over the lower section of the pink stairs, slightly left of center. Its curved wooden supports should create an open canopy rather than a solid doorway.
Place the little purple-haired girl in a pink outfit underneath the arch. She sits on the staircase, facing forward, partly sheltered by the wooden supports. Make sure her face remains visible through the opening.
Next, attach the thick green climbing vine to the arch's right side. Arrange its large blue blossoms near the upper curve and allow the leafy stems to descend toward the lower garden.
In Dreamy Room Level 926, the stairs continue behind this structure and connect visually with the crowned white cat positioned above.
Place additional shrubs, pink blossoms, and a small mushroom near the nearby walls. Beneath the craft workshop, keep the pink-walled lower entrance and its warm golden window details visible.
This arrangement creates a magical passage between the busy castle interior and the peaceful scenery below.
Step 9. Set Up the Pumpkin Carriage and Two Royal Horses.
The lower-left garden in Dreamy Room Level 926 contains an adorable royal transportation scene. Begin by placing the golden pumpkin-shaped carriage on the grass, just below the wooden staircase arch and to the right of the fountain.
The carriage features rounded golden panels, decorative wheels, a heart motif on its side, and a large blue-purple bow on the roof. Orient it so its entrance and ornate side are visible from the front.
Next, place the two miniature cream-colored horses directly in front of the carriage, facing toward the right. Both horses have pink manes and tails, along with blue decorative plumes and harness details.
Keep the horses close together, as though they are ready to pull the carriage out of the castle courtyard.
In Dreamy Room Level 926, the carriage should remain entirely on the lower grassy area, not on the staircase or the surrounding water.
Add the nearby tall green leaves and small purple rocks beside the horses. These accessories connect the carriage to the pond area and help create the finished fairy-tale atmosphere of Dreamy Room Level 926.
Step 10. Complete the Frog Pond and Royal Garden on the Right.
The lower-right section of Dreamy Room Level 926 becomes a quiet pond garden where a green frog sits beside a beautifully dressed visitor.
Begin by arranging the shallow pale blue pond near the front-right base of the castle. Surround it with irregular lavender stones, keeping the water visible in the middle.
Place the large green frog on the left side of the pond, facing toward the visitor. Beside the frog, position the brown-haired, cat-like character in a light green dress, with her back partially turned toward the viewer.
Behind these figures, add the golden candelabra with its lit candles. A green canopy-like decorative plant also appears nearby, tucked beneath the workshop balcony.
In Dreamy Room Level 926, the water should contain a few small lily pads, while the edges feature tall grasses, rounded shrubs, and low green plants.
Position the two blue-green trees along the far-right boundary, one closer to the castle and another nearer the front edge.
Place the hollow wooden stump planter with pink flowers near the bottom-right shoreline. These finishing touches make this small pond one of the most peaceful corners of Dreamy Room Level 926.
Step 11. Finish the Heart-Shaped Fountain, Garden Sign, and Stepping-Stone Path.
The final major decorations in Dreamy Room Level 926 belong along the lower-left edge of the island.
Place the large circular fountain on the grass to the left of the pumpkin carriage. It has a pink stone rim, shallow water filled with lily pads, and an elevated heart-shaped pink basin at its center.
Arrange small pink and purple mushrooms around the fountain's base. Behind it, install the whimsical zigzag-shaped wooden signpost, decorated with colorful spots and small symbols. The sign rises along the garden's left boundary.
Next, create the stepping-stone path extending from the bottom-left edge of the castle island into the surrounding water. Position the four rectangular lavender stepping stones in a diagonal row on top of the connected green patches.
For Dreamy Room Level 926, complete the outer shoreline using small lily pads, pink water flowers, grass clusters, and scattered stepping stones. Keep the larger flowering lily pads near the bottom-left and far-right water edges.
Finally, inspect the decorations across the entire castle, especially the carriage, fountain, trees, and pond. Dreamy Room Level 926 should now resemble the completed reference scene, with every major object occupying its intended place.
Notes and Precautions
While Dreamy Room Level 926 looks like a relaxing decoration puzzle, its numerous overlapping objects can make accurate placement difficult. Keep these precautions in mind:
- Work from back to front. Place the tall towers, rear bedroom, windows, and major furniture before adding smaller decorations. This helps prevent large objects from hiding their intended positions.
- Distinguish the two staircases. Dreamy Room Level 926 contains the main descending staircase in front and a shorter upper staircase leading to the bedroom platform. Do not confuse their decorative pieces.
- Watch the character positions. The sleeping cat belongs in the upper bedroom, the crowned cat stands on the pink stairs, the witch occupies the left platform, and the workshop characters stay on the right balcony.
- Keep similar flowers separate. Blue floral arrangements decorate the upper-right wall and the lower wooden arch, while pink flowers appear in planters, vines, and the surrounding garden.
- Use visible landmarks. The main roof, golden windows, purple table, and pink staircase are excellent reference points for placing smaller objects.
- Check the outer edges. In Dreamy Room Level 926, tiny details such as water lilies, mushrooms, shrubs, and the hollow stump are easy to overlook.
The objective is not simply to fill the space, but to reproduce the intended layout accurately.
Tips and Tricks from top player
Experienced puzzle players can make Dreamy Room Level 926 easier by following a systematic placement strategy rather than placing objects randomly.
-
Start with the largest pieces. Complete the towers, rooftop, royal bed, workshop, and dining table first. These objects define the space available for everything else.
-
Divide the castle into separate zones. Treat Dreamy Room Level 926 as six connected areas: rooftop and bedroom, dining room, magical workstation, central staircase, workshop balcony, and lower gardens. Concentrate on one zone at a time.
-
Use character interactions as clues. The witch belongs beside the cauldron, the apron-wearing bear belongs behind the dessert table, and the workshop apprentice stands beside the older craftsperson.
-
Match object orientation carefully. Some large objects look correct at first glance but can obscure nearby decorations if positioned incorrectly. Compare their visible fronts, sides, and surrounding landmarks with the completed reference.
-
Place small accessories last. Potions, glasses, tiny flowers, candles, mushrooms, and lily pads become much easier to position once all major furniture is in place.
-
Check every layer before finishing. Dreamy Room Level 926 has decorations on multiple elevations, including the upper bedroom, left balcony, central stairs, right workshop, and ground-level gardens.
-
Make small adjustments when something seems wrong. If an object does not register in Dreamy Room Level 926, compare its position with nearby items and try adjusting it slightly rather than moving unrelated decorations.
The most reliable shortcut is to complete one entire section before moving to the next.
Final Scene: A Magical Fairy-Tale Kingdom in Dreamy Room Level 926
Once every item is correctly positioned, Dreamy Room Level 926 transforms the empty pastel platform into an enchanting miniature castle filled with warmth, imagination, and delightful characters.
The towering blue rooftops and golden crown flag overlook a peaceful royal bedroom where a cat princess sleeps beneath luxurious curtains. Nearby, another crowned cat enjoys a magnificent dessert table while a friendly bear serves treats. On the opposite side, a cheerful witch practices magic beside her bubbling cauldron and colorful potions.
Below, the grand pink staircase connects the castle's different levels, while an elderly craftsperson and a young apprentice work together on a decorated balcony. The surrounding gardens feature a pumpkin carriage pulled by two miniature horses, a heart-shaped fountain, a frog pond, flowering vines, and charming stepping stones.
The completed Dreamy Room Level 926 captures the atmosphere of a living fairy tale, rewarding careful observation and precise object placement with a beautifully detailed fantasy kingdom.