Dreamy Room Level 928
Dreamy Room Level 928 guide - Dreamy Room 928 Walkthrough & Solution.
Important Notice Regarding Level Numbering
Due to frequent changes in Dreamy Room's level numbering and differences between platforms (Android/iOS) – for example, level 928 on Android might not be the same as level 928 on iOS – the text guide below may not always match the images and video above. Please prioritize the image and video guides. If you find that the guide content doesn't match your current level, please visit the All Level Walkthroughs page to find the correct guide based on level images. Thank you for your understanding.
Dreamy Room Level 928 Walkthroughs & Guide
Step 1. Establish the Two-Story Building and Interior Layout
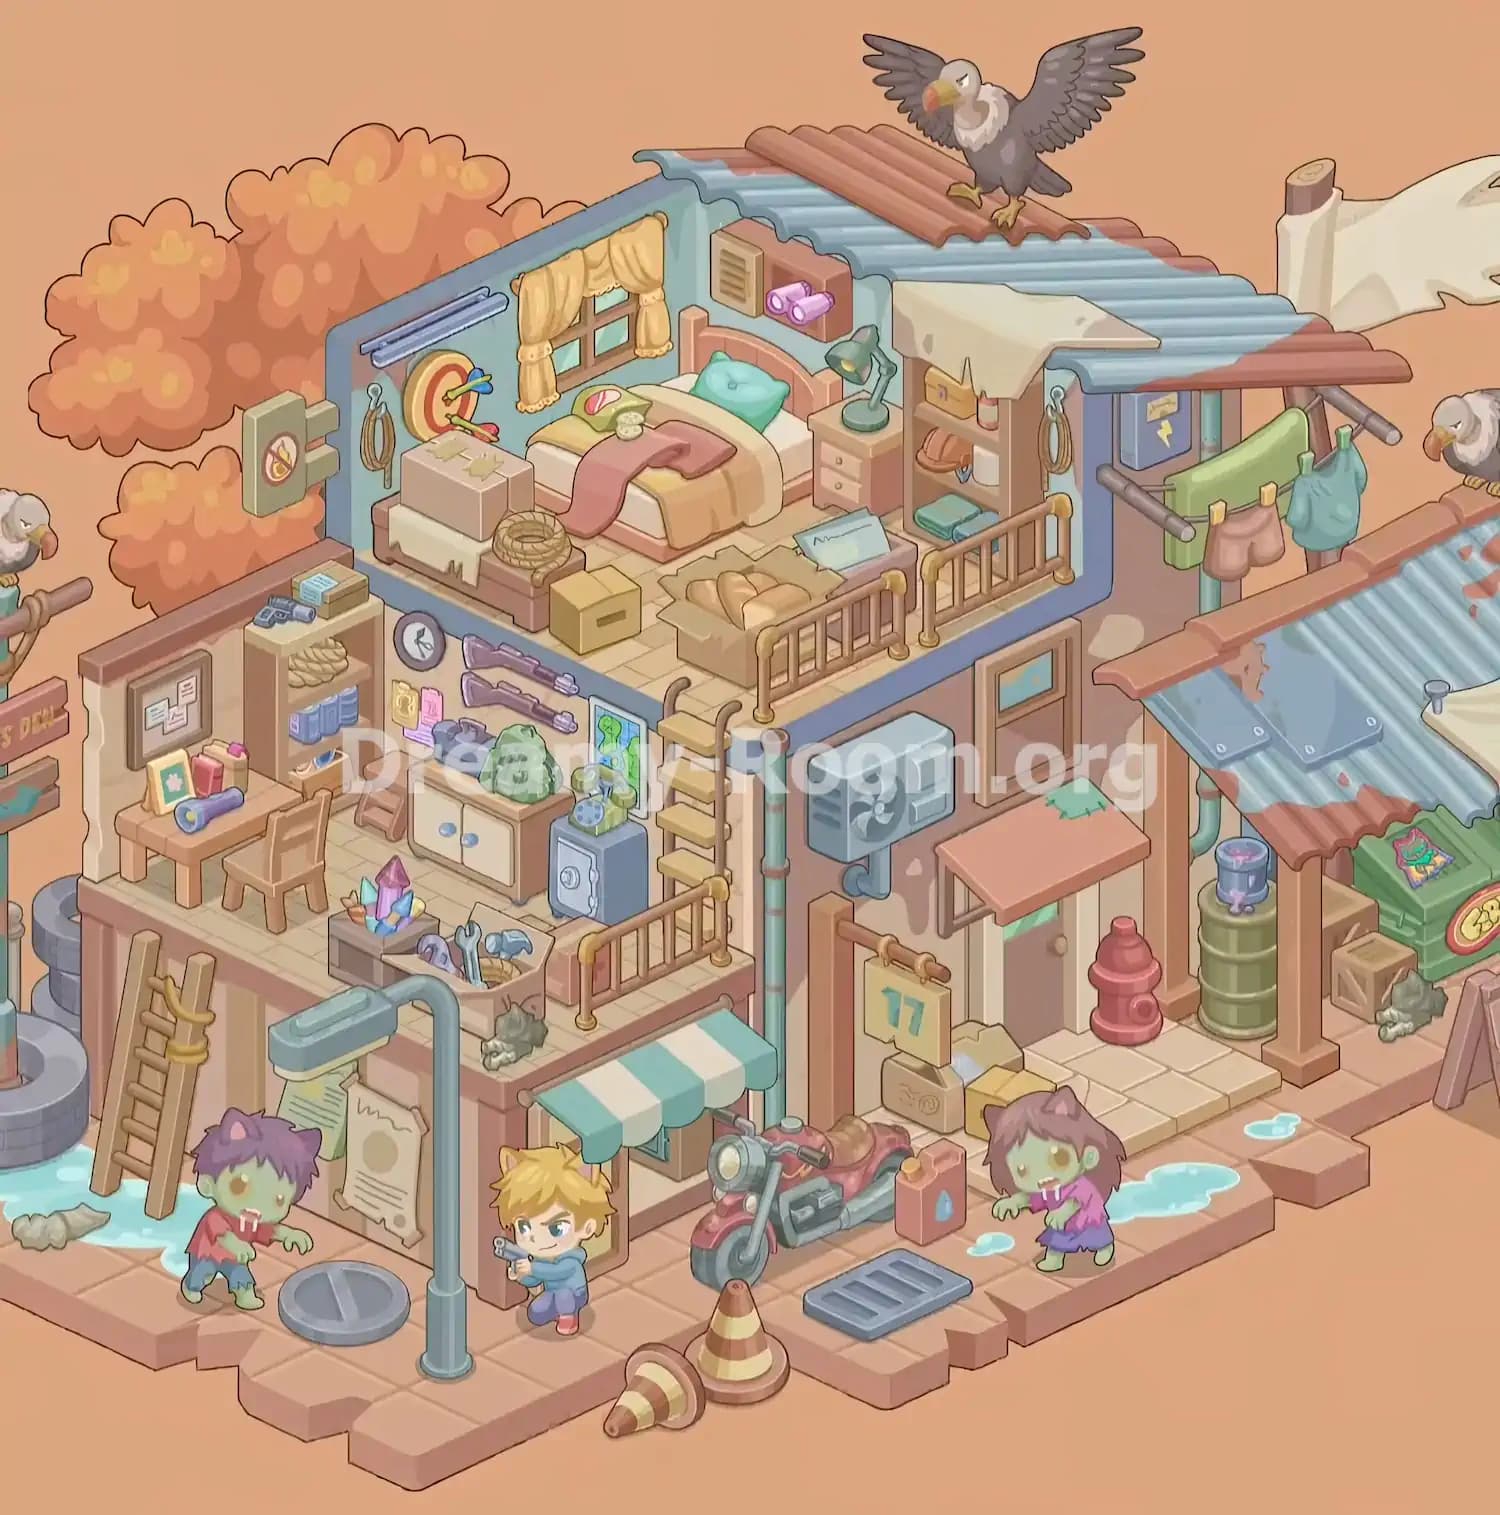
Begin Dreamy Room Level 928 by examining the empty building, which features light wooden flooring, pale blue-green interior walls, exposed patches of brown plaster, and a surrounding peach-colored tiled street. The structure forms the foundation for a compact, two-story survival shelter, with a sleeping area upstairs and a work-and-storage area downstairs.
In Dreamy Room Level 928, the upper room occupies the central raised section, while the lower working space extends toward the front-left side. Keep the upper bedroom floor clear initially, leaving enough room for the bed, furniture, storage containers, and guardrails.
The completed Dreamy Room Level 928 layout also includes a short wooden staircase connecting the two floors near the front-right edge of the lower platform. A separate, longer wooden ladder leans against the building's exterior left wall.
Pay attention to these structural features before placing smaller objects. Dreamy Room Level 928 relies on matching the reference's layered arrangement, so understanding the boundaries between the bedroom, workshop, roof, and street makes later placement considerably easier.
Step 2. Decorate the Upstairs Window and Dartboard Corner
The first major bedroom decorations in Dreamy Room Level 928 belong along the upper-left and rear walls. Start with the small wooden-framed window positioned slightly left of center on the back wall. Hang the yellow curtains across its upper frame, with gathered fabric hanging on both sides and a decorative valance above.
Next, place the circular red-and-yellow dartboard on the left wall, below the long blue-gray horizontal fixture. Several colorful darts should protrude from the target, with their ends pointing outward. A loop of brown rope hangs immediately to the left of the dartboard.
Dreamy Room Level 928 also features a small warning sign attached outside the left wall, identifiable by its red prohibition symbol. Keep this sign near the room's exposed left boundary rather than placing it inside the bedroom.
These details establish the personal character of the hideout. When decorating Dreamy Room Level 928, use the window and dartboard as positioning anchors for the remaining upper-floor furniture. Their placement determines how much space remains for the bed and supplies.
Step 3. Position the Bed, Bedside Cabinet, and Wall Fixtures
The bed is the main attraction of the upper bedroom in Dreamy Room Level 928. Place it against the back wall, slightly right of center, with its wooden headboard beneath the wall-mounted equipment. The foot of the bed faces diagonally toward the viewer.
Dress the bed with a cream-and-yellow blanket, a teal pillow near the headboard, and a long dusty-pink throw draped across the middle and hanging toward the foot. Small green and pink soft items rest on the bedding near its left side.
To the right of the bed, position a small wooden bedside cabinet with drawers. A green adjustable desk lamp sits on top, angled toward the sleeping area. Above the bed and nightstand, attach the rectangular ventilation unit and the adjoining box holding two short pink cylindrical fixtures.
Dreamy Room Level 928 requires these pieces to fit tightly without overlapping the bedside cabinet or the window curtains. Keep the lamp completely on the cabinet rather than the mattress.
Once everything is arranged, the bedroom in Dreamy Room Level 928 should resemble a comfortable sleeping space assembled from scavenged furniture. Double-check the bed's orientation before moving on, since it provides the main reference point for the remaining upstairs objects.
Step 4. Arrange the Upstairs Storage Boxes, Food Supplies, and Guardrails
With the bed positioned, Dreamy Room Level 928 shifts attention to the supplies surrounding it. On the left side of the sleeping platform, place a low storage bench or surface with a pale cloth hanging across its front. Two taped cardboard boxes sit on top, while a neatly coiled rope rests toward the front edge.
Set a smaller yellow cardboard box on the floor near the bed's lower-left corner. In front of the bed, toward the right, position a large open container filled with several bread loaves. A pale blue sheet or folded document rests near the back of this container.
Along the right wall, install the narrow open shelving unit. It holds small bottles or containers, a brown item of footwear, and neatly folded teal fabric on its lower shelves.
Dreamy Room Level 928 also includes wooden safety railings with golden-colored posts around the exposed front and right edges of the upper floor. Leave the opening for the short staircase unobstructed.
In Dreamy Room Level 928, the storage supplies should look deliberately crowded but organized. The bread container is particularly important because it occupies the central foreground of the upper bedroom, directly behind the railing. Proper placement makes Dreamy Room Level 928 feel like a believable shelter stocked for an emergency.
Step 5. Complete the Upper Roof, Laundry Line, and Perched Birds
The rooftop is one of the most recognizable features of Dreamy Room Level 928. Above the sleeping area, add the blue corrugated roofing panels, which slope toward the right side of the building. Several reddish-brown roof sections run across the upper ridge, contrasting with the weathered blue metal.
A large gray eagle-like bird stands prominently on the highest roof section, its wings extended and its yellow talons gripping the surface. Place it near the top center-right, ensuring that its wings extend above the roofline.
On the right side of Dreamy Room Level 928, build the small covered laundry section beneath a reddish-brown canopy. Add the horizontal metal rods and green hanging panel, followed by the pink shorts and blue-green shirt hanging from clips. A small blue electrical box with a yellow lightning symbol sits against the adjacent wall.
An additional light-colored fabric canopy stretches over the upper-right shelving area. Smaller gray birds perch on exposed pipes or roof edges at the sides of the scene.
The roof in Dreamy Room Level 928 should appear patched together from different materials. Avoid placing the eagle too low, and keep the laundry items separate from the roof tiles. These details give Dreamy Room Level 928 its distinctive rooftop silhouette.
Step 6. Furnish the Lower-Level Desk and Supply Shelves
Next, move into the lower-left workshop area of Dreamy Room Level 928. This section serves as a small office and storage space for the hideout's inhabitants. Begin by placing a simple wooden desk against the left wall, with a matching chair directly in front.
On the desk, arrange a small framed picture, two upright pink and red containers, and a blue cylindrical flashlight. Above the desk, hang a rectangular noticeboard containing several pinned notes and documents.
Immediately to the right of this work area, install the tall wooden shelving unit. Its top holds a small box of supplies and a dark compact tool or handgun. A coil of rope occupies an upper shelf, while blue storage canisters and additional small objects fill the shelves beneath.
Dreamy Room Level 928 also has a small round clock mounted on the interior wall toward the right side of this shelving unit.
Make sure the desk and chair do not block the shelving unit. In Dreamy Room Level 928, both must remain visible from the open front of the building. The furniture should create a cramped but functional workstation.
The lower floor of Dreamy Room Level 928 tells the story of people preparing to survive outside dangers, and this desk-and-shelving arrangement is the foundation of their equipment storage.
Step 7. Organize the Weapons, Toolboxes, Safe, and Workshop Equipment
Continue decorating the lower workshop in Dreamy Room Level 928 by moving toward its center and right side. Install the low wooden cupboard with two cream-colored doors and blue knobs against the rear wall. Place a dark blue equipment bag and a larger green backpack on top.
Above the cupboard, mount two long purple weapons horizontally, one above the other. Small yellow and pink papers should be attached to the adjacent wall. To their right, hang a green-and-blue map or illustrated poster.
Beside the cupboard, set a tall gray metal safe or equipment locker. On its top, position a small green-and-blue communication device or telephone. A shallow wooden step stool sits near the cupboard's left side.
At the front of the workspace, place two open containers. One holds large colorful crystals in purple, blue, and turquoise shades. The other contains tools, including a wrench, hammer-like equipment, and miscellaneous supplies.
Dreamy Room Level 928 also features a small gray rat near the front-right ledge, close to the boxes. Keep it separate from the tool containers.
Arrange the equipment so the weapons remain visible above the furniture. Accurate placement is essential in Dreamy Room Level 928, especially around the crowded cupboard and safe. Once this area is complete, Dreamy Room Level 928 gains a fully equipped survival workshop.
Step 8. Add the Exterior Ladder, Staircase, Pipes, and Storefront
The next stage of Dreamy Room Level 928 focuses on the building's exposed front and left exterior. Position the long wooden ladder against the left outer wall, with its upper end resting near the raised workshop platform. A thick yellow rope is wrapped around part of the ladder.
Place several stacked tires behind this ladder and add the tall pipe rising from the tire-filled area. Small puddles and scattered debris surround the base.
At the front of the workshop, extend the wooden guardrail across the exposed platform edge. Install the short staircase with pale wooden treads leading from the lower workshop up to the bedroom level. Beside it, a vertical teal-colored drainpipe runs down the outside wall.
Below the workshop, Dreamy Room Level 928 includes a small storefront with a teal-and-white striped awning. The awning projects over the entrance, creating shade for the area beneath it.
A tall blue-gray streetlight stands directly in front of the storefront. Nearby, attach a weathered notice or poster to the outer wall.
In Dreamy Room Level 928, these exterior pieces establish the building's height and depth. Be especially careful with the ladder and streetlight, as their positions are easy to confuse. Properly aligning them helps the Dreamy Room Level 928 scene look balanced.
Step 9. Build the Central Entrance and Right-Side Storage Area
Move toward the front-right section of Dreamy Room Level 928, where the building connects to a small street-level entrance and covered storage area. On the main wall, place the blue-gray external ventilation unit with its visible circular fan. Beneath it, attach the curved outlet pipe.
Install the small rectangular upper window, the lower entrance door, and the reddish-brown awning projecting above the doorway. A torn green cloth patch appears above the awning on the wall.
Next, add the wooden hanging sign marked with a large blue number, suspended from a horizontal bracket near the doorway. Set cardboard boxes beneath the sign and place a bright red fire hydrant on the tiled landing to the right.
Dreamy Room Level 928 also includes a covered shed farther to the right. Its roof uses blue corrugated panels, reddish tiles, and metal patches. Underneath, position a green barrel with a small paint bucket on top, several wooden crates, a large green storage container with a colorful label, and a small gray rat near the crates.
The pipes and supporting wooden posts should frame this storage area correctly. In Dreamy Room Level 928, the right-side shed must appear connected to the larger building rather than standing independently. This arrangement completes much of the environmental structure of Dreamy Room Level 928.
Step 10. Place the Motorcycle, Fuel Container, and Roadside Hazards
The street in front of the building becomes an important part of Dreamy Room Level 928 once the upper floors and exterior walls are complete. Start by placing the red motorcycle beneath the striped storefront awning, slightly right of center. Its front wheel points toward the lower-left side of the scene, while the seat and rear section extend toward the building.
Position the red fuel container with a blue water-drop symbol beside the motorcycle, near its rear wheel. The motorcycle should remain fully visible and should not overlap the entrance steps.
On the road, place a rectangular gray drainage grate in front of the motorcycle. Another round manhole cover lies farther left, near the streetlight.
Dreamy Room Level 928 also includes two orange-and-yellow striped traffic cones in the foreground. One stands upright near the motorcycle's front wheel, while the other lies sideways near the bottom edge of the pavement.
Add scattered blue puddles, small rubble pieces, and cracks along the uneven road edges. The pavement is made up of peach-colored tiles with broken sections and raised blocks.
These hazards make the street appear abandoned and dangerous. When finishing this section of Dreamy Room Level 928, keep the traffic cones separate and ensure that the drain grate is not hidden under the motorcycle. Dreamy Room Level 928 uses these small street objects to complete its post-apocalyptic atmosphere.
Step 11. Position the Survivor, Zombies, and Final Environmental Details
The final major placement task in Dreamy Room Level 928 involves the characters that bring the zombie survival scene to life. Place the blond-haired survivor near the front-center of the building, slightly to the left of the motorcycle. He wears a blue top, dark pants, and red shoes, and holds a small gray firearm pointed toward the left side of the street.
To the survivor's left, position the first zombie with pale green skin, messy purple hair, a torn reddish shirt, and blue pants. Its arms extend forward, and its mouth is open.
Place the second zombie on the right side of the road, beside the blue puddles. This character has long purple hair, green skin, a purple-and-pink outfit, and raised arms. Keep both zombies facing inward toward the survivor.
Dreamy Room Level 928 also features autumn-colored orange trees behind the building, additional birds along the side structures, and small gray rats near the platforms and storage crates. Add these where visible in the completed scene.
Use the survivor as the central anchor for the street composition. The two zombies should frame him from opposite directions without covering the motorcycle or entrance.
Once these characters and background details are positioned, Dreamy Room Level 928 should match the reference's lively, slightly humorous zombie apocalypse setting. Check every floor, ledge, and street corner before considering Dreamy Room Level 928 complete.
Notes and Precautions
Dreamy Room Level 928 contains many small objects packed into a relatively narrow multi-story environment. Careful placement is especially important because the game focuses on finding the correct location for each item rather than simply decorating freely.
- Respect the different floor levels. Dreamy Room Level 928 separates the bedroom, workshop, and street into distinct areas. Do not mix their furniture or equipment.
- Check overlapping objects. The bread box, guardrails, bedside furniture, and workshop containers sit close together. In Dreamy Room Level 928, small placement errors may make the final layout look incorrect.
- Keep the roof decorations distinct. The large eagle belongs on the highest rooftop, while smaller birds appear near the side structures.
- Watch the character directions. The survivor stands between the two zombies, with each character occupying a specific part of the street.
- Distinguish similar containers. Cardboard supply boxes, wooden crates, the green storage container, and the metal safe all have different locations in Dreamy Room Level 928.
- Inspect tiny decorative details. The wall clock, documents, rope coils, bottles, weapons, rats, and traffic cones are easy to overlook.
Before finishing Dreamy Room Level 928, compare the completed arrangement against the reference image, especially around the upper-right shelving unit and lower-right storage shed.
Tips and Tricks from top player
Experienced players can approach Dreamy Room Level 928 more efficiently by placing large structural pieces first and working toward smaller decorations.
- Use a top-to-bottom placement strategy. Start with the bedroom, continue to the workshop, then finish the outdoor street in Dreamy Room Level 928. This makes it easier to track completed areas.
- Prioritize large anchor objects. Position the bed, desk, shelving unit, motorcycle, and storage shed before placing accessories. These objects define most of the available space.
- Group items by purpose. Keep bedroom supplies upstairs, survival equipment downstairs, and environmental hazards outside. Dreamy Room Level 928 becomes easier when objects are mentally sorted into these categories.
- Use neighboring objects as guides. For example, the bedside lamp belongs immediately right of the bed, while the fuel container sits beside the motorcycle.
- Inspect elevated surfaces. Some Dreamy Room Level 928 objects belong on roofs, shelves, cabinet tops, and ledges rather than on the ground.
- Save small street details for last. Traffic cones, puddles, signs, and rats are easier to arrange after the larger items are positioned.
- Avoid rushing crowded corners. The lower workshop and upper supply storage contain several overlapping items that require accurate placement.
The most useful strategy for Dreamy Room Level 928 is to treat each area as a separate miniature puzzle. Complete one section before moving to the next, and use the screenshot's larger objects as visual landmarks.
Final Scene: A Cozy Hideout in a Zombie-Filled Neighborhood
The completed Dreamy Room Level 928 reveals a charming survival shelter surrounded by the playful chaos of a zombie apocalypse. At the top of the building, a cozy bedroom features a neatly made bed, yellow curtains, a dartboard, stacked supplies, bread, and essential furniture. A large eagle spreads its wings above the patchwork corrugated roof, while laundry hangs from a makeshift outdoor line.
Below, the workshop is packed with weapons, tools, crystals, backpacks, shelves, and survival equipment. Outside, a red motorcycle waits beside the entrance, surrounded by traffic cones, a streetlight, drainage covers, abandoned crates, and scattered puddles.
A determined blond survivor confronts two approaching green-skinned zombies, giving the colorful street a sense of action and humor.
Dreamy Room Level 928 transforms an empty structure into a lively, detailed post-apocalyptic home. Completing Dreamy Room Level 928 rewards careful observation, precise object placement, and attention to every tiny environmental detail.