Dreamy Room Level 921
Dreamy Room Level 921 guide - Dreamy Room 921 Walkthrough & Solution.
Important Notice Regarding Level Numbering
Due to frequent changes in Dreamy Room's level numbering and differences between platforms (Android/iOS) – for example, level 921 on Android might not be the same as level 921 on iOS – the text guide below may not always match the images and video above. Please prioritize the image and video guides. If you find that the guide content doesn't match your current level, please visit the All Level Walkthroughs page to find the correct guide based on level images. Thank you for your understanding.
Dreamy Room Level 921 Walkthroughs & Guide
Step 1. Build the Raised Garden Loft on the Right Side
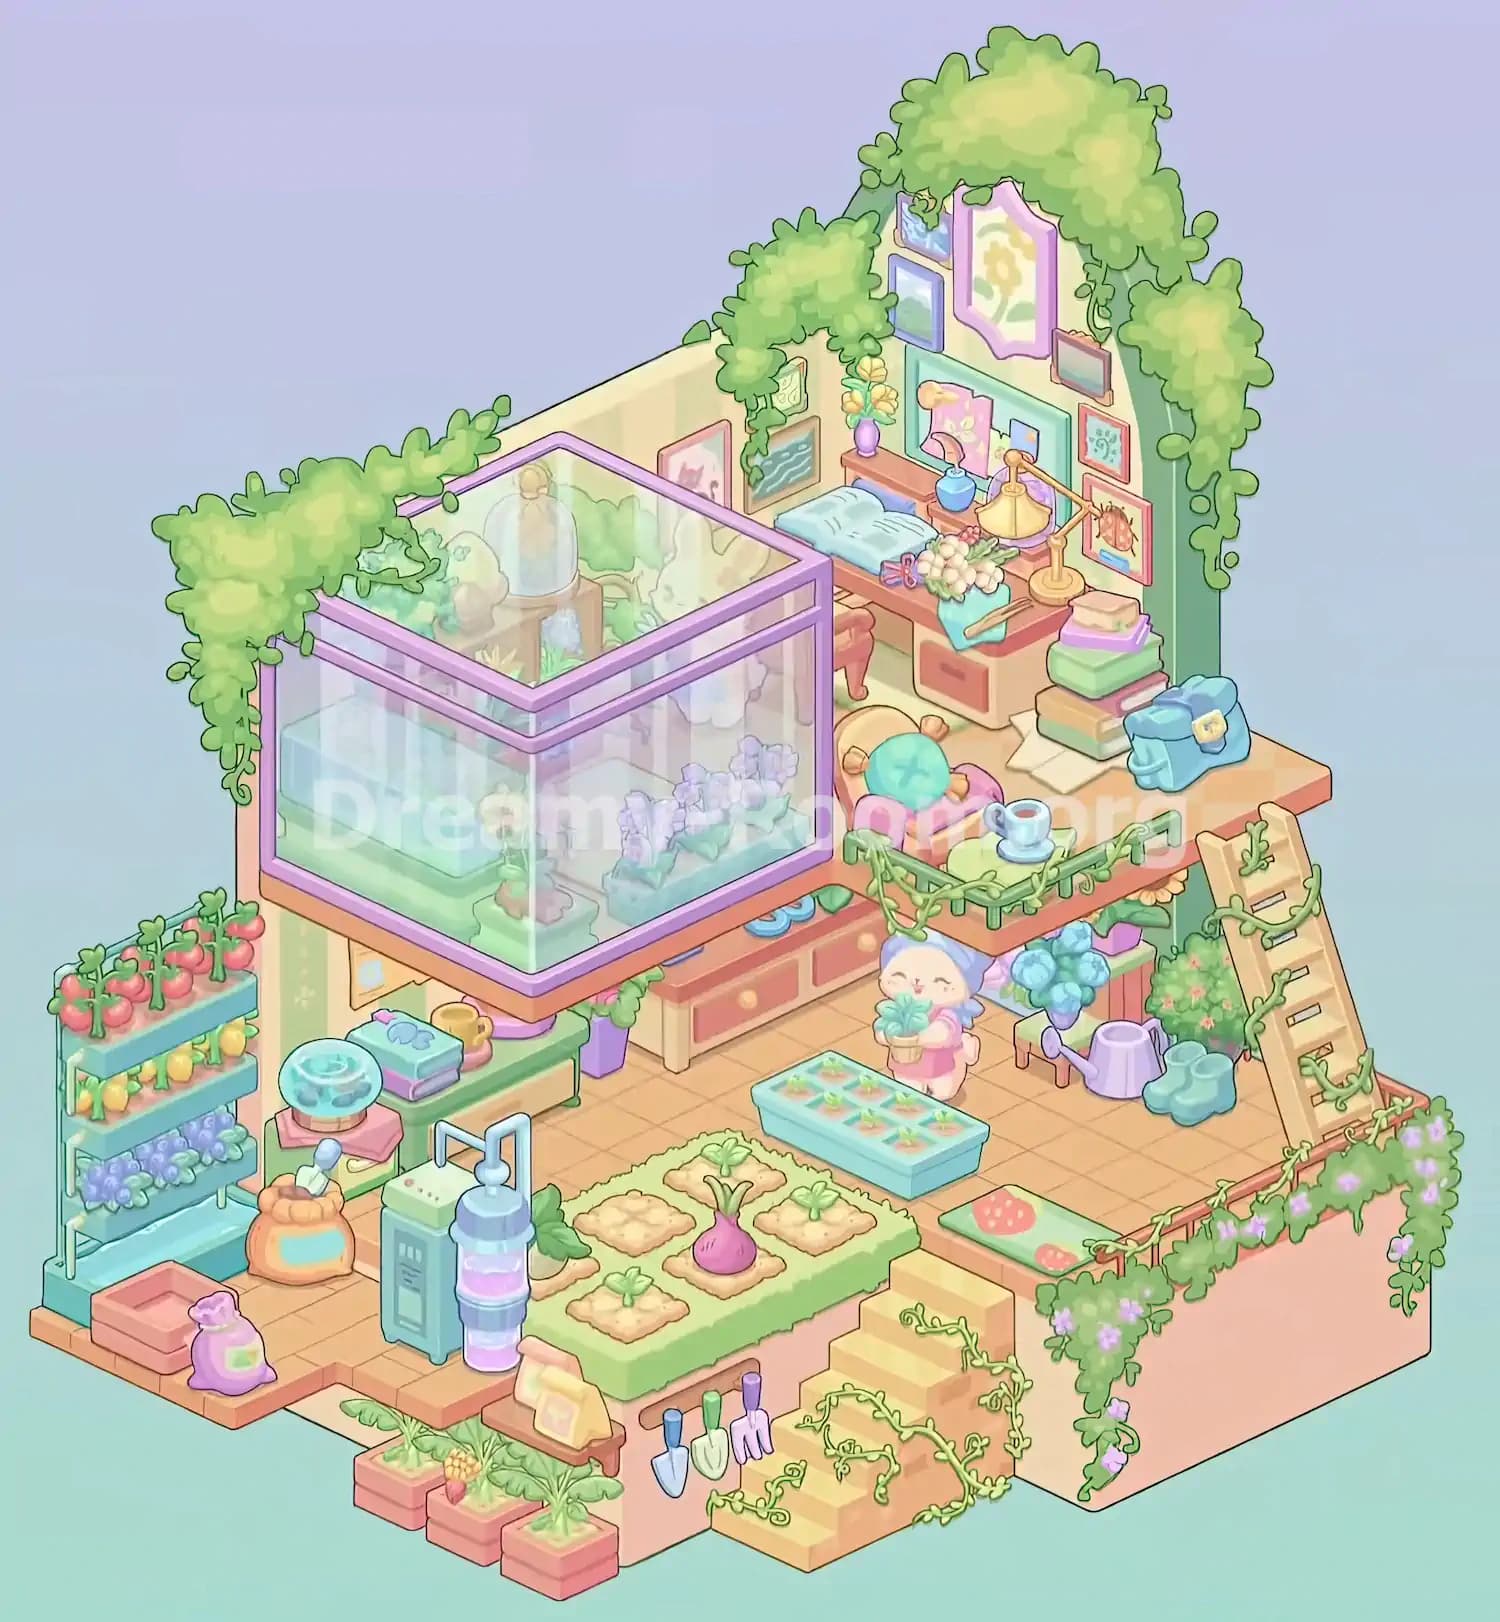
Begin Dreamy Room Level 921 by establishing the room's two-level layout. The empty room features pale yellow and mint-green striped walls, a warm peach tiled floor, and a distinctive curved architectural feature at the back-right corner.
The completed arrangement has an elevated platform occupying the upper-right portion of the room. Position this loft area so that it extends toward the right edge, leaving enough space beneath and in front for the lower gardening section.
The upper platform serves as a comfortable reading and working area, while the lower floor accommodates gardening equipment and vegetable beds. Its exposed front edge should face the viewer, creating a clear boundary between the two levels.
In Dreamy Room Level 921, getting this structural arrangement correct is essential because many smaller objects depend on the larger furniture's position. Keep the upper-right wall accessible for decorative pictures and preserve the left side for the large glass greenhouse.
Before continuing, check that the raised platform aligns naturally with the back wall and leaves room for the staircase, balcony railing, and lower-floor decorations.
Step 2. Position the Large Purple-Framed Greenhouse on the Left
The most prominent structure in Dreamy Room Level 921 is the beautiful glass greenhouse occupying the upper-left section of the completed room.
Place this large transparent enclosure against the left portion of the striped back wall. Its lavender-purple frame forms a rectangular glass box with a visible top opening, transparent side panels, and a warm pinkish base.
The greenhouse sits above the lower storage area, creating an elevated display that appears to float over the gardening equipment beneath it. Position its front corner toward the viewer, with its right glass wall facing the central area of the room.
The greenhouse should extend across much of the left half without completely covering the desk on the upper-right side.
In Dreamy Room Level 921, the transparent enclosure is an important visual reference because its purple edges indicate the correct alignment. Avoid placing it too far right, where it could overlap the reading desk and upper seating area.
Once positioned correctly, the enclosure becomes the centerpiece of the garden theme and provides space for the plants and decorative items added next.
Step 3. Fill the Glass Greenhouse with Plants, Flowers, and Water Features
With the greenhouse frame established, begin arranging the decorations inside it. Dreamy Room Level 921 features a miniature botanical environment with water, flowers, greenery, and delicate display pieces.
Position the large aqua-blue rectangular water tank or basin along the left interior side. Its pale turquoise walls should remain visible through the front glass panel, with a soft green base beneath it.
On the right interior side, arrange the long rectangular flower planter filled with clusters of lavender-purple blossoms. These flowers should face outward through the greenhouse's right glass wall.
Near the front-center, add the small flowering plant with yellow petals. Farther back, position the wooden display supports and the transparent bell-shaped glass dome with its rounded golden top. Surround these features with leafy green plants and the smaller decorative pieces visible inside the enclosure.
The key to completing this part of Dreamy Room Level 921 is preserving the separation between the water feature on the left and the purple flowering planter on the right.
Check the greenhouse from the front before moving on. The plants should remain visible through the clear walls rather than appearing crowded into one corner.
Step 4. Arrange the Storage Cabinets and Small Accessories Beneath the Greenhouse
The next area of Dreamy Room Level 921 is the storage space underneath and behind the elevated glass enclosure.
Position the long, low storage cabinet with peach-colored drawer fronts along the rear-center floor. Its pale yellow frame and round drawer knobs should be visible beneath the right side of the greenhouse and behind the central gardening area.
On the left side, place the low green shelf against the striped wall, directly underneath the greenhouse's overhanging front edge. This shelf holds several everyday accessories.
Arrange the stack of folded turquoise and purple books or cloth-covered items on the shelf, with a yellow cup positioned nearby. Add the small round aqua-blue decorative bowl or fountain on its pink stand toward the front-left section.
A purple flowerpot with trailing greenery should sit near the right end of this lower shelf, close to the central cabinet.
In Dreamy Room Level 921, these accessories help fill the narrow gaps beneath the greenhouse. Their placement is easy to overlook because the larger glass structure partially conceals them.
Keep the small objects close to their supporting furniture rather than placing them on the open gardening floor.
Step 5. Organize the Three-Tier Produce Shelf and Gardening Supplies on the Left
Now furnish the lower-left corner of Dreamy Room Level 921 with its colorful harvest storage and essential gardening equipment.
Place the tall turquoise three-tier produce shelf along the far-left edge of the room. Arrange the red tomatoes on the top shelf, the yellow fruits or vegetables on the middle shelf, and the purple grape-like produce on the bottom shelf.
The produce should face outward, giving the shelf the appearance of a compact indoor market display.
Near the bottom of this shelf, place the shallow peach-colored rectangular container and the small purple gardening supply bag. Next to them, position the orange bag of soil or fertilizer, with its little scoop sticking out of the open top.
Closer to the center, install the teal gardening machine and its tall transparent purple-and-blue cylindrical attachment. The blue-green device should stand beside the raised vegetable bed, not directly in front of the produce shelf.
In Dreamy Room Level 921, organizing these objects carefully creates a practical gardening work zone. Their distinct colors also help identify their intended positions.
Make sure the shelving unit remains against the far-left boundary and that the supplies fit neatly around its base without blocking the central floor.
Step 6. Create the Central Vegetable Garden and Seedling Nursery
The main growing area of Dreamy Room Level 921 occupies the lower-center foreground.
Position the large rectangular raised garden bed here, slightly forward of the storage cabinet and greenhouse. It has a soft green grassy border, pale pink sides, and multiple square patches of light brown soil.
Arrange the small green seedlings in their individual planting patches. Some have only a couple of leaves, while others have more developed sprouts. The largest and most recognizable vegetable is a purple turnip or radish with leafy green stems. Place it prominently near the center of the garden bed.
Behind this main bed, set down the shallow aqua-blue rectangular seedling tray. It contains two rows of small growing compartments filled with young orange-green plants. This tray belongs on the tiled floor between the garden bed and the small character figure farther back.
The challenge in Dreamy Room Level 921 is distinguishing these two growing areas. The large grass-bordered bed belongs in the foreground, while the compact blue seed tray stays behind it.
Check that each soil patch remains visible and that the purple root vegetable stands upright as the garden's focal point.
Step 7. Decorate the Front Steps with Planters, Gardening Tools, and Vines
Continue Dreamy Room Level 921 by decorating the front edge of the garden and the stairs leading toward the elevated right-side area.
Place the short cream-yellow staircase at the front-right corner of the central garden. It should descend toward the viewer, with its upper end adjoining the raised floor and its lower steps reaching the room's front edge.
Add the curling green vines across the staircase, letting them twist around the sides and partially cross the steps.
Along the front face of the raised vegetable bed, arrange the three small gardening tools. These include a blue-handled trowel, a green-handled spade, and a purple-handled hand fork.
On the lower front-left boundary, position three salmon-pink rectangular planter boxes. Each contains a tropical-looking plant with broad leaves; the center arrangement also features a small yellow pineapple-like fruit.
Nearby, place the small pale yellow supply packet on a narrow wooden ledge.
In Dreamy Room Level 921, these front-edge decorations are important because they connect the indoor vegetable garden with the outside-facing design.
Keep the tools in their compact group and avoid moving the planter boxes onto the central soil bed, where they would cover the seedlings.
Step 8. Furnish the Upper-Level Desk with Books, Flowers, and a Lamp
Move to the upper-right platform, where Dreamy Room Level 921 features a charming botanical study corner.
Position the long wooden writing desk directly against the back wall. The desk has warm peach and brown tones, with storage compartments and drawers underneath.
Place an open pale-blue book toward the left side of the desktop. Its pages should face the viewer, giving the impression of a book being studied.
Near the center, arrange the small pink scissors, a blue vase or bottle, and the bouquet of delicate white flowers wrapped in turquoise-blue paper. The bouquet rests diagonally across the front portion of the desk.
Install the golden adjustable desk lamp on the right, with its round base resting on the tabletop and its angled arm extending toward the workspace.
Add the purple vase containing yellow flowers along the back of the desk, and position the small blue decorative bottle nearby.
In Dreamy Room Level 921, this desk contains several small items that must fit tightly together. The open book should remain visible, while the lamp and bouquet should not cover each other completely.
Maintain the desk's position against the wall so that the decorative pictures can be arranged above it in the next step.
Step 9. Hang the Botanical Wall Art and Arrange the Upper Reading Corner
The upper corner becomes especially inviting once you add the wall decorations and seating furniture in Dreamy Room Level 921.
Cover the tall back-right wall with the collection of framed botanical artwork. Place the large pink-framed yellow flower picture high in the center of the arched wall. Surround it with smaller pictures in blue, teal, orange, and pink frames.
The collection includes abstract floral patterns, plant illustrations, and colorful nature-themed images. A broader teal-framed picture belongs directly above the desk, while additional smaller frames extend along the wall toward the left.
Next, position the pink-and-orange cushioned armchair near the front-left portion of the upper platform. Add its round turquoise back cushion, with its small golden corner details, and place the light-blue teacup and saucer on the small green side surface nearby.
On the right side, stack the colorful books over the pale sheet of paper and set the small blue satchel beside them.
In Dreamy Room Level 921, these objects transform the balcony into a cozy reading retreat.
Finish by adding the lush green foliage above the tall wall and along the upper-left edge. The leafy canopy should drape naturally around the pictures without hiding the central flower artwork.
Step 10. Complete the Lower Garden with the Character, Flowers, Watering Can, and Balcony Decorations
The final placement stage of Dreamy Room Level 921 focuses on the lower-right gardening area and the remaining details around the balcony.
Position the small smiling character beneath the upper platform, just right of center. The character has a blue hairstyle or head covering, a pink outfit, and holds a little potted green plant close to its chest. Its face should point toward the viewer, while the aqua-blue seedling tray sits directly in front.
To the character's right, arrange the low plant stand holding a large cluster of blue flowers. Set the lavender watering can on the floor beside it, with the small teal rubber boots positioned farther right.
Behind these accessories, add the bushy green plant with tiny pink blossoms.
On the upper balcony, install the green railing along the front edge, decorated with twisting vines. Attach the pale wooden ladder to the platform's outer-right side, leaning downward toward the garden floor.
Finally, drape flowering vines with purple blossoms along the front-right wall and extend the greenery around the right edge. Place the green mat with red strawberry illustrations near the top of the front staircase.
In Dreamy Room Level 921, the finishing challenge is making every decorative element fit without hiding the character, tools, or important gardening supplies.
Once all plants, furniture, and small accessories match the reference arrangement, Dreamy Room Level 921 is ready to complete.
Notes and Precautions
Dreamy Room Level 921 contains many overlapping objects, so careful attention to their locations is particularly important.
- Place large structures first. The glass greenhouse, elevated platform, storage cabinets, and garden bed determine how the remaining decorations fit together.
- Watch overlapping objects. The transparent greenhouse partly conceals items inside and underneath it, making some smaller objects harder to identify.
- Separate the growing areas. The main vegetable bed belongs in the foreground, while the small turquoise nursery tray sits farther back.
- Pay attention to height. The desk, armchair, wall pictures, and book stack belong to the elevated section rather than the lower garden.
- Keep the fruit shelf correctly organized. Red produce goes on top, yellow produce in the middle, and purple produce at the bottom.
- Check the staircase and ladder. The cream-colored front steps and the wooden ladder on the far right occupy different positions.
- Do not ignore decorative plants. Hanging vines, purple blossoms, potted greenery, and small flowers are all part of the finished arrangement.
The main difficulty in Dreamy Room Level 921 is not speed but identifying the correct position for every object. When something does not fit, compare its shape, color, and intended surroundings with the completed image before moving other items.
Tips and Tricks from top player
A systematic approach makes Dreamy Room Level 921 considerably easier to solve.
- Work from large to small. Start with the greenhouse and furniture, continue with shelves and planters, and finish with tools, flowers, and decorative objects.
- Use the room's fixed features as landmarks. The striped wall, green arched border, front recessed area, and right edge help determine where everything belongs.
- Group accessories by purpose. Gardening tools belong near the soil bed, books and writing materials belong upstairs, and watering equipment belongs near the lower-right plants.
- Arrange partially hidden objects early. Place items underneath the greenhouse before filling the surrounding area with large decorations.
- Use strong color contrasts to identify pieces. The lavender greenhouse frame, turquoise seedling tray, purple root vegetable, and golden desk lamp are useful visual references.
- Complete one section at a time. Finish the lower-left storage area before decorating the central vegetable bed, then move upstairs.
- Save trailing greenery for the end. Vines and hanging blossoms are easier to position after the main furniture and platforms are arranged.
- Check every remaining gap. Empty-looking corners may be intended for a small pot, supply bag, book, or garden tool.
In Dreamy Room Level 921, the most effective shortcut is to recognize the room as three connected areas: the left greenhouse and storage space, the central vegetable garden, and the upper-right reading loft.
With this layout in mind, solving Dreamy Room Level 921 becomes a matter of matching every item to its natural position.
Final Scene: A Peaceful Two-Level Botanical Retreat
The completed Dreamy Room Level 921 reveals a delightful indoor gardening sanctuary filled with pastel colors, greenery, and thoughtful details.
On the left, a large lavender-framed glass greenhouse displays lush plants, a turquoise water feature, and rows of purple flowers. Beneath it, shelves and cabinets hold gardening supplies, books, and decorative accessories, while a three-tier rack showcases colorful freshly harvested produce.
The foreground features a raised vegetable patch with young seedlings and a striking purple root vegetable. Small planters, gardening tools, and twisting vines decorate the front steps.
Above the garden, a cozy reading area includes a wooden desk, an open book, a golden lamp, framed botanical artwork, and a cushioned armchair. Books, a blue satchel, and a teacup complete the peaceful atmosphere.
Below, a cheerful little gardener holds a potted plant beside trays of seedlings and watering supplies.
Dreamy Room Level 921 beautifully combines nature, organization, and relaxation into one charming miniature retreat.