Dreamy Room Level 933
Dreamy Room Level 933 guide - Dreamy Room 933 Walkthrough & Solution.
Important Notice Regarding Level Numbering
Due to frequent changes in Dreamy Room's level numbering and differences between platforms (Android/iOS) – for example, level 933 on Android might not be the same as level 933 on iOS – the text guide below may not always match the images and video above. Please prioritize the image and video guides. If you find that the guide content doesn't match your current level, please visit the All Level Walkthroughs page to find the correct guide based on level images. Thank you for your understanding.
Dreamy Room Level 933 Walkthroughs & Guide
Step 1. Install the Rooftop Canopy and Decorate the Upper Structure
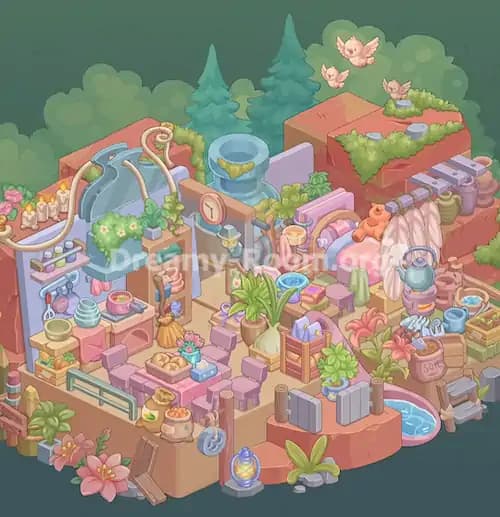
Begin Dreamy Room Level 933 by focusing on the upper portion of the dollhouse. The empty structure already features beige walls, wooden flooring, and a raised platform, providing the foundation for the elaborate decorations.
Start with the distinctive brown bamboo-style canopy above the upper-left terrace. Position this sloping canopy over the left side of the raised dining area, with its rounded wooden sections facing forward. Three pale ropes wrap around the canopy, giving it a rustic, handmade appearance. Its lower edge should hang above the dining area without covering the balcony furniture.
Next, position the slanted blue roof section toward the upper middle of Dreamy Room Level 933. This roof features several pale-green diamond-shaped window panels. Directly beneath it, arrange the wooden-framed window and its soft blue curtains, which are tied back on both sides.
The roof and curtains establish the upper room's cozy atmosphere. As you continue Dreamy Room Level 933, use the beige wall corner and surrounding greenery as reference points. The green and blue conifer trees and tall purple-blue flowers visible behind the house provide the scenic backdrop.
Make sure the canopy and blue roof occupy their correct locations before adding small decorative objects. These architectural elements are essential positioning references for the remaining furniture in Dreamy Room Level 933.
Step 2. Arrange the Upper Terrace Dining Table and Royal Cat
The raised terrace is one of the most eye-catching sections of Dreamy Room Level 933. Transform this upper-left platform into a delightful outdoor dining space featuring a crowned pink cat, elegant chairs, colorful plants, and a small tea table.
Start by positioning the round cream-colored table near the center of the upper terrace. Its decorative golden pedestal should be visible beneath the tabletop. Place the small turquoise vase filled with yellow flowers in the middle of the table.
Next, arrange the ornate blue-and-gold chairs around it. These chairs feature curved golden frames, soft blue seats, and heart-shaped details. Leave room behind the table for the main character.
Position the pink cat wearing a golden crown behind and slightly to the left of the table. The cat sits on a decorative chair beneath the bamboo canopy, holding a small purple object. Its face should be visible from the front of Dreamy Room Level 933.
Add the large pink flower arrangement near the right side of the cat, in front of the curtained window. On the far-left rear edge of the terrace, place the small brown plant stand containing bright yellow sunflowers.
Finally, add the smaller decorative objects around the seating area, including the curled purple ornament and rolled accessories near the back-right railing. In Dreamy Room Level 933, arranging the furniture first makes these tiny placements significantly easier.
Step 3. Decorate the Balcony Railings, Hanging Banners, and Window
Continue Dreamy Room Level 933 by decorating the balcony's front edge and the large window below. These decorations visually connect the upper terrace with the bedroom and living spaces underneath.
Start by positioning the wooden balcony railings along the exposed front edges of the upper dining platform. The railings should have dark brown posts, creating a clear boundary around the seating area.
Next, hang the long blue-and-lavender fabric banners over the front railing. Each banner features a soft gradient, gold trim, and a pointed lower edge. Arrange them so they hang vertically down the front of the raised terrace, with the decorative fabric visible above the lower-floor furniture.
Place lush flower arrangements along the balcony edge. The front-left corner features pink blossoms and green leaves, while the planter closer to the middle holds clusters of red-pink flowers surrounded by taller foliage.
Now focus on the left wall of Dreamy Room Level 933. Position the large brown-framed window below the balcony and decorate it with a flowing turquoise curtain swag. The fabric should drape diagonally between the pink floral attachments on either side.
Small framed floral pictures also appear beneath the balcony. In Dreamy Room Level 933, these pictures should be placed below the hanging banners without being completely hidden.
Check that the fabric, flowers, and railing overlap naturally before proceeding.
Step 4. Create the Cozy Bedroom in the Lower-Left Corner
The bedroom occupies the lower-left section of Dreamy Room Level 933. Its most important feature is the large blue bed positioned beneath the tall decorated window.
Begin by placing the bed against the left and rear portions of the lower room. The rounded beige headboard should face toward the back wall, while the blue blanket extends diagonally toward the bottom-left of the screen.
Arrange the turquoise pillows against the headboard. They feature frilled edges and pink heart-shaped decorations. Place the round purple cushion between the pillows, then position the folded turquoise patterned cover across the upper portion of the bed.
A small cream-and-brown sleeping pet belongs on the blanket near the pillows. This adorable animal adds warmth to the bedroom and is an important detail in Dreamy Room Level 933.
Next, place the wooden bedside cabinet to the right of the bed. The cabinet has a green front panel and a warm-toned drawer. On top, position the translucent blue-and-purple bowl or basin.
Place the pink-dressed girl with dark braided hair on the circular pink-and-yellow rug beside the bed. She should face toward the sleeping pet, with her back partially visible.
When arranging Dreamy Room Level 933, keep the bed aligned beneath the window and leave enough space beside it for the bedside cabinet and character.
Step 5. Organize the Bedroom Accessories and Decorative Storage
After positioning the bed, fill the foreground of the bedroom with the smaller accessories that give Dreamy Room Level 933 its playful atmosphere.
Start with the low storage bench or trunk at the foot of the bed, near the lower-left edge of the room. It has a warm brown body with a blue decorative fabric covering its upper front edge.
Place the folded purple fabric and bright yellow cushion on top of the bench. Beside them, arrange the small brown rectangular box. These objects should sit neatly without obscuring the bed.
Position the pink-and-gold treasure chest immediately to the left of the bench. The chest has curved golden trim and a prominent pink front panel. Add the brown teddy bear beside the chest, lying near the outside corner of the bedroom.
Behind the teddy bear, place the small lantern with its glowing yellow interior. This creates a charming decorative cluster in Dreamy Room Level 933.
Check the round rug beneath the girl and the patterned floor visible between the furniture. The rug should sit between the bed and storage bench, with the girl's feet resting on it.
Complete this section by checking the pink flowers around the front-left edge of the house. In Dreamy Room Level 933, the large blossoms, treasure chest, teddy bear, and lantern form a compact decorative arrangement that should not extend into the central dressing area.
Step 6. Build the Dressing Corner and Small Duck Pond
Move to the lower-middle portion of Dreamy Room Level 933, immediately to the right of the bedroom. This area contains a clothing rack, a girl in a pink outfit, a blue chair, colorful plants, and a small rectangular pond.
Begin by installing the clothing rack in the center-front section. It has four tall brown posts connected by pale ropes and horizontal hanging bars. Position it between the bedroom and the blue seating area.
Hang the miniature clothes from the rack. The garments include pink dresses, a purple outfit, and a yellow piece hanging toward the right. Keep the clothing grouped so the individual garments remain visible.
Next, place the small girl wearing a pink bunny-ear headband on the rounded blue platform in front of the rack. She holds a pink rectangular object and faces slightly left.
Behind her, position the large blue armchair with its curved arms and golden decorative details. Place a wooden storage crate near the girl's right side, with folded purple fabric draped over its edge.
Now add the rectangular pond at the bottom-center-left of Dreamy Room Level 933. It has a blue rim, orange sides, and turquoise water. Position two tiny yellow ducks inside, one near the left and another closer to the rear-right.
Finish this Dreamy Room Level 933 section with the flowering cactus, leafy plants, and gray rocks bordering the pond and dressing platform.
Step 7. Arrange the Blue Sofa and Elegant Tea Table
The central-right living area is another major focal point in Dreamy Room Level 933. This section features a luxurious blue sofa, a beautifully prepared tea table, and a small girl standing beside the furniture.
Begin by placing the blue sofa against the right-side interior wall, in front of the brown cabinet. The sofa features rounded arms, gold decorative curls, and an upholstered backrest with a quilted pattern.
Place the square purple pillow on the sofa's left side and the round pink cushion with golden tassels toward the right. Keep the beige seat visible beneath both cushions.
Position the rectangular wooden coffee table directly in front of the sofa. Its top has a long turquoise runner extending across the surface.
Now arrange the tea service. Place the pink teapot and matching teacup toward the right half of the table. On the left, position the tiered serving stand holding small pink pastries and purple rolled sweets. A golden heart-shaped ornament decorates the top of the stand.
Next, position the girl wearing a pink dress and pink ear-shaped headband behind the left end of the coffee table, near the blue shelving unit. She holds a small green vase.
In Dreamy Room Level 933, the table must sit between the sofa and the blue armchair. Leave the pink patterned rug visible beneath the furniture.
Check that the pastries and tea set are not hidden behind the sofa cushions. This arrangement creates the cozy indoor gathering space seen in the completed Dreamy Room Level 933 image.
Step 8. Decorate the Living Room Walls, Cabinet, and Display Shelves
Now complete the back-right interior of Dreamy Room Level 933 by adding its wall art, display cabinet, decorative ornaments, and shelving.
Start by positioning the brown cabinet directly behind the blue sofa. Its cream-colored drawer with a gold handle should face forward, and a small pale cat figure appears near the cabinet's left side.
Arrange the decorative objects across the cabinet's top surface. Place the small pink vintage radio on the left, followed by the pale blue-gray sculpted bust. Add the green-and-gold ornament and several gold candleholders with white candles toward the right.
Next, decorate the walls. Above the archway, place the smaller horizontal floral picture in its golden frame. On the upper-right wall, position the large blue-framed painting featuring purple flowers and a golden ornamental crest.
To the right of that picture, hang the small portrait of a brown animal playing a golden horn. Add the small pink-and-gold wall decoration farther to the right.
Position the tall turquoise vase on its ornate cream-and-gold pedestal near the far-right wall. Place another pink-dressed girl beside it, facing the vase.
Finally, install the blue bookshelf beneath the balcony near the center-left of the living area. Fill it with pastel books, small dishes, rolled objects, and ornaments. Add the inset blue display shelf beside the sofa and the potted plant inside the arched opening.
These decorative details are essential to finishing Dreamy Room Level 933. Pay close attention to the overlapping wall decorations and cabinet objects before moving to the painting corner.
Step 9. Complete the Painting Studio and Surrounding Flower Garden
Finish Dreamy Room Level 933 by decorating the front-right platform and adding the surrounding garden details. This area becomes a miniature art studio filled with paintings, stools, paint supplies, and pottery.
Start by placing two wooden easels on the raised front-right platform. Position the easel holding the green floral landscape painting on the left, closer to the living room. Place the second easel, holding a pale landscape painting, immediately to its right.
Arrange two small blue stools around the easels, one toward the left-front side and another nearer the right. Between them, position the low blue storage cabinet containing colorful books or supplies.
Place the paintbrush containers on top of this cabinet. Include the small green cup containing brushes and colorful art materials, together with the pale container of drawing tools.
Position the open sketchbook on the floor in front of the cabinet, near the platform's front edge.
Now decorate the pottery area on the right side of Dreamy Room Level 933. Add the pink vase on its small round stand, the bowl containing yellow paint and a brush, and the taller blue and pink ceramic vessels. Place the folded turquoise cloth toward the right edge.
Install the small wooden staircase leading down from the platform at the lower-right corner.
Complete Dreamy Room Level 933 by arranging the pink and purple flower clusters, green plants, gray stones, and large blossoms around the outside edges. Check the flowers beside the staircase, the plants around the pond, and the large pink lilies at the bottom-left.
With these final objects correctly positioned, Dreamy Room Level 933 should closely match the completed reference image.
Notes and Precautions
Dreamy Room Level 933 contains many closely arranged objects, so accurate placement is more important than speed. Keep these points in mind:
-
Use the existing architecture as your guide. The beige walls and raised wooden platforms establish where the upper terrace, bedroom, living room, and art studio belong.
-
Arrange large furniture before small decorations. In Dreamy Room Level 933, placing the bed, sofa, terrace table, and display cabinet first helps prevent overlapping pieces from obstructing smaller items.
-
Pay attention to the different elevations. The upper dining terrace is higher than the bedroom, while the painting studio occupies a separate raised platform near the right-front corner.
-
Check character orientation. The crowned cat faces forward from the upper terrace, while the girls on the lower level face different objects, including the bed, clothing rack, and turquoise vase.
-
Do not confuse similar accessories. Dreamy Room Level 933 includes several vases, flower arrangements, framed pictures, and small decorative containers. Match their colors and shapes to the reference image.
-
Watch for partially hidden decorations. The cabinet behind the sofa, the hanging banners, and the shelf beneath the balcony are especially easy to overlook.
-
Preserve clear spaces around the pond and stairs. Flowers, plants, and rocks should frame these areas rather than cover the ducks or the wooden steps.
Tips and Tricks from top player
To solve Dreamy Room Level 933 more efficiently, work systematically instead of placing objects randomly.
- Follow a top-to-bottom approach. Complete the elevated terrace before decorating the lower rooms. This makes it easier to identify which accessories belong upstairs.
- Divide the scene into zones. Treat the upper café, bedroom, dressing area, living room, painting studio, and outdoor garden as separate sections.
- Use distinctive objects as landmarks. The bamboo canopy, blue bed, large sofa, and rectangular duck pond are excellent reference points in Dreamy Room Level 933.
- Group matching items mentally. Tea accessories belong around the sofa table, clothing belongs on the wooden rack, and paintbrushes belong near the easels.
- Save tiny decorations for last. Books, candles, framed pictures, flowers, and small ornaments are easier to position after furniture is settled.
- Compare overlapping objects carefully. Some items in Dreamy Room Level 933 sit directly in front of others, so their visible positions can appear different from their actual placement areas.
- Recheck every character. The placement of the pink-dressed girls and crowned cat helps confirm that each section has been arranged correctly.
The best strategy for Dreamy Room Level 933 is to focus on one decorated area at a time. Each completed section makes the remaining objects easier to identify.
Final Scene: A Magical Dollhouse Filled with Creativity and Charm
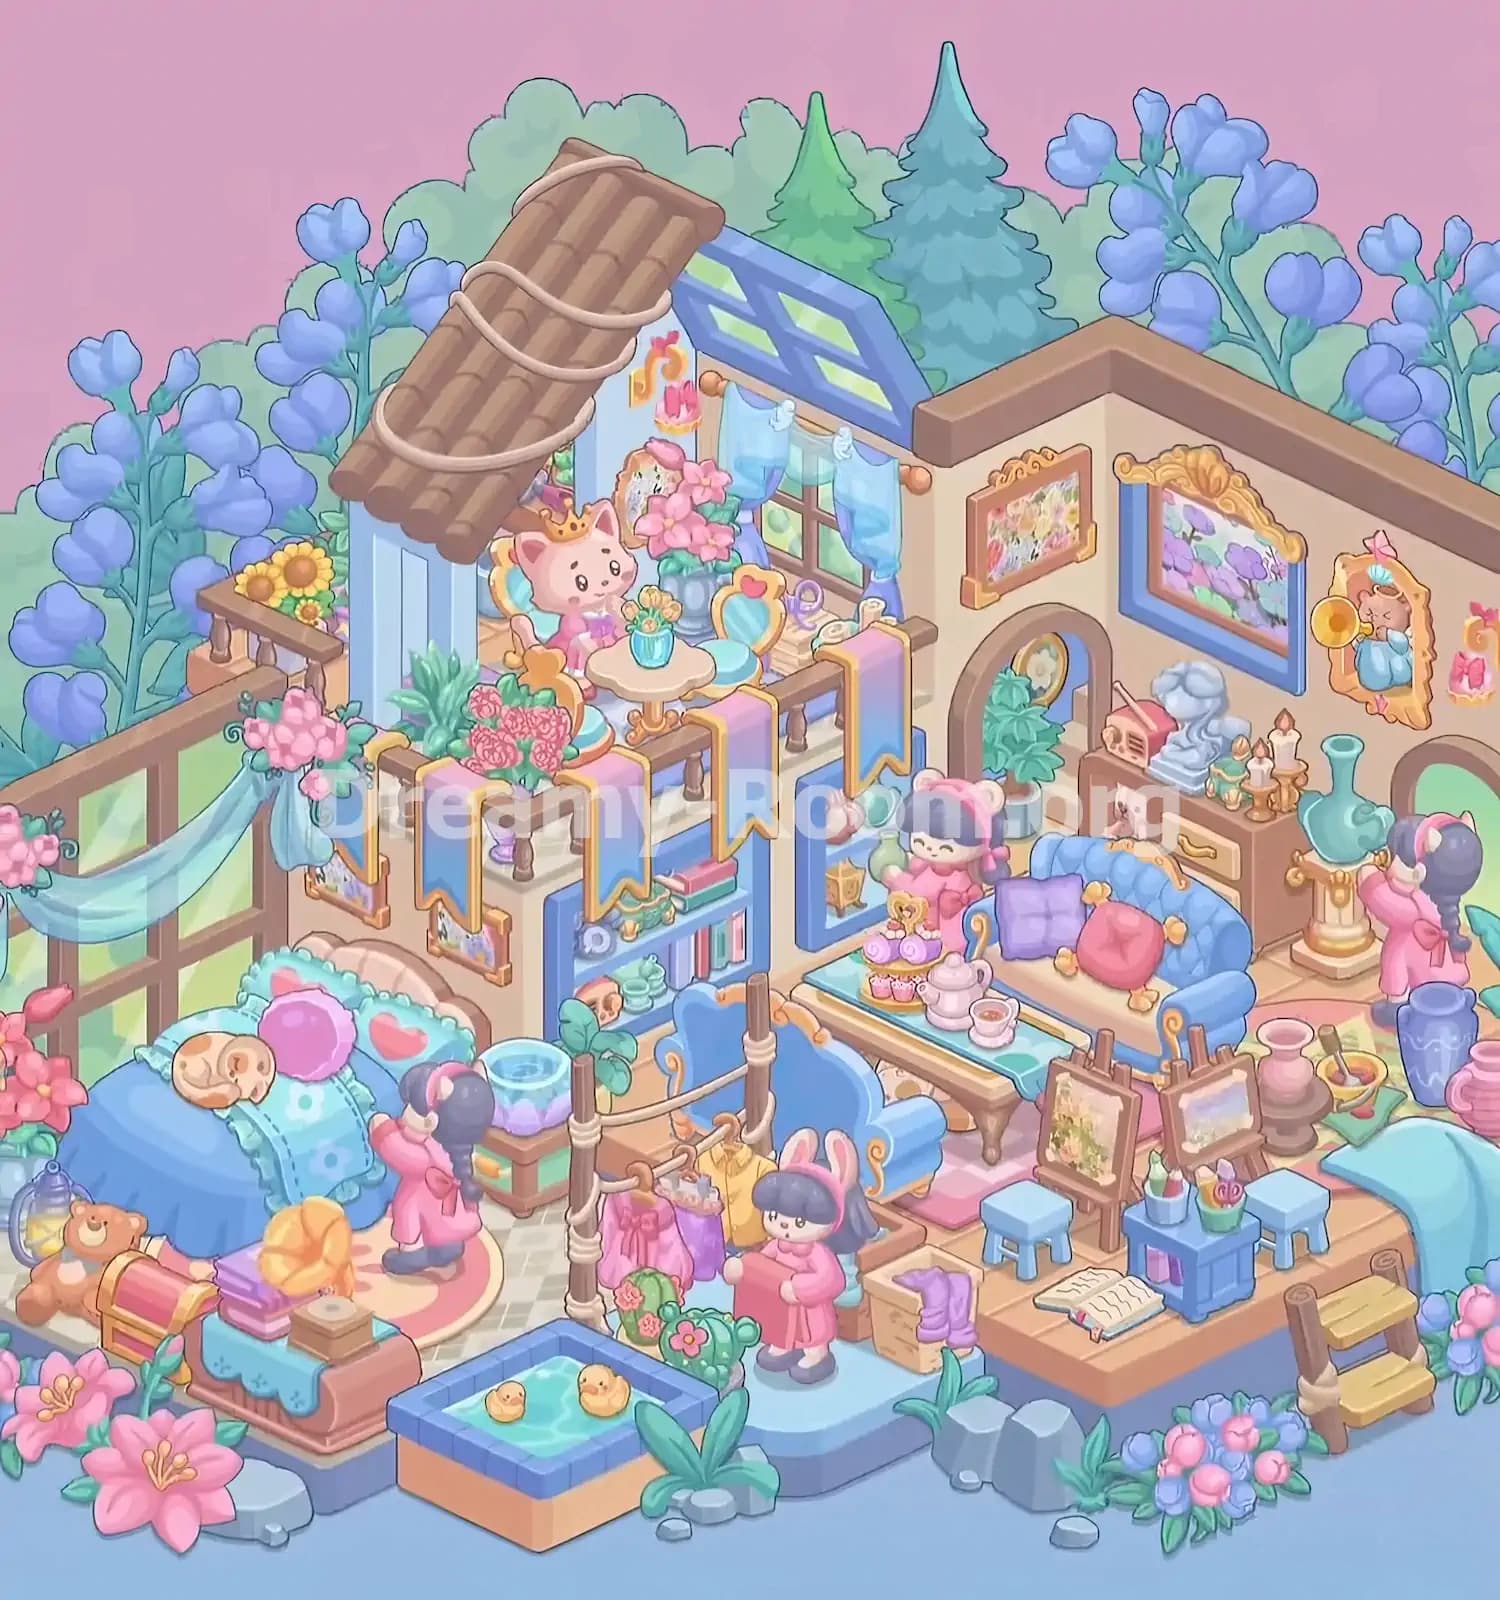
The completed Dreamy Room Level 933 reveals an enchanting dollhouse retreat surrounded by lush greenery and colorful blossoms. On the upper terrace, a crowned pink cat enjoys a charming dining space beneath a rustic bamboo canopy, accompanied by ornate chairs, flowers, and delicate blue curtains.
Below, a cozy bedroom features a blue bed, heart-shaped pillows, a sleeping pet, and adorable toys. Nearby, a small dressing area displays colorful clothing beside a peaceful pond where two yellow ducks float.
The central living room offers a comfortable blue sofa, a beautiful tea set, sweet pastries, floral paintings, and elegant ornaments. To the right, a creative painting studio contains wooden easels, art supplies, pottery, and tiny blue stools.
Pink-dressed characters bring warmth and personality to the entire scene, while flowering plants and garden stones soften the edges.
Dreamy Room Level 933 transforms a simple empty structure into a magical miniature home, rewarding careful observation and precise object placement.