Dreamy Room Level 906
Dreamy Room Level 906 guide - Dreamy Room 906 Walkthrough & Solution.
Important Notice Regarding Level Numbering
Due to frequent changes in Dreamy Room's level numbering and differences between platforms (Android/iOS) – for example, level 906 on Android might not be the same as level 906 on iOS – the text guide below may not always match the images and video above. Please prioritize the image and video guides. If you find that the guide content doesn't match your current level, please visit the All Level Walkthroughs page to find the correct guide based on level images. Thank you for your understanding.
Dreamy Room Level 906 Walkthroughs & Guide
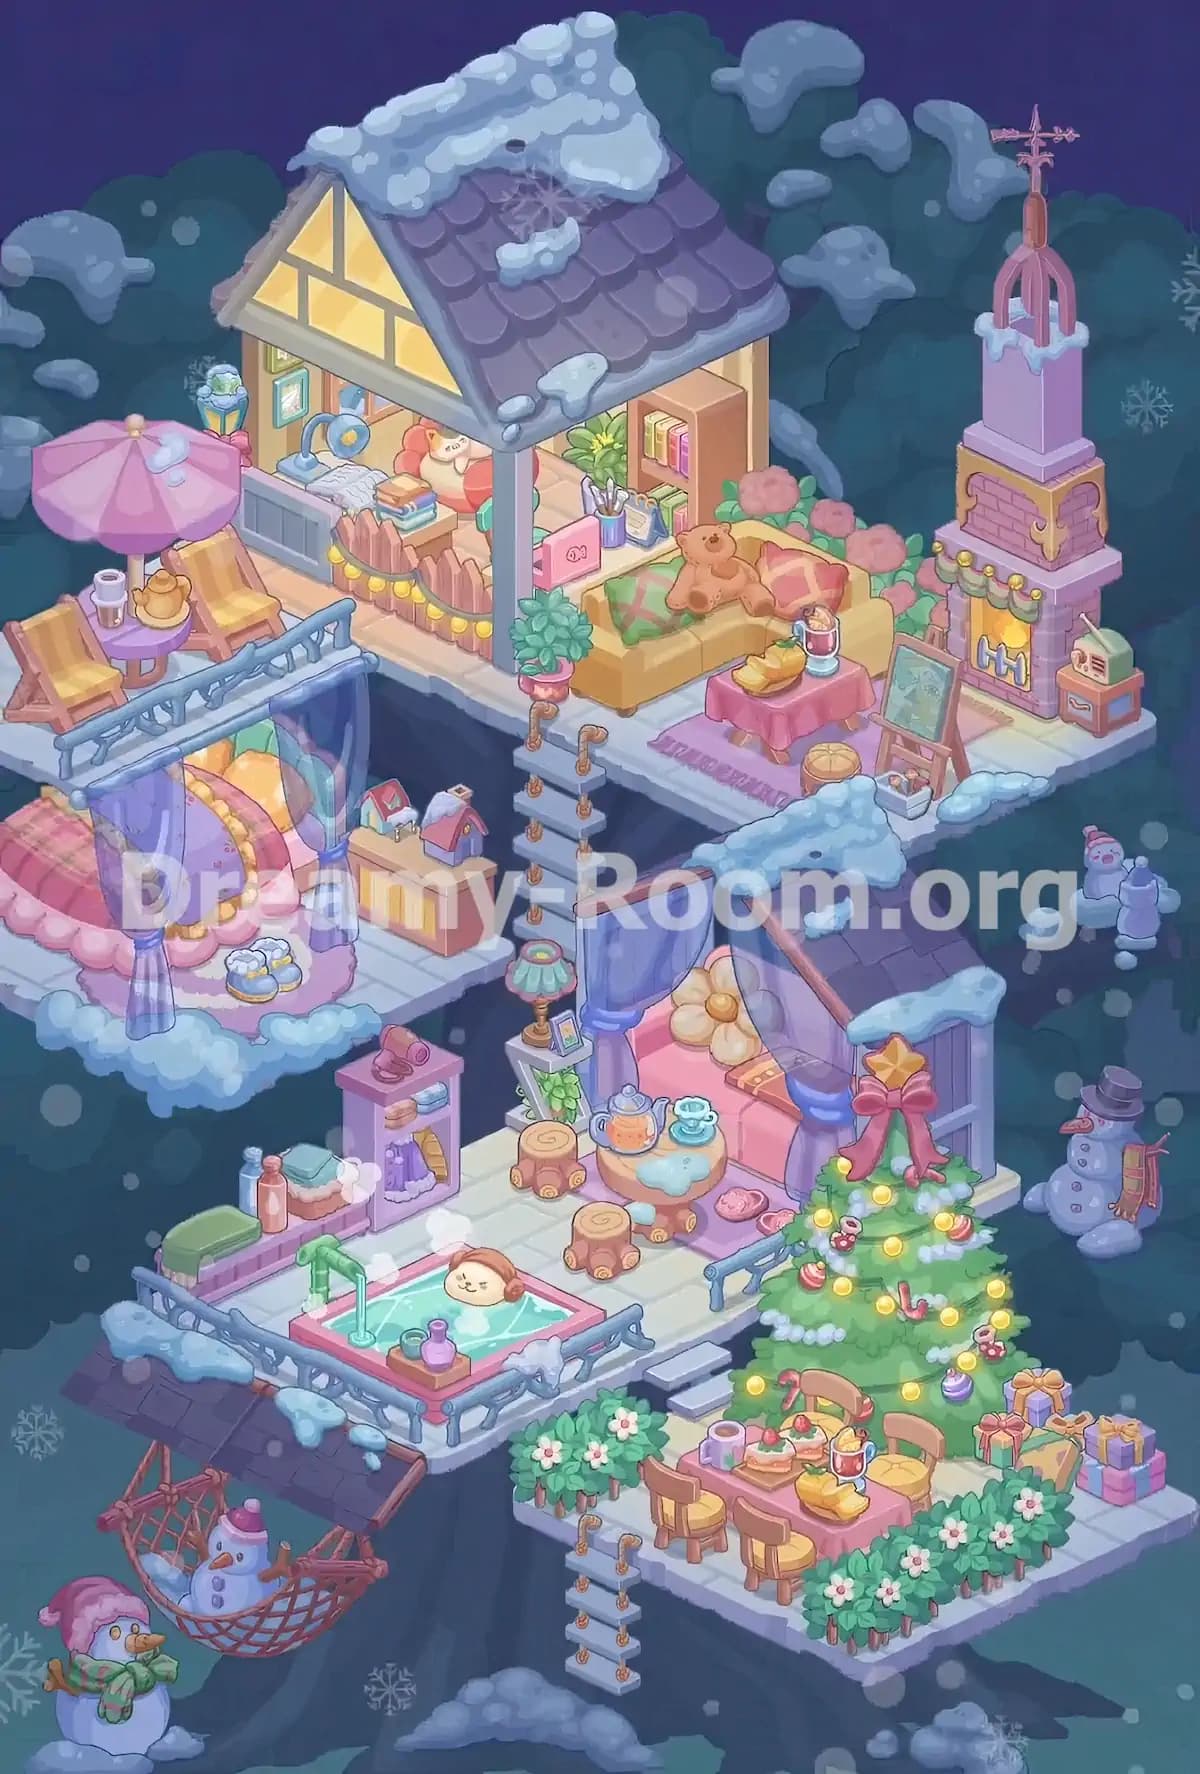
Step 1. Build the Multi-Level Treehouse Platforms and Floor Layout
Begin Dreamy Room Level 906 by establishing the structure of the winter treehouse. The starting scene features a simple rectangular platform with pale wooden tiles floating in front of a large snow-covered tree. Your first objective is to develop this empty foundation into the interconnected floors visible in the completed design.
Arrange the largest floor sections to create the upper living area, the suspended bedroom on the left, and the lower relaxation terrace. The upper floor supports the cottage, outdoor tea area, sofa, and fireplace. Beneath it, a smaller platform extends toward the left to accommodate the circular bedroom.
The bottom section of Dreamy Room Level 906 contains the hot tub and the Christmas dining terrace on the right. Leave sufficient room between these platforms for the connecting ladders and hanging decorations.
Pay attention to the direction of each floor extension. The architecture of Dreamy Room Level 906 depends on accurately aligning these separate sections before adding furniture and smaller accessories.
Step 2. Construct the Snow-Covered Cottage on the Upper Platform
The most prominent architectural feature of Dreamy Room Level 906 is the beautiful cottage occupying the upper-left and central portion of the treehouse. Position the cottage toward the back of the highest platform, leaving an outdoor balcony on its left and a seating area on its right.
Install the pale wooden walls, supporting posts, and steep purple-tiled roof. The roof slopes downward toward the right, while its left-facing triangular gable contains warm yellow illuminated window panels. Thick patches of white snow cover the roof ridge, upper edges, and several individual tiles.
The cottage should remain partially open at the front so the interior furnishings are visible. Position its main vertical support post near the center of the upper platform.
In Dreamy Room Level 906, the roof's placement is especially important because it visually separates the enclosed study from the outdoor lounge. Make sure the snowy roof sits directly above the cottage walls rather than extending too far over the balcony.
Step 3. Furnish the Cozy Study Inside the Upper Cottage
Once the cottage structure is complete, furnish the small study beneath its roof. This workspace occupies the back-left and middle section of the upper platform in Dreamy Room Level 906.
Place the blue-gray writing cabinet or desk along the left interior wall. Arrange an open book, several stacked books, and the blue desk lamp with a yellow circular center on the work surface. Add the small framed pictures to the wooden wall behind the desk, alongside the decorative window.
Position the red flower-shaped cushioned seat toward the back of the study. On the right side, install the tall brown bookshelf filled with colorful books, with a leafy green plant beside it.
Next, place the narrow white countertop holding the pink heart-decorated item, stationery cup, and small framed accessories.
For Dreamy Room Level 906, the most important detail is keeping these objects inside the cottage's footprint. Finish the study by adding the short wooden picket fence with glowing yellow bulbs along its open front edge.
Step 4. Arrange the Pink Umbrella and Outdoor Tea Balcony
Move to the far-left side of the upper platform, where Dreamy Room Level 906 features a relaxing outdoor tea corner. This balcony sits directly beside the cottage and extends toward the left edge of the scene.
Place two wooden reclining chairs with golden-yellow striped cushions, angling them toward the small round purple table between them. Set the pink patio umbrella behind the table so its broad canopy covers much of the seating area. Small snow patches rest on top of the umbrella.
Add the golden teapot, teacup, and serving accessories to the purple tabletop. The chairs should remain visible on opposite sides of the table, with the umbrella pole positioned behind the arrangement.
Install the blue-gray decorative railing along the balcony's front edge. A colorful lantern stands near the cottage wall behind the umbrella.
In Dreamy Room Level 906, this compact seating arrangement requires careful spacing. Keep the umbrella, chairs, and tea table grouped closely without blocking the neighboring study area.
Step 5. Decorate the Upper Living Room with the Sofa and Teddy Bear
The upper-right living area is one of the warmest spaces in Dreamy Room Level 906. Start by placing the large mustard-yellow sofa to the right of the cottage's central support post, facing diagonally toward the front of the platform.
Decorate the sofa with green patterned cushions and a pink geometric pillow. Place the brown teddy bear directly on the sofa, leaning against the back cushions.
Behind the sofa, arrange the decorative pink flowering bushes along the rear edge of the platform. These blossoms form a colorful backdrop against the dark snowy forest.
Position the small rectangular coffee table in front of the sofa. Cover it with a pink tablecloth and place the golden bread or pastry platter alongside the red beverage glass. A lavender rectangular rug with fringed ends rests beneath the table.
Add the leafy potted plant beside the cottage post on the sofa's left.
Dreamy Room Level 906 rewards accurate object placement, so keep the sofa, teddy bear, table, rug, and flowers aligned as one continuous lounge arrangement.
Step 6. Install the Fireplace, Chimney, and Decorative Accessories
Continue furnishing the upper-right corner of Dreamy Room Level 906 by building the tall decorative fireplace. Position it at the far-right rear of the upper platform, next to the sofa and coffee table.
The fireplace has a purple body, glowing yellow firebox, decorative golden trim, and a pink brick-patterned chimney. Above it sits a tall lavender tower topped with a snow-covered pink spire and copper-colored weather vane.
Add the green decorative garland with small yellow bulbs across the fireplace's upper front edge. The bright flames should remain visible through the opening near the bottom.
Place the small brown side cabinet immediately to the right of the fireplace and set the pale green retro radio on top.
In front of the fireplace, position the wooden easel holding a framed green picture or map. Nearby, add the small basket of accessories and the low round wooden stool.
The fireplace in Dreamy Room Level 906 must stand behind these smaller objects, creating depth without covering the seating arrangement or the platform's outer edge.
Step 7. Connect the Different Floors with Ladders, Railings, and Supports
After arranging the upper furnishings, connect the different sections of Dreamy Room Level 906 using the suspended ladders and surrounding safety railings.
Install the first vertical ladder near the central front edge of the upper platform, close to the potted plant and the transition between the cottage and sofa area. This ladder features gray horizontal steps joined by short brown rope sections. It descends toward the lower sleeping and relaxation spaces.
Add the blue-gray railings around the exposed balcony edges, keeping the opening for the ladder unobstructed. The upper-left tea balcony has a longer railing that also helps support the hanging curtains below.
A second shorter ladder hangs from the front-left edge of the bottom-right dining terrace. Position its steps vertically beneath the platform.
The placement of these ladders is a significant detail in Dreamy Room Level 906 because they visually establish how the treehouse's separate floors connect.
Check the relative heights of the platforms before placing the final handrails, ropes, and snow-covered edge decorations.
Step 8. Create the Suspended Circular Bedroom on the Left
The middle-left section of Dreamy Room Level 906 contains a dreamy suspended bedroom. This sleeping area sits below the upper tea balcony, with its front edge floating above the snowy forest.
Position the large circular bed toward the left side of the middle platform. The bed features a pink scalloped base, layered lavender and pink bedding, warm yellow cushions, and a soft pink patterned blanket. Place the rounded pink rug beneath the bed so its outer edge remains visible.
Hang the translucent purple curtains around the sleeping area. These curtains descend from the upper balcony structure and are tied back with blue bands, creating a canopy-like enclosure without hiding the bed completely.
Add the pair of pale blue slippers near the foot of the bed.
To the right, place the yellow-fronted wooden bedside cabinet with two decorative miniature houses on top.
Dreamy Room Level 906 requires the bedroom furniture to fit neatly beneath the balcony. Keep the cabinet near the inner wall and leave the bed visible through the curtains.
Step 9. Build the Pink Canopy Nook and Storage Corner
On the middle-right side of Dreamy Room Level 906, create a second comfortable resting space beneath a small purple gabled roof. This alcove occupies the area below the upper fireplace and to the right of the central ladder.
Install the purple wooden side walls and sloping roof, covering its ridge and front edge with thick white snow. Add the translucent lavender curtains across the open front, tying them toward the sides with blue bands.
Inside the nook, position the pink cushioned daybed against the rear wall. Arrange the large cream-colored flower pillow with its golden center near the back, and place the small rectangular book or cushion on the seat.
To the left of the alcove, install the tall lavender storage cabinet. Add the folded towels and colorful clothing to its shelves, with rolled items resting on top.
Dreamy Room Level 906 also includes small personal accessories in this section, including slippers near the daybed entrance. Keep them close to the nook without obstructing the lower walkway.
Step 10. Install the Hot Tub and Winter Bathing Area
The lower-left terrace in Dreamy Room Level 906 is dedicated to a cozy outdoor spa. Start by placing the square hot tub near the front-left corner of the lower platform. Its pink border surrounds pale turquoise water decorated with white swirling patterns.
Position the small animal character's head in the center of the water, with its brown earmuffs visible above the surface. Install the green water spout at the back-left corner of the tub, angled inward.
Place the wooden bath tray holding purple and green bottles along the front-right edge of the hot tub.
Along the rear-left side of the terrace, arrange the low bench or ledge with a green cushion, folded towels, and brown bottle. Add the decorative containers and smaller bath supplies nearby.
Surround the exposed front and left sides of the spa with blue-gray railings and patches of snow.
In Dreamy Room Level 906, the hot tub must remain positioned toward the foreground, leaving the rear-right section free for the tea table and canopy nook.
Step 11. Arrange the Tea Table and Relaxation Accessories Beside the Spa
The lower relaxation terrace of Dreamy Room Level 906 includes a second tea area positioned immediately in front of the pink canopy nook.
Place the small round wooden tea table on the lavender floor rug near the rear-right side of the spa platform. Add the transparent orange-filled teapot and matching pale blue teacups to its surface.
Arrange the short tree-stump stools around the table. Their natural wood texture complements the rustic treehouse surroundings. Add the small patches of snow visible across the table and nearby floor.
Near the back-left side of the tea area, position the teal scalloped table lamp on its narrow white stand. Include the small framed picture on the stand and the leafy decorative plant beneath it.
Set the pink slippers near the canopy nook, beside the rug.
Dreamy Room Level 906 contains several similarly colored wooden accessories, so distinguish the round tea table from the short stools and small storage surfaces.
The finished tea corner should sit between the canopy bed and the open spa area without blocking either space.
Step 12. Furnish the Christmas Dining Terrace with Chairs, Food, and Flowers
Move to the lower-right platform, where Dreamy Room Level 906 features a festive outdoor dining area. This terrace extends to the right of the spa and is connected to it by a short set of pale gray steps.
Position the rectangular pink dining table toward the front-center of the platform, leaving enough space behind it for the large Christmas tree.
Arrange four wooden chairs around the table, with two along the near side and two along the far side. Their yellow seat cushions add warmth to the winter setting.
Decorate the tabletop with the layered cake or dessert topped with strawberries, the purple mug, the red beverage glass, and the golden pastry or bread platter.
Place rows of leafy green flowering bushes around the terrace's exposed front and side edges. Each shrub is decorated with small pale pink and white blossoms.
In Dreamy Room Level 906, these hedges form a low border rather than a tall wall. Keep them around the dining area while ensuring the table, chairs, and festive decorations remain clearly visible.
Step 13. Complete the Christmas Tree, Presents, Snowmen, and Hanging Decorations
The final decorating stage of Dreamy Room Level 906 brings the entire winter scene together. Position the large green Christmas tree at the back-right of the dining terrace, behind the pink dining table.
Decorate the tree with glowing golden lights, white snowy garlands, red-and-white candy canes, colorful baubles, and tiny festive ornaments. Place the golden star at its top, accented by the large red ribbon bow.
Arrange several wrapped Christmas presents around the tree's lower-right side. The boxes have pastel purple, pink, blue, and green wrapping with golden bows.
Next, add the snowmen around the exterior. Place the tall snowman wearing a dark top hat and striped scarf to the right of the middle terrace. Position the smaller snow figures on the snowy ledge farther above it.
Below the spa platform, install the small dark-purple canopy and hanging brown net hammock. Set a snowman inside the hammock, then place another snowman wearing a pink hat and green scarf on the ground to the left.
Dreamy Room Level 906 is complete when every decoration occupies its proper location and the individual treehouse spaces match the finished arrangement.
Notes and Precautions
Dreamy Room Level 906 contains many overlapping platforms, making precise positioning more challenging than in a single-room puzzle. Remember that the main objective is not simply to decorate freely but to find the correct location for each item.
Pay special attention to the upper cottage roof. Its size and position determine how clearly the study, balcony, and sofa can be seen. Avoid confusing roof decorations with the smaller snowy roof covering the middle-right canopy nook.
The two bedroom areas also require different arrangements. The left bedroom uses a large circular bed with hanging curtains, while the right bedroom features a rectangular pink daybed beneath a fixed purple roof.
Another common source of confusion in Dreamy Room Level 906 is the variety of small wooden furniture. The tea table, dining chairs, tree-stump stools, and storage cabinets belong to different zones.
Keep the ladders aligned with their corresponding platform edges. Similarly, place the hanging snowman hammock beneath the lower-left terrace rather than on the main floor.
Finally, check the positions of the small accessories, including slippers, books, bottles, cushions, cups, flowers, and presents. Even a tiny misplaced item can prevent Dreamy Room Level 906 from matching the required arrangement.
Tips and Tricks from top player
The most effective strategy for Dreamy Room Level 906 is to complete the treehouse from the largest structures to the smallest decorations. Establish the floors, cottage, roofs, and ladders first. These pieces provide clear reference points for everything else.
Next, divide Dreamy Room Level 906 into six main zones: the upper cottage study, outdoor tea balcony, fireplace lounge, suspended left bedroom, lower spa terrace, and Christmas dining area. Focusing on one zone at a time prevents similar objects from becoming mixed up.
Place large furniture before adding cushions, books, cups, or decorative accessories. For example, position the mustard sofa before the teddy bear and pillows, and finish the dining table before arranging its food.
Use the snow-covered edges and nearby railings as alignment guides. These details help distinguish the separate decks when objects overlap in the isometric view.
A particularly useful shortcut in Dreamy Room Level 906 is to save the smallest decorations until the end. Books, bottles, photo frames, slippers, ornaments, and gifts are much easier to position once the larger furniture is settled.
If an object does not fit where expected, compare its shape, color, and orientation with the corresponding area rather than repeatedly placing it at random.
Final Scene: A Magical Christmas Treehouse in Dreamy Room Level 906
The completed Dreamy Room Level 906 transforms an empty floating platform into a charming winter retreat nestled among the branches of a magnificent snow-covered tree.
At the top, a warmly illuminated cottage overlooks a cozy outdoor tea balcony. The adjoining living room features a mustard-yellow sofa, cuddly teddy bear, pink flowers, and a glowing purple fireplace beneath a snowy chimney.
Below the cottage, a circular pastel bedroom floats behind delicate purple curtains, while a second pink sleeping nook offers a peaceful place to relax. The lower terrace contains a steaming turquoise hot tub, rustic wooden furniture, and a welcoming tea corner.
On the right, a beautifully decorated Christmas tree illuminates a festive dining area filled with pastries, colorful presents, and flowering greenery. Cheerful snowmen and a suspended hammock add playful details to the snowy surroundings.
With every object correctly positioned, Dreamy Room Level 906 becomes a magical holiday hideaway filled with warmth, comfort, and festive charm.