Dreamy Room Level 799
Dreamy Room Level 799 guide - Dreamy Room 799 Walkthrough & Solution.
Important Notice Regarding Level Numbering
Due to frequent changes in Dreamy Room's level numbering and differences between platforms (Android/iOS) – for example, level 799 on Android might not be the same as level 799 on iOS – the text guide below may not always match the images and video above. Please prioritize the image and video guides. If you find that the guide content doesn't match your current level, please visit the All Level Walkthroughs page to find the correct guide based on level images. Thank you for your understanding.
Dreamy Room Level 799 Walkthroughs & Guide
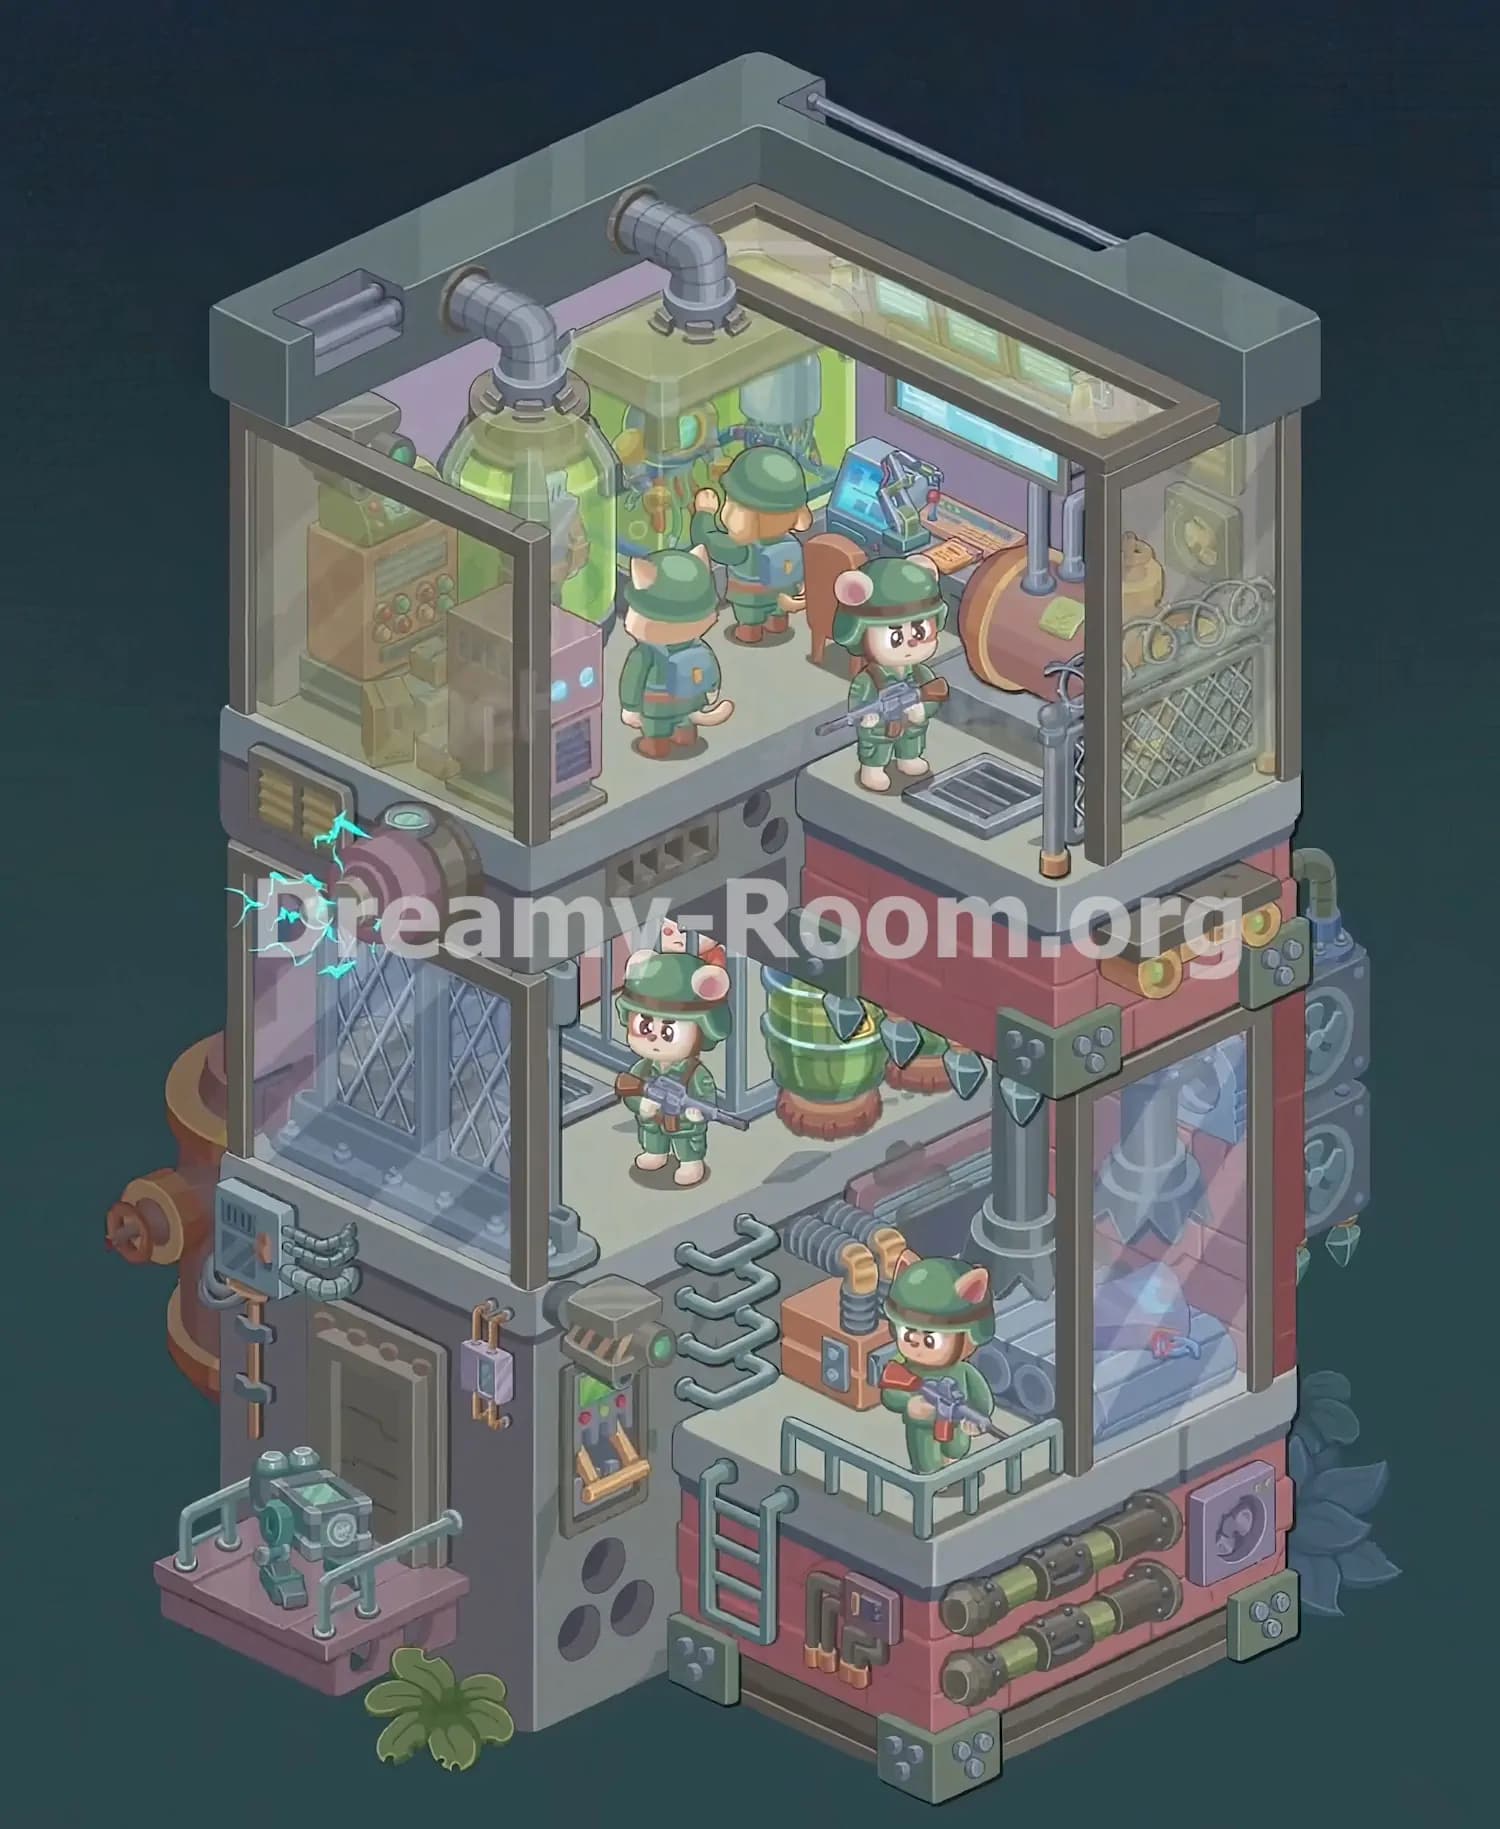
The completed Dreamy Room Level 799 room has a dense industrial layout, so work from the largest architectural elements toward the smallest props. Establishing floors, walls, machinery, and pipes first will make the placement of the mouse workers and decorative details much easier.
Step 1. Build the two-level industrial structure and open front walls
Begin Dreamy Room Level 799 by establishing the main shell of the facility. The original block becomes a tall cutaway building with two principal interior levels and multiple exterior platforms. Keep the main rectangular footprint, but form the upper room across the full width and the lower room beneath it. The front and portions of both side walls should remain visually open or covered by large transparent panels so the laboratory equipment remains visible.
Place thick gray-green structural beams around the upper perimeter, including the raised border running along the back and right sides of the roof. Add dark vertical framing posts at the front corners of the upper room and along the right edge. The middle floor should form a broad gray platform, while the lower-right portion develops into a red-brick-colored extension. In Dreamy Room Level 799, getting this shell correct is essential because almost every later object snaps against these structural boundaries.
Step 2. Install the upper laboratory’s large tanks and ceiling ventilation
Next, concentrate on the back-left and back-center of the upper floor in Dreamy Room Level 799. Place the two large green laboratory tanks against the rear wall. The first tank belongs toward the upper-left corner and has a bulbous transparent chamber with green liquid or light inside. The second, taller rectangular green tank sits slightly to its right and farther back.
Attach a thick silver-gray ventilation pipe to each tank. Both pipes curve upward using elbow joints and connect into the roof area. The left pipe rises from the rounder vessel, bends toward the rear wall, and disappears into a circular fitting. The second pipe rises from the tall central tank and bends toward the back-right portion of the roof. These ducts are important visual anchors in Dreamy Room Level 799. Also add the smaller colored tubes, valves, and laboratory attachments around the tanks so the rear wall begins to look densely mechanical rather than empty.
Step 3. Complete the upper-left machinery, storage, and control equipment
Fill the upper-left side of Dreamy Room Level 799 with the smaller industrial machines surrounding the large tank. Along the far-left wall, position a tall brown control cabinet containing several colored buttons or indicator lights. Additional boxes and equipment should sit immediately beside and partly behind it, creating a tightly packed maintenance area.
Near the middle of the upper room, place the blue angled control console. Its illuminated screen faces toward the front-right side of the room, allowing the nearby mouse workers to operate it. Add the smaller switches, keyboard-like panel, and colored controls around the screen. A narrow horizontal illuminated panel belongs on the back wall behind this station. In Dreamy Room Level 799, this upper control area should feel busy but organized: tanks occupy the rear, equipment fills the left edge, and the console acts as the central workstation. Do not accidentally shift these objects too far forward, or they will interfere with the character placements added later.
Step 4. Add the upper-right pressure tank, pipes, mesh enclosure, and floor grate
Move to the upper-right corner of Dreamy Room Level 799 and place the large reddish-brown horizontal cylindrical tank. It sits against the right/back wall just below the control-room window area. Its circular end faces toward the center of the room, while a narrow vertical gray pipe rises from the top-right side. Small notes or paper-like details rest nearby.
Behind and to the right of this tank, install the industrial mesh enclosure. Its side is made from diagonal metal latticework, with several curved pipes or circular loops visible inside. A pale vertical pipe runs along the extreme right edge. On the floor in front of this machinery, place the dark rectangular ventilation grate. The grate belongs near the front-right corner of the upper platform. These components give Dreamy Room Level 799 its unmistakable laboratory-bunker appearance, so make sure the red tank, mesh cage, and grate remain grouped on the right rather than drifting toward the central workstation.
Step 5. Position all four upper and middle mouse soldiers
Characters are important placement clues in Dreamy Room Level 799. On the upper floor, place one mouse worker near the back-center machinery, facing the tanks and control station. A second mouse stands closer to the front-left/center area of the upper floor. Another worker belongs near the middle of the laboratory, positioned between the green machinery and the blue console.
The most prominent upper character is the armed mouse soldier standing on the front-right platform. Place this character directly beside the floor grate, holding a gray-purple rifle across its body and facing outward toward the viewer. All of these mice wear green military-style helmets and matching uniforms.
A fourth mouse soldier belongs on the middle level below the main laboratory, approximately in the center-left opening. This character also holds equipment or a weapon and faces forward. Correct character placement is one of the trickier parts of Dreamy Room Level 799, because several mice look similar; use their surrounding machinery and floor position rather than appearance alone.
Step 6. Build the middle-left cage room and electric generator assembly
The left side of the middle level becomes one of the most distinctive areas in Dreamy Room Level 799. Install the tall transparent or glass-fronted enclosure immediately beneath the upper-left laboratory. Inside it, add the crossed metal lattice panels that resemble a secured elevator, containment cage, or reinforced industrial gate.
On the exterior upper-left edge of this enclosure, attach the large purple cylindrical electrical device. Its circular end points outward to the left and emits bright blue electrical arcs. The device should protrude noticeably beyond the building rather than sitting flush against the wall.
Directly beneath this enclosure, attach a gray electrical box with bundled cables and pipes extending downward and sideways. A narrow orange-brown pipe also runs vertically nearby. These parts create the electrically powered left façade of Dreamy Room Level 799. Because the generator extends beyond the main footprint, it is easy to misplace; use the upper glass enclosure as the main alignment reference.
Step 7. Decorate the lower-left maintenance room and exterior machinery platform
Continue downward on the left side of Dreamy Room Level 799. Place the large plain metal door on the lower-left interior wall. It has a dark gray surface and small circular rivet-like details near its upper edge. To the right of the door, install a narrow vertical control panel containing green and red indicator lights and a small lever or handle near the bottom.
Above and around this panel, add the short zigzagging gray pipes running horizontally across the wall. Small copper-colored tubes and a tiny purple module belong near the door frame. On the far lower-left exterior, create a small pinkish platform with a protective gray railing. Place the compact green mechanical unit or pump on this platform, with a long thin pipe extending toward the main structure. The lower-left corner of Dreamy Room Level 799 should look like a service station built outside the main bunker, while the interior wall remains packed with maintenance controls.
Step 8. Assemble the suspended central tank and lower-right workstation
The center of Dreamy Room Level 799 contains a hanging green mechanical vessel beneath the upper-right platform. Position this rounded green tank just below the middle floor, slightly right of center. It has metallic bands around its body, a reddish base, and pointed gray attachments or fins extending from the sides. A dark connector at its top links it to the structure above.
Below and to the right, build the lower-right workstation. Place the orange rectangular machine against the rear wall of this lower room. Two flexible ribbed tubes rise from the machine, one gray and one yellow-orange, before bending upward. In front of it, place another mouse soldier on the small raised platform, holding a rifle or tool.
Add the surrounding metal railing around the platform’s front and left edges. This creates a protected workstation overlooking the lower section. In Dreamy Room Level 799, the suspended green tank and orange machine should remain visually separate even though they occupy the same central-right region.
Step 9. Complete the lower-right glass chamber and exterior side mechanisms
Now fill the far-right side of Dreamy Room Level 799. Behind the lower-right mouse worker, install the large transparent glass wall or chamber. Visible through the glass are oversized gray industrial pipes and cylindrical components. The machinery runs diagonally and vertically, creating depth behind the red structural frame. Small colored details appear near the bottom of this chamber.
Outside the right wall, attach the large stacked circular mechanical components. Two prominent round wheel- or fan-like mechanisms sit vertically along the exterior right side, partially hidden by the building frame. Additional pipes and hardware surround them.
The red structural columns framing this section should extend from the middle level downward. Add dark gray reinforcement plates with visible bolts at important joints. Dreamy Room Level 799 uses these repeated riveted plates throughout the structure, so check each corner carefully. The lower-right chamber should ultimately look enclosed behind glass while still allowing its oversized internal pipework to remain clearly visible.
Step 10. Finish the red lower façade with ladder, canisters, fan panel, and reinforcement plates
Complete the front-right base of Dreamy Room Level 799 with the red industrial façade. Attach the short gray-green ladder vertically to the front-left side of this red section, directly below the lower workstation railing. To the right of the ladder, place the small rectangular pipe-control panel with copper tubing.
Two long horizontal cylindrical canisters or pipe assemblies mount across the red front wall. They run parallel to each other, one above the other, with green central sections and dark metal caps. Immediately to their right, attach the square pink panel containing a dark circular fan or vent symbol.
Add gray-green corner plates with bolts at the lower corners and at other structural joints. Additional riveted brackets belong on the upper red wall beneath the middle platform. Small yellow circular fittings are visible along the horizontal strip near the upper-right façade. These finishing pieces are especially important in Dreamy Room Level 799, because several look interchangeable until you compare their exact orientation and mounting points.
Step 11. Add the roof rails, exterior pipes, plants, and final tiny details
Finish Dreamy Room Level 799 by checking the outer silhouette for small pieces that are easy to overlook. Along the roof perimeter, place the narrow metallic rail or pipe that runs horizontally across the back-right upper edge. Another short pair of silver pipes protrudes from the upper-left exterior wall. Confirm that the roof border remains thick and green-gray, framing the exposed laboratory below.
Around the bottom of the structure, add the small plant growth. A soft green leafy plant sits near the lower-left/front base, while darker foliage appears around the far-right rear corner. On the left rear edge, several round brown-orange pipe sections or circular mechanical pieces protrude from behind the building.
Finally, inspect Dreamy Room Level 799 for tiny cables, wall notes, colored indicator lights, valve handles, pipe joints, bolts, and reinforcement brackets. These small pieces can prevent completion even when the major machinery appears correct, so compare every exposed wall and platform before assuming the room is finished.
Notes and Precautions
The main challenge of Dreamy Room Level 799 is distinguishing between objects that share the same industrial color palette. Pipes, brackets, machines, and wall fittings often use similar gray-green tones, making incorrect placements appear plausible at first glance. Use the completed building’s architecture as your guide: large tanks stay upstairs, electrical equipment dominates the left exterior, and red structural panels identify the lower-right section.
Be particularly careful with the mouse characters in Dreamy Room Level 799. Their uniforms and helmets are nearly identical, so match them according to pose and surrounding workstation. The rifle-holding mouse beside the upper floor grate is especially useful as a landmark.
Do not ignore pieces extending beyond the original room footprint. The electrical generator on the left, circular mechanisms on the right, exterior machinery platform, and rear pipes are intentional parts of Dreamy Room Level 799.
Also check transparent areas carefully. Objects visible through glass may look as though they belong outside the building when they actually sit inside a chamber. Whenever a piece refuses to settle, test nearby mounting surfaces rather than forcing it into a visually similar location.
Tips and Tricks from top player
A reliable strategy for Dreamy Room Level 799 is to place objects from largest to smallest. Start with floors, structural frames, red wall sections, large tanks, glass enclosures, and major machinery. Once these anchor objects are correctly positioned, the available spaces for smaller equipment become much more obvious.
Treat each section of Dreamy Room Level 799 as a separate puzzle. Complete the upper laboratory first, then the middle-left electrical enclosure, followed by the lower-left maintenance wall and finally the lower-right workstation. This reduces visual clutter and prevents accidentally dragging pieces across already completed areas.
Another useful shortcut is to identify objects by their connection points. Curved ventilation pipes usually reveal which tank they belong to, while bolted brackets naturally align with structural corners. Flexible ribbed hoses belong near the orange lower machine, and the electrical coil obviously pairs with the reinforced enclosure on the left.
Save tiny decorations for last. In Dreamy Room Level 799, small notes, switches, tubing, indicators, and wall hardware are much easier to position once every large surface is occupied.
Final Scene – Dreamy Room Level 799 Completed
The completed Dreamy Room Level 799 becomes a charming miniature military-science facility packed into a tall industrial cutaway. The upper floor functions as a busy laboratory, with glowing green tanks, curved ventilation ducts, control consoles, a red pressure vessel, mesh storage, and several helmeted mouse workers. Below it, Dreamy Room Level 799 continues into a secured mechanical complex: an electrified containment area dominates the left side, while maintenance panels, pipes, doors, and an exterior machine platform fill the lower wall. On the right, another armed mouse operates beside orange machinery and flexible hoses, overlooking a glass chamber full of oversized pipes. The red lower façade is finished with a ladder, twin cylindrical canisters, a ventilation panel, bolts, and reinforced brackets. Small plants soften the base of the structure, while blue electrical sparks and glowing equipment make the entire Dreamy Room Level 799 scene feel active, secretive, and wonderfully detailed.