Dreamy Room Level 839
Dreamy Room Level 839 guide - Dreamy Room 839 Walkthrough & Solution.
Important Notice Regarding Level Numbering
Due to frequent changes in Dreamy Room's level numbering and differences between platforms (Android/iOS) – for example, level 839 on Android might not be the same as level 839 on iOS – the text guide below may not always match the images and video above. Please prioritize the image and video guides. If you find that the guide content doesn't match your current level, please visit the All Level Walkthroughs page to find the correct guide based on level images. Thank you for your understanding.
Dreamy Room Level 839 Walkthroughs & Guide
Step 1. Place the giant fried-chicken bucket in the center of Dreamy Room Level 839
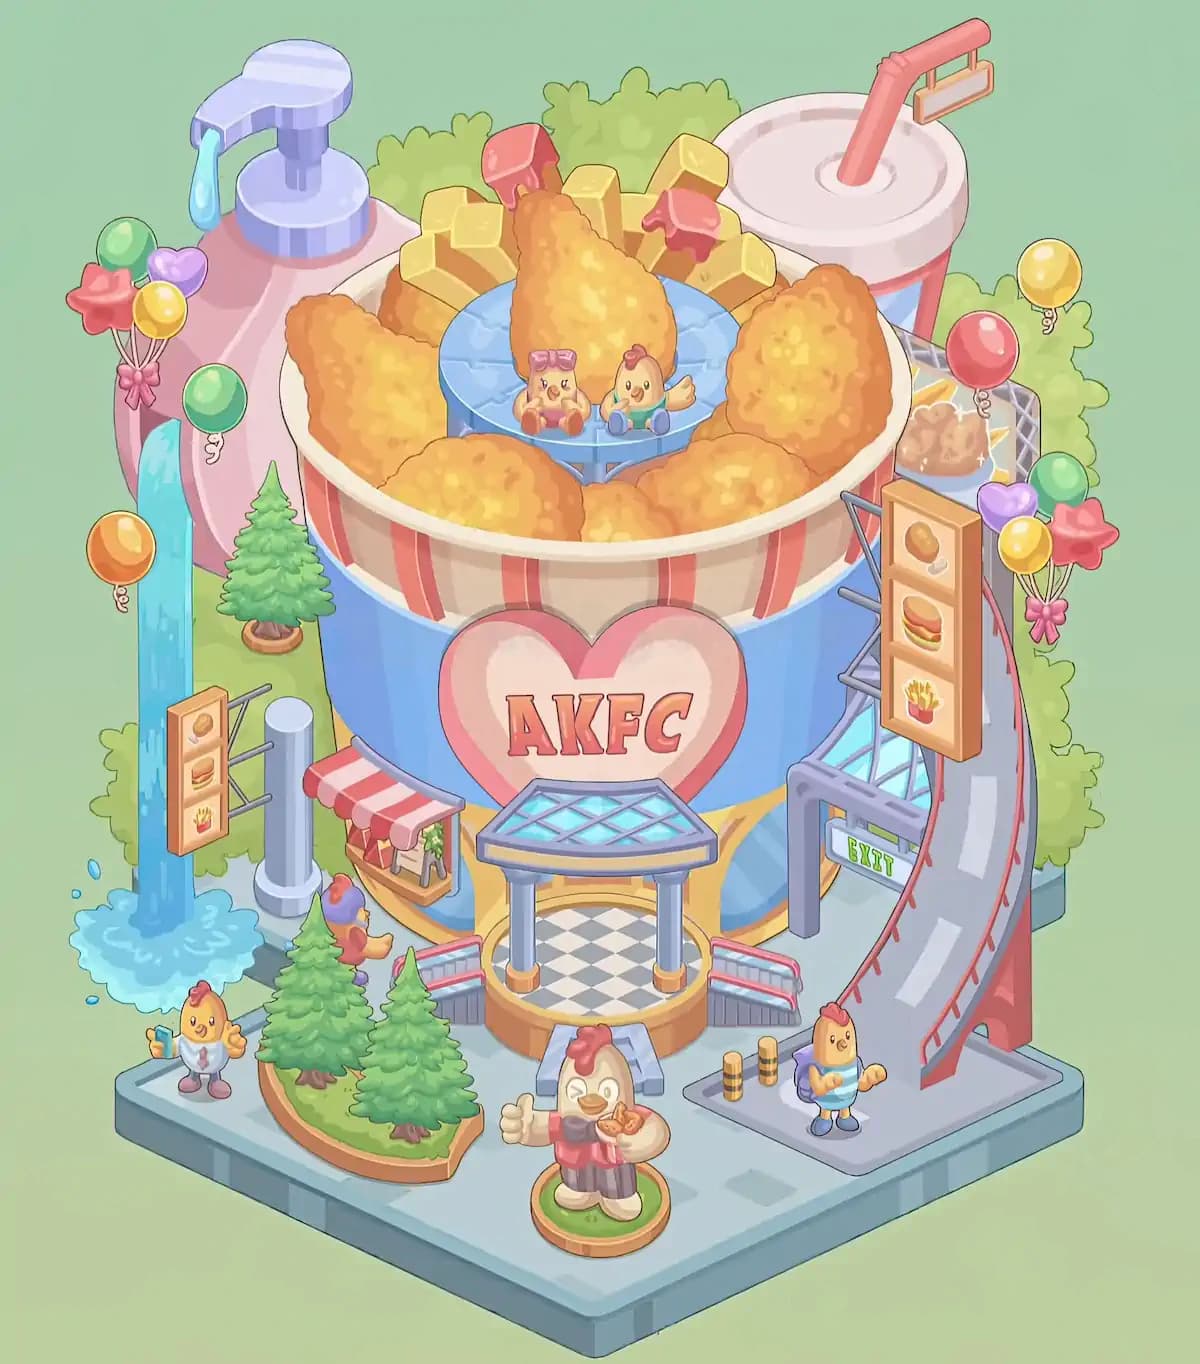
Begin Dreamy Room Level 839 with the enormous restaurant bucket because it determines the position of nearly everything else. Place the bucket in the upper-middle and central portion of the platform, leaving a generous open area in front for the entrance and mascot statue. The lower half of the bucket is blue, while the top rim has alternating cream and reddish-pink vertical stripes. A large pink heart-shaped emblem sits on the front of the bucket, with the red “AKEC” lettering centered inside it. The bucket should occupy most of the width of Dreamy Room Level 839 without touching either side edge. Make sure the upper rim remains visible because the food pieces will eventually sit inside it. Behind the bucket, leave enough room for shrubs, the drink, and the large dispenser. Correctly positioning this central object is essential because the entrance canopy, ramps, signs, and surrounding decorations all align with it.
Step 2. Fill the bucket with fried chicken, fries, sauce, and the blue mascot platform
Next, complete the oversized meal at the top of Dreamy Room Level 839. Arrange the large golden fried-chicken pieces around the inside edge of the bucket. One tall piece stands prominently near the center-back, while additional pieces fill the left, front, and right sections. Between the chicken pieces, place the chunky yellow fries so that they rise above the bucket rim. Several fries have blobs of red sauce on top, especially toward the rear and upper-left areas. In the very center of the food, add the round blue raised platform. Two tiny chicken mascots sit together on this blue platform, creating the focal point of the upper section. Dreamy Room Level 839 uses heavy overlap here, so some food pieces should partially hide others. Do not try to spread everything evenly. The final arrangement should look deliberately crowded, like an overflowing promotional fried-chicken bucket.
Step 3. Add the oversized drink and sauce dispenser behind the bucket
The two tallest background props in Dreamy Room Level 839 belong behind the main restaurant bucket. On the back-right side, place the huge takeaway drink cup. It has a pale pink lid, a mostly white body with red-and-blue decoration, and a thick red straw that bends diagonally upward toward the upper-right corner. The cup should appear partly hidden by the bucket and nearby greenery rather than standing completely separate from the restaurant.
On the back-left of Dreamy Room Level 839, position the enormous pink dispenser container. Its top has a large lavender pump mechanism with a rounded push top and cylindrical neck. A blue drop hangs beneath the dispenser outlet. The dispenser rises above the left side of the bucket and also sits partially behind it. These exaggerated food-service objects create the scale and theme of Dreamy Room Level 839, so their rear-layer placement is important; putting them too far forward will block later signs and landscaping.
Step 4. Build the main entrance and checkered lobby in front of the bucket
Now construct the restaurant entrance at the lower center of Dreamy Room Level 839. Directly beneath the heart logo, place the entrance structure with its blue glass-like canopy. The roof is a shallow geometric awning filled with a light-blue diamond lattice pattern. Two pale columns support the front corners, each ending in warm orange bases. Beneath the canopy is a black-and-white checkerboard floor that leads inward toward the restaurant.
Place the short front approach and steps immediately below this entrance. On both sides, attach the matching sloped stair or ramp sections with gray surfaces and pink-red handrails. These side rails angle outward from the entrance and help define the center of Dreamy Room Level 839. The entrance should remain perfectly aligned with the bucket logo above it. If the canopy appears noticeably off-center, move it before continuing, because the front statue and nearby landscaping depend on this central axis.
Step 5. Assemble the raised road, EXIT gate, and right-side menu sign
The right side of Dreamy Room Level 839 contains a tall gray roadway or ramp that curves downward from the rear-right area toward the lower-right corner. Position this road beside the bucket rather than directly in front of it. The surface is gray with lighter rectangular road markings, while reddish rails run along the outside edge. Red structural supports lift the lower section above the base.
At the lower-left side of this roadway, place the gray EXIT gateway. A small rectangular sign reading “EXIT” in green letters hangs beneath the top beam. Higher up, attach the tall three-panel menu board facing outward. Its three pictures show a chicken drumstick at the top, a burger in the middle, and fries at the bottom. Metal framework supports the sign behind it. Dreamy Room Level 839 requires careful layering here: the menu belongs in front of the road structure, while parts of the support frame disappear behind it. Keep the lower road landing clear for the small mascot added later.
Step 6. Create the waterfall, small food stand, post, and left-side menu area
Move to the left side of Dreamy Room Level 839 and build the cluster that balances the tall roadway on the opposite side. Place the bright blue vertical stream along the far-left side of the restaurant. It runs downward behind the foreground objects and ends in a light-blue splash pool near the lower-left area. Add several small droplets around the puddle so it looks like water is actively splashing onto the platform.
Beside the stream, place the tall silver-gray cylindrical post. Slightly behind and to the right of this post is the small food kiosk with a red-and-white striped awning. The little counter structure sits close to the bucket wall and includes a tiny green plant beneath the canopy. Farther left, attach the narrow three-panel menu board showing the same food theme: chicken, burger, and fries. Dreamy Room Level 839 positions this sign facing toward the viewer, with thin horizontal supports extending behind it. Keep the water visible rather than accidentally covering it with the kiosk or sign.
Step 7. Add all trees, shrubs, and the landscaped island
Greenery fills many of the gaps in Dreamy Room Level 839. Begin with the large pale-green bushes behind the central bucket. They form a soft background around the fried chicken, drink cup, and dispenser without rising higher than those oversized props. Continue similar shrub clusters down the left and right sides so the restaurant appears surrounded by vegetation.
At the lower-left and center-left of Dreamy Room Level 839, place the curved raised planting bed. It has a warm brown-orange border and a green grassy surface. Three evergreen trees dominate this landscaped island: a larger tree toward the left-middle and two additional conifers extending toward the right. Another separate evergreen appears higher on the left near the waterfall and bucket. These trees overlap some nearby objects, which is an important placement clue. The planting bed should stay behind the foreground mascot statue but in front of parts of the restaurant. Dreamy Room Level 839 looks much fuller once these plants are correctly layered.
Step 8. Place the balloon clusters around both sides of Dreamy Room Level 839
Balloons provide the bright party atmosphere around Dreamy Room Level 839. On the upper-left side near the dispenser, arrange a cluster containing several colorful balloons, including red star shapes and round green, yellow, purple, and other pastel balloons. Pink ribbon bows gather some of the strings together. Additional individual balloons appear farther down the left side, including an orange balloon near the waterfall and a green balloon closer to the bucket.
Repeat this celebratory decoration on the right side of Dreamy Room Level 839. Place individual red and yellow balloons around the upper-right greenery, then build another multicolored cluster beside the large menu sign. This grouping includes round green, purple, and yellow balloons together with a red star-shaped balloon and a pink bow. The balloons should sit around the outer perimeter rather than covering the major restaurant structures. Because several strings are extremely thin, use the balloon bodies themselves as the main clue when testing placement.
Step 9. Position the small chicken mascots and foreground character statue
The mascot characters make Dreamy Room Level 839 feel like a complete themed attraction. At the front-left edge of the platform, place the small standing chicken character near the waterfall and landscaped area. This mascot wears a light outfit and stands close to the edge while holding a small food-related item. On the lower-right side, place another chicken mascot at the foot of the raised roadway. This character wears blue-toned clothing and holds food in front of its body.
A partially hidden chicken character also appears near the kiosk and trees on the left side of Dreamy Room Level 839. Finally, place the largest mascot statue at the absolute front center. This character stands on a round green platform with an orange border, directly in line with the entrance. It wears a red-and-dark uniform, holds pieces of fried chicken, and gives a prominent thumbs-up gesture. Its position is deliberately separated from the entrance so it acts like a welcoming restaurant mascot.
Step 10. Finish the bollards, supports, signs, and small details in Dreamy Room Level 839
Use the final stage of Dreamy Room Level 839 to place the smaller objects that are easy to overlook. Near the front-right side of the entrance and close to the roadway, add the pair of short yellow-and-black striped bollards. They stand upright on the open pavement between the entrance area and the small right-side mascot. Check that the road's red support legs are visible beneath the raised section and that its outer red handrail follows the curve correctly.
Inspect both three-panel food signs in Dreamy Room Level 839 and verify their order: chicken at the top, burger in the center, and fries at the bottom. Make sure the green EXIT sign hangs beneath its gray gateway. Check the tiny kiosk plant, water droplets, balloon strings, ribbons, blue dispenser drop, ketchup-topped fries, entrance columns, railings, and checkerboard floor. Dreamy Room Level 839 can look almost finished while one tiny object remains misplaced, so scan every edge before assuming the level is complete.
Notes and Precautions
The biggest difficulty in Dreamy Room Level 839 is the amount of visual overlap. The giant bucket, food, background props, shrubs, signs, and balloons all occupy closely packed layers. Start with large structural pieces and avoid filling tiny gaps too early. If an object refuses to lock into place, compare its silhouette with the empty space rather than judging only by color.
Pay particular attention to the left waterfall area and the right elevated roadway. Both sides contain several objects stacked in front of one another. In Dreamy Room Level 839, a correct object may seem visually hidden once later pieces are added, so this is normal. The mascot statue belongs at the very front, while the giant cup and dispenser belong at the very back. The central restaurant entrance should remain aligned with the heart logo and front statue throughout Dreamy Room Level 839.
Tips and Tricks from top player
For Dreamy Room Level 839, place objects in a back-to-front order whenever possible. Start with the giant bucket, rear shrubs, dispenser, and drink. Then complete the bucket contents, side structures, entrance, landscape, and finally the mascots, balloons, and small details. This reduces the chance that large objects obscure useful placement guides.
Another effective Dreamy Room Level 839 strategy is to treat the room as five zones: central bucket, upper background, left waterfall area, right roadway area, and front entrance plaza. Finish one zone at a time instead of dragging objects randomly around the screen. Symmetry also helps: the left and right food menu boards visually balance one another, while balloon clusters occupy both outer sides. If you are stuck in Dreamy Room Level 839, inspect narrow spaces near trees, behind signs, beside the road supports, and around the kiosk, because these are the easiest places to miss a final small piece.
Final Scene of Dreamy Room Level 839
The completed Dreamy Room Level 839 becomes a colorful miniature fried-chicken theme restaurant centered on an enormous blue bucket overflowing with crispy chicken, fries, sauce, and two tiny mascots seated on a blue platform. A giant drink and pump dispenser rise behind the restaurant, surrounded by leafy bushes. At ground level, a glass-canopy entrance with a checkerboard floor welcomes visitors, while a large chicken mascot statue gives a thumbs-up from the front plaza. To the left, a waterfall splashes beside a striped food kiosk, signs, evergreen trees, and balloons. To the right, an elevated curving roadway passes an EXIT gate, food menu, balloon cluster, and another chicken mascot. Dreamy Room Level 839 finishes with landscaped greenery, colorful party decorations, small bollards, multiple characters, and carefully layered restaurant details, transforming the once-empty platform into a cheerful fast-food attraction.