Dreamy Room Level 9
Dreamy Room Level 9 guide - Dreamy Room 9 Walkthrough & Solution.

Important Notice Regarding Level Numbering
Due to frequent changes in Dreamy Room's level numbering and differences between platforms (Android/iOS) – for example, level 9 on Android might not be the same as level 9 on iOS – the text guide below may not always match the images and video above. Please prioritize the image and video guides. If you find that the guide content doesn't match your current level, please visit the All Level Walkthroughs page to find the correct guide based on level images. Thank you for your understanding.
Dreamy Room Level 9 Walkthroughs & Guide
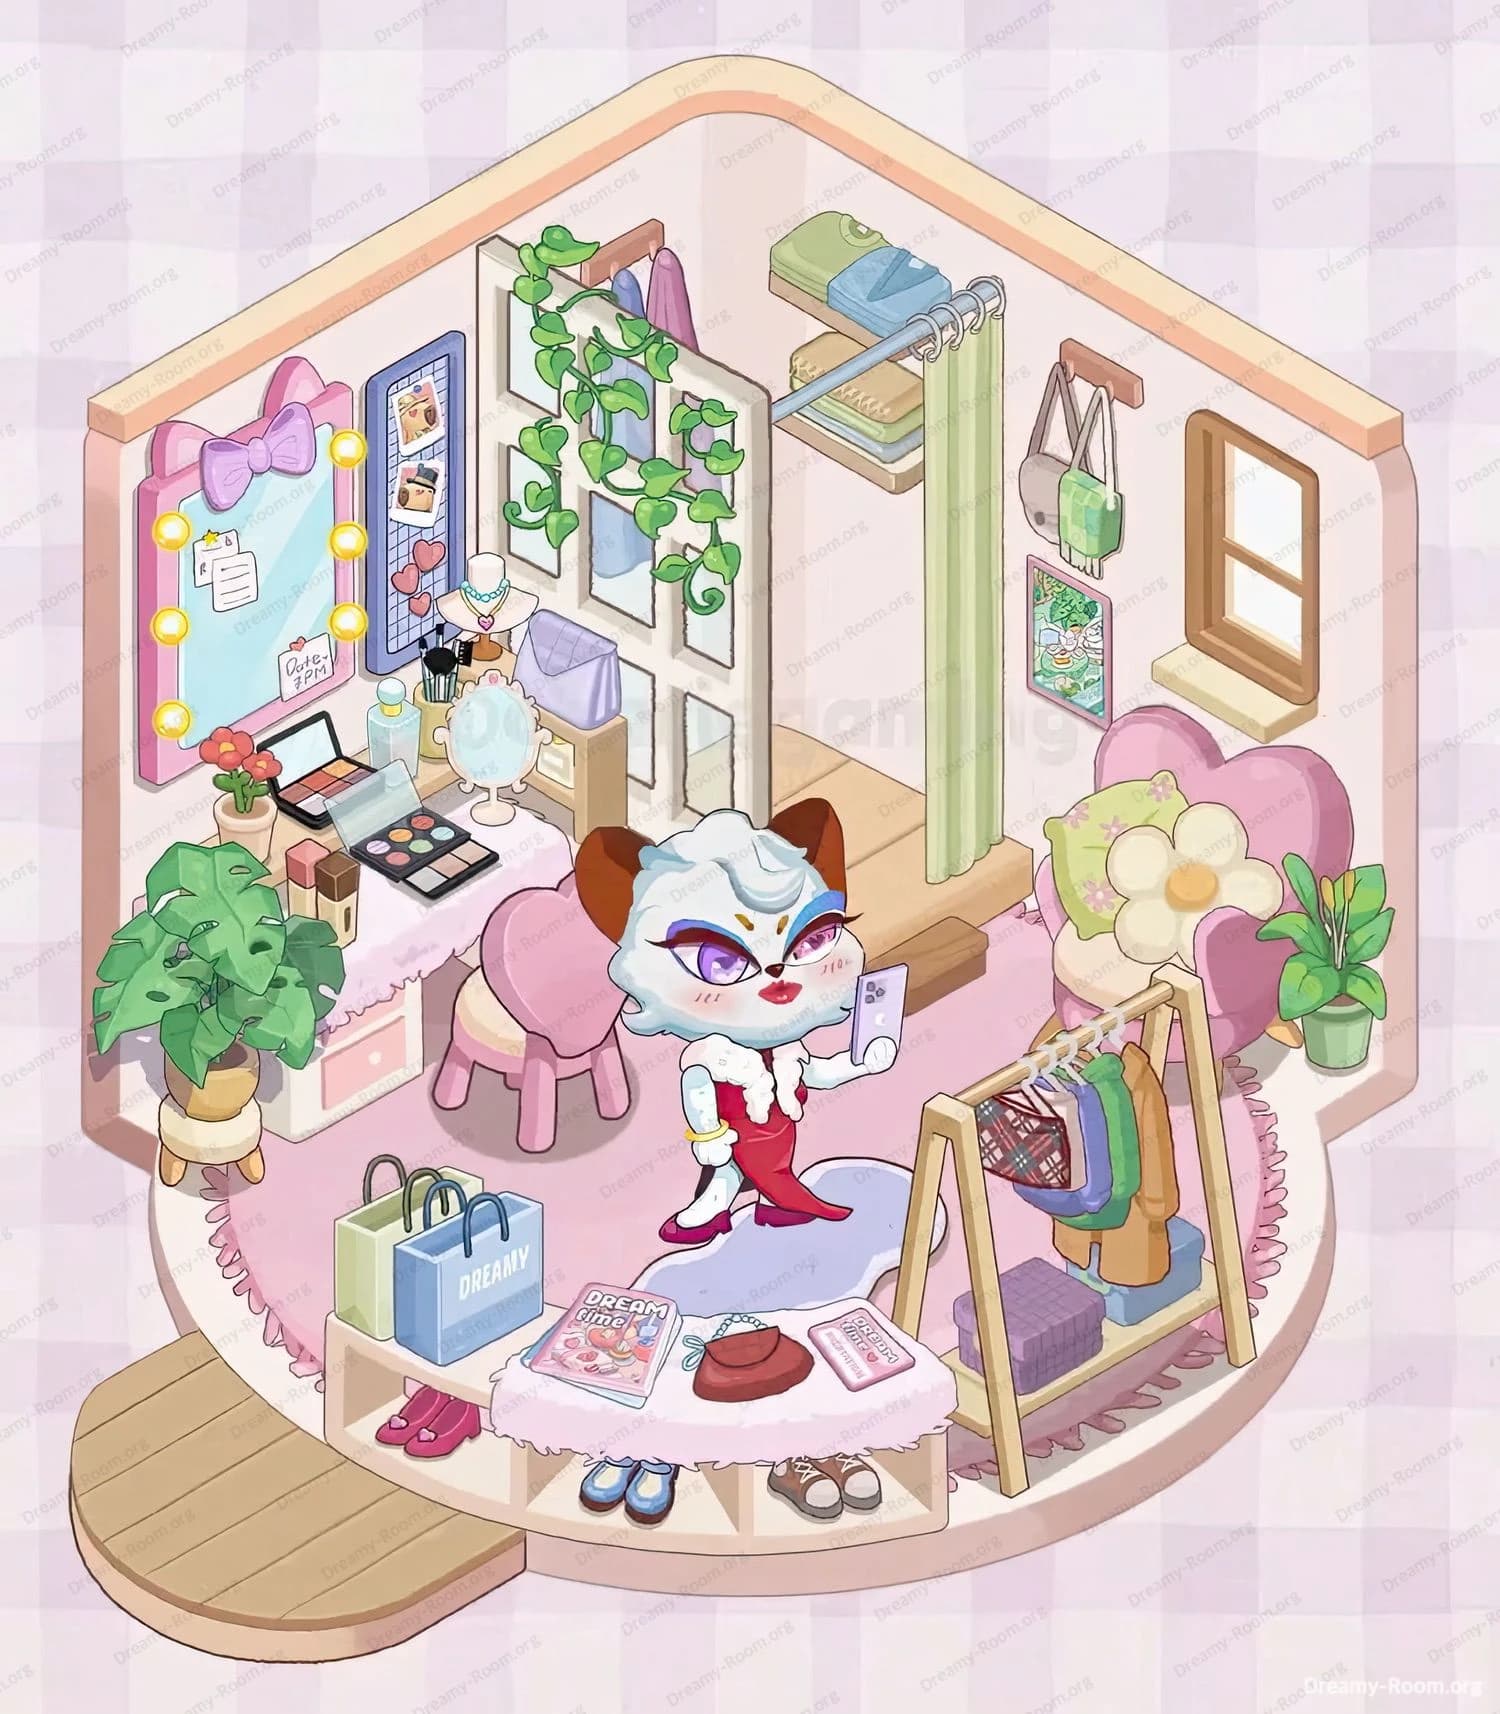
Welcome to Dreamy Room Level 9, where your task is to transform a bare corner space into the charming room shown in the completed image. In this guide, we’ll walk you through each step of arranging every item in its precise location. The main challenge of Dreamy Room Level 9 lies in figuring out the correct spot for every object—so follow along carefully to conquer this level!
Step 1. Lay the Round Pink Rug
Start Dreamy Room Level 9 by placing the round pink rug on the floor in the center of the room. This rug forms the foundation for your cozy space, so position it carefully so it covers most of the circular floor area.
Step 2. Position the Wooden Step at the Entrance
Next, align the small wooden step at the front entrance. This step is already part of the default layout in Dreamy Room Level 9, but make sure it’s firmly placed before you move on. It creates a natural threshold between the outside and your new interior.
Step 3. Set Up the Partition with Hanging Vines
In the back-left corner of the room, place the tall white partition. Adorn it with the hanging vines that drape down each panel. In Dreamy Room Level 9, this partition not only adds a touch of greenery but also separates the vanity area from the rest of the space.
Step 4. Place the Vanity Table and Mirror
Against the left wall, position the vanity table topped with a large mirror framed by glowing bulbs. Don’t forget to attach the pink bow above the mirror. Arranging the vanity in Dreamy Room Level 9 is key, as it anchors the makeup area and sets the whimsical theme of the room.
Step 5. Organize the Makeup Items on the Vanity
Carefully place each makeup product—eyeshadow palette, brushes, lipsticks, and blush—on top of the vanity. In Dreamy Room Level 9, attention to detail is crucial; ensure all items are neatly spaced so you can see each product clearly.
Step 6. Add the Heart-Shaped Stool
Slide the pink heart-shaped stool directly in front of the vanity table. This stool is essential in Dreamy Room Level 9, as it provides the perfect seat for your character to get ready. Align it so the heart shape faces outward for a cute aesthetic.
Step 7. Hang Clothes and Accessories
On the right side of the partition, install the wall hooks and clothing rod. Drape a pastel shirt and a small towel over these hooks. Below them, hang a light green bag to add variety. Dreamy Room Level 9 emphasizes meticulous placement, so make sure these items are clearly visible yet neatly arranged.
Step 8. Position the Clothing Rack and Shoes
In the center of the room, place a freestanding clothing rack displaying the elegant red gown and a few other garments. Line up several pairs of shoes beneath it—flats, sandals, and slippers. This rack is one of the focal points of Dreamy Room Level 9, showcasing your fashion finds.
Step 9. Arrange the Shopping Bags and Plants
Place two shopping bags labeled “Dreamy” on the floor to the left, near the rug’s edge. On both sides of the room, add potted plants—a large leafy one on the left and a smaller plant on the right. In Dreamy Room Level 9, these plants bring life to the interior and balance out the decor.
Step 10. Add the Heart Chair and Character Figure
Set the plush pink heart chair near the right wall, close to the window. Finally, place your cat-like character figurine (wearing the red dress) in the center of the room, holding a paper or checklist. This finishing touch in Dreamy Room Level 9 completes the cozy, storybook atmosphere.
Notes and Precautions
- Confirm Object Placement: In Dreamy Room Level 9, items can snap into specific spots. If you see a slight glow, that means it’s the correct location.
- Mind the Room Layout: Ensure none of the objects overlap awkwardly, as this can prevent you from completing the level.
- Watch the Walls: Some items, like the partition or window decor, must align exactly with the walls to register as correct.
- Save Progress: Before exiting, confirm you’ve saved your game. If not, you may need to repeat your progress in Dreamy Room Level 9 from scratch.
Tips and Tricks
- Use the Grid: Zoom in to see the grid. This feature in Dreamy Room Level 9 helps you align items with precision.
- Start with Large Items: Placing big pieces (like the vanity or clothing rack) first creates a framework to guide the smaller decorations.
- Check Hints: Some levels, including Dreamy Room Level 9, offer subtle hints if you hover over certain areas. Pay attention to these if you get stuck.
- Experiment Freely: Don’t be afraid to shuffle items around. This level is all about discovering the perfect layout.
By following these steps, you’ll conquer Dreamy Room Level 9 and reveal a sweet, stylish interior that perfectly matches the completed image. Focus on each object’s placement, and you’ll soon become an expert at decorating your Dreamy Room—happy arranging!


