Dreamy Room Level 234
Dreamy Room Level 234 guide - Dreamy Room 234 Walkthrough & Solution.
Important Notice Regarding Level Numbering
Due to frequent changes in Dreamy Room's level numbering and differences between platforms (Android/iOS) – for example, level 234 on Android might not be the same as level 234 on iOS – the text guide below may not always match the images and video above. Please prioritize the image and video guides. If you find that the guide content doesn't match your current level, please visit the All Level Walkthroughs page to find the correct guide based on level images. Thank you for your understanding.
Dreamy Room Level 234 Walkthroughs & Guide
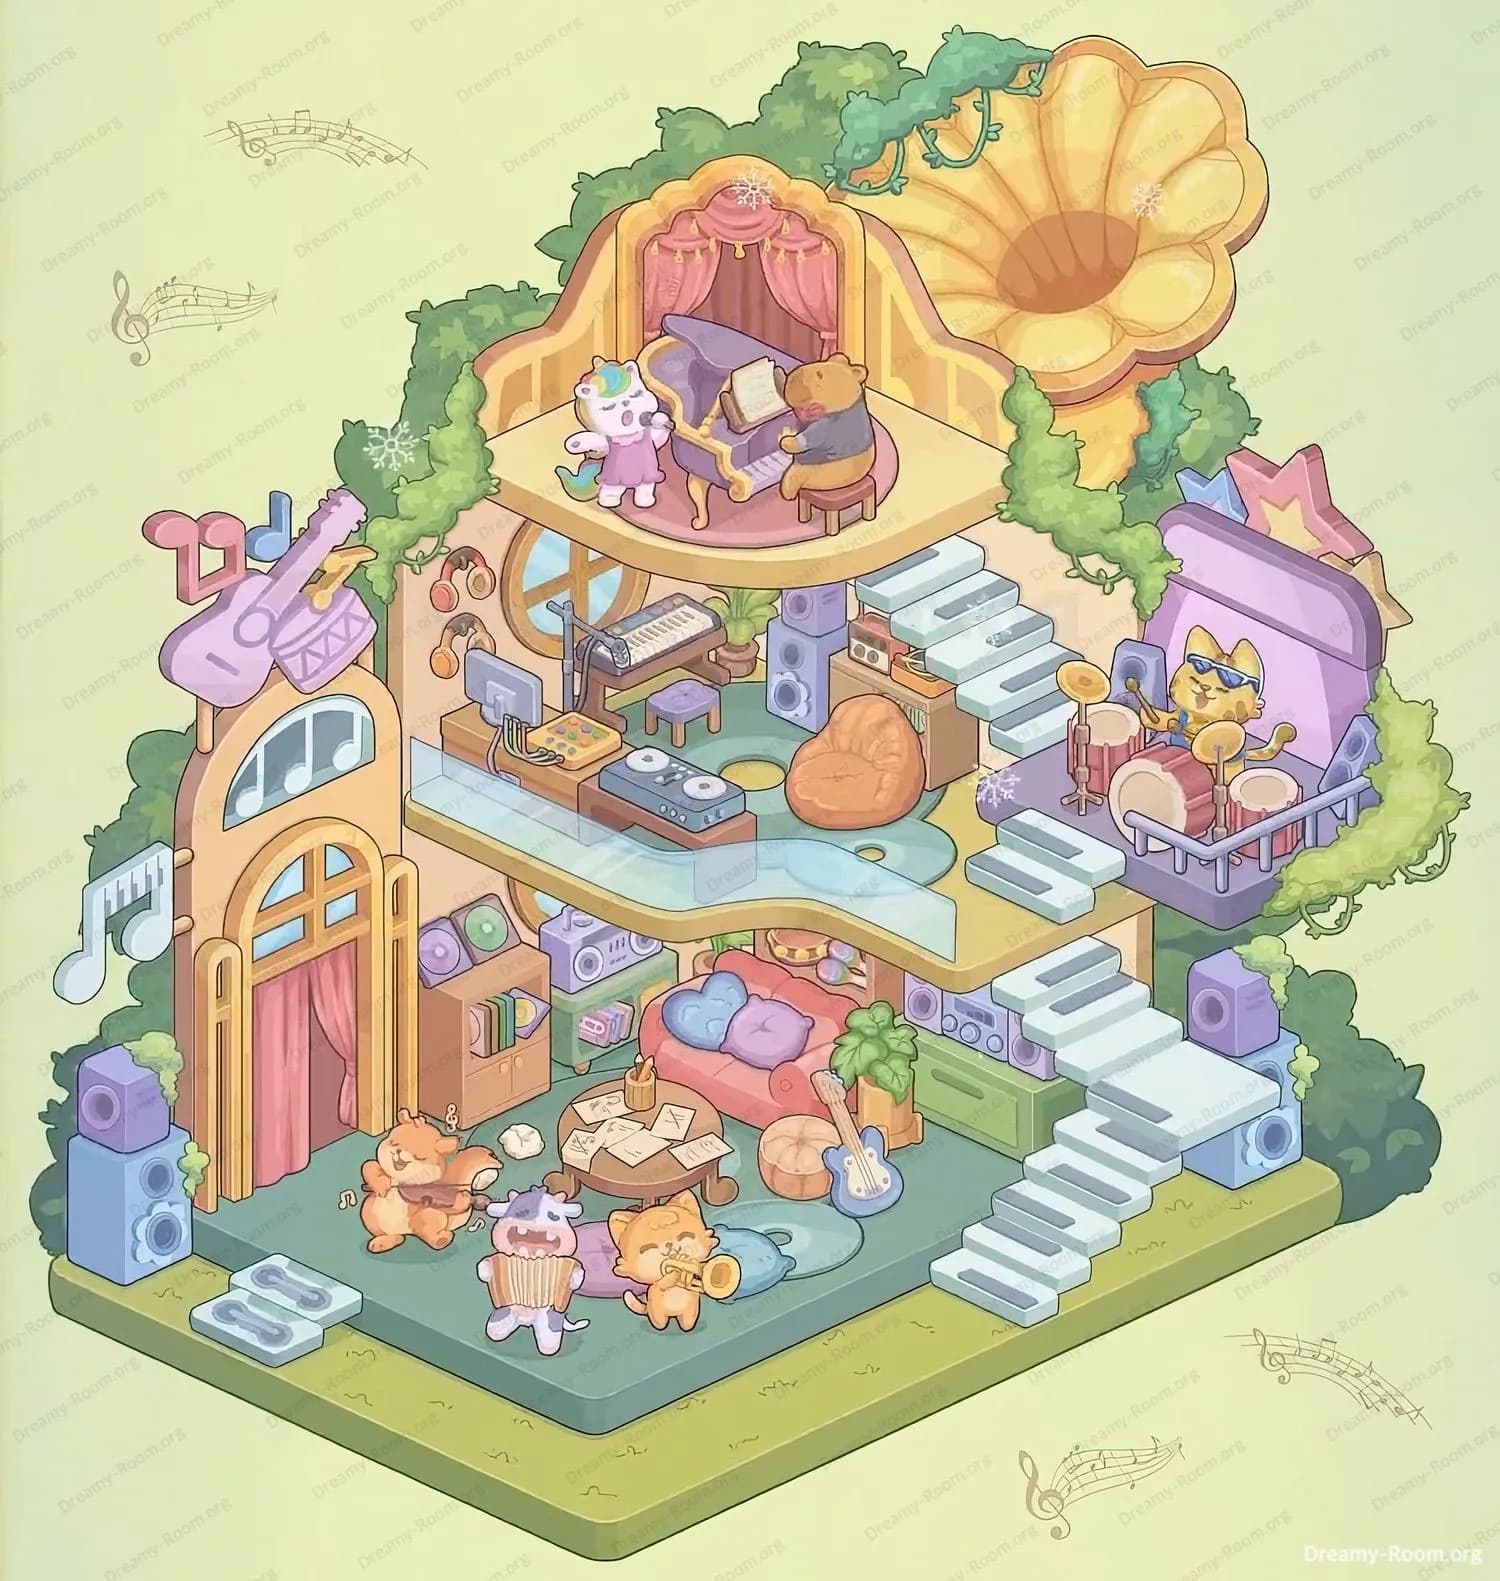
Step 1. Place the entrance curtains in the bottom-left alcove of Dreamy Room Level 234
Begin Dreamy Room Level 234 by positioning the pink pleated curtains in the bottom-left doorway recess. In Dreamy Room Level 234, the entrance door is framed by an arch, and the soft drapes should hang flush against the doorway edges. Gently drag the curtain asset until its top rod aligns with the curved arch, ensuring that the fabric covers the entrance opening entirely. In Dreamy Room Level 234, the curtain’s folds must appear natural, so nudge it slightly left or right to avoid any overlap with the adjacent music-note shelf. Take your time in Dreamy Room Level 234 to angle each fold so that it casts the right shadow on the floor. Confirm that the bottom of the curtain just grazes the platform’s grassy edge, enhancing the cozy feel of Dreamy Room Level 234’s entryway.
Step 2. Install the giant gramophone horn atop the right wall in Dreamy Room Level 234
In Dreamy Room Level 234, the iconic gramophone horn must be secured to the right-hand wall, peeking over the leafy green backdrop. Drag the large yellow horn into position so that its flared bell sits flush against the top of the vertical wall panel. Dreamy Room Level 234 requires that the horn’s base tucks just behind the ivy vines, so adjust its depth until the front edge of the horn appears in front of the foliage but behind the wall’s lip. In Dreamy Room Level 234, the horn should slightly overhang the right edge of the level’s profile, creating the illusion that it’s spilling music into the room. Rotate it gently until the curvature matches the wall’s angle, and ensure that the gold rim catches the light correctly in Dreamy Room Level 234’s ambient shading.
Step 3. Arrange the large floor speakers on the bottom platform of Dreamy Room Level 234
For Dreamy Room Level 234, two towering speakers bookend the bottom stage. Place the left speaker flush against the bottom-left grass border, leaving a small gap so the corner of the green platform remains visible. In Dreamy Room Level 234, the right speaker mirrors this placement on the opposite side of the bottom step. Ensure both speaker faces are perfectly vertical in Dreamy Room Level 234, without any tilt, so that they look ready to blast sound. The speaker cones should be centered within the square grill frames in Dreamy Room Level 234, so use the gridlines to align them pixel-perfectly. Slightly nudge each speaker toward the center to avoid having them too close to the grass edge in Dreamy Room Level 234.
Step 4. Position the music note wall décor on the left wall of Dreamy Room Level 234
Next, in Dreamy Room Level 234, decorate the left vertical wall with two sets of floating musical notes. Drag the first treble-staff cluster about one-third down from the top of the left wall, just above the entrance arch. The second cluster goes slightly lower and to the left, creating a cascading effect. In Dreamy Room Level 234, these note decals must not touch the edge of the wall, so leave at least ten pixels of margin. Rotate the lower note cluster by about 5 degrees counterclockwise in Dreamy Room Level 234 to mimic drifting sheet music. Make sure both decals are equally transparent, matching the game’s muted palette.
Step 5. Furnish the bottom floor seating area in Dreamy Room Level 234
On the bottom level of Dreamy Room Level 234, place the cozy coral couch in the center, about two-thirds back from the grass edge. Add the pastel blue heart-shaped pillow on the left side of the couch and the lavender rectangle pillow on the right. In Dreamy Room Level 234, the pillows should overlap the couch back by a few pixels to appear nestled. Next, center the round wooden coffee table in front of the couch, scattering the cream-colored letters and papers atop it. Ensure that some papers hang slightly off the edge for a lived-in look in Dreamy Room Level 234. Finally, lean the light blue electric guitar against the couch’s right arm, its neck pointing toward the wall, ensuring the body sits on the green platform in Dreamy Room Level 234.
Step 6. Add the bottom-floor musicians in Dreamy Room Level 234
In Dreamy Room Level 234, it’s time to bring the bottom-tier characters to life. Place the orange cat guitarist on the far left of the couch, angled slightly toward the center. Position the white unicorn accordionist next, so the unicorn’s hooves rest on the grass, and the accordion keys face the viewer. Finally, set the yellow cat trumpeter to the right of the unicorn, turning its body to play toward the middle. In Dreamy Room Level 234, ensure each character’s feet touch the ground plane and no limbs intersect unnaturally. Use the “nudge” tool to adjust each musician’s instrument so it aligns perfectly with their paws in Dreamy Room Level 234, conveying a harmonious performance.
Step 7. Build the floating staircase in Dreamy Room Level 234
For Dreamy Room Level 234, construct the piano-key staircase ascending from the bottom platform to the second level. Begin by placing the first white key block at the bottom-right grass edge, then stack alternating white and light gray key steps upward. In Dreamy Room Level 234, each key block must overlap the previous by exactly 5 pixels to maintain a consistent riser height. Continue zigzagging left and right until the staircase reaches the second level landing. Make sure no steps hover more than 20 pixels above the previous one in Dreamy Room Level 234, or the game will mark them incorrectly aligned. Finally, rotate the entire staircase group slightly to match the isometric perspective in Dreamy Room Level 234.
Step 8. Outfit the second-floor music studio in Dreamy Room Level 234
The second tier of Dreamy Room Level 234 features a mini recording studio. Place the transparent glass railing along the front edge, snapping it into the channel just behind the stair exit. Next, center the wooden DJ console with turntables and mixer on the middle of the platform. Add the tiny gray stool in front of the console, then slot the miniature keyboard and matching stool behind it. In Dreamy Room Level 234, situate the bean-shaped orange cushion just to the right of the console for a casual lounge spot. Flank the console with two tall gray speakers, ensuring their bases align with the platform. Finally, tuck a small potted plant behind the right speaker in Dreamy Room Level 234, adding a touch of greenery.
Step 9. Set up the third-floor stage performance in Dreamy Room Level 234
At the top level of Dreamy Room Level 234, you’ll create a grand performance area. Place the ornate pink and gold archway at the back of the stage, ensuring the draped curtains frame the space perfectly. Center the lavender grand piano within the arch, then add the open sheet music perched on its music stand. Position the teddy-bear pianist on the matching wooden stool, toes just brushing the keys. Next to the piano, stand the singing unicorn, its head tilted mid-note. In Dreamy Room Level 234, verify that the arch curves symmetrically around both characters and that the piano’s legs shadow the platform correctly for depth.
Step 10. Add the side drum deck and final accents in Dreamy Room Level 234
Finally, complete Dreamy Room Level 234 by placing the drum kit platform to the right of the third-floor stage. Snap the lavender star-topped frame behind the drums, then arrange the bass drum, snare, toms, and cymbals on the teal deck. Position the sunglasses-clad cat drummer on the stool, paws gripping the drumsticks. In Dreamy Room Level 234, the cymbals should slightly overlap to convey depth, so nudge them forward by 3 pixels. Add trailing ivy vines climbing up from the gramophone horn into the archway to tie levels together. Scatter a few snowflake motifs around the third floor to match the frosted accents in Dreamy Room Level 234.
Notes and Precautions for Dreamy Room Level 234
- Alignment is Crucial: In Dreamy Room Level 234, even a tiny misalignment can mark objects as incorrect. Always zoom in and use pixel-perfect adjustments.
- Layer Order Matters: The gramophone horn vines and wall decals must sit above certain walls but behind others. In Dreamy Room Level 234, check the layer panel if an object vanishes unexpectedly.
- Perspective Consistency: Staircases and platforms in Dreamy Room Level 234 rely on isometric perspective. Avoid rotating pieces beyond prescribed angles.
- Object Snapping: Use the game’s snap-to-grid feature when arranging speakers, railings, and furniture in Dreamy Room Level 234 to prevent floating or sunken items.
- Character Poses: Ensure musicians’ limbs never intersect with instruments awkwardly. In Dreamy Room Level 234, misaligned paws can break immersion.
- Saving Frequently: Because Dreamy Room Level 234 is complex, save after each major placement to avoid losing progress.
Tips and Tricks from top player for Dreamy Room Level 234
- Use Nudge Controls: Top players of Dreamy Room Level 234 recommend tapping the arrow keys for one-pixel adjustments instead of dragging to keep things precise.
- Lock Background Layers: In Dreamy Room Level 234, lock the leafy backdrop and walls once placed so you don’t accidentally move them while arranging props.
- Group Similar Items: Group all drum-kit parts or speaker sets in Dreamy Room Level 234 before placement. This lets you rotate and mirror them in unison for perfect symmetry.
- Color Highlight: Temporarily increase object opacity in Dreamy Room Level 234’s settings to spot misaligned shadows or overlaps more easily.
- Shortcuts: Memorize the hotkeys for bringing an object forward or sending it backward in Dreamy Room Level 234 to manage layer order efficiently.
- Preview Mode: Use Dreamy Room Level 234’s 3D preview to catch perspective errors that aren’t obvious in the editor’s flat view.
Final Scene Description of Dreamy Room Level 234
In Dreamy Room Level 234, the final scene unfolds as a whimsical, multi-tiered music studio wrapped in nature’s embrace. The bottom floor showcases vibrant performers—a guitar-strumming cat, playful accordion unicorn, and trumpet-tooting kitten—gathered around a plush coral sofa with heart pillows and a scattered letter-strewn coffee table. Two large speakers tower in opposite corners, balanced by a stylized door curtain and floating musical notes on the left wall. A cascading piano-key staircase leads to the second level, where a modern DJ console, beanbag lounge, and potted plant nestle behind a glass railing. Above, an ornate arch frames a lavender grand piano and performing duo—a bear pianist and singing unicorn—set beneath a colossal gramophone horn entwined with ivy. To the side, a star-topped drum deck hosts a sunglasses-clad cat drummer, cymbals clashing cheerfully. The interplay of pastel hues, soft lighting, and botanical accents in Dreamy Room Level 234 evokes a cozy yet dynamic musical paradise.