Dreamy Room Level 500
Dreamy Room Level 500 guide - Dreamy Room 500 Walkthrough & Solution.

Important Notice Regarding Level Numbering
Due to frequent changes in Dreamy Room's level numbering and differences between platforms (Android/iOS) – for example, level 500 on Android might not be the same as level 500 on iOS – the text guide below may not always match the images and video above. Please prioritize the image and video guides. If you find that the guide content doesn't match your current level, please visit the All Level Walkthroughs page to find the correct guide based on level images. Thank you for your understanding.
Dreamy Room Level 500 Walkthroughs & Guide
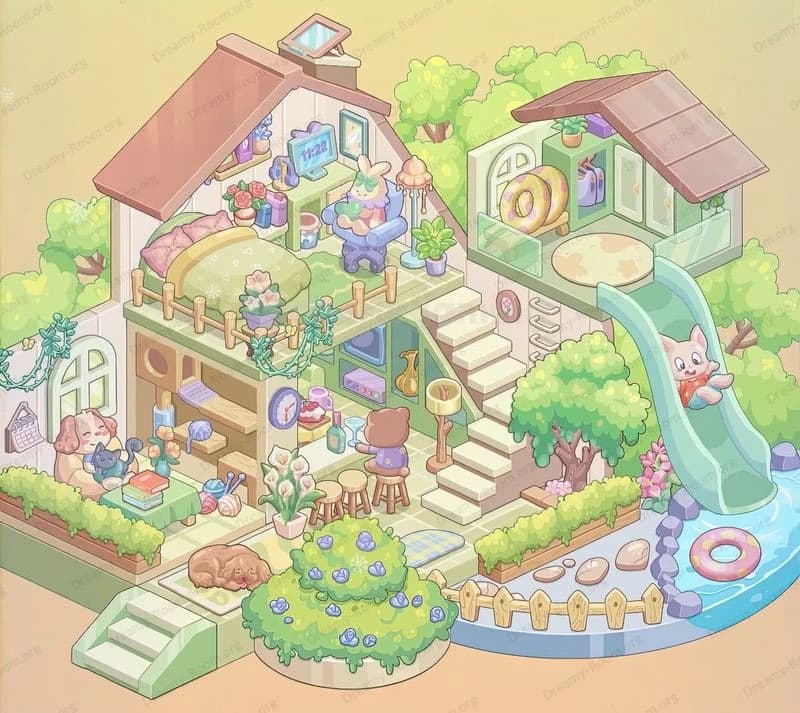
Step 1. Place the drawer decorations on the front panel
Begin Dreamy Room Level 500 by completing the outer drawer base, because every later placement visually anchors to this frame. The pale blue drawer handle belongs on the lower left of the front face, exactly centered vertically. To its right, snap the pink square button with the paw icon so it sits just above the bottom edge. On the right-front corner of Dreamy Room Level 500, attach the small wooden ladder so its top aligns with the office floor and its rungs lean against the drawer wall. Slide the long yellow page so it curls out of the side slot, and push the pink sheet halfway from the lower slot beneath it. Finally, tuck the three golden binder rings underneath the front-right corner and the two beige folders under the front-left, giving Dreamy Room Level 500 its notebook-drawer identity before you touch the interior.
Step 2. Place the glass walls around the office floor
Next, seal the playable floor of Dreamy Room Level 500 with transparent walls so the future furniture looks like it’s inside a miniature diorama. Position the tall glass panel along the front edge, leaving a small gap on the right where the ladder reaches the top. Then place the left glass wall snug with the solid grey back wall, and curve it slightly around the spiral staircase zone. On the right side of Dreamy Room Level 500, extend the glass all the way to the meeting room corner so that the office desks, plants and water dispensers are safely enclosed. Make sure the front glass clips precisely into the side panels to avoid visual overlaps. This framing step in Dreamy Room Level 500 is critical; if the glass is misaligned, later objects like potted plants and desktop monitors will appear outside the structure instead of inside.
Step 3. Place the four work desks in the central floor
Now focus on the open-plan office core of Dreamy Room Level 500. In the center of the checkered floor, arrange four identical work desks in a tight two-by-two block. The bottom pair should sit closest to the glass railing, with a narrow walking strip between them and the front wall. The top pair should align directly behind them, leaving a corridor at the back leading toward the glass double doors. On each desk in Dreamy Room Level 500, ensure the beige tabletop faces outward and the blue drawers face the viewer. The left-front desk should point slightly toward the plant and drawer handle, while the right-front desk points toward the ladder side. Proper spacing is key in Dreamy Room Level 500 so that characters, chairs and small items later fit without looking cramped or overlapping adjacent tiles.
Step 4. Place computers, chairs and paperwork on the desks
With the desks placed, you can now populate Dreamy Room Level 500’s workstations. On every desk, add a monitor and keyboard: a blue-themed screen with a small graph on the bottom-left desk, and a similar blue setup with stacks of documents on the bottom-right. On the back row, place a purple monitor on the left desk and a blue monitor with orange graph bars on the right desk. Each desk in Dreamy Room Level 500 gets a blue curved office chair tucked in at a slight angle. Put piles of beige paperwork to the left side of the front monitors and on the left of the purple screen. On the back-right desk, stack two green books and one brown book next to the keyboard. These details define the busy, paperwork-heavy atmosphere that characterizes Dreamy Room Level 500’s central open-plan zone.
Step 5. Place the water dispensers, cacti and front plants
To bring life into Dreamy Room Level 500, distribute the green accents and utilities. First, drop a tall blue water dispenser to the left of the front desks, right in front of the spiral staircase zone. Then add a second identical dispenser between the two front desks and the glass railing so workers share refreshments. Around each desk in Dreamy Room Level 500, place a tiny green cactus pot near the front corners—four in total, one for each station. Along the front glass, position a large potted plant exactly in the center, its leaves pressed gently against the glass. Mirror that greenery by setting another big plant on the far right edge of the floor behind the ladder, completing the row of foliage. These plants and water coolers make Dreamy Room Level 500 feel fresh and cozy while subtly guiding where characters will stand.
Step 6. Place the gaming corner and beanbag lounge on the left
Now build the relaxation area of Dreamy Room Level 500. On the far left, against the glass wall, place a rectangular TV console with a bright “YOU WIN!” game screen. In front of it, lay two pink game controllers on top of the console. To the right of this setup, on the floor, drop two big golden beanbag seats, one slightly behind the other. Lean a teal round cushion against the front beanbag to show a casual, slouchy vibe. In front of the console, add a potted plant to the left, snug against the glass wall. This playful zone of Dreamy Room Level 500 balances the serious work area and emphasizes that the challenge is figuring out that the gaming console and beanbags belong on the open front-left corner, not near the desks or meeting room.
Step 7. Place the spiral staircase, kitchen shelves and bird worker
On the left rear part of the main floor, install the spiral staircase so it begins just behind the first water dispenser and curls upward toward the lounge level. Under that staircase in Dreamy Room Level 500, place the kitchenette shelves: rows of pastel mugs, small bottles and snacks neatly arranged, all sitting above a pair of blue cabinets with gold handles. Next, seat the green bird employee at the back-left desk. Perch it on a teal chair facing the purple monitor, with a yellow mouse or calculator to its right. Dreamy Room Level 500 depends on these details to show vertical flow; the staircase must align exactly with the upper lounge platform, and the bird worker clarifies that this left desk belongs next to the refreshment zone rather than by the meeting room.
Step 8. Place the sleepy bear, coffee, and busy cat at their desks
Now animate the center of Dreamy Room Level 500 with characters. On the back-right desk, recline the round tan bear on the teal chair, leaning back with feet on a stack of books on the floor. Rest a green book on the bear’s belly and add a tall pink takeaway coffee cup on the desk’s right corner. On the front-right desk of Dreamy Room Level 500, seat the orange cat in the teal chair, paws on the keyboard, eyes focused on the bar-chart monitor. Stack two green books and a brown book to the left of this cat. The front-left desk stays human-free but stacked with documents, emphasizing variety in work styles. Correctly placing these characters is a core challenge in Dreamy Room Level 500: each animal lines up with its personalized clutter and can’t be swapped without making the scene look wrong.
Step 9. Place the corridor rug, meeting-room doors, printer, and bookcase
Shift attention to the mid-right walkway of Dreamy Room Level 500. Lay a purple rectangular rug directly in front of the glass double doors that lead into the meeting room. On this rug, place the fox in a pink dress standing and facing the doors, with two exclamation marks floating above. Position a leafy plant pot to the left of the doors, between rug and desks. To the right side in Dreamy Room Level 500, set the beige multifunction printer/copier: paper tray at the bottom, control panel on top. Immediately beside it, arrange the long low bookcase with colorful books and binders, leaving two loose sheets on its top surface. Anchor a large potted plant at the far right edge of the walkway. This cluster tells players that Dreamy Room Level 500’s administrative tools belong along this corridor, not scattered among the desks.
Step 10. Place the meeting room table, chairs, shelves and plant
Inside the glass meeting room of Dreamy Room Level 500, start with the large rectangular conference table centered in the room. On it, place a white flower arrangement in the middle and three purple bottles evenly spaced around it. Arrange three teal office chairs: one on the far side facing the viewer, one on the right side and one on the left side of the table. Against the back wall of Dreamy Room Level 500, install a set of three shelves. On the top shelf, roll and stack cream-colored documents; on the middle shelf, line colorful files and books; and on the bottom shelf, place more bottles and small decorations. Add a tall potted plant in the back-right corner to soften the room. Correct placement here is vital; if shelves or chairs drift too far, the glass walls will visually clash, breaking the clean meeting-room look of Dreamy Room Level 500.
Step 11. Place the upper lounge sofa, rug, coffee table and plant
Move up the spiral staircase to the first upper level of Dreamy Room Level 500, directly above the gaming corner. Place a long yellow sofa near the center back of this platform, parallel to the front edge. In front of it, drop a brown coffee table with a white potted flower arrangement on top. Under both sofa and table, spread a pale purple rug spanning most of the lounge floor. Near the wall edge, add another small rectangular cushion to hint at extra seating. Then position a tall potted plant to the right of the sofa so its leaves rise near the glass wall. This lounge in Dreamy Room Level 500 must sit precisely above the spiral staircase exit so the architecture feels believable and so players recognize that the soft relaxing furniture belongs here, not in the open-plan floor below.
Step 12. Place the CEO office desk, chair, shelves, and wall decor
Finally, complete the executive corner of Dreamy Room Level 500 on the top-right platform. Position the L-shaped CEO desk along the front edge of this upper level, with its shorter side pointing left. Place the blue swivel chair behind it. On the desk’s front edge, add the “CEO” nameplate and a row of colorful books and stationery. To the right, put a yellow mug, a green potted plant, and a closed gray briefcase. Behind the desk in Dreamy Room Level 500, stand the tall yellow bookcase filled with folders and boxes. On the left wall, hang the large chart board with line and bar graphs, a small round clock above it, and a clipboard board below. Stand the suited cat CEO in front of the chart, proudly reviewing results. This final arrangement signals that the top tier of Dreamy Room Level 500 is the command center overseeing the whole miniature office.
Notes and Precautions
Dreamy Room Level 500 may look cute, but it is strict about positional logic. Many objects are similar in size, so the game easily lets you place desks, plants or water dispensers in technically valid but visually wrong tiles. Always confirm that every character in Dreamy Room Level 500 is matched to their distinctive props: the gamer console stays with the beanbags, the sleepy bear stays with the reading books and coffee, and the bird belongs near the staircase-kitchen corner. Watch the vertical alignment too—upper-floor furniture in Dreamy Room Level 500 must sit directly above its supporting tiles on the floor below, or shadows and edges will look misaligned. Because this game is meant to be relaxing and untimed, you can freely pick up items and nudge them until everything feels harmonious.
Tips and Tricks from top player
Top players approach Dreamy Room Level 500 by zoning rather than by individual items. First, mentally divide the room into exterior drawer, open-plan office, relaxation corner, administration corridor, meeting room, lounge and CEO office. Then, when you draw a new item from the box in Dreamy Room Level 500, immediately assign it to a zone before looking for its exact tile. Use thematic logic: anything with screens or keyboards goes to the central desks or gaming console; documents, folders and printers stick to the right corridor or CEO desk; soft cushions and beanbags stay near sofas. Another strong tactic in Dreamy Room Level 500 is to place all plants last. Their pot shapes and heights help you refine composition and hide minor spacing imperfections. If you ever feel stuck, compare symmetry: pairs like water dispensers and desk cacti usually mirror across the room, guiding you toward their correct positions.
Final Scene Overview of Dreamy Room Level 500
When everything is correctly arranged, Dreamy Room Level 500 becomes a tiny, bustling office tucked inside a whimsical drawer. The outside shows folders, binder rings, notes and a paw-print button, hinting at a playful workplace. Behind the glass, the front floor is packed with four busy desks, glowing monitors and tiny cacti, flanked by water dispensers and lush plants. On the left, beanbags face a “YOU WIN!” console while a spiral staircase leads to a cozy lounge. On the right, a fox waits nervously outside a glass-walled meeting room where flowers and bottles decorate the conference table. Above, the CEO relaxes in a bright office with graphs, books and a commanding desk, surveying the entire miniature world of Dreamy Room Level 500.