Dreamy Room Level 736
Dreamy Room Level 736 guide - Dreamy Room 736 Walkthrough & Solution.

Important Notice Regarding Level Numbering
Due to frequent changes in Dreamy Room's level numbering and differences between platforms (Android/iOS) – for example, level 736 on Android might not be the same as level 736 on iOS – the text guide below may not always match the images and video above. Please prioritize the image and video guides. If you find that the guide content doesn't match your current level, please visit the All Level Walkthroughs page to find the correct guide based on level images. Thank you for your understanding.
Dreamy Room Level 736 Walkthroughs & Guide
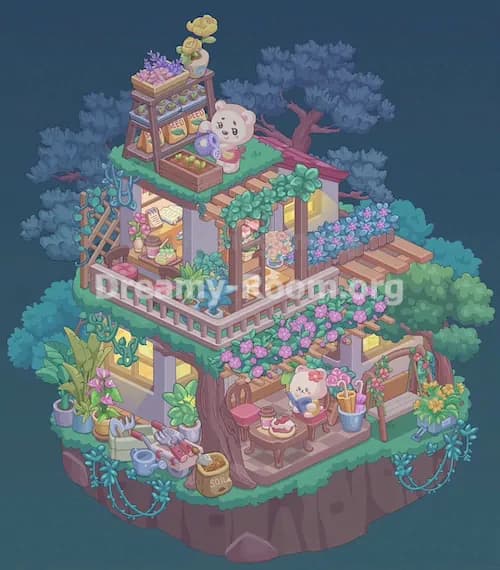
Step 1. Place the exterior fence, front gate, and surrounding garden border.
Begin Dreamy Room Level 736 by building the outside frame of the scene. The empty room already sits on a raised pink base with blue hydrangea bushes behind it, so your first job is to define the garden boundary. Place the pale pink-and-cream picket fence along the front edge and continue it around the right side of the base. The large arched front gate belongs in the center of the front side, directly below the main lower-floor opening. Its blue panels and cream frame should face forward. Add the two square gate posts beside it, then fill the remaining border with rounded blue and purple hydrangea bushes. In Dreamy Room Level 736, these exterior pieces are important because they visually lock the entire room into place.
Step 2. Arrange the large outdoor flower clusters and fruit trees.
Next, decorate the garden perimeter of Dreamy Room Level 736 with the larger natural objects. Put the big blue and lavender hydrangea clusters around the front-left corner, front-right corner, and behind the right wall. The bushes should look dense, almost like a soft floral hedge wrapping the house. Place the peach-colored fruit tree at the front-left outside corner, partly behind the fence but still visible above the flowers. A second fruit tree belongs on the upper-right terrace area, where its peach fruit hangs over the garden seating zone. Add smaller green shrubs near both trees so the transition from fence to flowerbed feels natural. This step matters because Dreamy Room Level 736 uses outdoor plants as anchors for the indoor furniture layout.
Step 3. Build the upper greenhouse frame on the top-left platform.
Move to the top platform of Dreamy Room Level 736 and place the cream arched greenhouse structure on the upper-left side. The curved white frame should sit above the turquoise glass panels, forming a small conservatory wall behind the tea area. Make sure the arches lean backward into the scene rather than floating in front of the room. Add the pale glass side panels at the far-left back corner and continue the arched roof pieces across the top. The greenhouse frame should partly overlap the blue wall and sit beneath the large hydrangea canopy in the background. In Dreamy Room Level 736, this piece can be tricky because it is not centered; it belongs more to the left and back, leaving space on the right for the painter’s corner and fruit tree.
Step 4. Place the upper tea table, stools, and fountain.
Now complete the top garden lounge in Dreamy Room Level 736. Put the small round table with the pink cloth under the greenhouse arches on the upper-left platform. The teapot, cups, and saucers belong on top of this table, with the small stools tucked around it. To the right of the tea table, place the blue circular fountain with the shell-like pedestal in the middle. Its basin should sit near the center of the upper terrace, slightly behind the front row of flowers. Add the small red decorative pieces around the fountain basin, making sure they stay inside the water feature area. Dreamy Room Level 736 rewards exact positioning here: the tea set should feel sheltered by the greenhouse, while the fountain should remain open and visible.
Step 5. Add the lavender flower row and upper garden accessories.
In Dreamy Room Level 736, the front edge of the upper terrace is filled with tall purple flowers. Place the lavender-like flower row along the ledge directly in front of the greenhouse and fountain, running horizontally from left toward the center. Keep the blossoms upright and evenly spaced so they form a soft divider between the upper garden and the lower indoor rooms. On the right side of the upper terrace, place the wooden easel, small paint buckets, brushes, and stool near the fruit tree. Add the sunflower patch and small potted plants beside the easel, close to the right wall. These objects create an artist’s garden corner. The main placement challenge in Dreamy Room Level 736 is balancing this busy area without covering the fountain or terrace flowers.
Step 6. Decorate the upper-left bedroom with bed, curtains, and window pieces.
Place the bedroom furniture on the raised left indoor platform of Dreamy Room Level 736. The pink bed belongs against the left wall, below the arched window and purple curtains. Add the gold canopy rail and draped purple fabric above the bed so it looks like a cozy royal sleeping nook. Put the pillows, heart cushion, and blanket on the bed, then place the small bedside table near the lower-left side of the bed. The mushroom-style lamp and little flower decoration sit on or beside this table. Add the large bow cushion near the front-left edge of the bedroom platform. Dreamy Room Level 736 uses many pink and purple pieces in this section, so check that the bed stays against the wall and does not slide into the kitchen below.
Step 7. Place the wardrobe, plush seat, and bedroom floor decorations.
Continue the bedroom area of Dreamy Room Level 736 by placing the tall blue wardrobe on the right side of the bedroom platform, just beside the bed area and near the inner corner. Its glass doors should face forward. Add the small pink rug or cushion area in front of the wardrobe, then place the plush toy or tiny character figure on top of the pink seat near the front center of the bedroom. The decorative pillow, toy-like items, and small accessories should stay grouped near the bed rather than drifting into the living room. Place the pale window-like roof pieces along the left upper ledge, above the bedroom wall. Dreamy Room Level 736 is especially sensitive here because bedroom items sit on a narrow tier, so align them with the platform edge.
Step 8. Set up the central sitting room with cabinet, wall decor, and bunny chair.
The middle-right raised room in Dreamy Room Level 736 becomes a refined sitting room. Place the blue cabinet with gold handles against the back wall near the center, slightly to the right of the wardrobe. Put the books, small containers, and golden ornament on or inside the cabinet shelves. Add the tall gold plant stand with yellow flowers near the cabinet. Place the pink armchair at the right side of the sitting area, then seat the bunny character in the chair facing forward. The round coffee table with cake and flowers belongs in front of the bunny. Add the wall decorations above: gold picture frames, star ornaments, shell-like hanging lamp, and small mirror frames. In Dreamy Room Level 736, this section connects the bedroom and living room, so keep it centered on the raised ledge.
Step 9. Place the right-side balcony door, curtains, skylight, and hanging ornaments.
On the right wall of Dreamy Room Level 736, place the tall double door or window with vertical panels. It belongs on the lower-right wall, framed by purple curtains that hang on both sides. Add the gold tassels near the curtain edges and the hanging star decorations above the doorway. The purple curtain must sit inside the wall area, not outside the garden bushes. Above this room, place the rectangular glass skylight on the slanted upper-right roof ledge. Add the blue-purple hydrangea cluster near the skylight and let the green vine hang down the outer right wall. Dreamy Room Level 736 often hides mistakes in this area because the wall, roof, and bushes overlap. Use the doorway as the main alignment point.
Step 10. Arrange the lower-left kitchen with refrigerator, counters, and cooking items.
The kitchen occupies the lower-left floor of Dreamy Room Level 736. Place the yellow refrigerator at the far-left back corner, standing against the short left wall. To its right, place the blue-and-white kitchen counter line with sink, stove, shelves, and cabinet doors. Add the cooking pot, pan, plates, cups, jars, and small food containers on the counters. The sink area should sit near the middle-left, while prepared food and dishes spread toward the inner corner. Place small bottles and utensils carefully so they do not cover the dining table. Dreamy Room Level 736 makes the kitchen feel full, but every item still has a fixed role: refrigerator on the far left, cooking station along the back, and serving pieces closer to the center.
Step 11. Add the dining table, chairs, flowers, and lower-center details.
Place the long rectangular dining table in the lower-center of Dreamy Room Level 736, slightly in front of the kitchen counter. Its striped pastel tablecloth should run lengthwise from left to right, with the bright colors visible from the front. Add the wooden chairs around the table, keeping two or more on the front side and others tucked behind or at the ends. Put the purple flower vase in the middle of the table. Near the inner corner, place stacked bowls, fruit, jars, and small food items on the adjacent counter surface. Add the tiny blue storage box or appliance nearby. In Dreamy Room Level 736, this dining zone is the bridge between kitchen and living room, so keep a walking gap around the dog and the front gate area.
Step 12. Complete the lower-right living room with sofa, TV, coffee table, and pet.
Finish the indoor furniture of Dreamy Room Level 736 by decorating the lower-right living room. Place the pink sofa along the right side, facing left toward the television. The TV belongs on the low console against the inner wall, with its purple screen angled forward. Add the console decorations, books, and small items beneath or beside the TV. Put the white cloud-shaped coffee table in front of the sofa and place the pink tea set on top. Add the small pink round stool near the table. The pale blue rug sits under this seating area. Place the little white dog near the center of the lower floor, just between the dining table and living room, with the purple yarn ball nearby. Dreamy Room Level 736 feels complete only when the pet sits naturally in the open floor space.
Step 13. Add the final small plants, lamps, flowers, and decorative accents.
The final placement pass in Dreamy Room Level 736 is all about small accessories. Add the yellow flower plants in gold stands near the TV area, sitting room, and central ledges. Place the small side table near the sofa with decorative items on it. Add the pink teapot, jars, cups, food trays, and tiny containers wherever they match the kitchen or living room surfaces. Check the hanging wall ornaments again: the gold frames, stars, shell lamp, and oval decorations should be above the bunny sitting area and the right doorway. Add the last hydrangea clusters around the roofline and front fence until the home looks wrapped in flowers. Dreamy Room Level 736 depends on these details, because even one misplaced cup or plant can make the final scene feel incomplete.
Notes and Precautions
Dreamy Room Level 736 is visually dense, so avoid placing furniture randomly just because the colors match. Pink items appear in the bedroom, dining area, upper tea corner, and living room, but each group has a different purpose. Purple curtains belong both near the bed and beside the right doorway, so compare their size before placing them. The greenhouse arches must sit on the upper-left terrace, not over the bedroom. The kitchen pieces should stay on the lower-left floor, while the TV and sofa stay on the lower-right floor. In Dreamy Room Level 736, the main challenge is determining the correct placement for each object, especially where raised platforms overlap. Always place large furniture first, then medium items, then tiny accessories.
Tips and Tricks from top player
For Dreamy Room Level 736, start with fixed architectural pieces: fence, gate, greenhouse frame, doors, windows, and skylight. These objects define the boundaries and make the remaining placements easier. After that, place large furniture by zone: bedroom on the upper-left, sitting room in the center, kitchen on the lower-left, living room on the lower-right, and garden terrace on top. A useful shortcut is to match object “families.” Food, pots, jars, and plates belong near the kitchen; teacups and fountain pieces belong on the upper terrace; gold frames and hanging stars belong on the walls; hydrangeas and trees belong outside. In Dreamy Room Level 736, do not rush tiny decorations. Use the platform edges, wall corners, and object shadows to confirm exact placement.
Final Scene Description
The completed Dreamy Room Level 736 scene becomes a pastel garden mansion surrounded by blue and lavender hydrangeas. A cream fence and arched blue gate frame the front, while peach trees, vines, and flower bushes soften the edges. Inside, the lower-left floor holds a cozy kitchen with a yellow fridge, counters, dishes, and a striped dining table. The lower-right area becomes a living room with a pink sofa, TV, tea table, rug, and a small white dog playing near a yarn ball. Above, the left platform turns into a purple-curtained bedroom with a pink bed, wardrobe, toys, and soft cushions. The center sitting room features a bunny in a chair, cake table, gold wall ornaments, and flower stands. At the top, Dreamy Room Level 736 finishes with a greenhouse tea corner, blue fountain, lavender flowers, painter’s tools, fruit tree, and blooming garden terrace.