Dreamy Room Level 729
Dreamy Room Level 729 guide - Dreamy Room 729 Walkthrough & Solution.

Important Notice Regarding Level Numbering
Due to frequent changes in Dreamy Room's level numbering and differences between platforms (Android/iOS) – for example, level 729 on Android might not be the same as level 729 on iOS – the text guide below may not always match the images and video above. Please prioritize the image and video guides. If you find that the guide content doesn't match your current level, please visit the All Level Walkthroughs page to find the correct guide based on level images. Thank you for your understanding.
Dreamy Room Level 729 Walkthroughs & Guide
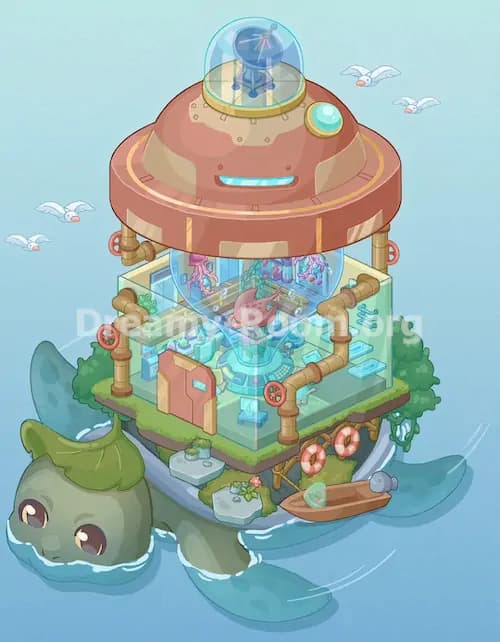
Step 1. Place the circular metal base and align the broken platform pieces.
Start Dreamy Room Level 729 by focusing on the large round platform at the bottom of the scene. This is the foundation for every other object, so it must be placed first and aligned carefully. The platform is made from several grey-green metal panels with visible seams, rivet lines, and a missing wedge-like opening on the front-right side. In Dreamy Room Level 729, this broken circular base should sit slightly below the center of the screen, with the curved edge visible in front and the taller back portion hidden behind the main structure. Make sure the right-side gap lines up with the angled support ramp below it. The thin cylindrical support legs should hang down from the platform edges, especially on the front-right and front-left areas. Getting this base correct in Dreamy Room Level 729 makes the later dome placement much easier.
Step 2. Place the large green dome body in the center of the platform.
Next in Dreamy Room Level 729, place the large glowing green dome directly on top of the circular platform. This is the main object of the completed room, so it should dominate the middle of the scene. The dome is shaped like a wide industrial bell or reactor chamber, wider at the bottom and narrower at the top. Its front edge should overlap the platform, while its back rises into the misty tree background. In Dreamy Room Level 729, the dome has vertical panel seams, faint rivets, and several darker green stripes running down from the top. Position it so the bottom rim forms a bright green ring around the platform. The dome should not sit too far left or right; it must feel centered, with the lower doors and pipes balanced around it. This placement defines the whole puzzle layout of Dreamy Room Level 729.
Step 3. Add the round top cap with bolts on the dome.
After the main dome is in place, add the circular top cap in Dreamy Room Level 729. This cap sits flat on the upper surface of the dome and looks like a sealed metal hatch. It should be placed slightly above the center of the dome, near the top of the image. The top cap is lighter green than the dome body and has a ring of round bolts spaced around its edge. In Dreamy Room Level 729, two darker green bands cross over the cap from front to back, matching the industrial style of the lower panels. Be careful not to rotate or shift this piece incorrectly, because the bolts must look evenly distributed along the rim. The cap should feel like it seals the dome from above. Once placed correctly, Dreamy Room Level 729 begins to look like a finished mechanical greenhouse or glowing forest reactor.
Step 4. Place the left arched doorway on the lower-left side of the dome.
Now place the left arched doorway in Dreamy Room Level 729. This object belongs on the lower-left face of the dome, near the front-left edge. The doorway has a dark grey metal frame with rounded corners and a glowing turquoise interior. Its opening should face forward-left, making it look like an entrance built into the dome. In Dreamy Room Level 729, the left doorway is partly covered by a cluster of bright green moss and hanging vines draped over the top-left side of the arch. The frame has small rivets around it, so align it with the dome’s curved surface rather than placing it flat on the platform. This doorway is one of the clearest placement clues in Dreamy Room Level 729 because the glowing blue-green light must point outward and the vines must hang down naturally.
Step 5. Place the right arched doorway and match it with the curved wall.
The second arched doorway in Dreamy Room Level 729 goes on the right side of the dome, slightly higher and farther back than the left doorway. It has a similar dark metal frame and a turquoise glowing interior, but it appears more vertical because it sits on the right curved wall. Place it near the lower-right side of the dome, where the green platform rim curves around. In Dreamy Room Level 729, this right doorway is decorated with vines that spread outward to the right, forming a delicate chain of leaves and tendrils. Do not place it too close to the front edge; it should feel attached to the side of the dome. The glowing opening should be visible, but partly framed by the metal arch. Correctly placing both doorways helps Dreamy Room Level 729 feel symmetrical without being perfectly mirrored.
Step 6. Install the tall left pipe and the small glowing beacon pipe.
The pipe system is one of the trickiest parts of Dreamy Room Level 729. Start on the left side by placing the tall vertical silver pipe behind the left doorway. It rises straight upward from the dome’s lower side and releases a pale bubble-like mist at the top. Then place the shorter front-left pipe that supports the small crystal beacon. This pipe bends horizontally from the dome, then curves upward into a short vertical post. On top of it sits a faceted grey crystal lamp with a bright cyan glow around its middle. In Dreamy Room Level 729, this beacon should sit to the left of the dome, slightly above the left doorway, not directly on top of it. The silver pipe segments should look jointed, with curved elbows and straight sections. These pipe placements add depth and make Dreamy Room Level 729 look like a living machine.
Step 7. Add the central vertical pipe and its curved lower connector.
The tallest pipe in Dreamy Room Level 729 belongs near the upper-right side of the dome’s front face. Place the long segmented silver pipe so it rises from a curved elbow attached to the dome and extends high above the top cap. The pipe should be nearly vertical, with several ring divisions along its length. Its bottom connector forms an L-shaped bend that attaches to the dome’s side, just above the middle-right area. In Dreamy Room Level 729, this central pipe is visually important because it creates height and balances the left beacon. Make sure the pipe does not overlap the top cap too awkwardly; it should stand slightly in front of the dome’s right side while still appearing fixed to the structure. A small puff of pale green mist should rise from its open top, reinforcing the strange, dreamy atmosphere of Dreamy Room Level 729.
Step 8. Place the rear-right bent pipe and the far-right vertical pipe.
Continue the mechanical details of Dreamy Room Level 729 by adding the rear-right bent pipe. This pipe sits near the upper-right background side of the dome and bends outward like an exhaust arm. It should extend from the dome, curve upward, then bend horizontally toward the right. At its end, a soft cloud of pale green vapor should appear. In Dreamy Room Level 729, this pipe is partly behind the main vertical pipe, so layer it carefully to keep the depth correct. Then place the far-right vertical pipe near the right doorway. This pipe rises from the lower-right area and also emits small mist bubbles at the top. The right-side pipe should be thinner and shorter than the central pipe. These two pieces make Dreamy Room Level 729 feel functional, as if the green dome is breathing through several metal vents.
Step 9. Add the front vines, moss clusters, and hanging plant details.
The greenery gives Dreamy Room Level 729 its abandoned magical mood. Begin with the moss cluster over the left doorway, letting the leaves sit on the arch and the hanging strands fall down the front. Then place the long vine cluster along the front-left edge of the green platform rim. It should stretch horizontally across the lower-left side, with small clover-like leaves and dangling tendrils. In Dreamy Room Level 729, another vine cluster belongs on the right side, starting near the right doorway and trailing along the outer rim. It forms a looping chain of small leaves and round plant nodes. Add the bright green plant mass at the front-right edge, where vines wrap around the rim and hang downward. These organic details are essential in Dreamy Room Level 729 because they soften the metal structure and help show the correct object layering.
Step 10. Place the lower front hatch, brackets, and small metal details.
At the bottom front of the dome in Dreamy Room Level 729, place the small rectangular hatch or utility panel beneath the glowing green rim. It sits near the center-front, slightly left of the broken gap in the lower platform. This panel is muted grey-green and includes small pipe-like brackets, clamps, and vertical attachments. In Dreamy Room Level 729, it is partly hidden under the dome’s bright lower edge, so only the upper portion should feel tucked into the structure. Make sure this piece does not float on top of the platform; it should appear attached to the underside of the dome. Small metal details like this are easy to miss, but they are important for completing Dreamy Room Level 729. They also act as placement markers, helping you confirm the dome is centered correctly over the platform.
Step 11. Check the background trees, mist bubbles, and final layering.
The final placement work in Dreamy Room Level 729 is about depth and atmosphere. The large dark green tree mass should remain behind the dome, filling the upper background without covering the main structure. Smaller tree silhouettes appear on the left, upper center, and right side. Pale mist bubbles rise around the pipe openings, especially near the left tall pipe, central pipe, rear-right pipe, and far-right pipe. In Dreamy Room Level 729, the lower-left foreground also contains blurry green foliage that overlaps the platform, creating a soft frame. Do not move these background and foreground elements too far forward, or they will hide the important metal platform and doorways. The correct layout of Dreamy Room Level 729 depends on layering: platform at the bottom, dome in the center, pipes above, vines on top, and forest mist behind everything.
Notes and Precautions
Dreamy Room Level 729 is a placement puzzle where the biggest challenge is deciding exactly where each object belongs. The dome, pipes, doors, and vines are all curved, so small misalignments can make the final scene look wrong. Always place the large structural items first: the broken circular platform, the green dome, and the top cap. After that, add the doors, pipes, and plants.
Watch the layering carefully in Dreamy Room Level 729. The left doorway should sit in front of the dome, but its vines should sit on top of the doorway. The right-side vine chain should follow the rim instead of floating in the air. The central vertical pipe must appear attached to the dome through its elbow connector, while the rear-right pipe should feel farther back.
Also pay attention to the glowing turquoise areas. In Dreamy Room Level 729, the two arched doorways and the crystal beacon are the strongest light sources. If they face the wrong direction or are placed too high, the scene loses its visual logic. Keep the objects close to their curved surfaces and use rivet lines as guides.
Tips and Tricks from top player
For Dreamy Room Level 729, top players usually build from large to small. Place the base first, then the dome, then the top cap. Once the main shape is correct, use the glowing doorways as anchors. The left doorway tells you where the front-left vine cluster belongs, while the right doorway shows where the long looping vine should start.
A useful trick in Dreamy Room Level 729 is to match metal textures. Silver segmented pipes should connect to the dome at natural mechanical joints, not random empty spots. The tallest pipe belongs slightly right of center, the beacon pipe belongs to the left, and the bent exhaust pipe belongs behind them on the upper-right side. This creates a clear height rhythm.
Another top-player shortcut for Dreamy Room Level 729 is to use the green rim as a guide for plants. Most vines sit along that rim or over the arched doors. If a plant cluster feels disconnected from the rim, it is probably in the wrong place. Save the mist bubbles and soft background details for last so they do not distract you while placing the main objects.
Final Scene Description
The completed Dreamy Room Level 729 scene shows a glowing green mechanical dome resting on a cracked circular metal platform in a dark, misty forest. The central dome rises like a mysterious reactor or hidden greenhouse, sealed by a round bolted hatch at the top. Two arched doorways glow turquoise from within, one on the lower-left front and one on the right side. Silver segmented pipes climb from the dome, bend outward, and release soft pale vapor into the air. A small crystal beacon glows on the left pipe, adding a magical sci-fi detail. Bright green moss and curling vines cover the doorways and wrap around the lower rim, making the structure look ancient, alive, and overgrown. Around it, blurred trees and fog create a quiet underwater-like atmosphere. Dreamy Room Level 729 ends as a peaceful yet mysterious forest machine, perfectly assembled piece by piece.