Dreamy Room Level 223
Dreamy Room Level 223 guide - Dreamy Room 223 Walkthrough & Solution.
Important Notice Regarding Level Numbering
Due to frequent changes in Dreamy Room's level numbering and differences between platforms (Android/iOS) – for example, level 223 on Android might not be the same as level 223 on iOS – the text guide below may not always match the images and video above. Please prioritize the image and video guides. If you find that the guide content doesn't match your current level, please visit the All Level Walkthroughs page to find the correct guide based on level images. Thank you for your understanding.
Dreamy Room Level 223 Walkthroughs & Guide
Step 1. Place the mossy island base at the center of the water border in Dreamy Room Level 223
In Dreamy Room Level 223, your starting point is always the blank water pool with a circular ring of gentle teal water. The primary challenge of Dreamy Room Level 223 is recognizing the exact shape and orientation of the mossy island core. To begin, click and drag the irregularly shaped sandy-green island piece to the center of the teal water ring. As you settle the island into place, pay attention to how the island’s contours align perfectly with the water’s scalloped edge. Dreamy Room Level 223 rewards precise placement, and once the island base snaps correctly, you will hear a satisfying chime. This initial move in Dreamy Room Level 223 sets the foundation for all subsequent decorations and ensures that future layers will align without overlap.
Step 2. Install the giant tree trunk with lily pad staircase on the island in Dreamy Room Level 223
In Dreamy Room Level 223, after setting the base island, you will notice a sturdy tree trunk asset among your inventory pieces. The central feature of Dreamy Room Level 223 is the towering brown trunk that rises slightly off-center toward the island’s back. To place it correctly, drag the trunk piece so that its bottom curves align with the island’s green top layer. Next, attach the series of soft-blue lily pad steps spiraling around the trunk, positioning each circular pad on the left side. Dreamy Room Level 223 provides subtle snap points, so gently nudging the lily pads until they click ensures a smooth staircase look. This step in Dreamy Room Level 223 creates the foundation for both levels of the treehouse, so precision here guarantees that balconies and rooms above will attach seamlessly.
Step 3. Build the lower-level balcony kitchen area on the left side of the trunk in Dreamy Room Level 223
The next challenge in Dreamy Room Level 223 is constructing the cozy kitchen balcony nestled on the lower left side of the trunk. You’ll find a curved wooden balcony piece with railing in your decoration palette. In Dreamy Room Level 223, drag this balcony to the midpoint between the trunk’s base and its midsection. As you place it, ensure the curved wooden railing sits flush against the tree bark. Dreamy Room Level 223’s engine will highlight a subtle green glow when your placement is accurate. This balcony is the perfect spot for cooking activities below the sleeping quarters. Once snapped into place, the lower kitchen platform in Dreamy Room Level 223 will lock and provide a stable stage for the stove, kettle, and pantry items in the following steps.
Step 4. Add cooking accessories: the stove, kettle, fruit bowl, and garlic bundle to the kitchen balcony in Dreamy Room Level 223
Now that the balcony structure is locked, Dreamy Room Level 223 invites you to furnish this kitchen nook with delightful cooking accessories. First, locate the small gray stove asset and place it against the railing on the lower balcony’s inner edge. In Dreamy Room Level 223, the stove must sit flush with the balcony floor to avoid clipping through the railing. Next, grab the matching blue kettle and position it directly atop the stove’s burner plate. Dreamy Room Level 223’s intuitive placement system will produce a snap confirmation sound when alignment is perfect. Continue by placing the round wooden fruit bowl filled with oranges at the front corner of the balcony. Finally, hang the tied garlic bundle on the railing spindles. Each accessory in Dreamy Room Level 223 contributes to the cozy kitchen ambiance.
Step 5. Construct the upper-level bedroom treehouse on the right side of the trunk in Dreamy Room Level 223
In Dreamy Room Level 223, the upper-level bedroom platform floats gracefully on the right side of the trunk above the kitchen. To begin, select the larger rectangular balcony piece with a decorative wooden arch frame. Drag it to the correct height on the trunk, lining the arch with the natural curve of the bark. Dreamy Room Level 223 will show a subtle outline to guide perfect alignment. Once the arch snaps into place, attach the platform floor so that it forms a supportive base for the bedroom. Dreamy Room Level 223 players often overlook the precise rotation of this piece; ensure it faces outward toward the front-right view. This bedroom foundation in Dreamy Room Level 223 lays the groundwork for installing the bed, shelves, and writing desk furniture that follow.
Step 6. Decorate the bedroom: place the bed, blanket, pillow, bookshelf, desk, lamp, and wall frames in Dreamy Room Level 223
With the upper bedroom balcony established, Dreamy Room Level 223 tasks you with arranging the restful sleeping area. Begin by placing the wooden bed frame so its headboard sits under the arch. In Dreamy Room Level 223, you’ll notice a green blanket asset; lay it neatly across the mattress and align the folds to the bed edges. Next, add the single pale pink pillow at the head of the bed, tucking it slightly under the blanket’s top edge. Dreamy Room Level 223’s hint system will highlight any misalignment with a red outline—adjust until it turns green. Now, select the pale yellow bookshelf and position it against the inner wall on the left, filling it with miniature books. Place the small writing desk and matching blue desk lamp on the right side, and finish by hanging two framed pictures on the back wall in Dreamy Room Level 223.
Step 7. Add outdoor leisure features: telescope, dog character, chicks, and bird’s nest on branch in Dreamy Room Level 223
In Dreamy Room Level 223, the scene comes alive when you add charming outdoor elements around the treehouse. Begin by selecting the small telescope prop and placing it on the left-hand lower balcony railing. Ensure the telescope barrel points outward toward the horizon; Dreamy Room Level 223 snaps it precisely when aligned. Now, choose the happy dog character figure and drop it behind the telescope, so it appears to peer through the lens. Dreamy Room Level 223’s layering system will automatically position the dog in front of the trunk. Next, pick up the two tiny yellow chicks and place them—one on top of the telescope barrel and the other at its base on the balcony floor. Finally, drag the green leafy branch extension with bird’s nest to the top of the tree trunk. As you drop it, Dreamy Room Level 223 will confirm perfect overlap, and a mother bird circle icon will appear to indicate you’ve placed it correctly.
Step 8. Hang the star string lights and wicker swing chair on the right balcony in Dreamy Room Level 223
Dreamy Room Level 223 invites you to add whimsical accents to the right-side balcony area. First, locate the pink rope swing with an orange wicker seat and teal cushion asset. Drag it so the rope hooks over the balcony railing’s curved top beam. In Dreamy Room Level 223, adjust the rope length until the swing hangs flush with the balcony floor. A gentle glow will confirm proper placement. Next, select the string of golden star lights dangling between the ceiling beam and a railing post. Dreamy Room Level 223 will highlight anchor points; align the left end with the inner beam hook and the right end with the railing post. When the stars appear evenly spaced, release to snap. These decorative pieces in Dreamy Room Level 223 bring playful charm to your treehouse retreat.
Step 9. Lay out the picnic blanket area with basket, lantern, stump table, and mushroom stepping stones in Dreamy Room Level 223
On the ground level of Dreamy Room Level 223, it’s time to create a cozy picnic scene. First, select the small cream-colored picnic blanket and position it on the grassy patch just to the right of the trunk’s base. Dreamy Room Level 223 will show a faint outline indicating the ideal spot. Next, add the wooden picnic basket filled with fruits and sandwiches to the blanket’s top-left corner. In Dreamy Room Level 223, ensure the basket’s handle points toward the trunk for visual balance. Then, place the rustic lantern asset at the blanket’s bottom-right corner. Dreamy Room Level 223’s grid overlay aids with even spacing. Now, drag the little tree stump table to the island’s far right, and place a single red apple on its flat top. Finally, choose three blue-green mushroom stepping stone props and position them in the surrounding water shallow area to the lower right. Dropping each element using Dreamy Room Level 223’s snap feature completes the inviting picnic vignette.
Step 10. Place the cat character at the grill area with barbecue, pumpkins, and barrel in Dreamy Room Level 223
To finish your Dreamy Room Level 223 transformation, you will arrange the playful cooking scene below the treehouse. First, find the small charcoal grill prop with sizzling sausages on top and place it on the grass directly in front of the trunk’s base. Dreamy Room Level 223 will animate smoke rings when the grill is properly aligned. Next, select the cat character model with a turquoise apron and drop it beside the grill so it appears to be tending the meats. Dreamy Room Level 223’s collision detection ensures the cat’s feet rest firmly on the ground. Now, pick up the pair of small orange pumpkins and place them near the barrel asset at the trunk’s base left side. Finally, position the rustic wooden barrel directly behind the grill. When all elements settle without overlapping, you’ll have completed Dreamy Room Level 223’s final scene pieces.
Notes and Precautions
In Dreamy Room Level 223, precision is key, and this walkthrough assumes careful alignment of each decorative piece. Always be mindful of overlapping hotspots: if an asset fails to snap, try rotating it slightly or nudging it by a few pixels to find the invisible snap zone. Dreamy Room Level 223’s layering system can sometimes misinterpret depth; adjust vertical placement gradually until the green indicator appears. Avoid rushing through placements—incorrect positioning will block later steps in Dreamy Room Level 223, forcing you to remove and reposition items. Pay special attention to the tree branches when attaching the nest and the swing; misaligned branches in Dreamy Room Level 223 can cause the swing to clip through the railing. If you encounter a persistent bug, save your progress, restart the level, and use the quick placement hints in Dreamy Room Level 223 to confirm proper placement before proceeding.
Tips and Tricks from top player
- Structure First: Place larger structural pieces—like the island base and trunk—before smaller assets to avoid accidental overlaps in Dreamy Room Level 223.
- Pre-Rotate Assets: Top players of Dreamy Room Level 223 pre-rotate items in the inventory pane, reducing adjustment clicks during placement.
- Zoom Strategically: Zoom out to view all snap points across Dreamy Room Level 223, then zoom in to fine-tune alignments for tiny props.
- Memorize Hotspots: Study shadowed edges and faint outlines in Dreamy Room Level 223 to build a mental map of placement zones, speeding up decoration.
- Use Hints Wisely: Activate hints sparingly in Dreamy Room Level 223 to maintain the puzzle challenge—each hint reveals subtle guides without spoiling the fun.
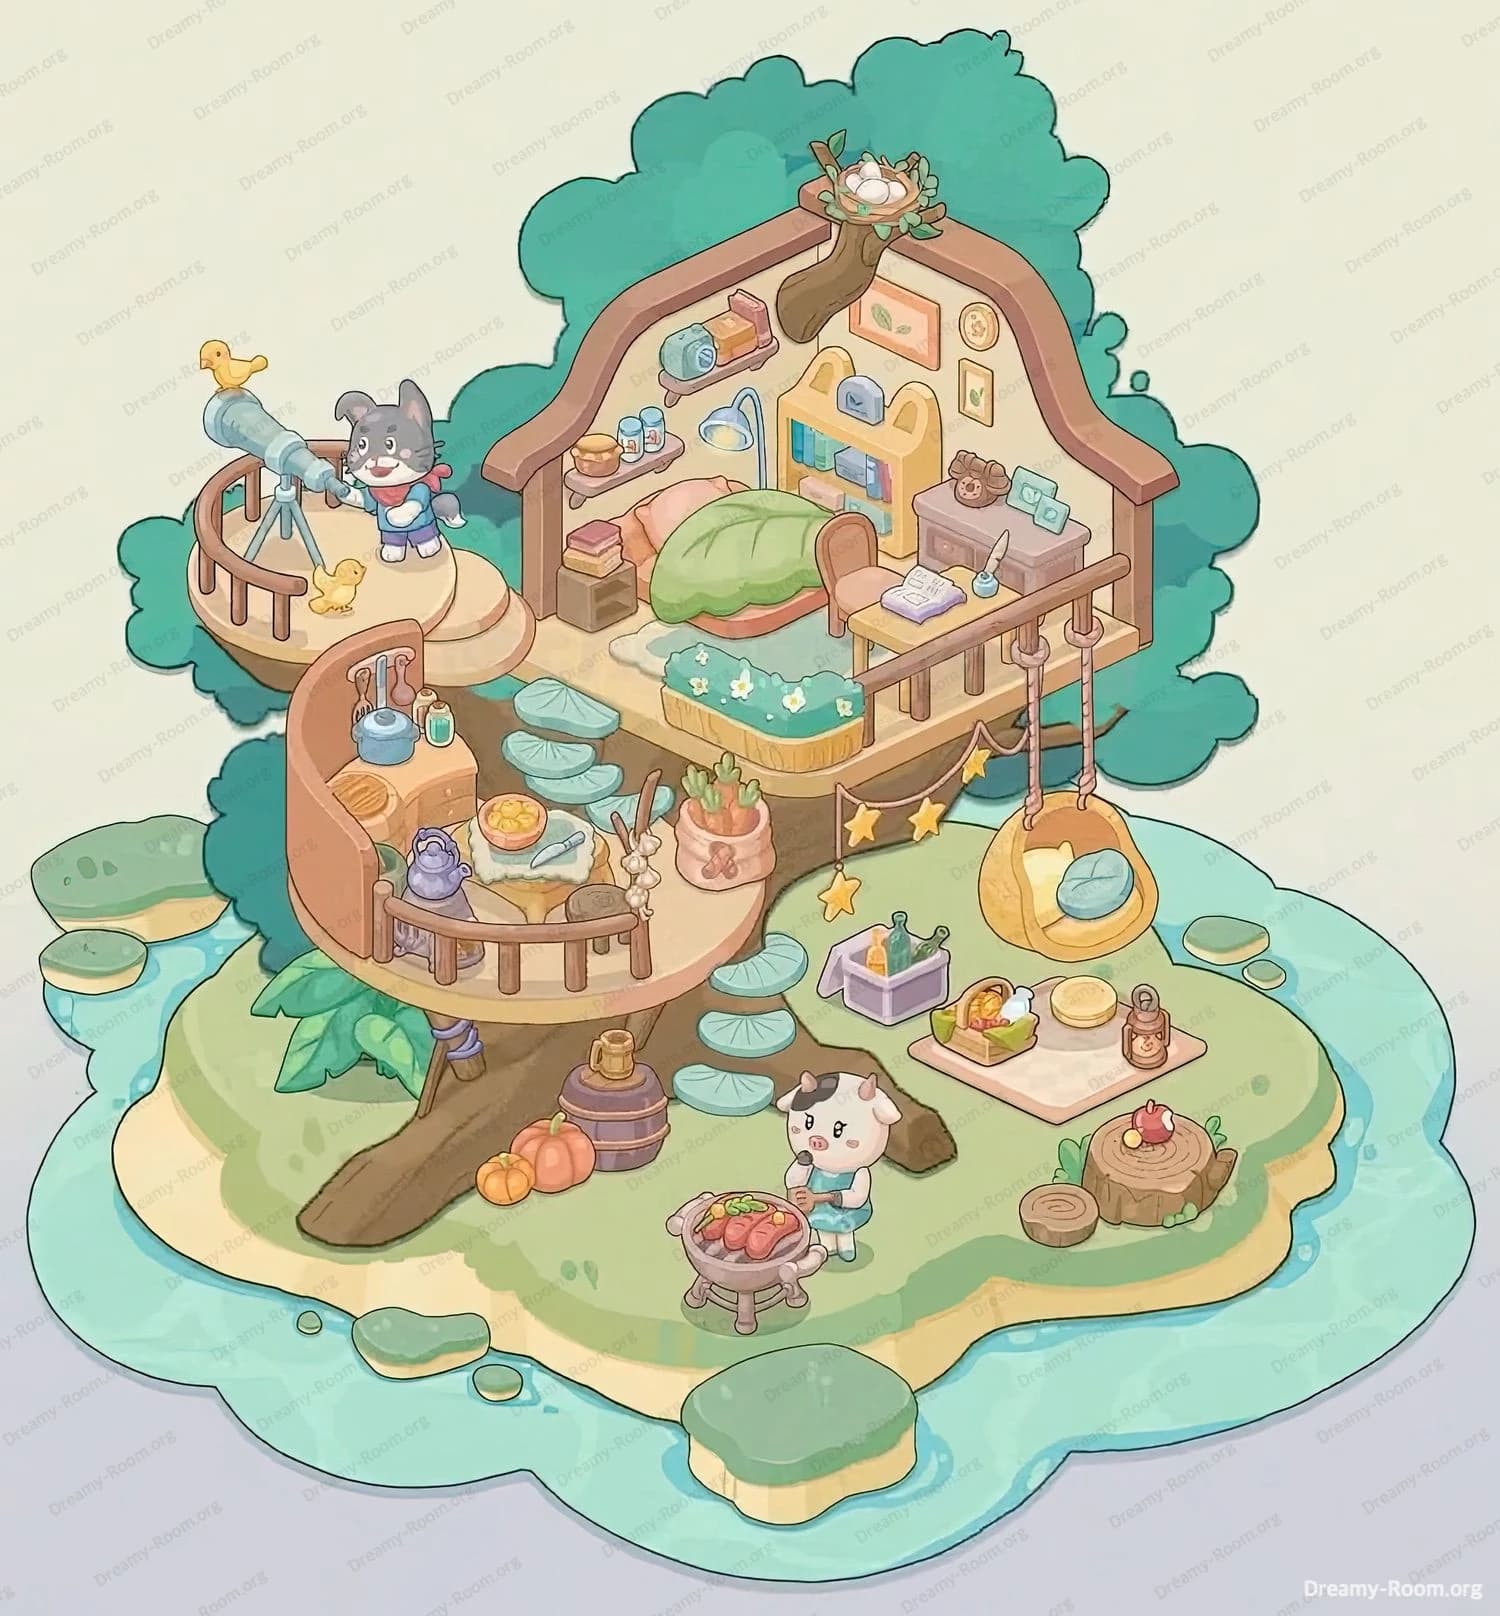
Final Scene Description
In Dreamy Room Level 223’s final scene, an island sits in a water ring. A trunk rises from the center, wrapped by a spiral of lily pads. The scene feels warm and inviting. On the lower left balcony sits a stove with a kettle, a fruit bowl of oranges, and a hanging garlic bundle. Below, a grill smokes sausages beside a cat in an apron. Above on the right, a balcony holds a green-blanket bed with a pink pillow, a yellow bookshelf, and a desk lit by a lamp under framed pictures. Lights hang above a wicker swing chair. A curious dog peers through a telescope with two tiny chicks nearby. At ground level, a picnic blanket with a fruit basket and lantern sits beside a stump table. Mushroom stepping stones lead into the water; a barrel with pumpkins rests at the base. At the top, a branch carries a bird’s nest.
Enjoy mastering every placement in Dreamy Room Level 223!