Dreamy Room Level 216
Dreamy Room Level 216 guide - Dreamy Room 216 Walkthrough & Solution.
Important Notice Regarding Level Numbering
Due to frequent changes in Dreamy Room's level numbering and differences between platforms (Android/iOS) – for example, level 216 on Android might not be the same as level 216 on iOS – the text guide below may not always match the images and video above. Please prioritize the image and video guides. If you find that the guide content doesn't match your current level, please visit the All Level Walkthroughs page to find the correct guide based on level images. Thank you for your understanding.
Dreamy Room Level 216 Walkthroughs & Guide
Step 1. Erect the arch-shaped pastel-green walls
In Dreamy Room Level 216, your first task is to erect the trio of pastel-green walls that define the room’s unique alcove shape. Dreamy Room Level 216 begins with an empty corner platform, and you must carefully slot in two scalloped side walls and one curved back wall featuring a raised molding detail. Dreamy Room Level 216 challenges your spatial awareness: these walls have interlocking joints that click when aligned correctly, preventing any gaps or misalignments. Dreamy Room Level 216 rewards patience and precision here—take your time to ensure each internal corner meets at a precise 90-degree angle before progressing to the next placement. Proper wall alignment now ensures all subsequent decor pieces will sit flush against the interior surface and maintain the delicate pastel-green aesthetic of Dreamy Room Level 216.
Step 2. Lay the terrazzo-patterned floor tile
In Dreamy Room Level 216, after establishing the walls, the next step is to lay the terrazzo-patterned floor tile. Dreamy Room Level 216 provides a single large speckled tile piece that must be positioned flush against the interior wall seam, covering the raised floor platform with its stone chips and soft pastel flecks. Dreamy Room Level 216 makes precise placement vital: align the tile’s front corner cutout with the corresponding notch in the base so that the edges line up perfectly. Dreamy Room Level 216’s focal artwork relies on that seamless terrazzo foundation to showcase subsequent furniture pieces. As you press down, the tile clicks into place—confirm there are no protruding bits, and you’re ready to move on in Dreamy Room Level 216.
Step 3. Install the stained-glass windows
In Dreamy Room Level 216, the third main objective is to install the three decorative stained-glass window panels. Dreamy Room Level 216 frames feature two tall side windows on the left and right walls, each with a shimmering mosaic pattern of pastel circles and stars, and one upper back window with wooden spindles. Dreamy Room Level 216 challenges you to place the side panels so that the lower edge aligns exactly with the wall’s midpoint, creating a cohesive look on both sides. Dreamy Room Level 216 expects that the upper spindle window clicks into the top groove of the back wall, adding depth and architectural interest. Take care that each window’s translucent texture sits flush without gaps for the light to filter evenly throughout the scene in Dreamy Room Level 216.
Step 4. Mount the overhead and floor lighting fixtures
In Dreamy Room Level 216, once your windows are secure, you’ll shift focus to lighting. Dreamy Room Level 216 includes a horizontal wooden beam with five suspended copper bulb fixtures that must snap into the ceiling groove above the center of the room. Dreamy Room Level 216 instructs you to evenly space each bulb along the beam, ensuring uniform illumination across the workspace below. Dreamy Room Level 216 also offers a cozy floor lamp with a beige fabric shade and curved wooden arm for the back-right corner. Dreamy Room Level 216 rewards careful alignment: the lamp base should sit flush against the interior wall niche, complementing the overhead glow. Confirm each light fixture clicks audibly before moving on in Dreamy Room Level 216 to create a warm ambiance.
Step 5. Position the main desk, laptop, and stool
In Dreamy Room Level 216, the centerpiece of the workspace is the curved wooden desk placed against the back-left interior wall just beneath the windows. Dreamy Room Level 216 tasks you with clicking the laptop onto the desk’s center notch, angling its screen toward the center of the room. Dreamy Room Level 216 emphasizes that the desk’s front edge must align flush with the floor platform’s edge to avoid floating. Dreamy Room Level 216 also includes a round wooden stool paired with a pale green circular rug—place the rug first, then the stool directly in its center. Dreamy Room Level 216 challenges your attention to detail: ensure the rug’s pattern is aligned with the terrazzo floor seams for a polished finish in Dreamy Room Level 216.
Step 6. Assemble the left open shelf and decorative trinkets
In Dreamy Room Level 216, you’ll now assemble the tall, dark wooden open shelf along the left interior wall. Dreamy Room Level 216 requires you to slide the shelf base into the flush corner, then click each tier into position from bottom to top. Dreamy Room Level 216 provides assorted decorative trinkets: a blooming white potted flower, a pale blue scented candle, a retro yellow radio, and a chocolate-glazed donut. Dreamy Room Level 216 instructs placing the potted flower on the top left shelf, the candle to its right, the radio on the second shelf, and the donut neatly centered on the third tier. Dreamy Room Level 216 also includes a small blue storage box for the bottom shelf—align it with the shelf frame to maintain balance and visual harmony in Dreamy Room Level 216.
Step 7. Configure the back-right bookcase and printer cart
In Dreamy Room Level 216, the next critical arrangement involves the back-right bookcase and its adjacent printer cart. Dreamy Room Level 216 features a tall brown bookshelf that slots into the right interior wall niche; click to secure its four shelves at even intervals. Dreamy Room Level 216 then has you load colorful books—red, yellow, blue, and green—into neatly stacked groups across the middle shelves. Dreamy Room Level 216 also supplies a mobile trolley with a blue printer perched on top and two cardboard storage boxes on the lower shelf. Dreamy Room Level 216 requires positioning the printer so the paper tray faces outward and the boxes aligned flush under the cart’s frame. Secure each item to complete this workspace corner in Dreamy Room Level 216.
Step 8. Scatter the boxes, rolled papers, and documents
In Dreamy Room Level 216, after constructing the shelves, you’ll introduce a sense of lived-in charm by scattering boxes and documents on the raised platform. Dreamy Room Level 216 provides a medium cardboard box brimming with rolled white scrolls—place this box just to the left of the desk adjacent to the open shelf. Dreamy Room Level 216 next supplies an empty brown box; situate it near the center edge of the platform to anchor the cluster. Dreamy Room Level 216 then challenges you to distribute loose white paper sheets across the wooden floor, ensuring some overlap on the circular rug. Dreamy Room Level 216 rewards randomness: vary the paper angles and overlaps to mimic natural disarray while still framing the desk area in Dreamy Room Level 216.
Step 9. Arrange the front seating area with coffee table
In Dreamy Room Level 216, the front terrace transforms into a cozy lounge zone. Dreamy Room Level 216 includes two inviting cream-colored armchairs—place them side by side flush at the front edge of the raised platform, aligning their backs with the terrazzo floor boundary. Dreamy Room Level 216 provides soft green square pillows and folded pink blankets; click one pillow onto each chair, then drape a blanket over the armrest for layered texture. Dreamy Room Level 216 also supplies a round wooden coffee table—center this table between the chairs. Dreamy Room Level 216 finishes the vignette with a decorative globe and a slice of strawberry-topped cake on the tabletop, creating a welcoming scene that highlights the main gameplay challenge: perfect object placement in Dreamy Room Level 216.
Step 10. Place the telescope, side table, and potted plants
In Dreamy Room Level 216, your final assembly includes accent pieces that bring the scene to life. Dreamy Room Level 216 provides a blue tripod telescope—click to secure it at the right platform edge, angling the lens toward the room’s interior to suggest stargazing. Dreamy Room Level 216 next includes a small two-tier wooden side table with a peach-pink cushion on top and a folded cream blanket on the lower shelf—position this to the right rear of the chairs near the telescope. Dreamy Room Level 216 also offers two potted green plants—place the taller plant in a gray pot on the front-left corner of the terrace and the shorter plant in a yellow pot on the back-right near the printer cart. This completes the scene in Dreamy Room Level 216.
Notes and Precautions
When tackling Dreamy Room Level 216, it’s important to take your time and verify each piece clicks securely. Always check that each wall segment, floor tile, and decorative item has audibly locked into place in Dreamy Room Level 216 to prevent unwanted shifting later. Ensure the windows sit flush without dark gaps around their frames to maintain the ambient light quality in Dreamy Room Level 216’s alcove design. Be mindful when placing fragile items like the globe, cake plate, and laptop—overlapping objects may obstruct collision detection in Dreamy Room Level 216, so leave a small clearance between adjacent pieces. Finally, remember that the main puzzle of Dreamy Room Level 216 is determination of correct placement, not speed—pause to double-check your alignments before proceeding to ensure a flawless decorative arrangement. Additionally, if you accidentally place an item in the wrong spot, use the undo feature rather than force-moving pieces—this reduces the risk of misclicks or broken alignment in Dreamy Room Level 216. Watch for the subtle floor pattern interruptions around the cardboard boxes, as misalignment can be a silent clue that you’ve offset the terrazzo tile by just a few pixels in Dreamy Room Level 216. Finally, always place base-level furniture (like desks and shelves) before fragile accent pieces, ensuring a stable foundation for higher-priority items in Dreamy Room Level 216.
Tips and Tricks from top player
For expert navigators of Dreamy Room Level 216, there are a few advanced strategies to keep in mind. Dreamy Room Level 216 veterans recommend starting by visualizing the entire layout before touching any props; a mental map ensures faster object placement. Dreamy Room Level 216 enthusiasts also suggest placing base pieces like the terrazzo floor and walls first, then gradually layering furniture to avoid obstruction issues. Dreamy Room Level 216 champion players often use the undo button sparingly, reserving it for critical alignment errors rather than minor adjustments. Dreamy Room Level 216 pros advise double-clicking on each item edge to activate the magnet snapping, which locks objects precisely into their grooves. Lastly, Dreamy Room Level 216 experts highlight that zooming in on tight corners can reveal subtle alignment guides that you might otherwise miss.
Final Scene Description
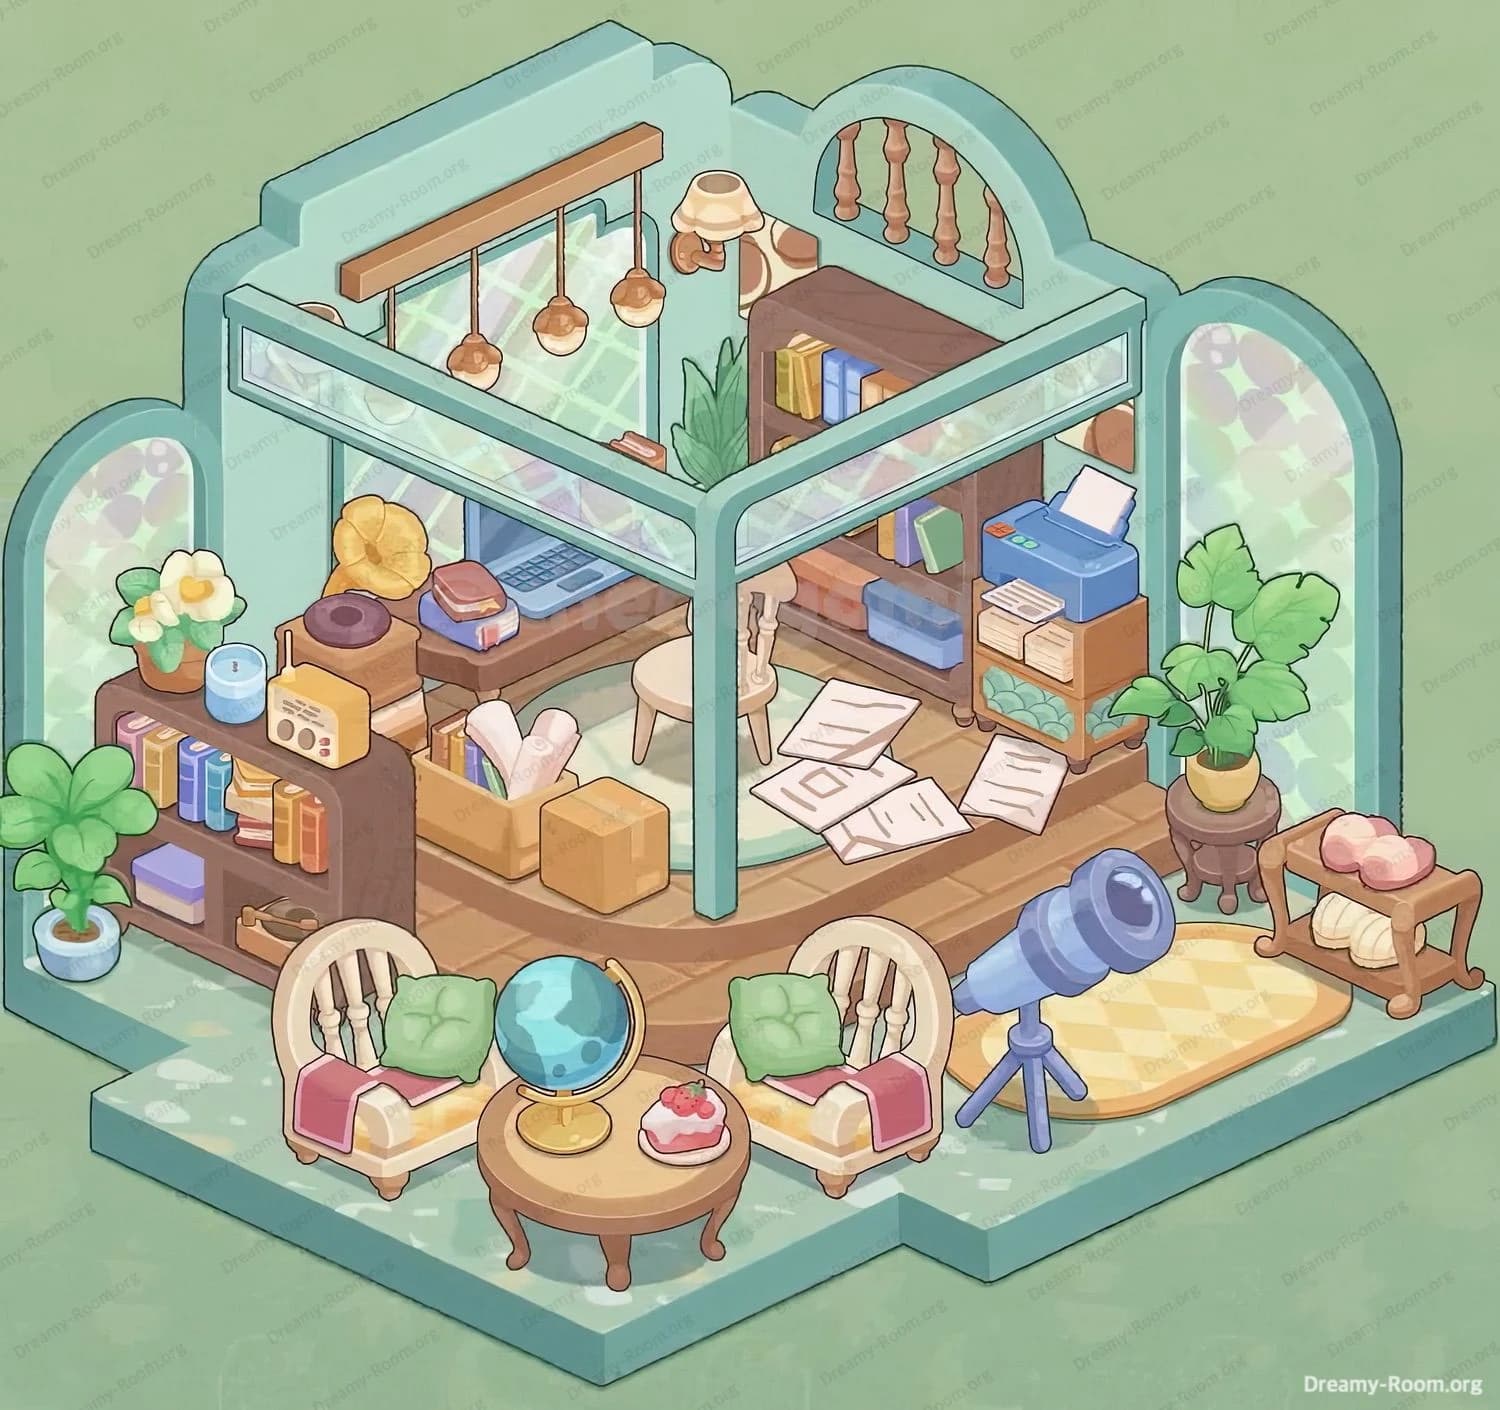
In the completed Dreamy Room Level 216 scene, the pastel-green arch alcove now brims with harmony and texture. The terrazzo-patterned floor anchors the space, seamlessly interlocking with scalloped walls and three mosaic-stained windows. Warm overhead bulbs cast ambient light onto a curved wooden desk holding a sleek laptop, beside a round stool on a mint-green rug. A dark open shelf lines the left wall, showcasing a white potted bloom, blue candle, vintage radio, glazed donut, and stacked books. Opposite, a tall bookcase and printer cart hold colorful volumes and storage boxes. Cardboard parcels and scattered papers evoke a lived-in study, while two cream armchairs with green pillows and pink throws flank a round coffee table adorned with a globe and strawberry cake slice. A blue tripod telescope peers toward the room, balanced by a two-tier side table with cushion and blanket. Lush potted plants at front-left and back-right add natural flourish. This tableau underscores that the main gameplay of Dreamy Room Level 216 is mastering precise object placement.