Dreamy Room Level 318
Dreamy Room Level 318 guide - Dreamy Room 318 Walkthrough & Solution.

Important Notice Regarding Level Numbering
Due to frequent changes in Dreamy Room's level numbering and differences between platforms (Android/iOS) – for example, level 318 on Android might not be the same as level 318 on iOS – the text guide below may not always match the images and video above. Please prioritize the image and video guides. If you find that the guide content doesn't match your current level, please visit the All Level Walkthroughs page to find the correct guide based on level images. Thank you for your understanding.
Dreamy Room Level 318 Walkthroughs & Guide
Step 1. Place the base elements: grassy island, foundation, and large pink trees
Begin Dreamy Room Level 318 by placing the circular grassy island base exactly centered in the scene — this grassy island is the main anchor for Dreamy Room Level 318. Place the floating brown foundation beneath the grass so its scalloped edge lines up with the bottom center of the screen; this ensures the later staircase and fountain sit flush. Next add the pair of large pink-blossom trees behind the building: one tree should sit behind the left rear corner and one behind the right rear corner. When you set those trees, double-check their trunks tuck behind the building’s upper floors so they appear behind, not overlapping, which is essential in Dreamy Room Level 318. These base placements form the visual foundation for Dreamy Room Level 318 and must be precise before continuing.
Step 2. Place the lower-level fountain and terrace
For Dreamy Room Level 318, place the fountain assembly on the lower-left section of the grassy island so the fountain lip overlaps the edge of the foundation by a small margin. Position the multi-tiered fountain so its purple water cascades visibly and its base rests on the lower step area; this ensures Dreamy Room Level 318’s left profile matches the reference. Add the lower-level terrace railing and platform directly behind and above the fountain — the terrace should align with the portafilter area that will be added later. Make sure the terrace column supports sit evenly spaced and that no fountain bits obscure the stair rail that leads up to the right side. These precise placements are crucial to the composition in Dreamy Room Level 318.
Step 3. Place the staircase, hydrangea row, and right-side railing
Now place the staircase on the lower-right quadrant of Dreamy Room Level 318, angled so the steps face the viewer and the handrail meets the platform at the same height as the middle floor. Line up the hydrangea row (pink flowering bushes) along the right edge of the staircase so each flower pot is evenly spaced and the row mirrors the exact curve shown in Dreamy Room Level 318. Add the teal balustrade railing along the middle deck where the stairs meet the building; the teal posts should match the spacing of the terrace posts on the left to maintain symmetry in Dreamy Room Level 318. Double-check that the hydrangea row does not float above the ground — a small vertical nudge is often needed to make Dreamy Room Level 318 look grounded.
Step 4. Install the middle-level facade: doors, windows, and balcony
Place the building’s middle-level facade in the center of Dreamy Room Level 318. Position the central rounded door slightly right of center on the middle tier and add the two small square windows on either side, with flower boxes under each window. Attach the small balcony directly above the middle tier so its door aligns vertically with the lower stairs. Add the small decorative snowflake detail on the corner wall tile to the left of the door to match Dreamy Room Level 318. Make certain the balcony floor sits directly above the terrace railing and that the facade’s shadow overlays the terrace correctly — this alignment is a recurring visual anchor in Dreamy Room Level 318 and helps the whole building read as one cohesive structure.
Step 5. Place the espresso/coffee module and large pink cup
In Dreamy Room Level 318 the coffee machine and oversized pink cup are key mid-level features. Place the coffee machine body on the left side of the middle tier, with its portafilter arm extending toward the center. Hang the metallic steam/lever assembly so it overhangs the cup area but does not intersect the cup. Position the large pink cup directly under the portafilter so a stream of coffee visually pours into it — the cup rim should align with the terrace edge. Add the long wooden handle protruding left and ensure the machine’s control knob faces forward as seen in Dreamy Room Level 318. This module must feel mechanically attached to the terrace to look natural in Dreamy Room Level 318.
Step 6. Assemble the upper control platform, glass walls, and green planters
Place the green control platform (the teal top with buttons and a little display) as the roof for the middle structure, centered and slightly offset toward the front so its front lip overhangs the terrace. Surround this control platform with the glass walls: insert four curved transparent glass panels to form a square enclosure and make sure the curved corners match Dreamy Room Level 318’s rounded glass look. Affix the low planter boxes all around the outer edge of the glass so the green shrubs sit on top of the platform, leaving the middle interior clear for furniture. Attach the small hanging lamps to the outside glass corners where each curtain will later meet the glass to reproduce the lighting seen in Dreamy Room Level 318.
Step 7. Place interior furnishings: curtains, bookcase, table, cake, and vase
Inside the glass enclosure of Dreamy Room Level 318, install the deep green curtains at each glass opening and tie them back with golden bows, placing the tie points approximately one-third from the top. Add the tall wooden bookcase centered against the back wall and fill it with colorful books so that its top aligns with the glass panel seams; this mirrors Dreamy Room Level 318’s cozy library nook. Place the round wooden table on the right interior side and set a small cake and teacup on it; the cake should be centered and slightly forward. Add a small blue vase with a single flower near the left window seat. These interior items must be scaled carefully to match Dreamy Room Level 318’s perspective and to keep the scene charming.
Step 8. Position characters, small accessories, and finishing details
Finally, position the two cat characters inside the glass enclosure to bring Dreamy Room Level 318 to life. Place the left cat in a pink dress on the left window seat, facing slightly inward and waving; its head should be just below the curtain tie. Place the right cat in a blue outfit on the right interior bench, angled toward the table with the cake so they appear to interact. Add the framed cat portrait on the right back wall slightly above the bookcase top and hang the small window arch decoration near the right interior wall. Finish with small flower pots on the middle-level window boxes, a tiny pile of books on the left window ledge, and make sure each hanging lamp outside the glass glows subtly. These tiny placements are the final, delicate moves in Dreamy Room Level 318.
Notes and Precautions
- Placement order matters in Dreamy Room Level 318: start with the large background components (island, trees, terrace) then add middle and upper layers. If you place small accessories first, they may snap to the wrong layer in Dreamy Room Level 318.
- Watch depth and overlap: ensure that the trees sit behind the building and that railings are above the terrace but below the control platform to keep Dreamy Room Level 318 visually consistent.
- Scale everything carefully: the bookcase, table, and characters must be scaled so their tops align with the glass seams — mis-scaled items will make Dreamy Room Level 318 look off.
- Avoid layer collisions: when placing the coffee machine and cup in Dreamy Room Level 318, nudge items by single-pixel increments if collision prevents correct alignment.
- Save often: if the game supports saving checkpoints, save after Step 4 and Step 6 to avoid losing the precise alignment work in Dreamy Room Level 318.
Tips and Tricks from top player
- Anchor then adjust: top players of Dreamy Room Level 318 recommend locking the island base and middle facade first, then using nudge tools to align decorative railings and flower boxes by small increments.
- Mirror placements: use symmetry — place the hydrangea row and fountain relative to the centerline of Dreamy Room Level 318 to make other alignments simpler.
- Use layers visually: imagine Dreamy Room Level 318 as foreground (characters, table), midground (glass enclosure, control panel), and background (trees, sky). Place items in that order to avoid overlap problems.
- Batch place small items: group the small planters and lamps so you can place multiple matching items at once in Dreamy Room Level 318 and then tweak their spacing.
- Final polish: after everything is placed in Dreamy Room Level 318, zoom out and check silhouettes to ensure no item pokes through glass or tree outlines — tweak as needed.
Final scene
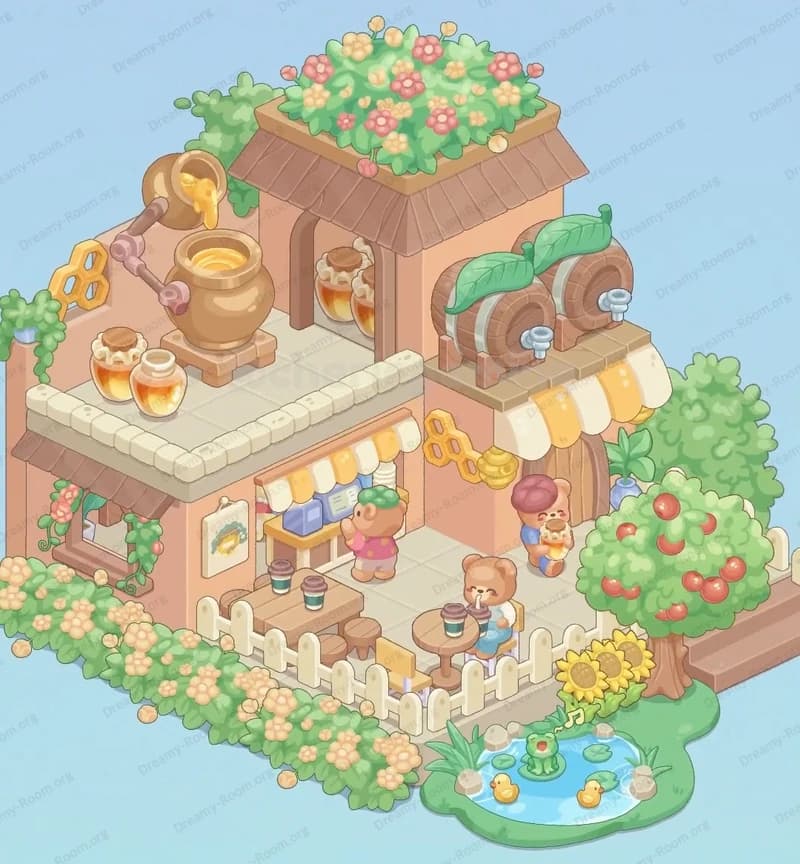
The completed Dreamy Room Level 318 presents a layered, storybook diorama: a scalloped grassy island anchors a pastel three-tier building crowned by a teal control platform and glass-walled conservatory. Pink blossom trees rise behind the structure while a purple-hued fountain spills at the lower left. A grand staircase lined with a row of pink hydrangeas leads to a middle-level door fitted with twin windows and flower boxes. The middle terrace hosts a whimsical coffee module pouring into an oversized pink cup. Above, the control platform’s rounded display and buttons are ringed with planter boxes and transparent glass, their deep-green curtains tied back with gold bows. Inside the conservatory, a tall bookcase and framed portrait flank a round wooden table with a cake and vase, while two cheerful cat characters in pastel dresses share the cozy space. Warm hanging lamps and carefully placed shrubs complete the balanced, charming tableau of Dreamy Room Level 318.