Dreamy Room Level 539
Dreamy Room Level 539 guide - Dreamy Room 539 Walkthrough & Solution.
Important Notice Regarding Level Numbering
Due to frequent changes in Dreamy Room's level numbering and differences between platforms (Android/iOS) – for example, level 539 on Android might not be the same as level 539 on iOS – the text guide below may not always match the images and video above. Please prioritize the image and video guides. If you find that the guide content doesn't match your current level, please visit the All Level Walkthroughs page to find the correct guide based on level images. Thank you for your understanding.
Dreamy Room Level 539 Walkthroughs & Guide
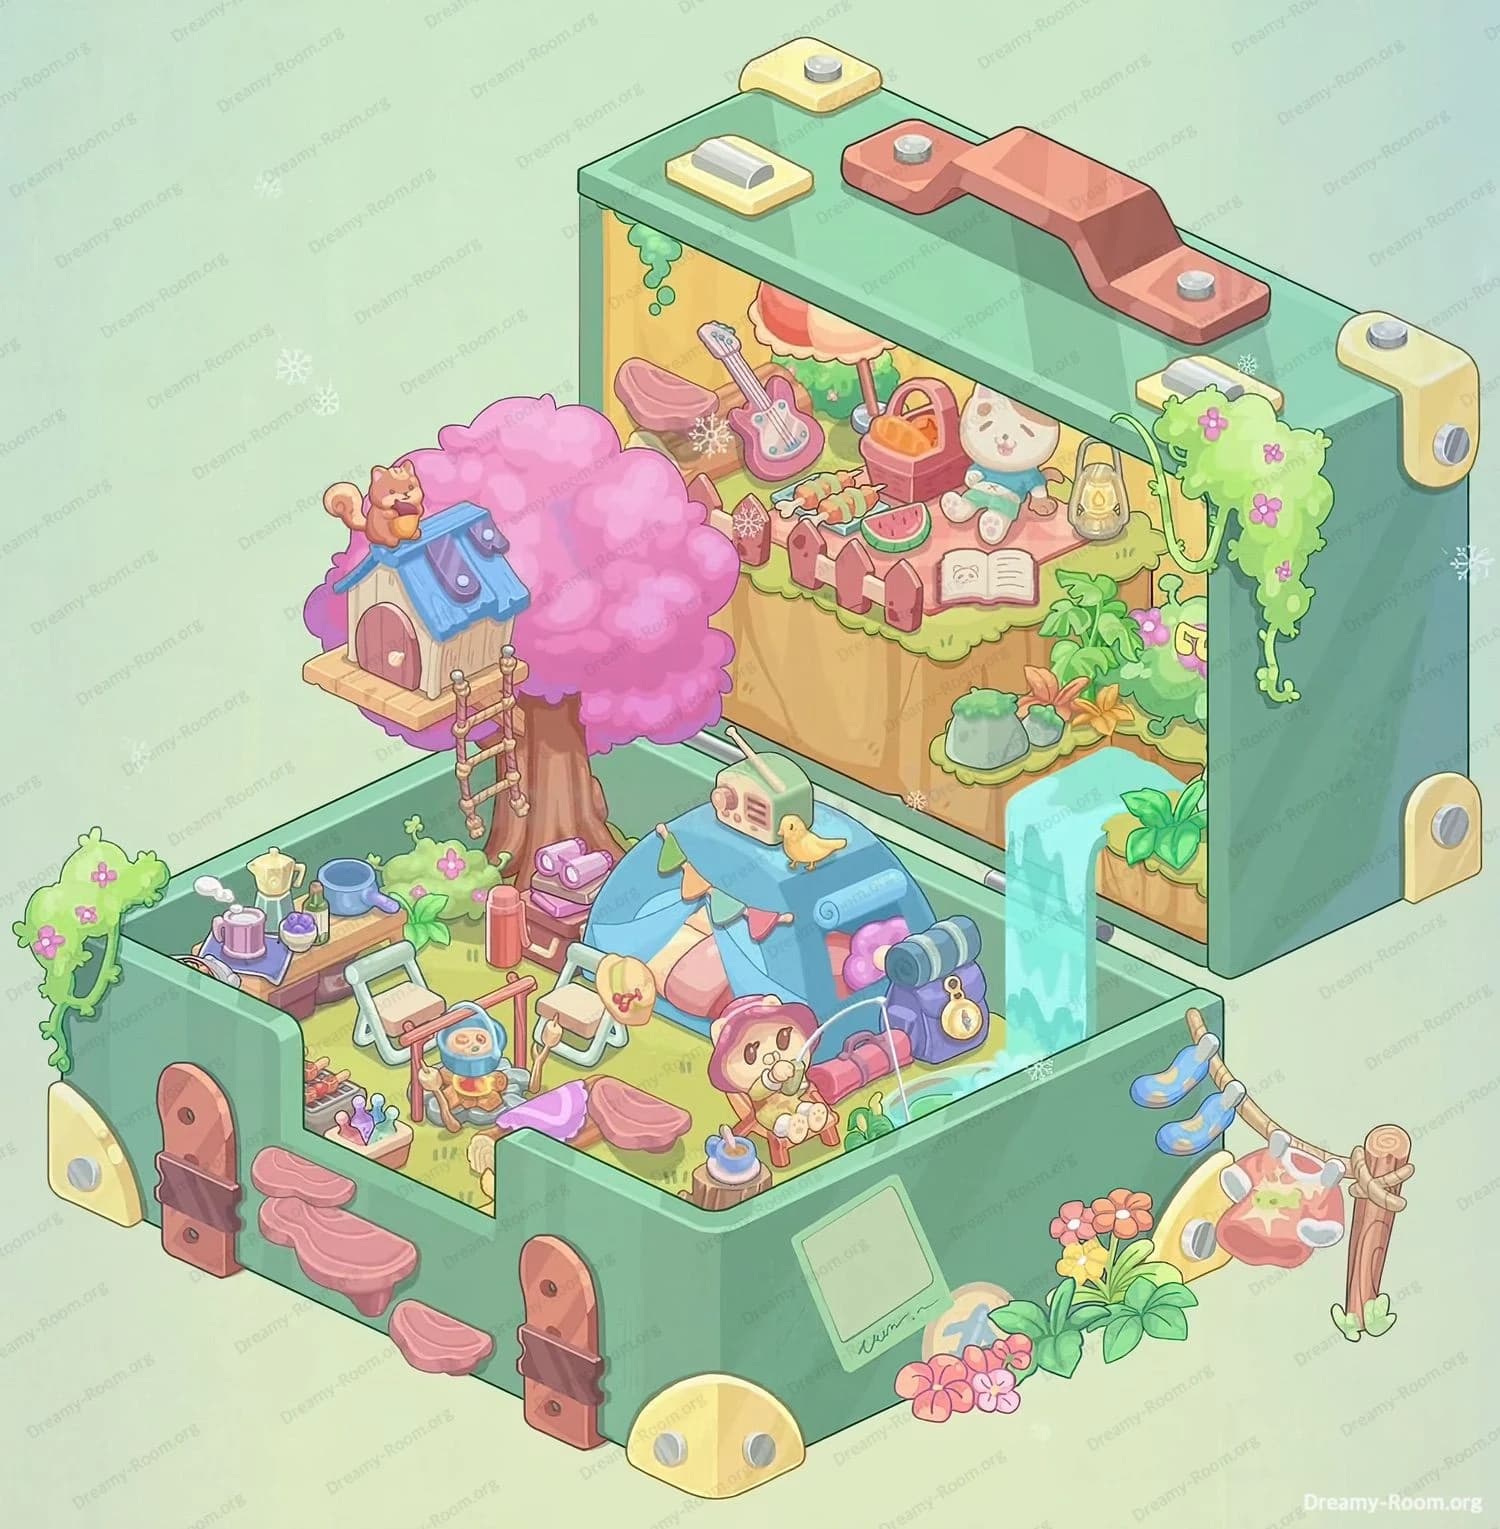
Dreamy Room Level 539 transforms a simple grassy suitcase with a small waterfall into a dreamy camping scene packed with toys, snacks, and cozy details. In this puzzle, the main challenge is figuring out the exact position of every item so the miniature campsite looks perfectly balanced and alive, just like the completed image for Dreamy Room Level 539.
Step 1. Place the big pink tree and treehouse on the back-left corner
Start Dreamy Room Level 539 by anchoring the main structure on the lower grassy floor. Select the large pink-crowned tree and drag it to the rear-left corner of the suitcase base, almost touching the back wall but still fully inside the green frame. The brown trunk should rise near the middle of the left wall, and the canopy should overlap slightly in front of the wooden ledge of the lid. Next, place the small wooden treehouse platform so it rests on the left side of the pink foliage, hanging over the inner wall. The blue roof of the treehouse must lean left, with the tiny arched door facing forward. Finally, add the little wooden ladder so it runs from the grass up to the platform, aligned with the trunk. Put the orange squirrel on the roof ridge, looking toward the center of Dreamy Room Level 539 to establish the playful focal point.
Step 2. Place the picnic table, tea set, and chairs on the left side
Now convert the left foreground into a tea corner. In Dreamy Room Level 539, select the wooden table and position it along the left inner wall, roughly centered between the front and the tree trunk. The tabletop should run diagonally from front-left to back-right. On top of it, carefully place the pastel tea set: the yellow teapot goes near the back-left, the purple mug and blue cup sit closer to the front edge, and the small kettle and other cups fill the remaining space. Next, drag the two folding chairs. One chair belongs in front of the table, slightly angled toward the center; the other sits on the right side of the table, turned inward. Ensure their white frames point toward the table. In front of the left wall, near the corner, place the crate filled with colorful bottles so it lines up with the suitcase edge. This arrangement makes the left side of Dreamy Room Level 539 feel like a cozy picnic station.
Step 3. Place the swing set and small camper in the front-left
The next objective in Dreamy Room Level 539 is filling the lower-left center with play equipment. Choose the small swing frame with two vertical posts and a horizontal bar. Position it just to the right of the picnic table, leaving enough space so the chair backs don’t overlap the swing ropes. The frame should sit parallel to the front edge. Attach the circular swing seat at the middle of the frame, making sure it hangs above the grass rather than clipping into it. Then place the tiny bundled-up camper character with a blue hood and orange face directly on the swing seat, facing forward. Under the swing, drop the small round base or stand so it looks like part of the structure. Right behind this area, tuck a slim red thermos bottle upright between the swing and the tree trunk. This careful placement keeps the toy zone tidy and ensures the swing scene reads clearly at a glance in Dreamy Room Level 539.
Step 4. Place the tent, radio, bird, and camping gear in the center
The heart of Dreamy Room Level 539 is the central campsite. Select the blue triangular tent and place it slightly right of center on the lower platform, with its entrance facing the front. The top of the tent should sit almost under the edge where the lid meets the base. Attach the colorful bunting to the tent, making sure the tiny flags stretch across the front. On top of the tent, position the pale green radio box so its speaker faces the front-right, and then perch the small yellow bird on top of the radio, tilting toward the waterfall. In front of the tent, place the pink cushion or sleeping bag so it rests just below the entrance. To the right of the tent, stack the rolled sleeping bags: blue on top, purple beneath, snug against the side wall. Hang the small round yellow clock or pocket watch at the right end of these rolls so it dangles just above the grass. This cluster makes Dreamy Room Level 539 feel like a lived-in campsite.
Step 5. Place the camper girl, campfire kettle, and stepping stones
Now focus on the foreground center of Dreamy Room Level 539. Drag the seated camper girl with the pink hat and place her in front of the tent slightly toward the right, but still left of the waterfall. She should sit on the small red stool or log, facing diagonally toward the water. Put the roasting stick or fishing rod in her hands so it points to the lower-right. Just in front of her, place the tiny blue kettle on the short wooden stump near the front edge—this should look like it is warming beside a tiny invisible fire. Then lay down the three pink stepping-stone slabs to form a loose path from the front edge toward the tent: the biggest stone nearest the front, a smaller one in the middle, and the last stone closest to the tent entrance. These stones help guide the eye toward the central camp and keep the lower edge of Dreamy Room Level 539 from feeling empty.
Step 6. Place the fishing line, waterfall pool, flowers, and clothesline
Dreamy Room Level 539 uses the built-in waterfall as an active play area. Attach the thin white fishing line so it stretches from the camper girl’s hands into the shallow blue pool at the base of the waterfall on the lower floor. Ensure the line curves gently across the grass rather than vanishing into it. Around the pool, drop a few small green plants to soften the transition from water to ground. On the outside-right of the suitcase front, place the cluster of colorful flowers—yellow, pink, and orange—so they overlap the lower edge slightly. Next, attach the wooden post for the clothesline to the right of the case, outside the box. Connect the rope from this post to the upper-right edge of the suitcase rim. Hang the two blue socks on the left side of the line and the bright star-patterned towel on the right. A tiny sprout should sit at the base of the post. This step turns the waterfall side of Dreamy Room Level 539 into a lively washing and fishing corner.
Step 7. Place the lid shelf picnic—guitar, basket, cat plush, and book
Shift your attention to the inner lid, the upper half of Dreamy Room Level 539. First, select the long green shelf or ledge object and ensure it aligns along the middle of the wooden back panel, already built into the level. On this shelf, from left to right, you must place several precise items. Start with the pink cushion near the left end. Next to it, lean the pastel electric guitar so its neck points toward the top-left corner. Slightly to the right, add the skewer or snack stick and the star-shaped cookie or decoration. Continue along the front edge with two slices of watermelon and a few tiny strawberries. Near the center-right, put the orange picnic basket under the striped parasol, with its bread and fruit clearly visible. To the far right, seat the white cat plush with a teal scarf, legs dangling forward. Finally, open the small book and lay it just in front of the cat. This precise line-up defines the cozy picnic story of Dreamy Room Level 539.
Step 8. Place the upper plants, rocks, vines, suitcase details, and final decor
To finish the scene of Dreamy Room Level 539, decorate the remaining gaps. On the right side of the lid, above the waterfall’s start, place the rounded stones and leafy plant cluster on the small grassy patch, making sure they sit directly behind the falling water. On the upper-right inner wall, attach the trailing green vine with pink flowers so it drapes downward, almost touching the shelf. At the lower-right corner of the lid shelf, tuck additional foliage near the waterfall opening. Now decorate the suitcase exterior: attach the golden corner guards to the front corners, the brown leather straps with dark buckles to the front wall, and the pink rock steps along the left front, aligned like a staircase leading into the box. Stick the pale green label to the front-right wall, just above the flowers. Finally, add the small clusters of blossoms and ivy along the left outer wall. With these final touches, every object is correctly placed, and Dreamy Room Level 539 reaches its complete, charming look.
Notes and Precautions
In Dreamy Room Level 539, many items are similar in color, so misalignment is common. Always check that objects do not overlap the suitcase edges unnaturally; if the treehouse hangs outside the inner wall or the tent touches the waterfall, you’ve placed them incorrectly. The swing frame must not clip into the picnic table, and the chairs should remain clearly readable. On the lid shelf, keep the guitar and watermelon slices in front of the fence line, not behind it, or they may appear hidden. Ensure the cat plush sits to the right of the basket, not under the umbrella pole. For the waterfall side of Dreamy Room Level 539, confirm the fishing line actually touches the pool and doesn’t end on dry grass. Small details—like the socks on the clothesline or the clock near the sleeping bags—must face outward so players can identify them quickly and avoid frustrating trial-and-error placements.
Tips and Tricks from top player
Experienced players treat Dreamy Room Level 539 as a story puzzle rather than a random object dump. Imagine the order of a real campsite: big structures first (tree, tent, shelf), then furniture (table, chairs, swing), then characters and tiny props. This mental script reduces guesswork. Use the waterfall as a major axis; items that feel “wet” or outdoor-utility, like the clothesline and the fishing girl, belong near it, while cozy reading and music items belong up on the lid shelf. When stuck, compare object scale to nearby elements—the small camper on the swing must fit under the tree canopy, while the treehouse platform must clear the suitcase rim. Another trick for Dreamy Room Level 539 is to watch how shadows line up; the correct slot usually matches the direction of pre-drawn shadows on the ground. Finally, remember that symmetrical balance matters: left side is dense with picnic and play, right side with water, laundry, and flowers, while the center holds the tent hub.
Final scene overview
When completed, Dreamy Room Level 539 becomes a miniature dream campsite tucked inside a teal suitcase. On the lower level, a huge pink tree supports a tiny blue-roofed house where a squirrel keeps watch, while below, friends share tea at a cluttered table and a bundled camper swings happily. The central blue tent glows with bunting, radio music, and a little bird perched on top, surrounded by rolled sleeping bags and a dangling clock. At the right, a clear waterfall tumbles into a shallow pool where the pink-hatted camper fishes beside bright flowers. Outside, a clothesline with blue socks and a starry towel flutters by the post. Above it all, the lid shelf of Dreamy Room Level 539 displays a perfect picnic: guitar, fruit, basket, cat plush, and open book, framed by rocks and trailing vines. The suitcase hardware and rock steps make the whole diorama feel like a portable, magical world ready for a quiet holiday.