Dreamy Room Level 725
Dreamy Room Level 725 guide - Dreamy Room 725 Walkthrough & Solution.
Important Notice Regarding Level Numbering
Due to frequent changes in Dreamy Room's level numbering and differences between platforms (Android/iOS) – for example, level 725 on Android might not be the same as level 725 on iOS – the text guide below may not always match the images and video above. Please prioritize the image and video guides. If you find that the guide content doesn't match your current level, please visit the All Level Walkthroughs page to find the correct guide based on level images. Thank you for your understanding.
Dreamy Room Level 725 Walkthroughs & Guide
Step 1. Place the giant camera building base and shop entrance in the lower area.
Begin Dreamy Room Level 725 by treating the lower structure as the foundation for the whole scene. The finished design sits on a square pavement base, with a large orange-red shop building at the bottom and a giant camera body attached to the left side. Position the tall teal camera body on the far left, making sure the orange cap and green band sit near the upper-left corner. The large circular orange camera lens should project from the lower-left front, facing outward. On the front of the red building, place the glass shop door slightly right of center, then put the yellow steps directly below it. Add the small green folding sign at the foot of the stairs. Dreamy Room Level 725 depends heavily on this base alignment because every upper-floor object must sit neatly on the rooftop above it.
Step 2. Build the exterior storefront, balcony, windows, and side café area.
Next in Dreamy Room Level 725, decorate the outside of the shop before filling the rooftop. Above the front door, place the small orange sign that reads “Dreamy,” and center it over the entrance. Add the poster panel with the cute animal illustration to the left of the door, then place the small round wall light above it. On the right side of the lower building, install the window with the green striped awning. Below this awning, create the outdoor seating area: put the turquoise tiled platform against the right wall, add the orange fence around the front edge, and place the round café table with two pink chairs on it. The vase with white flowers belongs on the table. A black streetlamp with a small hanging light stands near the right corner. In Dreamy Room Level 725, these exterior objects complete the shop’s cozy street-level identity.
Step 3. Lay the upper-floor flooring, green rugs, and staircase zones.
For the main playable room in Dreamy Room Level 725, start with the rooftop interior. The empty platform becomes a divided studio with different floor zones. Place the pale wooden floor panels across the left-center boutique area, keeping them aligned diagonally with the room perspective. On the right side, lay the light gray tiled floor for the hallway and reception-like area near the elevator door. Add green rugs in several places: one large green rug goes in the front-center lounge area, another long green strip runs along the right-side hallway, and smaller green mats sit near the upper dressing and display zones. Place the green steps or low platform blocks near the center-left, just in front of the storage cabinets. Dreamy Room Level 725 requires these floor sections first because they act as visual guides for furniture placement and prevent later objects from appearing misaligned.
Step 4. Place the left boutique wardrobe, clothing displays, and top storage boxes.
Now focus on the left wall of Dreamy Room Level 725, where the fashion boutique elements belong. Put the tall orange wardrobe unit against the back-left wall. Its left open section holds hanging clothes, including pastel garments in pink, green, and blue. The middle display window should show the pink outfit behind glass, while the lower cubbies hold folded accessories and shoes. On top of this wardrobe, place the two large round red-orange storage boxes and the flat blue folded item. Below the wardrobe, install the freestanding clothing rack on the lower-left wooden floor. Hang several dresses and outfits on this rack, making sure the garments face outward toward the room. Dreamy Room Level 725 hides many placement clues in the color groupings, so keep warm orange furniture against the left wall and pastel clothes in front of it.
Step 5. Arrange the central boutique dresser, mirror, mannequin, and fashion props.
The front-left and central area of Dreamy Room Level 725 becomes a dressing corner. Place the pink oval standing mirror near the front-left edge of the upper room, angled so it faces inward. Beside it, put the small orange dresser with drawers, then add the lamp, books, and tiny accessories on or around it. The pink mannequin or doll in a frilly outfit stands just behind the dresser area, near the middle-left of the room. Behind this section, add the palm-like plant display and the colorful horse or carousel-style decorative figure on the wooden platform. The low orange cabinets with drawers belong nearby, with small bowls, hats, folded items, and decorative pieces on top. In Dreamy Room Level 725, the dressing corner can feel crowded, but that is intentional: the correct solution uses layered boutique objects without leaving large empty gaps.
Step 6. Place the front lounge with sofa, table, benches, plants, and cat figure.
Move to the lower-center rooftop area of Dreamy Room Level 725 and assemble the relaxing customer lounge. Place the orange-pink sofa along the lower-left side of the green rug, with its back facing the front edge of the room. Put the small round table in front of the sofa, slightly to the right, and add the potted flowers on top. The purple oval mat or table base sits beneath this round table. Place the two small pink benches on the right side of the lounge rug, one closer to the table and one near the cat figure. The seated orange cat character belongs near the middle-right of the lounge, facing inward. Add the leafy green plant near the top-right of this lounge zone, close to the divider wall. Dreamy Room Level 725 uses this lounge to connect the boutique side with the service-counter side.
Step 7. Set up the back-left photo booth, curtains, lamps, tripod camera, and plush display.
The upper-left rear area of Dreamy Room Level 725 is a cute photo studio corner. Place the lavender bed-like platform or display seat against the back-left wall, then add the large pink plush bunny or mascot on it. Surround this display with the pink curtain, small floral garlands, and decorative hanging elements. The dark blue standing backdrop or screen should sit to the left of the plush area. Place the tripod camera in front of the setup, pointing toward the plush display, with the white camera body facing inward. Add the small handbags and props near the platform edge. Overhead, attach the gray track lights along the back wall, with several spotlights directed downward. Dreamy Room Level 725 makes this photo booth one of the densest sections, so place the large plush first, then tuck the smaller props around it.
Step 8. Decorate the upper-middle workstation with vanity, plants, stool, shelves, and wall ornaments.
In the upper-middle part of Dreamy Room Level 725, build the makeup and styling workstation. Place the small orange vanity table against the back wall, slightly right of the plush photo area. Add the round mirror with lights on top of the table, then place the drawer unit and beauty items beneath or beside it. A small gray stool sits in front of the vanity. Put the leafy potted plant to the left of the vanity and the small green tree-like plant to the right. On the wall above, place the tiny shelf decorations, including blue and orange bottles, small figurines, and the narrow framed ornament. The warm yellow wall should stay visible around these details. Dreamy Room Level 725 relies on these upper-wall decorations to make the room feel finished, so do not leave the back wall plain.
Step 9. Install the scalloped partition, display window, service counter, and customer characters.
The most distinctive divider in Dreamy Room Level 725 is the orange scalloped wall that separates the central studio from the right-side service area. Place this curved partition diagonally from the upper-middle toward the center-right, with its blue window panels facing the front. Behind or inside the window area, place the staff animal character at the service counter. In front of the counter, add the two small customer figures: the pink animal character in a red dress stands closer to the counter, while the purple animal character with an orange top stands just to the right. Add the small laptop or display screen on the counter, along with the low orange counter blocks and books. Dreamy Room Level 725 makes this counter placement important because the characters must face the window, not the open floor.
Step 10. Complete the right hallway with elevator door, wall sign, bench, speaker, vase, and floor mat.
The right side of Dreamy Room Level 725 forms a tidy entrance hallway. Place the beige elevator or interior door on the far-right wall. Above it, add the turquoise rectangular sign. To the left of the door, mount the small pink wall notice. Put the green floor mat directly in front of the door, aligned with the gray tiles. In the lower-right tiled area, place the long pink bench horizontally, with the small orange speaker or box sitting near its right end. Add the tall blue vase with purple flowers near the left side of the door area, close to the service counter zone. The small wall lamps with orange shades should be attached along the yellow wall. Dreamy Room Level 725 uses this hallway as a calmer contrast to the crowded boutique side, so keep the objects spaced clearly.
Step 11. Add the rooftop walls, signage, lights, and outdoor decorative details.
After the main furniture is in place, Dreamy Room Level 725 needs its vertical details. The back and right yellow walls should frame the upper room, with the rounded corner at the top. Attach the gray lighting rails near the upper-left and upper-middle walls, making sure each spotlight points into the boutique and photo areas. Add the decorative wall lamps shaped like small orange sconces along the walls. On the far-right outer edge, place the tall vertical orange “Dreamy” sign running downward beside the building. The green tree canopy belongs behind the right side of the building, partially visible outside the room. These elements are easy to overlook in Dreamy Room Level 725, but they are essential because they turn the scene from a plain platform into a believable boutique studio built on a themed storefront.
Step 12. Check every small accessory, plant, cushion, book, and display item.
Use the final pass in Dreamy Room Level 725 to verify the small objects. Look for the potted flowers on the lounge table, the folded books near the benches, the little bags near the photo booth, the beauty items on the vanity, and the tiny bottles on the wall shelves. Confirm that the clothing rack is in the lower-left corner, the wardrobe sits tight against the back-left wall, the large plush bunny is in the rear display, and the service counter characters stand on the right. Check the orange stairs leading to the shop door, the café table outside, the green awning, the balcony fence, and the camera lens on the front-left. The main challenge in Dreamy Room Level 725 is determining the correct placement for each object, so small accessories matter as much as large furniture.
Notes and Precautions
In Dreamy Room Level 725, avoid placing decorative objects before the large structures are fixed. Start with the building base, camera body, walls, floor zones, wardrobe, partition, and door; then add furniture and accessories. Many items share similar pastel colors, especially pink benches, orange counters, green mats, and small plants, so it is easy to confuse one area with another. The left side is mainly fashion and dressing, the upper-left is the photo booth, the center-front is the lounge, and the right side is the counter and hallway. Dreamy Room Level 725 also uses perspective carefully: objects on the back wall should sit higher, while front objects should appear lower and larger. If something looks correct but will not lock into place, rotate your attention to its floor zone and nearby matching objects.
Tips and Tricks from top player
A reliable Dreamy Room Level 725 strategy is to solve the room by zones instead of by item size. First complete the lower storefront, then the left wardrobe, then the photo booth, then the lounge, and finally the right service area. Top players also use “anchor objects” to reduce guessing: the giant camera lens, left wardrobe, scalloped partition, elevator door, sofa, and plush bunny are the strongest anchors in Dreamy Room Level 725. Once those are correct, small items become easier because they usually belong near matching colors or themes. Keep all clothing items on the left, all customer-service items on the right, and all relaxation items near the front-center rug. Save tiny wall decorations for last, because they are easiest to place once the large furniture no longer blocks your view.
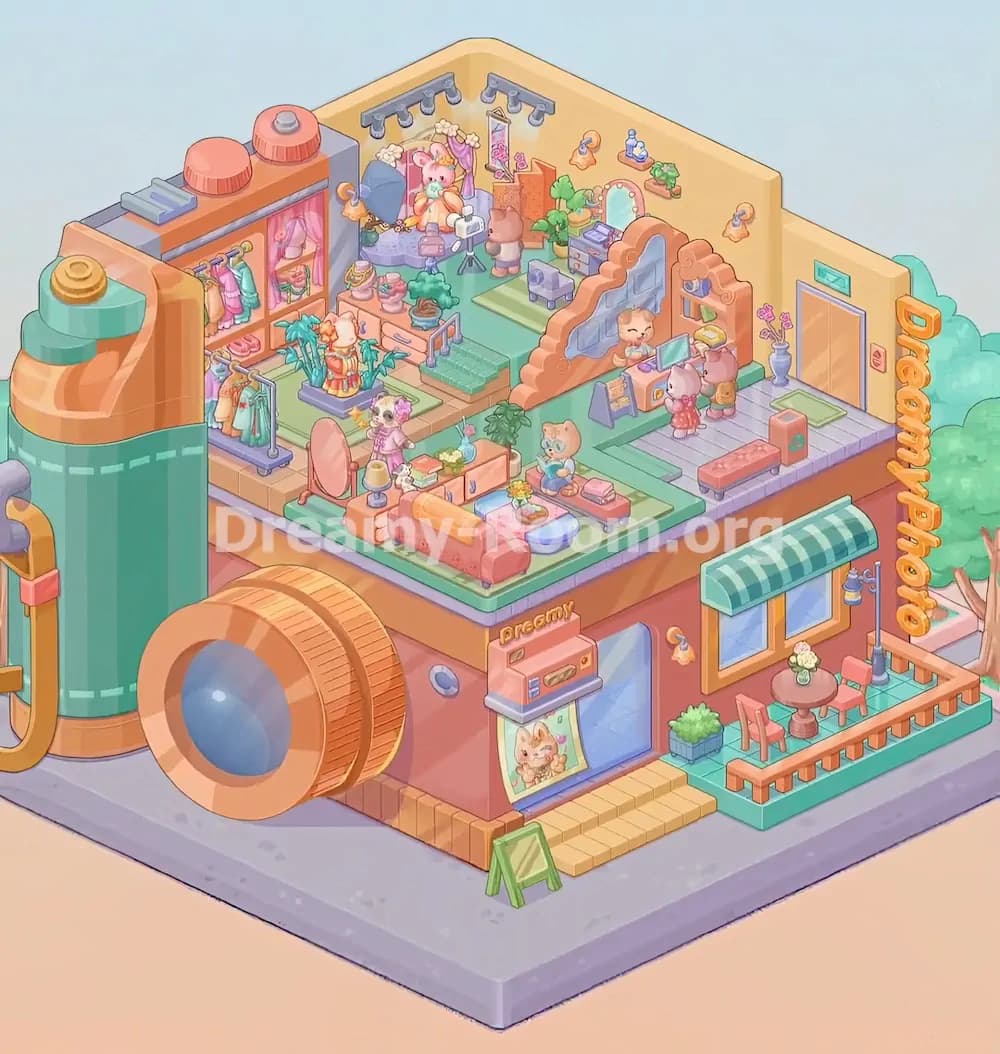
Final Scene Description
The completed Dreamy Room Level 725 scene is a cheerful boutique, photography studio, lounge, and café combined into one compact rooftop shop. A giant teal-and-orange camera forms the left side of the building, with a large lens projecting from the front. Below the decorated room, the red storefront has a glass door, yellow steps, a “Dreamy” sign, a poster, and a cozy outdoor café patio with striped awning, table, chairs, flowers, lamp, and fence. Upstairs, Dreamy Room Level 725 becomes full of soft pastel details: clothing racks, a wardrobe, a dressing mirror, sofa seating, plants, a round table, benches, a plush photo booth, vanity station, scalloped counter wall, animal customers, elevator door, lamps, shelves, and flowers. The final result feels busy but balanced, proving that the real puzzle of Dreamy Room Level 725 is finding the exact home for every object.