Dreamy Room Level 784
Dreamy Room Level 784 guide - Dreamy Room 784 Walkthrough & Solution.
Important Notice Regarding Level Numbering
Due to frequent changes in Dreamy Room's level numbering and differences between platforms (Android/iOS) – for example, level 784 on Android might not be the same as level 784 on iOS – the text guide below may not always match the images and video above. Please prioritize the image and video guides. If you find that the guide content doesn't match your current level, please visit the All Level Walkthroughs page to find the correct guide based on level images. Thank you for your understanding.
Dreamy Room Level 784 Walkthroughs & Guide
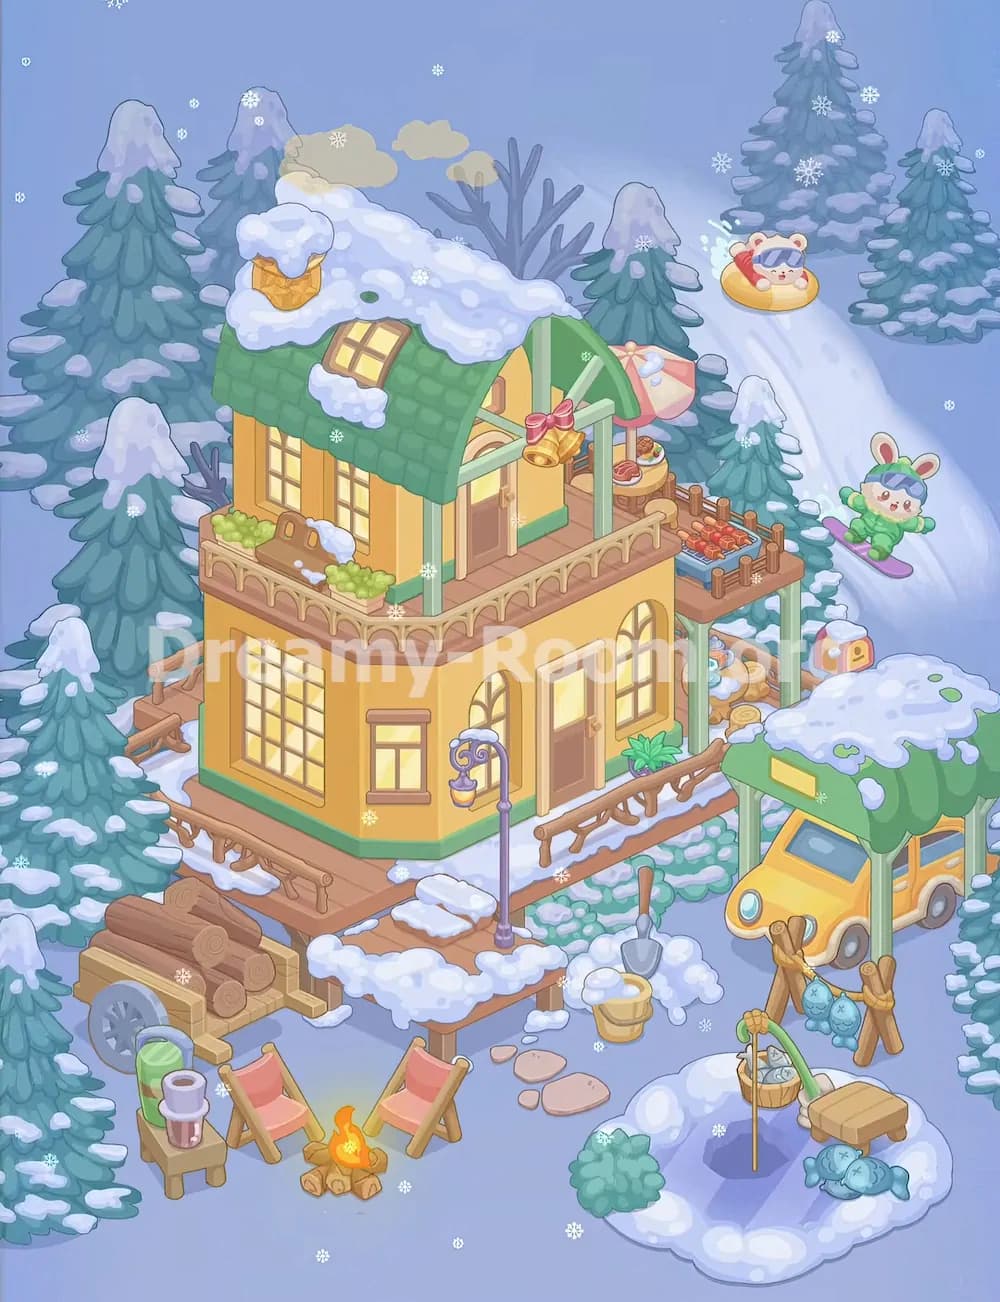
Dreamy Room Level 784 transforms an empty wooden platform into a warm two-story winter lodge surrounded by snowy pine trees. The completed scene combines a mountain home, an upper dining balcony, a covered vehicle area, a campsite, firewood storage, and a detailed ice-fishing corner. Although the objects are charming and easy to recognize, the main challenge in Dreamy Room Level 784 is identifying the exact placement slot for every structural piece and small decoration.
Step 1. Build the lower lodge on the central platform in Dreamy Room Level 784.
Place the large yellow ground-floor building slightly left of the platform’s center. Its broad front wall should face the lower-left side of the scene, while the narrower entrance wall faces toward the lower-right. Keep the existing wooden platform visible as a walkway wrapping around the building. Attach the green base trim along the bottom of the walls and preserve the wooden railings along the outer edges. The front-left corner of the house should sit above the later firewood-cart position, while the right entrance should remain accessible from the snow-covered walkway. In Dreamy Room Level 784, this lower structure is the main anchor, so an incorrect orientation will prevent the upper floor, roof, windows, and surrounding outdoor features from fitting. Confirm that the projecting right-side deck has enough room for two green support posts and the storage space beneath it.
Step 2. Add the lower windows, entrance, plant, and lamp in Dreamy Room Level 784.
Decorate the lower floor by inserting the large square multi-pane window into the wide left wall. Place the smaller rectangular window to its right, closer to the front corner. On the entrance-facing wall, install the narrow arched window to the left of the brown door and the taller arched window to the door’s right. The door has a pale illuminated panel and light-colored frame, making it easy to distinguish from the upper entrance. Set the leafy green plant on the walkway immediately to the right of this door. Next, position the tall purple streetlamp near the front edge of the walkway, approximately between the lower door and the snowy steps. Its curled decorative arm and hanging yellow lantern should face left. These facade pieces establish the correct orientation of the building and help confirm that the lodge has been placed properly.
Step 3. Construct the upper cabin and snowy roof in Dreamy Room Level 784.
Set the smaller upper cabin on top of the lower building, aligned toward the left and rear portions of the upper deck. Its yellow walls and green vertical trim should match the color scheme below. Place the three tall rectangular windows along the upper cabin’s left-facing wall, then add the brown upper door beneath the projecting green gable at the front-right corner. Cover the cabin with the curved green shingle roof and spread the thick irregular snow layer across its top. Insert the small slanted roof window into the front slope, slightly left of center. The yellow brick chimney belongs near the roof’s upper-left area and should be capped with a large mound of snow. Finally, position the beige smoke clouds above and behind the chimney. Dreamy Room Level 784 requires precise roof alignment because the chimney, skylight, snow covering, and front canopy each attach to separate but closely spaced placement points.
Step 4. Decorate the upper balcony with shrubs, a sled, and holiday bells in Dreamy Room Level 784.
Run the pale decorative railing around the exposed upper balcony, leaving the doorway and right-side dining area accessible. Along the left balcony edge, arrange two low clusters of light-green shrubs. Place one cluster near the far-left corner and the other close to the green entrance post. Fit the small brown wooden sled between them, leaning it against the cabin wall with a patch of snow resting on its upper surface. At the entrance, complete the green triangular canopy using the pale diagonal support beams. Hang the pair of gold bells beneath the canopy’s front point and place the large pink bow directly above them. The bells should hang over the doorway rather than against the side wall. These decorations are visually small, but they are important completion objects. When placing them, keep the balcony railing in front and the cabin windows behind to preserve the correct layered appearance.
Step 5. Arrange the upper dining table, umbrella, and grill in Dreamy Room Level 784.
Place the round wooden dining table behind the upper entrance on the right side of the balcony. Set the plates of food on top, including the red steak-like dish and the smaller colorful bowl or salad. Open the pink patio umbrella above and behind the table, with its canopy extending toward the snowy trees on the right. On the projecting deck farther right, position the blue rectangular grill close to the outer railing. Arrange the red-orange grilled food or skewers neatly across its cooking surface. Short wooden posts and railings enclose this small barbecue platform, while two green support columns descend from its outer edge to the ground-level storage area. In Dreamy Room Level 784, the table and grill can look interchangeable because both hold food. Remember that the round table stays under the umbrella near the cabin, while the blue grill occupies the exposed deck at the far-right edge.
Step 6. Complete the right-side storage, mailbox, carport, and yellow vehicle in Dreamy Room Level 784.
Under the barbecue deck, stack the cut logs horizontally between the lodge wall and the two green support posts. Keep the small blue-and-orange bundle visible near the upper part of the woodpile. Place the red-and-yellow mailbox behind this storage area, partially hidden by the snowy bank on the right. Farther forward, assemble the freestanding carport using its pale-green posts and rounded green roof. The roof should be heavily covered with snow, with several green patches still visible and a blank yellow sign centered on its front fascia. Park the compact yellow vehicle beneath the shelter, facing diagonally toward the lower-left. Its rounded front, blue circular headlamp, windshield, side windows, and gray wheels should remain visible. The car must sit fully beneath the canopy rather than beside it. This group occupies the entire right side of Dreamy Room Level 784, so finish it before placing the nearby fishing equipment.
Step 7. Set up the firewood cart and winter campsite in Dreamy Room Level 784.
Position the wooden firewood cart at the lower-left side of the lodge, directly beneath the front walkway. Its large gray wheel should face outward, while the stacked brown logs run horizontally across the cart bed. In the open foreground, place two coral-pink folding chairs so they angle toward one another. Set the small campfire between them using the crossed logs and bright orange flame. The left chair sits closer to the tiny side table, while the right chair belongs slightly behind and to the right of the fire. Place the square wooden side table beside the left chair and arrange the tall green thermos and the pink-and-white lidded mug on top. Dreamy Room Level 784 uses this campsite to balance the heavier carport on the opposite side, so avoid pushing the chairs too close to the building or too far into the central path.
Step 8. Add the snowy walkway, stepping stones, shovel, and bucket in Dreamy Room Level 784.
Cover portions of the wooden walkway with irregular snow patches, especially along the front steps, the area beside the purple lamp, and the railing leading toward the right entrance. In the open yard, place the group of flat pinkish stepping stones between the campsite and the ice-fishing area. Their largest stone belongs on the right, with the smaller stones trailing toward the left. Set the metal shovel upright in a mound of snow just below the carport and to the right of the stepping stones. Its wooden handle points upward while the gray blade rests in the snow. Place the small yellow wooden bucket directly below and slightly left of the shovel, filling its rim with snow. These pieces appear ordinary, but the central yard offers several similar empty spaces. Use the stepping stones as a positional guide: campsite objects remain to their left, while fishing objects belong to their right.
Step 9. Build the ice-fishing corner in Dreamy Room Level 784.
Create the circular snowy fishing island in the lower-right foreground. The dark purple ice hole belongs near its center, with a ring of raised snow around the perimeter. Position the green fishing rod so it curves over the hole and sends its line into the water. Place the thin upright rod support beside the left edge of the hole. Set the woven fish basket behind this support and fill it with several small gray fish. The low wooden stool belongs on the right side of the hole, angled toward the fishing rod. Lay two blue fish together on the snow below the stool. Add the rounded green shrub at the island’s lower-left edge. Finally, install the wooden A-frame drying rack closer to the carport and hang the three blue fish from its crossbar. Dreamy Room Level 784 separates the caught fish into three groups: basketed fish, hanging fish, and loose fish beside the hole.
Step 10. Place the winter characters and falling snow in Dreamy Room Level 784.
Finish the scene with the two playful characters on the snowy slope in the upper-right background. Place the small bear-like character high on the hill inside the yellow inflatable snow tube. The character wears large blue goggles and a red scarf, with a pale blue spray effect behind the tube to suggest fast downhill movement. Position the rabbit lower and farther right, riding the purple snowboard. Its green winter outfit, blue goggles, and long ears should remain clearly visible as it leans into the slope. Do not place either character on the lodge deck, even though their bright colors may resemble decorative toys. Scatter the snowflake effects across the sky, trees, building, and foreground. These final atmospheric elements make Dreamy Room Level 784 feel active and wintry while filling the otherwise empty blue background without obscuring important objects.
Notes and Precautions
The most important rule in Dreamy Room Level 784 is to place structural objects before interactive-looking decorations. Start with both floors, the roof, decks, support columns, carport, and major railings. If a large piece refuses to snap into place, rotate your attention to its orientation rather than trying random nearby spaces.
Several objects have potentially confusing shapes. The brown item between the upper shrubs is a sled, not indoor furniture. The round dining table belongs under the pink umbrella, while the blue rectangular object on the far-right upper deck is the grill. Likewise, the large pile of logs under the left walkway belongs on the wheeled cart, but the smaller firewood supply stays under the barbecue balcony.
Watch the layering around the right side. The mailbox sits behind the lower wood storage, the car is beneath the carport, and the hanging fish rack stands in front of the vehicle. In the fishing area, do not confuse the stool with the side table from the campsite. The stool stays beside the ice hole and holds nothing, while the campsite table supports the thermos and mug.
Small snow patches can also be difficult to place because many surfaces are already white. Match their contours to roof edges, railings, stairs, the bucket, and the wooden sled rather than dropping them onto open ground.
Tips and Tricks from top player
A reliable strategy for Dreamy Room Level 784 is to divide the scene into five zones: the lodge, upper balcony, right-side vehicle area, left campsite, and lower-right fishing area. Complete one zone at a time instead of opening every box and scattering objects across the screen.
Use recognizable anchor objects to solve less obvious placements. The chimney establishes the left side of the roof, the pink umbrella identifies the dining corner, the yellow car determines the carport direction, and the purple ice hole fixes the entire fishing layout. Once these anchors are correct, nearby accessories usually have only one logical remaining slot.
Keep small items near their probable parent object. Food stays near the table or grill, fishing equipment remains around the ice hole, and the thermos and mug stay beside the camp chairs. This reduces repeated dragging across the screen.
When a piece will not attach, temporarily place it back in the unpacking area and continue with larger objects. Another item may need to be installed first. Zoom in around the balcony railings, roof snow, fish rack, and grill because their valid placement points are close together. The main puzzle is not recognizing the objects but determining the game’s exact intended location for each one.
Final Scene of Dreamy Room Level 784
The completed Dreamy Room Level 784 scene shows a cheerful yellow mountain lodge glowing warmly among snow-covered pine trees. A thick white blanket covers the curved green roof, chimney, balconies, walkways, and carport. The upper balcony feels festive with green shrubs, a snowy sled, golden bells, a pink umbrella, a food table, and a barbecue grill. Below, illuminated windows, a brown entrance, a potted plant, and a purple streetlamp make the house welcoming.
The foreground becomes a lively winter retreat. Two folding chairs surround a small campfire beside a thermos and mug, while a wheeled cart holds the lodge’s firewood. A yellow vehicle rests under the snowy shelter on the right. Nearby, a shovel, bucket, fish-drying rack, fishing basket, rod, stool, and freshly caught fish surround the ice hole. Above everything, a goggled bear slides in a yellow tube while a rabbit snowboards down the sparkling hill.