Dreamy Room Level 807
Dreamy Room Level 807 guide - Dreamy Room 807 Walkthrough & Solution.
Important Notice Regarding Level Numbering
Due to frequent changes in Dreamy Room's level numbering and differences between platforms (Android/iOS) – for example, level 807 on Android might not be the same as level 807 on iOS – the text guide below may not always match the images and video above. Please prioritize the image and video guides. If you find that the guide content doesn't match your current level, please visit the All Level Walkthroughs page to find the correct guide based on level images. Thank you for your understanding.
Dreamy Room Level 807 Walkthroughs & Guide
Step 1. Build the raised sleeping platform in the back-right corner
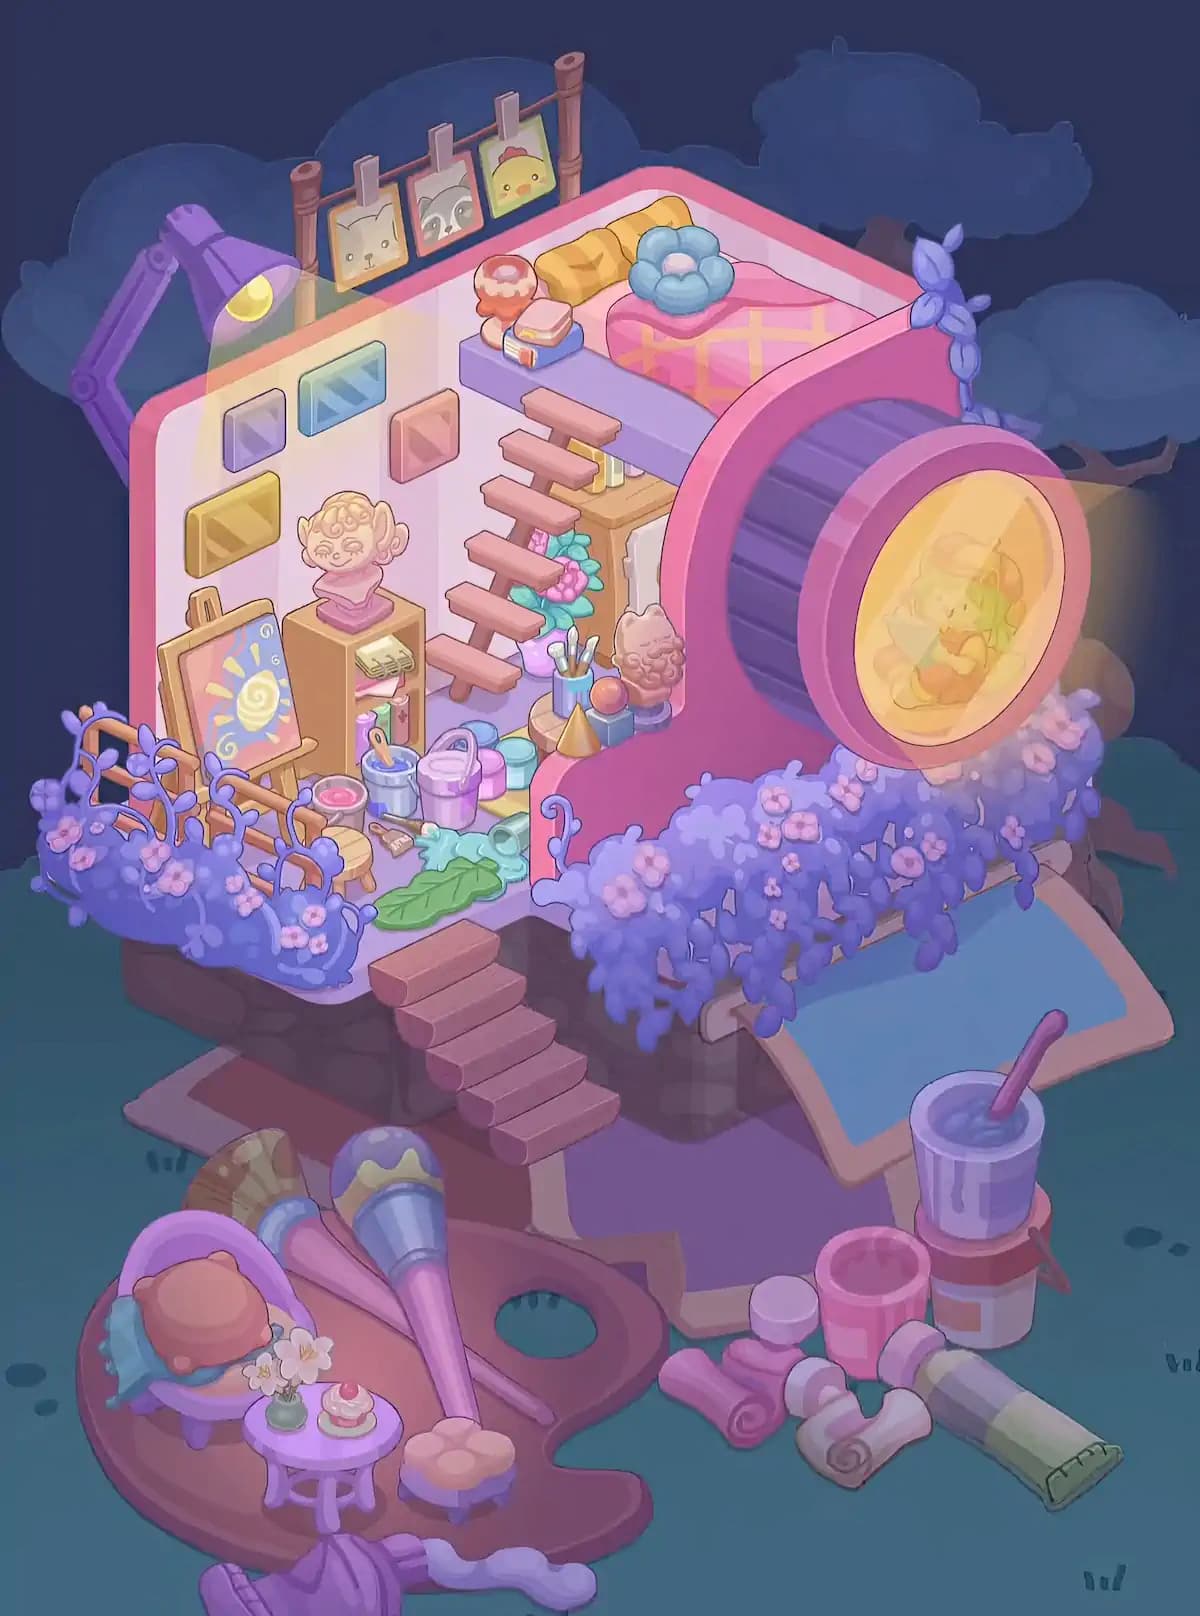
Begin Dreamy Room Level 807 with the large raised lavender platform that occupies the upper-right portion of the room. Position it against the back and right walls, leaving enough open space beneath its front edge for the staircase and studio storage area. On top, place the bright pink bed or mattress with its orange crisscross pattern toward the right side. The long yellow-orange segmented cushion rests along the back edge, while the large blue flower-shaped pillow belongs closer to the front-right portion of the bed.
At the front-left corner of this platform in Dreamy Room Level 807, arrange the small stack of books or cushions and place the red-and-cream mushroom-shaped ornament on top or immediately beside them. These small objects are important because they establish the exact edge of the sleeping area. Do not push the bed too far left; the staircase must still connect naturally with the platform. When correctly assembled, this upper section should look like a compact, colorful loft overlooking the art supplies below.
Step 2. Decorate the upper walls with the animal pictures, colored panels, and purple lamp
The wall decorations in Dreamy Room Level 807 are useful reference points for almost everything else. Behind the raised bed, attach the horizontal reddish-brown picture rail near the top of the back wall. Three small portraits hang from it with large clips: a pale animal portrait on the left, a gray raccoon-like face in the center, and a yellow chick portrait on the right. Keep all three evenly spaced.
Move to the left wall of Dreamy Room Level 807 and place the four translucent colored wall panels. The small lavender panel goes upper-left, the larger blue panel sits to its right, the peach-pink square belongs farther right and slightly lower, and the long yellow panel sits beneath the lavender piece. Outside the left wall, install the huge articulated purple desk lamp. Angle its arm inward so its yellow bulb shines diagonally across the upper-left studio wall. Correct placement makes the light beam fall across the colored panels and nearby artwork, which is a strong visual clue that the lamp is in the right position.
Step 3. Add the wooden staircase and the storage unit beneath the loft
Next, build the central transition between the lower studio and the loft in Dreamy Room Level 807. The narrow wooden staircase is made from individual pinkish-brown steps and rises diagonally from the lower-left toward the raised lavender platform. The lowest tread begins near the center of the room, while the highest tread meets the front edge of the loft. Keep the stairway slightly angled rather than perfectly vertical.
Behind the stairs in Dreamy Room Level 807, place the tall tan storage cabinet. Its top is partially hidden below the loft, with several pastel yellow, green, and pink supplies lined along the upper surface. A decorative cluster of turquoise leaves and pink flowers hangs down its front-left side. A pale cloth or canvas hangs along the right side of the unit. Near the base, arrange the blue cup of paintbrushes, the small golden cone, the reddish ball resting on a blue block, and the second sculpted head or bust. These items fit tightly together, so use the cabinet and staircase as anchors before attempting to place them.
Step 4. Create the left-side easel, sculpture, and bookcase display
The lower-left corner becomes the main indoor art station in Dreamy Room Level 807. Place the wooden easel against the left wall, angled slightly toward the open front of the room. Its canvas shows a cheerful abstract design with a yellow spiral in the center, surrounded by colorful rays and small decorative curls. The picture should face outward so it remains clearly visible after the flowers and fence are added.
Immediately to the right of the easel in Dreamy Room Level 807, position the narrow wooden bookcase. Place the pink pedestal bust of the curly-haired figure on top. Inside the upper shelf sits a pale ring-bound sketchbook or notebook, while the lower shelf contains small colorful books and paint containers. This cabinet should sit close enough to the staircase that the three elements—easel, bookcase, and stairs—form one compact studio arrangement. The bust must remain fully visible above the cabinet rather than being hidden behind the steps. Correct spacing here also creates the narrow floor area needed for the numerous paint cans that come next.
Step 5. Arrange all of the paint cans, brushes, spills, and floor accessories
The floor immediately in front of the easel is one of the most crowded areas of Dreamy Room Level 807. Start with the gray metal paint can containing a brush, then place the handled lavender bucket beside it. Add the short pink, mint-green, and blue cylindrical paint containers in a loose row extending toward the center. A shallow red paint dish sits nearer the left fence, with a flat paintbrush lying horizontally beside it.
Continue filling the floor of Dreamy Room Level 807 with the tipped mint-colored container and the pale turquoise paint spill. The long green leaf-shaped mat or decorative sheet lies across the front portion of this spill, pointing toward the staircase. Keep these pieces low and close together; they should look like the casual mess of an actively used art studio rather than a tidy row of supplies. The handles, lids, brushes, and containers overlap slightly in the completed image, so positioning the large buckets first and inserting the smaller pieces afterward is considerably easier.
Step 6. Install the circular pink sleeping pod and surrounding flower decorations
The largest single object in Dreamy Room Level 807 is the enormous rounded pink pod on the right. Place its main body directly against the right side of the raised platform. The arch curves from the upper bed area down toward the front-right edge of the room. Inside the opening is a dark purple ribbed tunnel, while the outer face contains a huge circular golden-yellow window. Through this warm window, a small sleeping figure and soft belongings can be seen inside the nook.
At the top-right of the pod in Dreamy Room Level 807, attach the purple balloon-animal decoration. Its narrow balloon sections rise above the curved pink frame. Then fill the entire lower-right railing with the dense purple flowering vines. The foliage should cascade downward in thick bunches, dotted with small pink blossoms. Similar purple flowers also wrap around the wooden railing on the front-left side of the room. Finally, tuck the large blue rectangular canvas or board beneath the right-hand flowers, leaning diagonally outward from under the room. These floral borders are essential because they visually connect the pod to the rest of the miniature studio.
Step 7. Finish the front balcony and attach the descending wooden steps
The exposed front edge of Dreamy Room Level 807 needs several structural pieces before the oversized painter’s palette can be completed. Along the front-left edge, install the low tan wooden fence and weave the purple flowering vines around its rails. The flowers should partly obscure the fence while leaving some of the wooden loops and posts visible. This section borders the easel and paint-supply area.
At the central front edge of Dreamy Room Level 807, attach the second staircase. Unlike the narrow loft stairs, these are broad chunky pink-brown wooden steps descending from the room toward the foreground. There are several evenly spaced treads, forming a short bridge between the elevated studio and the enormous palette below. Beneath and around this staircase, large flat mauve, beige, and blue sheets or canvases overlap on the ground. The stairs should point directly toward the painter’s palette rather than toward either side. If the angle is correct, the entire scene begins to feel like one continuous miniature world rather than disconnected decorations.
Step 8. Build the giant painter’s-palette lounge in the foreground
The foreground of Dreamy Room Level 807 is dominated by a huge reddish-brown artist’s palette complete with a circular thumb hole. Position it beneath the descending staircase. On the left side of the palette, place the small pink lounge chair with its large orange cushion and blue-green draped fabric. In front of the chair goes the tiny lavender round table. Add the green vase of small white flowers and the miniature pink dessert topped with cream and a red decoration.
Near the table in Dreamy Room Level 807, place the small matching stool with its flower-shaped peach cushion. Two enormous paintbrushes lie diagonally across the palette behind this seating arrangement. One has broad brown bristles and a pink handle; the second has a rounded blue-and-yellow brush head with another long pink handle. Let them cross naturally beneath the front staircase. These oversized tools establish the playful scale of the entire level, so they should remain clearly visible rather than being hidden behind the chair or table.
Step 9. Place the remaining giant paint pots, tubes, and spilled paint on the right
Complete the floor around Dreamy Room Level 807 by arranging the remaining oversized painting supplies to the right of the giant palette. Start with the tall lavender paint bucket at the upper-right of the foreground. A long pink-handled brush stands inside it. Beneath the bucket is a short stack of red and pale paint containers. Place the open pink paint cup nearby, together with the smaller pale-lavender cylindrical container.
Several squeezed paint tubes spread across the ground in Dreamy Room Level 807. Position the rolled pink tube horizontally near the center-right. Beside it are two light-colored tubes with pink bands and curled ends. The large mint-green tube extends diagonally toward the lower-right corner. At the very bottom edge, another purple tube lies on its side and releases a thick white stream of paint. Keep these objects outside the giant palette rather than on top of it. Their scattered arrangement, combined with the large brushes and paint containers, makes the completed scene resemble an artist’s workbench enlarged into a fantasy landscape.
Notes and Precautions
The main difficulty of Dreamy Room Level 807 is determining the correct placement of every object, especially because so many pieces overlap. Start with the loft, pod, cabinets, staircases, easel, and palette before placing small decorations. If a tiny object refuses to snap into position, another large object may be occupying the spot it needs.
Pay particular attention to the two staircases in Dreamy Room Level 807. The narrow staircase belongs inside the room and leads upward to the loft, while the wider staircase hangs from the front edge and descends toward the giant palette. The two can look similar when unpacked.
The flower vines are another potential source of confusion in Dreamy Room Level 807. One group wraps the left-front wooden fence, while the much larger mass covers the right-front railing below the circular pod. Likewise, keep the small indoor paint containers separate from the enormous foreground paint buckets and tubes. Scale is one of the strongest clues for identifying where an item belongs.
Tips and Tricks from top player
For Dreamy Room Level 807, work from back to front and from large to small. Place the raised lavender loft first, then the circular pink pod, the central cabinet, and both staircases. Once those pieces lock into position, the remaining gaps become obvious. This is much faster than attempting to place tiny paints and decorations immediately.
Another useful Dreamy Room Level 807 strategy is to use color matching. Pink and purple pieces usually belong around the pod and loft, wooden pieces cluster around the easel, shelves, fences, and stairs, while mint, blue, lavender, and pink cylindrical pieces mostly belong in the paint-supply areas.
When working on the crowded middle of Dreamy Room Level 807, temporarily ignore tiny brushes, cans, and ornaments. Establish the cabinet and staircase first, then place the turquoise-and-pink floral cluster, brush cup, cone, colored ball, and bust in the leftover spaces. Finally, use the completed image’s visible edges as guides: even partially hidden pieces usually reveal enough of their shape to determine their intended location.
Final Scene in Dreamy Room Level 807
The finished Dreamy Room Level 807 becomes a dreamy nighttime artist’s hideaway filled with soft pinks, purples, blues, and warm golden light. A cozy loft bed occupies the upper level beneath three clipped animal portraits, while a huge circular pink sleeping pod glows warmly on the right. A purple balloon animal sits above it and cascades of violet flowers spill over the surrounding railings.
Below, Dreamy Room Level 807 is packed with creative details: an easel displaying a bright spiral painting, two sculpted busts, shelves of art supplies, paint buckets, brushes, colorful cans, spilled paint, and a narrow staircase leading upward. A wider staircase descends to a gigantic painter’s palette transformed into a tiny lounge with a chair, flower table, dessert, stool, and enormous brushes. Scattered paint pots and squeezed tubes surround the palette, making Dreamy Room Level 807 feel like a miniature studio built inside an artist’s imagination.