Dreamy Room Level 804
Dreamy Room Level 804 guide - Dreamy Room 804 Walkthrough & Solution.
Important Notice Regarding Level Numbering
Due to frequent changes in Dreamy Room's level numbering and differences between platforms (Android/iOS) – for example, level 804 on Android might not be the same as level 804 on iOS – the text guide below may not always match the images and video above. Please prioritize the image and video guides. If you find that the guide content doesn't match your current level, please visit the All Level Walkthroughs page to find the correct guide based on level images. Thank you for your understanding.
Dreamy Room Level 804 Walkthroughs & Guide
Step 1. Establish the two-level layout before placing the decorations
Start Dreamy Room Level 804 by studying the empty room rather than immediately dropping plants wherever they seem to fit. The lower floor occupies the front and left side, while a raised mint-checkered platform runs across the rear and right side. The tall rounded walls form three main visual zones: the left arched window, the large central arch, and the smaller right window. The existing oversized tropical foliage outside the walls should remain visible because it frames the finished botanical shop.
The most important reference point in Dreamy Room Level 804 is the raised rear platform. The large greenhouse will eventually dominate its center-left portion, while an elevated balcony fills the upper-right side. Keep the lower-left floor open for dense plant displays and reserve the front-right raised section for seating. Understanding these boundaries early makes Dreamy Room Level 804 much easier, because almost every later object aligns with one of these structural landmarks. The main puzzle is always finding the one correct placement rather than simply arranging items aesthetically.
Step 2. Fill the central back wall with the tallest tropical plants
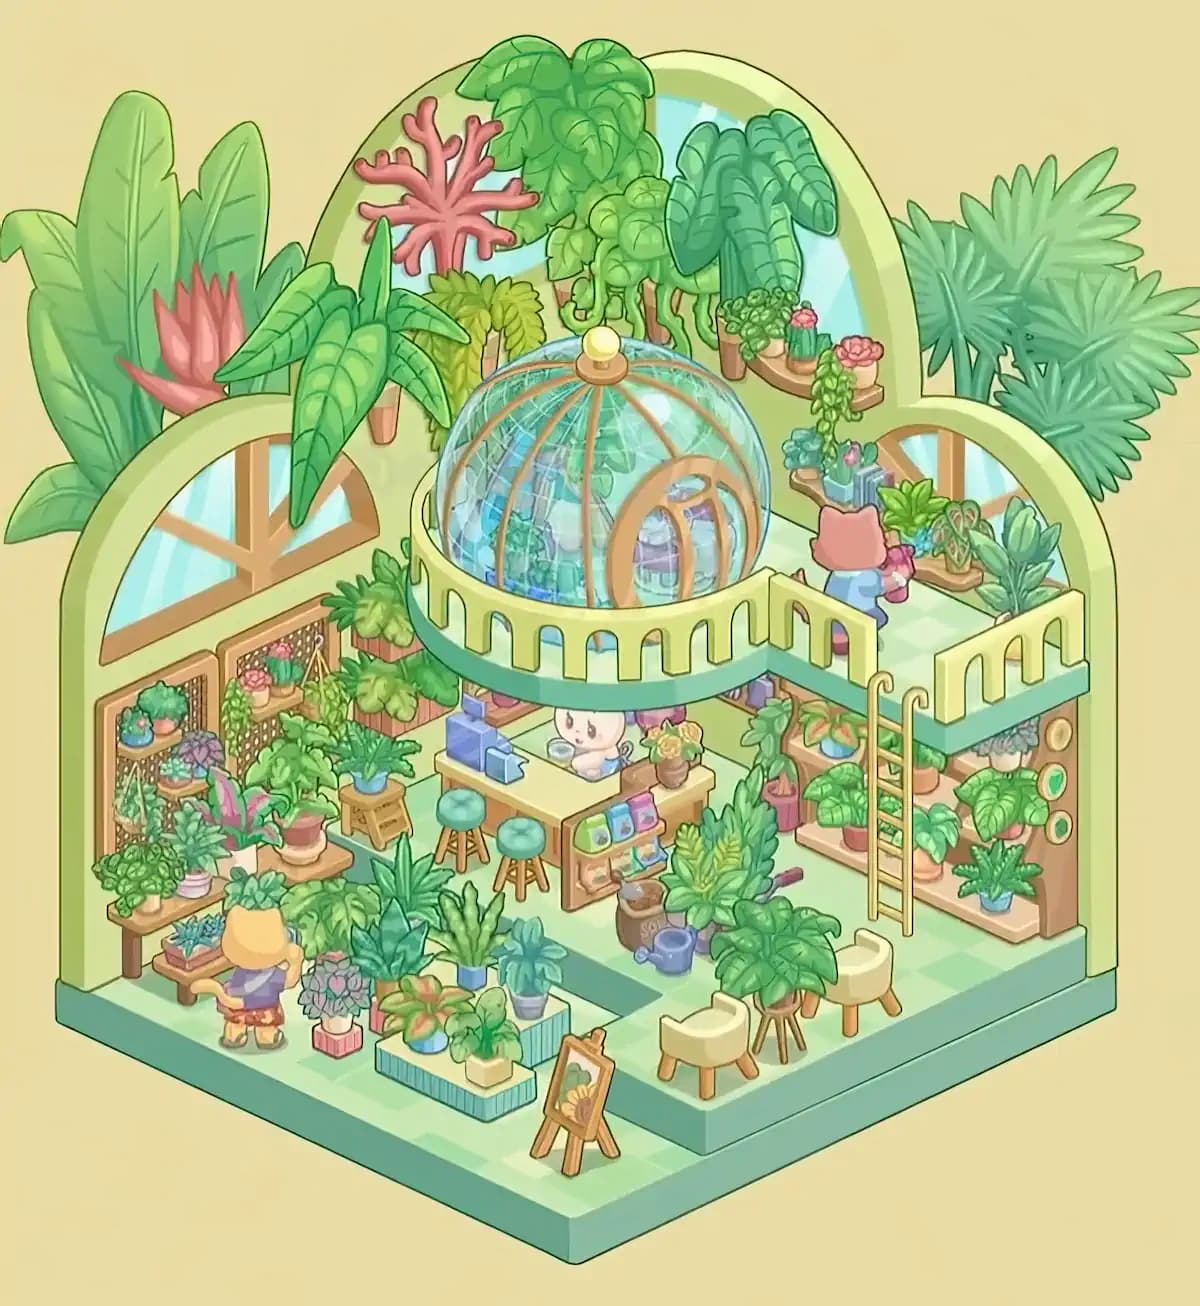
Next, work on the vertical greenery surrounding the large central arch in Dreamy Room Level 804. Place the largest broad-leaf plant high in the middle, where its overlapping round leaves hang down over the top of the central window. To its left, position the coral-pink branching plant against the pale green wall. Below and around it, add the yellow-green palm-like foliage and the long pointed leaves that extend toward the left window.
On the right half of the arch, Dreamy Room Level 804 uses several large dark-green elephant-ear leaves hanging downward from tall brown stems. Add the smaller curling and trailing foliage beneath them so the plants create a layered canopy instead of a flat row. Some of these pieces sit partially behind the greenhouse added later, which is why placing the wall vegetation now is helpful. When this portion of Dreamy Room Level 804 is correct, the upper wall should look densely overgrown while the blue window remains visible between the leaves. Avoid covering the window completely; the foliage should frame it.
Step 3. Build the glass greenhouse dome on the raised center platform
The centerpiece of Dreamy Room Level 804 is the round glass greenhouse, so place it across the middle of the elevated rear platform. The structure has transparent blue-tinted glass, curved brown-gold support ribs, a small round golden cap on top, and an oval wooden doorway facing toward the front-right. Various plants and gardening items can be seen through the glass, giving the dome a packed conservatory appearance.
Around the bottom of the greenhouse, attach the circular pale-yellow railing with repeated rounded openings and the dark teal band running beneath it. In Dreamy Room Level 804, this circular railing should project slightly in front of the glass dome and overlap some of the objects beneath it. The greenhouse sits high enough that the checkout counter will later appear below its front edge. This placement is one of the easiest areas to misjudge because the dome occupies several layers of the scene. Once positioned correctly, Dreamy Room Level 804 gains its main visual landmark, and the remaining furniture can be aligned around the greenhouse rather than guessed independently.
Step 4. Add the upper-right balcony, railing, and ladder
Continue Dreamy Room Level 804 by extending the greenhouse level toward the upper-right corner. Place the rectangular balcony platform beside the circular greenhouse walkway. Its pale-yellow railing should match the greenhouse railing, including the rounded vertical cutouts and teal strip along the bottom. The balcony runs directly in front of the small right arched window and leaves enough floor space for the gardener character and several potted plants.
Now place the tall narrow golden ladder at the front edge of this balcony. In Dreamy Room Level 804, the ladder descends vertically from the upper railing toward the lower floor and sits just right of center. Its two curved upper handles should rise slightly above the balcony edge. Make sure the ladder does not shift too far right into the plant shelf below. Correct positioning matters because the ladder visually connects the two floors and helps define the depth of Dreamy Room Level 804. When finished, the balcony should appear accessible from the lower gardening area rather than floating separately above it.
Step 5. Decorate the upper-right balcony with shelves, small plants, and the gardener
Now fill the upper-right gardening station in Dreamy Room Level 804. Along the curved back wall, place the small wooden shelves holding miniature pots. The highest shelf includes compact green foliage, a little red or pink flowering cactus, a pink flower pot, and a trailing vine that hangs over the shelf edge. Slightly lower and farther forward, add the small blue-green plants and another compact flowering arrangement.
Along the right window, Dreamy Room Level 804 has another narrow wooden plant ledge. Arrange the leafy potted plants across it, including the bright green upright plant, the decorative heart-shaped foliage, and the taller blue-green leaves near the far-right railing. Place the pink cat-like gardener on the balcony facing these plants. The character wears a light-blue outfit and holds a pink watering container or gardening item while looking toward the display. This character's orientation is important in Dreamy Room Level 804: the back faces the player while the character tends the plants against the wall.
Step 6. Create the left-wall pegboard plant displays
Move to the lower-left corner of Dreamy Room Level 804 and install the two rectangular wooden pegboard panels underneath the left arched window. Each panel contains small shelves filled with miniature pots. The left panel carries several colorful succulents and flowers in blue, pink, and neutral containers, while narrow vines trail downward. The right panel continues the arrangement with pink blossoms, green plants, and another hanging vine.
Below the panels, add the long wooden bench in Dreamy Room Level 804. Fill it with the larger trailing green plant, a striped lavender pot, and additional low foliage. A small lower stand or tray sits in front of the bench with another compact succulent arrangement. These pieces should create a deliberately crowded display without extending outside the room boundary. The challenge here is that many plants look interchangeable, but Dreamy Room Level 804 expects each one in a specific slot. Use the pegboards and wall edge as fixed reference points rather than judging position from neighboring leaves.
Step 7. Stack the middle-left plant stands and fill every tier
The space between the left wall display and the central greenhouse is another dense section of Dreamy Room Level 804. Place the reddish-brown tiered planters or crate-like stands directly beneath the greenhouse's left side. Fill the upper and middle tiers with broad green foliage so several leaves overlap the edges. These elevated plants help bridge the gap between the wall displays and the central shop area.
In front of the tiers, Dreamy Room Level 804 includes additional freestanding plants. Put a leafy plant in a terracotta-colored pot on its low square pedestal, then add the small wooden stool holding a blue pot of fern-like foliage. More broad-leaf greenery fills the gaps around these stands. The correct result should feel crowded but still reveal the individual shelves and furniture legs. This section is a good example of the core challenge in Dreamy Room Level 804: similar green objects can appear correct in several locations, but only one exact placement completes the puzzle.
Step 8. Assemble the checkout counter and central shop area
Place the rectangular wooden checkout counter beneath the front edge of the greenhouse in Dreamy Room Level 804. The counter faces the lower-left side of the room. Put the blue block-like register and checkout equipment on its left end. Behind the counter, position the small white character with pink features so its face looks outward toward the customer area. A small potted yellow flower sits toward the right side of the counter.
The front of the counter in Dreamy Room Level 804 contains a miniature merchandise display. Place the three colorful packets or cards—green, blue, and pink—across the upper section and the smaller gardening goods beneath them. In front of the counter, line up the two teal round stools with wooden legs. Their spacing should be even, with one slightly left of center and the other closer to the counter's right side. When this section of Dreamy Room Level 804 is correct, the shop finally starts to read as a functioning botanical store instead of a collection of unrelated plants.
Step 9. Build the large lower-right plant shelving unit
Under the upper balcony, position the large wooden plant shelving unit against the right wall of Dreamy Room Level 804. This display spans most of the lower-right wall and contains multiple horizontal shelves. Fill them with the large heart-shaped green leaves, rounded tropical foliage, and smaller potted plants in pink, red, blue, and neutral containers. Some leaves extend beyond the shelf edges, but they should not obstruct the nearby ladder.
The right vertical side of the shelf in Dreamy Room Level 804 has three small circular decorative pieces mounted one above another. Align these circles vertically near the outer wall. Add the additional leafy plants toward the top-left portion of the shelving and the blue-green fern-like plant on the lower-right shelf. A tall climbing plant in a pink pot stands just to the left of the unit. This is another tightly packed section of Dreamy Room Level 804, so use the shelf edges and ladder as anchors when determining where each individual pot belongs.
Step 10. Add the soil bag, watering can, tools, and central floor plants
The gardening supplies sit on the floor just to the right of the checkout counter in Dreamy Room Level 804. Place the brown bag labeled as soil near the front of the counter's merchandise rack. The blue watering can rests immediately beside it, with its handle and spout visible. A small pink-handled gardening tool lies horizontally a little farther to the right, partly surrounded by foliage.
Next, fill the nearby floor of Dreamy Room Level 804 with larger tropical plants. The big lime-and-dark-green plant sits close to the soil bag, while additional upright leafy plants occupy the spaces toward the front and left. Use blue, lavender, pink, and terracotta pots where they appear in the completed arrangement. Several leaves overlap one another, so do not assume a plant is incorrectly placed simply because part of its pot disappears. In Dreamy Room Level 804, the crowded overlap is intentional and reinforces the feeling of a busy plant store.
Step 11. Fill the front-left and center display islands with plants
The foreground becomes especially dense in Dreamy Room Level 804. Place the large rectangular display box near the front-center-left, with its pale cream top and blue-green striped sides. Arrange several small pots across it: the broad red-and-green leaves sit toward the left portion, while a light yellow square pot containing a green plant belongs closer to the front-right. Taller blue-green foliage rises behind them.
Around this display, Dreamy Room Level 804 includes numerous freestanding plants. Put the pink square planter with the rounded purple-and-green flower cluster near the left side, then arrange the taller pointed plants and broad leafy specimens behind and beside it. The goal is to create a continuous botanical mass without hiding the display platform completely. This part of Dreamy Room Level 804 can be confusing because the silhouettes overlap heavily. Concentrate on matching pot shape and color first; once the pot is in its intended position, the leaves usually line up naturally with the surrounding arrangement.
Step 12. Place the front-right stools, plant stand, and easel
Finish the main furniture arrangement in Dreamy Room Level 804 by decorating the raised front-right section. Put the large broad-leaf plant on the slim wooden tripod-style stand near the center of this platform. Its leaves spread outward and partly overlap the objects behind it. Position one small cream-colored stool in front-left of the plant and the second matching stool to its right and slightly farther back. Both stools have short wooden legs.
At the front edge of Dreamy Room Level 804, place the small wooden artist's easel. The framed picture on it shows a flower or sunflower-like botanical image and should face outward toward the player. Keep the easel on the lower floor, immediately in front of the step rather than on the raised platform. These smaller objects matter because Dreamy Room Level 804 checks exact placement even when an item seems purely decorative. The two seats, central plant stand, and easel should form a neat foreground cluster without covering the ladder.
Step 13. Add the lower-left character and complete the final plant arrangement
The final character in Dreamy Room Level 804 stands near the lower-left plant displays. Position the small figure with the rounded yellow head or hat facing away from the player and toward the plants. The character wears a purple upper garment and reddish patterned bottoms, with a small tail visible behind. Place the figure between the left display bench and the foreground flower pots, leaving enough space around the feet for the nearby low succulent tray.
Now check every remaining loose plant in Dreamy Room Level 804. Fill gaps with the small pink, blue, yellow, lavender, and terracotta pots, but resist the temptation to move plants simply to make the room look more symmetrical. The completed layout is intentionally organic and uneven. Look particularly carefully around the greenhouse base, checkout counter, foreground display island, and right shelving unit. Dreamy Room Level 804 is solved by matching each object's predetermined destination, and the final few tiny planters are often harder to place than the large greenhouse or furniture pieces.
Notes and Precautions
The largest source of mistakes in Dreamy Room Level 804 is the huge number of similar green plants. Match the container first—its color, shape, and size are often more useful clues than the leaves. A broad-leaf plant in a blue pot may belong in a completely different location from an almost identical plant in a pink pot.
Also pay attention to depth. Objects in Dreamy Room Level 804 deliberately overlap. The greenhouse railing covers part of the shop below it, upper plants sit behind the dome, and the ladder overlaps the lower-right shelving area. An object being partially hidden does not mean it is wrong. Characters also have fixed orientations: the pink gardener faces the upper-right plants, the white shopkeeper stays behind the central counter, and the yellow-headed customer or gardener faces the lower-left display.
Do not treat the existing exterior foliage as unpacked decorations. The giant leaves visible beyond the walls are part of the starting environment. The challenge in Dreamy Room Level 804 is identifying the correct placement for all of the new shop objects without disturbing the room's original architectural frame.
Tips and Tricks from top player
A reliable strategy for Dreamy Room Level 804 is to work from large structural pieces toward tiny plants. Place the greenhouse, balcony, ladder, counter, large shelving units, display platforms, and stools first. These objects create fixed boundaries that drastically reduce the number of possible locations for smaller decorations.
For plants, solve Dreamy Room Level 804 by pot rather than foliage. Look for distinctive clues such as the striped lavender pot, blue watering can, brown soil sack, pink square flower pot, pale-yellow planter, or blue fern container. Once those unique objects are locked into place, use them as landmarks for neighboring greenery.
Another useful shortcut in Dreamy Room Level 804 is to complete one visual zone at a time: upper wall, greenhouse, upper balcony, left display, checkout area, right shelving, then foreground. Avoid scattering objects across the room because the large volume of similar foliage makes it much harder to remember which spaces remain unresolved. The correct solution looks extremely crowded, so trust the reference placement even when leaves overlap heavily.
Final Scene in Dreamy Room Level 804
The completed Dreamy Room Level 804 becomes a charming two-level indoor botanical shop overflowing with greenery. A huge glass conservatory dome dominates the center, surrounded by pale-yellow railings and backed by towering tropical leaves, hanging plants, colorful flowers, and the distinctive coral-pink branching decoration. To the right, the upper balcony holds shelves of tiny pots while a pink gardener tends the window plants beside the ladder. Below, a large wooden plant wall fills the right side.
Across the lower floor of Dreamy Room Level 804, pegboards, benches, stools, display boxes, soil, a watering can, and dozens of potted plants surround the central checkout counter and its little white shopkeeper. A second character examines the plants on the left, while cream stools, a raised plant stand, and a botanical easel complete the foreground. Dreamy Room Level 804 ultimately transforms the once-empty mint room into a dense, cheerful greenhouse shop where every object has one carefully determined place.