Dreamy Room Level 840
Dreamy Room Level 840 guide - Dreamy Room 840 Walkthrough & Solution.
Important Notice Regarding Level Numbering
Due to frequent changes in Dreamy Room's level numbering and differences between platforms (Android/iOS) – for example, level 840 on Android might not be the same as level 840 on iOS – the text guide below may not always match the images and video above. Please prioritize the image and video guides. If you find that the guide content doesn't match your current level, please visit the All Level Walkthroughs page to find the correct guide based on level images. Thank you for your understanding.
Dreamy Room Level 840 Walkthroughs & Guide
Step 1. Place the central turquoise candy factory in the middle
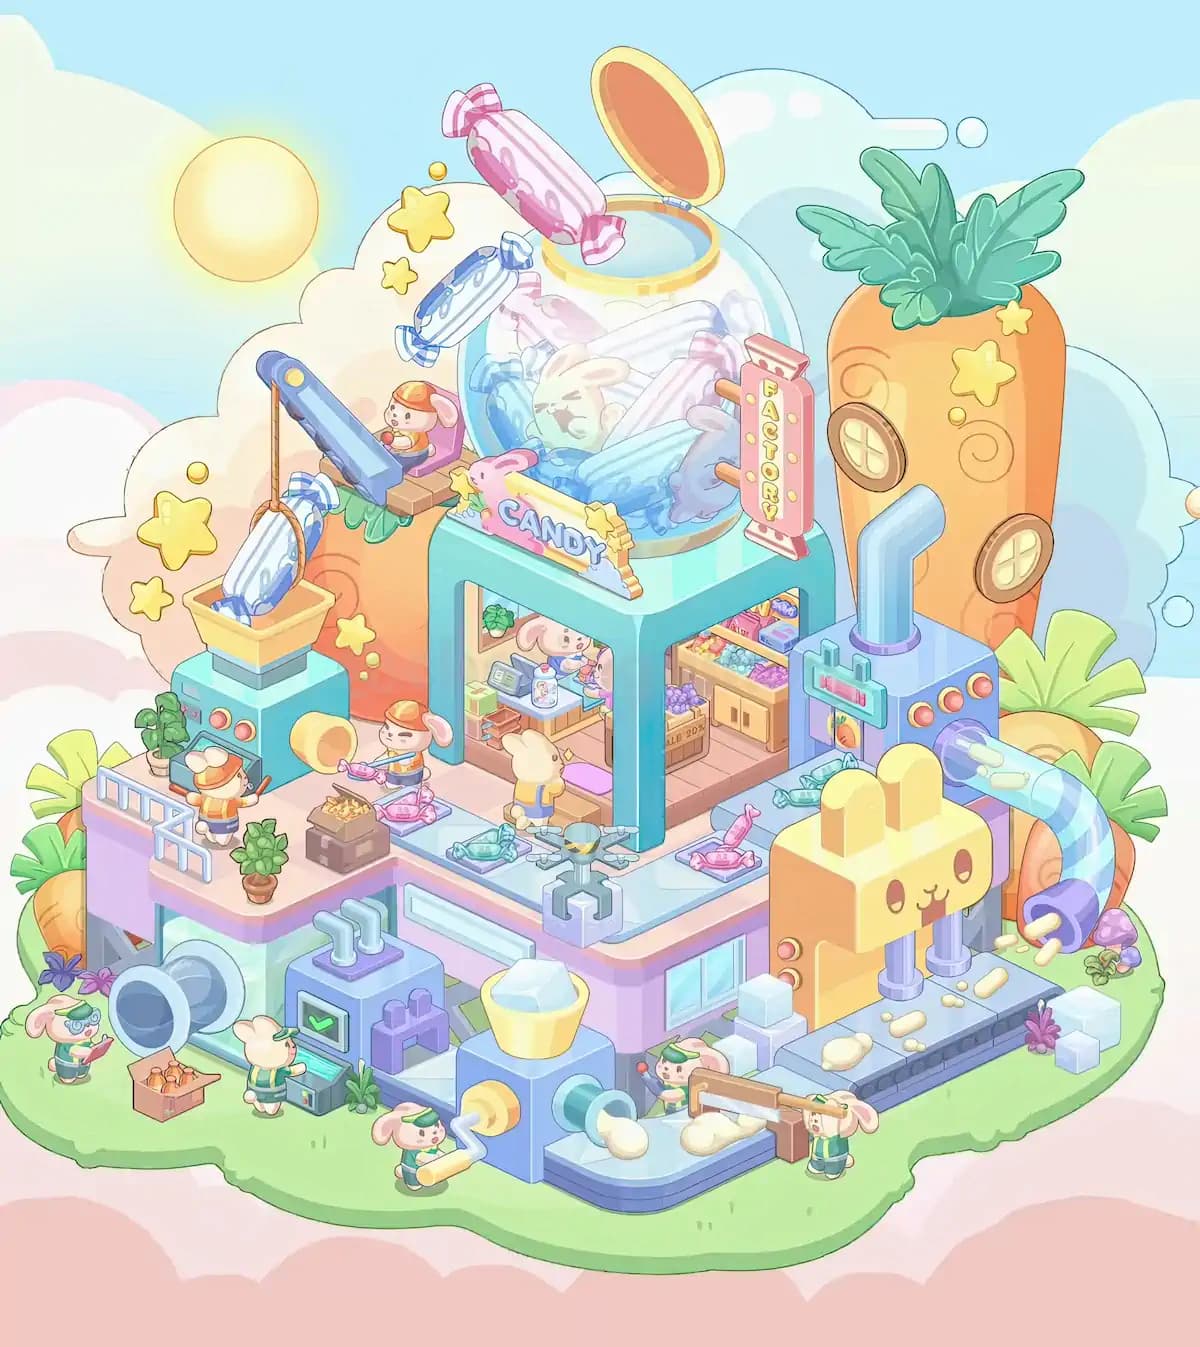
Begin Dreamy Room Level 840 with the large turquoise factory frame because almost every other object is positioned relative to it. Set this structure slightly above the center of the grassy island. It has two thick turquoise front pillars, a pale roof platform, and open rooms underneath. The left interior area contains a small work counter with containers and a bunny worker, while the right side resembles a candy-storage or preparation room filled with colorful sweets, boxes, shelves, and a tan cabinet. Another bunny stands near the central opening with its back facing outward.
Across the top-front edge, place the decorative CANDY sign with multicolored letters, a pink candy shape at the left, and yellow stars around it. On the factory's upper-right edge, attach the vertical pink FACTORY sign. Getting this central structure correct first makes the rest of Dreamy Room Level 840 much easier, since the crane, candy globe, carrot tower, pipes, and lower machinery all connect visually to this centerpiece.
Step 2. Build the giant candy globe on top of the factory
The most noticeable feature in Dreamy Room Level 840 is the huge transparent candy container sitting directly on top of the turquoise factory. Place the rounded glass globe centrally over the roof, slightly toward the left so the vertical FACTORY sign remains visible on its right side. Fill the globe with the large pastel wrapped sweets shown in the completed scene: blue striped candies, pink-and-white candies, white sweets, and the pale bunny-shaped candy visible near the middle. Several pieces overlap naturally, so do not try to arrange them in straight rows.
At the top of the globe, add the open circular yellow lid with its orange inner surface tilted upward and backward. One large pink wrapped candy sticks partly outside near the top-left opening, while another blue wrapped candy floats farther down on the left. Small golden stars decorate the surrounding area. In Dreamy Room Level 840, this globe determines the upper silhouette of the entire build, so incorrect placement here can make nearby pieces appear as though they belong somewhere else.
Step 3. Assemble the crane and candy-loading station on the upper-left side
Move to the upper-left section of Dreamy Room Level 840 and place the long blue crane arm diagonally above the smaller machinery. Its base rests on the raised peach-colored platform beside the central factory, while the arm points upward toward the left. A brown cord hangs from its outer end, carrying a blue-and-white wrapped candy directly above a square yellow collection hopper. The hopper belongs on top of a compact turquoise machine with small red and yellow indicator lights.
Place the orange-capped bunny worker on the raised work area beside the crane controls. Below and slightly left, another bunny worker appears at the front opening of the turquoise machine, wearing a white chef-style hat and orange-toned clothing. Add the small potted greenery around this section and the tiny decorative yellow stars floating against the cloud background. This cluster in Dreamy Room Level 840 is tightly packed, so use the crane arm, hanging candy, and yellow hopper as your main alignment points instead of positioning the bunny workers first.
Step 4. Complete the left production platform and lower pipe system
The left-middle platform of Dreamy Room Level 840 extends outward from the main factory and has a pale purple surface with a short white railing along its outer edge. Place the railing toward the far left, then add the small potted plants along the platform. Near the middle is a compact brown heating or cooking machine holding several small candy pieces. Position the orange-capped bunny worker immediately behind it, holding a large yellow cylindrical tool or dispenser angled toward the workstation. A pink tray or control surface sits close to the bunny.
Under this platform, install the large rounded blue-gray pipes pointing toward the lower-left corner. Next to them, place the box containing orange carrot-like ingredients on the grass. Add the small bunny worker near this box and another decorative plant close to the platform base. These details can be deceptive in Dreamy Room Level 840 because they overlap the supporting machinery. The big circular pipes should sit underneath the platform rather than on top of it.
Step 5. Install the front-left control machine and its bunny operator
At the lower center-left of Dreamy Room Level 840, place the purple-and-blue control machine directly beneath the main platform. It has two short curved pipes rising from its top, a green illuminated check-mark-style display on the front, and several purple block-like components on its right side. Position this machine between the large round pipes on the left and the blue candy-processing block farther to the right.
A small bunny worker wearing a green cap stands immediately in front-left of the machine, holding a large yellow-and-white curved pipe or candy tube. Add the nearby grass plants around its feet. Above the control unit, the edge of the raised factory platform should remain visible, including the long pale panel set into the front wall. This is another area where Dreamy Room Level 840 tests precise placement: the machine, worker, pipe piece, and nearby vegetation occupy a relatively small space and can appear interchangeable with components from the central conveyor system.
Step 6. Build the central candy-processing machine and curved conveyor
Now place the large blue cube-shaped processor near the lower center of Dreamy Room Level 840. It sits forward of the central factory and slightly right of the purple control machine. On top is a yellow cup-shaped container holding a large white crystalline or sugar-like piece. The cube has circular side openings: the left opening contains a yellow-and-white component, while the right opening connects into a pale curved conveyor channel.
Arrange several soft white candy pieces along this curved channel as it travels toward the right. A small green-capped bunny worker stands behind the conveyor near the machine, partially hidden by the equipment. Add the surrounding small blue blocks and structural pieces that form the connection between this processor and the right-side production line. In Dreamy Room Level 840, pay particular attention to the direction of the conveyor. The curve runs from the blue processor toward the right-front side; reversing it will cause multiple later pieces to stop matching the completed picture.
Step 7. Place the carrot tower and right-side pipe machine
The large orange carrot-shaped building belongs behind the machinery on the upper-right side of Dreamy Room Level 840. Position it immediately to the right of the main turquoise factory. Its leafy green top fans outward above the roofline, and the orange body includes round cream-colored windows with cross-shaped panes. Add the yellow star decorations and subtle circular patterns across the carrot surface. A second carrot-like form and large green leaves appear lower down behind the machinery at the far right.
In front of the carrot tower, place the blue-purple industrial machine with colored circular indicator lights. A tall bent light-blue exhaust pipe rises from its top. On its right side, attach the transparent curved tube with alternating blue and clear sections; a pale candy piece is visible inside this tube. Small purple mushroom-shaped decorations sit near the tube's lower-right area. This group gives the right side of Dreamy Room Level 840 its height and visual balance, so the carrot tower should remain behind everything else.
Step 8. Assemble the yellow bunny machine and straight conveyor belt
The large yellow bunny-shaped machine is one of the key foreground objects in Dreamy Room Level 840. Place it in the right-center foreground, directly in front of the carrot tower and beside the blue pipe machine. Its body has a cute rabbit face, two tall rounded ears on top, and small red-and-white controls on its left side. Two gray vertical supports extend downward beneath the rabbit body.
Directly below and to the right, install the long dark conveyor belt running horizontally toward the lower-right edge. Several pale oval and irregularly shaped candies should rest along this belt. Build the surrounding pale blue support blocks at both ends. Behind the belt, add the small purple foliage, mushrooms, and greenery. The rabbit machine should appear to feed or process candies onto this conveyor. Correct alignment is essential in Dreamy Room Level 840 because the yellow machine overlaps both the transparent upper tube and the lower belt while remaining clearly in front of the carrot building.
Step 9. Finish the front conveyor, wooden frame, workers, plants, and small decorations
Finish Dreamy Room Level 840 by adding the smallest foreground pieces. At the bottom-right portion of the conveyor, position the bunny worker in green clothing next to the brown wooden frame that crosses over the candy line. Another white candy rests immediately beside the worker. Check the pale blue cubes that support the conveyor ends and make sure the white candy pieces are spaced along both the curved center channel and the straight right conveyor.
On the lower-left grass, complete the small bunny worker near the ingredient box and nearby purple flowers. Add every remaining green plant tuft, potted plant, mushroom, star, and tiny loose candy visible around the machines. The grassy island itself stays unobstructed around the outside edge so the entire factory reads as a compact miniature complex rather than a completely filled room. These last pieces are particularly important in Dreamy Room Level 840, since a tiny plant or worker placed on the wrong platform can prevent the arrangement from matching the intended solution.
Notes and Precautions
The primary challenge of Dreamy Room Level 840 is recognizing which objects belong in front, behind, above, or underneath neighboring pieces. Many components use the same pastel blue, pink, yellow, and green palette, making incorrect placements look convincing at first. Build the largest structures first: central factory, candy globe, carrot tower, and major machines. Only then place the bunny workers, candies, plants, mushrooms, stars, and other small decorations.
Watch the depth carefully in Dreamy Room Level 840. The carrot tower is behind the right-side machinery; the big blue-gray pipes are underneath the left platform; the transparent candy tube passes in front of the carrot area; and the front conveyor occupies the lowest layer of the factory scene. The supplied Dreamy Room notes emphasize that there is no timer or pressure, so taking time to compare positions is part of the intended experience. dreamy room instruction
Also remember that several bunny workers look similar. Use the machinery they interact with to identify their correct locations rather than relying only on clothing.
Tips and Tricks from top player
A strong strategy for Dreamy Room Level 840 is to divide the scene into five zones: central factory, upper-left crane, lower-left machinery, upper-right carrot and pipe system, and lower-right conveyor. Complete one zone at a time instead of placing random objects across the whole island.
Use distinctive objects as anchors. In Dreamy Room Level 840, the candy globe immediately defines the center, the carrot tower defines the right background, the crane identifies the upper-left corner, and the yellow rabbit machine identifies the right foreground. Once those four anchors are correct, most remaining objects have only one visually logical space.
Another useful trick in Dreamy Room Level 840 is to delay characters and plants until the machinery is complete. Bunny workers are generally positioned directly beside the equipment they operate, so their correct spots become obvious after the machines are installed. Do the same with loose candies: first construct the conveyor or hopper, then place the candy on it. Finally, scan from top-left to bottom-right for missed stars, flowers, mushrooms, ingredient boxes, potted plants, and support blocks.
Final Scene of Dreamy Room Level 840
The completed Dreamy Room Level 840 becomes a whimsical candy factory floating on a bright green island among enormous pastel clouds. At the center, a turquoise workshop supports a huge transparent globe overflowing with pink, blue, white, and bunny-shaped wrapped sweets beneath an open golden lid. A crane loads candy on the left while miniature bunny workers operate hoppers, cooking stations, control machines, pipes, and ingredient boxes. On the right, a towering orange carrot building with leafy green foliage rises behind blue processing equipment and a transparent candy tube. The smiling yellow rabbit machine stands over a long conveyor carrying soft white sweets toward the foreground. Curved pipes, glowing controls, colorful signs, potted plants, mushrooms, flowers, stars, boxes, and tiny workers fill every remaining corner. Dreamy Room Level 840 ultimately feels like a complete miniature confectionery world, with every object carefully positioned to connect the factory into one lively production line.