Dreamy Room Level 863
Dreamy Room Level 863 guide - Dreamy Room 863 Walkthrough & Solution.
Important Notice Regarding Level Numbering
Due to frequent changes in Dreamy Room's level numbering and differences between platforms (Android/iOS) – for example, level 863 on Android might not be the same as level 863 on iOS – the text guide below may not always match the images and video above. Please prioritize the image and video guides. If you find that the guide content doesn't match your current level, please visit the All Level Walkthroughs page to find the correct guide based on level images. Thank you for your understanding.
Dreamy Room Level 863 Walkthroughs & Guide
Step 1. Build the main treehouse platforms in Dreamy Room Level 863
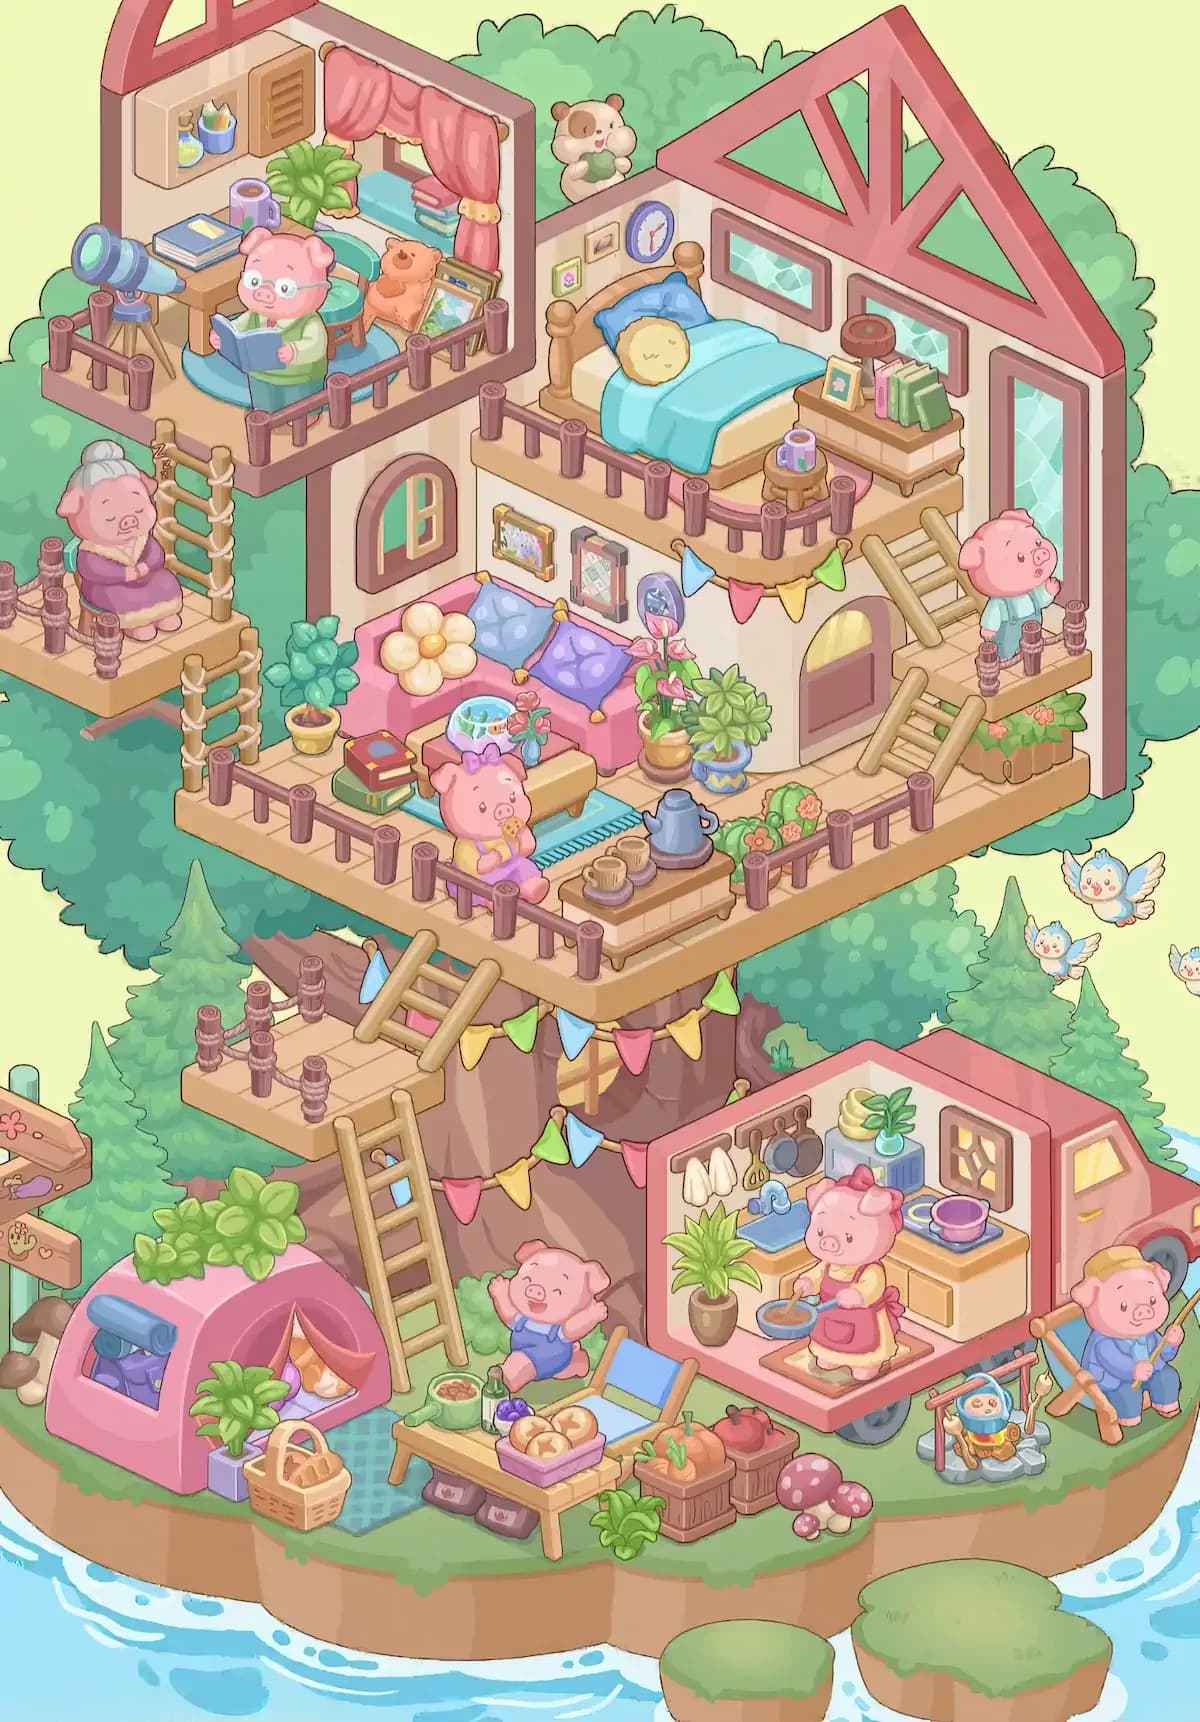
Start Dreamy Room Level 863 by establishing the large wooden platforms around the central tree trunk. These pieces determine where almost everything else will go, so avoid placing tiny decorations first. The broadest platform belongs around the upper-middle portion of the tree and stretches from the left side of the trunk across to the right. Add the mauve-purple railings along its exposed front and side edges. A smaller platform projects from the upper-left side, while another narrow landing appears on the far left below it. There is also a small intermediate landing against the trunk below the main floor.
Fit the wooden ladders between these levels. One ladder climbs from the left landing toward the upper-left room, another links the left landing to the large middle platform, and a separate ladder runs upward along the right wall toward the bedroom. In Dreamy Room Level 863, correct platform placement is especially important because railings, ladders, rooms, furniture, and characters all depend on these structural anchors. Before moving on, make sure the platforms form a believable continuous treehouse around the trunk.
Step 2. Assemble the upper rooms and roof frame in Dreamy Room Level 863
The next major task in Dreamy Room Level 863 is creating the upper treehouse rooms. Place the open-walled study room on the upper-left platform. Its pale walls form a cozy nook with an exposed front, while a pink-red roof frame rises along the upper edge. The room should sit high among the leaves, directly above the left-side ladders.
On the upper-right side, install the larger bedroom structure. Its most recognizable feature is the tall triangular red roof frame with open geometric sections. Set the cream-colored walls beneath it, including the long windows with pale blue glass. The bedroom projects over the central living floor and has a curved front balcony protected by purple railing posts.
Dreamy Room Level 863 uses these two rooms as the visual crown of the finished scene, so their alignment should feel symmetrical around the tree even though their shapes differ. Also place the upper wall openings and the tall narrow window on the far right. Once these large components lock correctly, Dreamy Room Level 863 becomes much easier because the upper furniture now has clearly defined locations.
Step 3. Furnish the upper-left reading room in Dreamy Room Level 863
Turn the left room of Dreamy Room Level 863 into the completed reading and hobby space. Place the wooden desk against the back-left wall. Set the stack of blue books on the desk and position the purple mug nearby. Above the desk goes the small wall storage unit containing colorful bottles and stationery, with the wooden slatted cabinet section beside it. Add the lush green plant near the back corner.
The small window belongs on the back-right wall of this room. Dress it with pink curtains gathered at the sides, and place the books around the window area. Put the round turquoise seat and blue oval rug in the middle of the floor. The bespectacled pig should sit here reading the open blue book, while the orange teddy bear rests behind and to the right.
Finally, place the blue telescope on its tripod at the far-left edge of the balcony, aimed outward beyond the railing. In Dreamy Room Level 863, these small accessories are easy to confuse with objects from other floors, so keep all books, study items, telescope pieces, and reading-room decorations together until this section is complete.
Step 4. Complete the upper bedroom in Dreamy Room Level 863
Move to the upper-right portion of Dreamy Room Level 863 and furnish the bedroom. The wooden bed sits lengthwise along the back wall, with its headboard toward the left. Add the dark blue pillow, round yellow cushion, pale mattress, and bright turquoise-blue blanket. A pink oval rug is partly visible beneath the bed.
Place the small round bedside table near the front-right corner of the bed and set the purple mug on top. Against the right wall goes the low wooden cabinet or bench. Arrange the framed picture and the upright pink and green books on it, with the small round brown decorative object positioned farther back.
Above the bed, hang the round wall clock and the two tiny framed pictures. Keep the blue-glass windows correctly aligned across the wall. The curved front balcony of the bedroom should remain open except for its railings and bedside items. Dreamy Room Level 863 also places a pig in a light blue shirt on the right-side landing outside this room. Position the character beside the railing near the descending ladder to complete this upper section of Dreamy Room Level 863.
Step 5. Create the central living room in Dreamy Room Level 863
The middle floor contains one of the busiest areas in Dreamy Room Level 863. Start by placing the pink sofa against the pale central wall. Add the two blue-purple patterned cushions and the oversized cream flower-shaped cushion. To the sofa's left, place the leafy plant in its yellow pot. Above the seating area, install the framed wall pictures and the oval decorative portrait.
The low rectangular coffee table belongs directly in front of the sofa. Arrange the patterned cup or container and the tiny flower vase on its surface. Place the stacked red and green books on the floor toward the front-left side of the table. To the right of the sofa, position the tall pink-flowering plant in its pot and the broader leafy plant in the blue patterned planter.
The arched window belongs on the left wall, while the rounded door occupies the right wall. Across the wall above the door, hang the colorful triangular bunting. Dreamy Room Level 863 relies heavily on these relative positions: sofa in the center, plants at both sides, table in front, and wall décor behind. Matching that arrangement makes the room immediately recognizable.
Step 6. Arrange the tea area, balcony garden, and seated pig in Dreamy Room Level 863
Now decorate the front edge of the main platform in Dreamy Room Level 863. Place the blue striped floor mat or rug in front of the coffee-table area, then position the small pig with the large bow at the front-left side of the rug. The pig sits facing outward while holding a snack.
Closer to the front-right, add the low wooden serving table. The blue-gray kettle sits prominently on top, accompanied by the cup and saucer and the remaining tea-service pieces. Do not confuse this setup with the purple mug in the bedroom or the cup in the study; Dreamy Room Level 863 distributes drinkware across several different floors.
Next, fill the narrow planter strip along the right-front railing with small pink and orange flowers. A rectangular flower box filled with greenery and red blossoms sits farther back against the right wall near the ladder. Complete this section by checking the purple railing posts around the entire platform. In Dreamy Room Level 863, the balcony looks crowded once finished, but the walkway from the living room door toward the ladders should still remain visually clear.
Step 7. Add the left landings, ladders, bunting, and tree details in Dreamy Room Level 863
Several transitional objects make the floors of Dreamy Room Level 863 feel connected. On the far-left landing, place the elderly pig with gray hair tied in a bun. She wears a purple outfit and stands inside the railing near the vertical ladder. That ladder climbs toward the upper reading room. Below her landing, another wooden ladder connects downward toward the main central platform.
At the center of the tree, place the smaller walkway and the diagonally positioned ladder that leads between the main platform and the lower levels. Wrap the brightly colored triangular bunting around the trunk, using the pink, yellow, blue, and green flags visible in the completed scene. Another string of flags appears higher up beneath the upper floors.
Do not cover the little cross-pane window already visible in the trunk; it remains a central feature of Dreamy Room Level 863. Also place the small plush animal above the upper rooms, where it peeks out from the foliage while holding a green object. These connecting details are easy to overlook, but they are important because Dreamy Room Level 863 uses ladders, railings, and bunting to visually link every floor.
Step 8. Set up the lower campsite in Dreamy Room Level 863
The bottom-left of Dreamy Room Level 863 becomes a cheerful campsite. Place the pink tent on the grass slightly left of the trunk. Its opening faces toward the viewer, with an orange-and-white cat resting inside. Attach or place the rolled blue sleeping mat on the tent's left exterior side. A large leafy plant sits on top of the tent, while another potted green plant stands near the front entrance.
Spread the blue-green checked picnic blanket in front of and slightly to the right of the tent. Set the wicker basket along the front-left edge of the blanket. Nearby, position the low reclining camp chair so that it angles toward the picnic food and tree.
Behind the picnic area, place the young pig wearing blue overalls. The character stands near the tree and raises one arm. This entire campsite occupies the left half of the lower island in Dreamy Room Level 863, leaving enough space on the right for the trailer kitchen. Avoid shifting the tent too close to the shoreline; its rear should visually nestle beneath the tree's foliage.
Step 9. Arrange the picnic food, produce crates, and mushrooms in Dreamy Room Level 863
Continue filling the ground level of Dreamy Room Level 863 by arranging the food directly in front of the camp chair. Place the small wooden picnic table at the center-lower area. On top, set the green cup or food container, the cluster of purple grapes, and the pink tray filled with bread rolls. Small storage containers fit underneath the table.
To the right, organize the wooden produce boxes. One crate contains orange carrots with green tops, while the adjacent box contains red fruit or vegetables. Add the loose leafy greens in front of the crates. Farther toward the shoreline, place the cluster of red mushrooms with white spots.
The purpose of this step in Dreamy Room Level 863 is to fill the narrow strip between the central picnic area and the trailer without blocking either one. The chair should remain behind the table, produce should extend toward the right, and the mushrooms belong close to the island's outer edge. Because many of these objects are small, Dreamy Room Level 863 may accept only a very specific position even when an item looks visually reasonable elsewhere.
Step 10. Install the camper kitchen in Dreamy Room Level 863
The large camper occupies the lower-right corner of Dreamy Room Level 863. Set the cream-and-pink trailer with its red roof, small side window, rear door, visible wheel, and open kitchen wall facing forward. Inside, place the sink along the back counter. Above it hang the white cloths, utensils, and dark cooking pans from the hooks.
On the upper shelf, position the bananas and the small green plant. The blue appliance sits below them. On the right-hand countertop, set the purple bowl or cup on its plate. The cooking pig stands in the center of the open trailer wearing a pink apron and preparing food in a pan, with the rectangular mat directly beneath her.
Pay attention to the boundaries of the trailer in Dreamy Room Level 863. Kitchen objects that appear to belong on the picnic table actually have fixed spots inside this tiny cooking space. Once the shelves, cookware, sink, counter, food, and character are installed, the lower-right side of Dreamy Room Level 863 should resemble a compact outdoor kitchen parked beside the family campsite.
Step 11. Place the remaining family members, baby swing, and outdoor details in Dreamy Room Level 863
Finish the character placement in Dreamy Room Level 863 by putting the adult pig in blue overalls at the far-right side of the campsite. He stands beside the trailer and holds a long gardening tool. Keep him close to the outer grass edge rather than inside the kitchen.
Near him, place the small suspended baby seat or swing. Its red-and-blue support frame stands over a little stone base, and the tiny pig sits in the hanging seat. This object belongs between the trailer area and the right shoreline. Add the small exterior objects around the trailer and campsite so nothing is left floating in the inventory.
Several pale blue-and-white birds fly through the right side of the completed scene, outside the treehouse structure. The background also remains filled with evergreen trees and the original green canopy. In Dreamy Room Level 863, these peripheral details may seem less important than the furniture, but they help confirm that the central objects are correctly aligned. The family members should appear distributed naturally from the highest study to the lowest campsite.
Step 12. Perform the final placement check for Dreamy Room Level 863
Before considering Dreamy Room Level 863 finished, scan the scene from top to bottom. At the highest level, confirm the telescope, desk, books, mug, cabinet, plant, curtains, reading pig, teddy bear, bed, pillows, blanket, wall clock, framed pictures, bedroom cabinet, books, mug, and standing pig. On the middle floor, verify the sofa, cushions, flower pillow, coffee table, stacked books, potted plants, flowering plant, tea table, kettle, cup, rugs, door, windows, planter boxes, wall artwork, and seated pig.
Next check every ladder, railing, platform, and string of bunting around the trunk. Finally, inspect the ground for the tent, sleeping cat, rolled mat, plants, picnic blanket, basket, chair, food table, grapes, bread, containers, produce crates, vegetables, leafy greens, mushrooms, camper, kitchen equipment, cooking pig, waving pig, adult pig, baby swing, and birds.
The defining puzzle of Dreamy Room Level 863 is determining the one intended location for each object. If something refuses to register, compare it with nearby shapes instead of assuming it belongs to the same general area.
Notes and Precautions
In Dreamy Room Level 863, complete the large structural items before worrying about accessories. The treehouse platforms, rooms, ladders, and trailer create reference points that make later placements much easier. Small cups, books, plants, wall pictures, and food items are the most likely pieces to be confused because several floors contain visually similar decorations.
Also watch the depth of objects in Dreamy Room Level 863. Something may look correct horizontally but still belong slightly farther back against a wall or slightly forward on a balcony. Keep the upper study items separate from the bedroom items, and keep indoor kitchen equipment separate from the outdoor picnic food.
There is no need to rush. The game's emphasis is on calmly organizing objects and finding their intended places rather than beating a countdown. dreamy room instruction Taking an extra moment to compare the completed composition is particularly useful in Dreamy Room Level 863, where many objects overlap.
Tips and Tricks from top player
A reliable strategy for Dreamy Room Level 863 is to work from largest to smallest. Place architecture first, furniture second, characters third, and tiny decorations last. This dramatically reduces trial-and-error because a large item such as the bed or sofa immediately reveals where several smaller objects must go.
Another useful Dreamy Room Level 863 trick is to finish one visual zone before jumping elsewhere. Complete the upper-left study, then the bedroom, then the central living room, then the campsite, and finally the camper. If you constantly move between floors, similar plants, cups, books, and decorations become much harder to track.
Use unusual shapes as anchors. The telescope identifies the study; the turquoise bed identifies the bedroom; the pink sofa identifies the living room; the pink tent identifies the campsite; and the open camper identifies the kitchen. Once those anchors are correct, Dreamy Room Level 863 becomes a process of filling the surrounding gaps. Save the birds, bunting, tiny food pieces, wall art, and other finishing details until the end.
Final Scene of Dreamy Room Level 863
The completed Dreamy Room Level 863 transforms the once-empty island into a lively multi-generation treehouse retreat. High in the branches, a glasses-wearing pig reads beside a telescope in a cozy study while the neighboring bedroom holds a turquoise bed beneath its striking red roof frame. Below, a pink sofa, colorful cushions, flowers, tea service, framed pictures, and bunting create a welcoming family living space connected by ladders and wooden balconies.
At ground level, Dreamy Room Level 863 becomes an outdoor holiday scene. A pink tent shelters a cat, picnic supplies cover the grass, bread and grapes sit ready to eat, and crates overflow with fresh produce. Nearby, a pig cooks inside the open camper while other family members relax, garden, play, or explore around the tree. Birds fly past the right side as water circles the island. Altogether, Dreamy Room Level 863 turns a single giant tree into a warm, bustling miniature home filled with carefully placed details.