Dreamy Room Level 826
Dreamy Room Level 826 guide - Dreamy Room 826 Walkthrough & Solution.
Important Notice Regarding Level Numbering
Due to frequent changes in Dreamy Room's level numbering and differences between platforms (Android/iOS) – for example, level 826 on Android might not be the same as level 826 on iOS – the text guide below may not always match the images and video above. Please prioritize the image and video guides. If you find that the guide content doesn't match your current level, please visit the All Level Walkthroughs page to find the correct guide based on level images. Thank you for your understanding.
Dreamy Room Level 826 Walkthroughs & Guide
Step 1. Build the musical room structure and curved railings in Dreamy Room Level 826
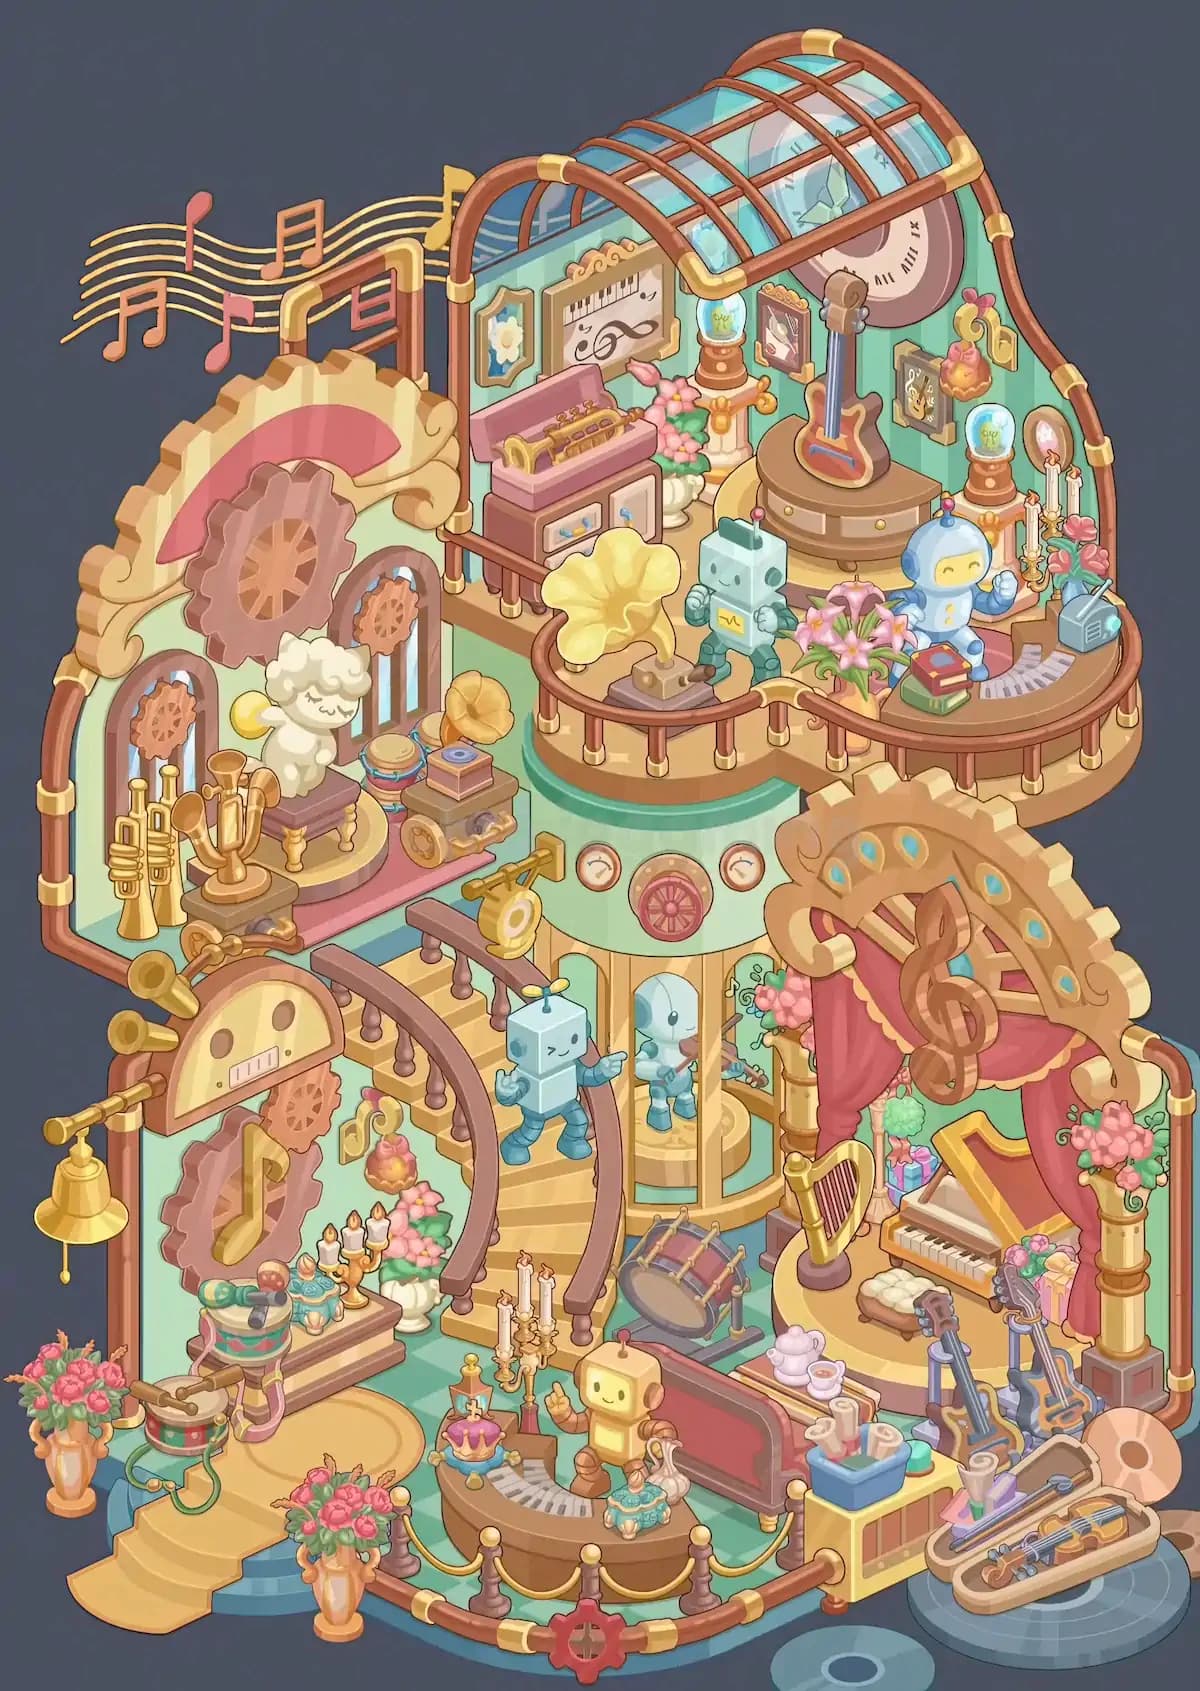
Begin Dreamy Room Level 826 by establishing the large structural pieces because virtually every smaller item depends on these boundaries. The completed room forms a tall, rounded music-themed building with mint-green walls, teal flooring, brown rails, and gold connector caps. Place the large decorative cream-and-pink gear wall along the upper-left exterior. Its oversized cogwheel sits roughly in the middle of this wall, with two smaller cogwheel details positioned lower down.
Fit the curved brown railings around the various balconies and walkways. One railing surrounds the upper music room, another bends around the central circular structure, and additional curved rails define the staircase and lower-level platforms. The gold joints should appear at regular points along the brown tubing. In Dreamy Room Level 826, these rails are useful visual landmarks because later objects line up closely with them. Also place the broad mint cylindrical central structure and the cream architectural supports beneath it before adding decorations.
Step 2. Install the glass roof and upper musical wall decorations
The highest section of Dreamy Room Level 826 receives a large arched glass canopy. Position this transparent turquoise roof over the upper-right room, supported by reddish-brown ribs with gold fittings. The roof curves from the rear wall toward the front and gives the top floor the appearance of a conservatory or vintage music pavilion. Make sure it does not extend over the large decorative gear façade on the left.
Next, decorate the rear wall. Place the framed keyboard-and-treble-clef artwork near the center-left, with the small flower picture to its left. Smaller framed musical pictures belong farther right. The large pink circular record or plaque sits high on the rear-right wall behind the guitar display. Add the decorative musical staff and colorful notes across the upper-left outside edge. In Dreamy Room Level 826, this flowing group of notes should appear to emerge from the building and extend toward the left, making it one of the clearest orientation clues for the entire level.
Step 3. Arrange the pink keyboard station and upper-left furniture
Now furnish the left portion of the top balcony in Dreamy Room Level 826. Place the compact pink keyboard or organ against the rear wall, below the keyboard-themed picture. Its pink upper section faces toward the front-right, while the small cabinet underneath provides storage and supports the instrument. Carefully align the cabinet so its front drawers and doors remain visible instead of being hidden against the wall.
Beside the keyboard, add the floral arrangement and the small decorative pedestal objects. A large yellow gramophone-style horn sits closer to the front edge of this balcony, opening toward the upper-left/front direction. Its base rests just inside the curved railing. Keep the horn separated from the nearby keyboard so both silhouettes remain visible.
The upper-left area of Dreamy Room Level 826 is crowded, and this is where placement errors are easy. Use the rear wall artwork, railing, and floor edge as reference points rather than judging spacing from individual tiny decorations.
Step 4. Create the raised guitar display on the upper-right floor
The centerpiece of the highest floor in Dreamy Room Level 826 is the guitar display. Place the large round brown platform slightly right of center under the glass canopy. The platform has a stepped circular base and should sit directly beneath the large pink wall record. Stand the reddish-orange guitar upright on this platform, with its neck rising toward the rear wall. Its darker neck and blue-gray central details make it easy to distinguish from the instruments placed on the lower stage.
Add the globe-like lamps or glass ornaments around this upper area. One sits near the rear of the room on a brown pedestal, while another appears to the right near the candles and floral decorations. Smaller framed pictures and the golden wall ornament fill the wall beside them.
In Dreamy Room Level 826, do not confuse this guitar with the two stringed instruments that eventually stand near the lower-right stage. This guitar belongs exclusively on the elevated circular display.
Step 5. Fill the upper balcony with robots, flowers, books, candles, and the radio
Next, complete the front edge of the top balcony in Dreamy Room Level 826. Place the mint-colored boxy robot toward the center-left of the balcony. Its square head, antenna, and mechanical arms should face outward. To the robot's right stands the rounded blue-and-white astronaut-like character with a yellow face visible through its helmet.
Between and around these characters, arrange the pink flowers in their vase or planter. The flowers sit prominently near the front railing and help separate the robot display from the objects on the right. Place the stack of colorful books toward the right-front section, followed by the small gray radio near the balcony's outer edge. Behind these objects, add the tall candle arrangement and the glass globe on its brown stand.
This section of Dreamy Room Level 826 contains many similarly sized accessories. Place the large robot and astronaut first, then use the gaps around them for flowers, books, candles, and radio rather than starting with the smallest objects.
Step 6. Complete the left-middle brass instrument gallery
Move down to the left-middle level of Dreamy Room Level 826, directly beneath the large gear façade. This platform is devoted largely to brass instruments and nostalgic music objects. Place the white fluffy sheep character on the raised round platform near the center-left. It should stand beneath the gears and beside the cluster of instruments.
Arrange the tall golden brass instruments toward the far left, with their bells pointing upward. Additional horn-shaped pieces sit in front and along the shelf. A smaller phonograph or horn-like object appears near the middle, accompanied by stacks of colorful round objects and a small rectangular music device. Place the compact wheeled decorative object toward the right side of this shelf, underneath the upper railing.
In Dreamy Room Level 826, the important clue is height: tall brass instruments belong against the left wall, while shorter accessories fill the shelf toward the center and right. Keeping that progression intact prevents several objects from being swapped accidentally.
Step 7. Assemble the central staircase, gauges, and robot display
The center of Dreamy Room Level 826 connects the upper and lower floors through a curved staircase wrapped around the mint-green cylindrical structure. Place the dark brown staircase rails so they descend from the left-middle balcony toward the central lower floor. The cream steps curve around the front of the structure rather than forming a straight staircase.
On the mint cylinder, install the small circular gauges on either side of the larger central decorative dial. The large center dial contains a pink wheel-like design. Another brass circular device projects from the left side near the stairs.
At the bottom-center opening, place the glass-fronted cylindrical display. Inside it stands a small pale-blue robot or character. A second boxy blue robot stands outside on the stairs, facing the display as though interacting with the character inside. This pairing is an important clue in Dreamy Room Level 826: one character belongs within the enclosed chamber while the other remains outside on the staircase.
Step 8. Build the curtained performance stage on the right
The largest performance area in Dreamy Room Level 826 occupies the middle-right side. Install the ornate cream-and-gold arch first, including the giant brown treble clef mounted prominently across the upper front. Hang the deep pink curtain behind it so the stage appears framed like a miniature theater.
Place the golden harp on the left side of the stage. The small grand piano belongs on the right, with its golden lid raised and the white-and-black keyboard facing toward the front-left. Put the cushioned piano stool in front of the keyboard. Add the flower vases along both sides of the stage, especially beside the tall columns.
Two string instruments rest toward the lower-right edge outside the main piano platform, leaning upright near the foreground. Pastel gift boxes or decorative packages sit behind and beside them. In Dreamy Room Level 826, keep the harp, piano, stool, and leaning instruments distinct; their correct positions follow the left-to-right layout of the finished concert area.
Step 9. Place the drum and smaller performance accessories
Continue decorating the middle level of Dreamy Room Level 826 by filling the space immediately in front of the stage. Position the large barrel-shaped drum slightly left of the stage entrance, close to the bottom of the curved staircase. It rests horizontally in a small support frame with its round drumhead angled toward the viewer.
Add the nearby candle stands and other tiny performance accessories around this transition area. The tall gold candlesticks appear near the staircase and help visually connect the stage to the lower room. Keep them upright and separated rather than clustering them directly against the drum.
Notice that the stage itself already contains several large objects, so Dreamy Room Level 826 uses this narrow front area for supporting pieces rather than another major instrument. If an accessory seems to block either the staircase or piano, it is probably in the wrong position. Preserve a visible passage through the center of the room.
Step 10. Decorate the lower-left mechanical music corner
The lower-left portion of Dreamy Room Level 826 combines gears, horns, candles, flowers, and mechanical music decorations. Attach the large cogwheel pieces to the wall first. Above them is the rounded cream control-panel decoration containing two circular details and a small rectangular center panel. A golden bell hangs along the far-left edge, and several brass horn pieces project nearby.
Place the dark rectangular table or cabinet beneath the gears. Its surface carries a group of candles and small decorative objects, while pink flowers sit close by. A colorful cylindrical container with a tube or hose belongs toward the foreground-left beside the steps. A similar vessel sits higher on the shelf above it.
The lower-left corner of Dreamy Room Level 826 also includes large bouquets in ornate peach-and-gold vases. One stands beside the left staircase and another appears nearer the front-center. These tall bouquets should frame the entrance rather than obstruct it.
Step 11. Assemble the reception desk and golden robot at the bottom center
At the very front of Dreamy Room Level 826, build the rounded reception or music counter. The desk curves toward the viewer and incorporates piano-key detailing along its upper surface. Position the small golden robot behind the desk, roughly in the center. Its friendly square face points outward, and one arm is raised while nearby accessories fill the desktop.
Place the pink-and-gold ornamental object on the left side of the counter and the turquoise decorative item toward the right. Behind the desk sits a long reddish bench or padded panel. Arrange the gold-topped posts and ropes along the foreground to create a semicircular queue barrier around the reception area. A red gear-shaped ornament sits at the center of the lowest front rail.
This counter is one of the strongest anchors in Dreamy Room Level 826. If the ropes, robot, or rear bench seem misaligned, reposition the desk first because the remaining objects are designed around its curved footprint.
Step 12. Finish the lower-right cart, instrument case, records, flowers, and entrance steps
Finish Dreamy Room Level 826 with the loose foreground objects. To the right of the reception desk, place the small yellow-and-red rolling cabinet or cart. Its blue top container holds several pale tubes, cups, or tool-like accessories. Additional pastel items rest beside the container.
At the extreme lower-right, position the open cream-colored string-instrument case. A violin-like instrument lies horizontally inside with its bow and accompanying accessories. The case rests partly over the large blue-gray circular record-shaped floor decoration. Another flat dark-teal record appears closer to the bottom center.
Return to the left foreground and make sure the short cream staircase curves downward toward the viewer, with the blue side strip following its edge. Position the flower vases on either side of the lower area where shown. Once these foreground pieces are correctly installed, Dreamy Room Level 826 should visually match the completed image from top to bottom.
Notes and Precautions
The biggest difficulty in Dreamy Room Level 826 is distinguishing between objects that belong to different musical displays. There are multiple guitars, horns, flowers, candles, robots, and globe-like decorations, so matching an object only by theme is unreliable. Instead, compare its size and intended support: the large guitar belongs on the upper circular platform, the harp and piano belong on the curtained stage, and the violin-like instrument belongs inside the open case at the bottom.
Be especially careful around the upper balcony and lower-left corner of Dreamy Room Level 826, where small items overlap visually. Place larger furniture before tiny accessories so you do not lose track of available attachment points.
There is no need to rush. Dreamy Room is designed around calmly organizing objects without a timer or pressure, so you can test placements methodically. dreamy room instruction In Dreamy Room Level 826, patience is particularly useful because several locations are intentionally close together.
Tips and Tricks from top player
For Dreamy Room Level 826, use a top-to-bottom placement strategy. Start with the roof, walls, platforms, stairs, and railings; continue with large instruments and furniture; finish with flowers, candles, books, and other tiny accessories. This keeps interactive areas visible for longer.
Another useful technique is to sort objects mentally into zones before placing them: upper conservatory, brass gallery, central machinery, concert stage, lower-left mechanical corner, reception, and foreground storage. Dreamy Room Level 826 becomes much easier once you stop treating the room as one enormous puzzle.
Use distinctive landmark objects whenever you become stuck. The giant gear wall identifies the left side, the glass roof identifies the upper-right, the treble-clef arch identifies the stage, and the curved piano counter identifies the bottom. From these anchors, work outward toward smaller items. Finally, when an object refuses to fit in Dreamy Room Level 826, check another floor before repeatedly trying neighboring spaces; duplicate themes are deliberately spread throughout the room.
Final Scene of Dreamy Room Level 826
The completed Dreamy Room Level 826 becomes a towering fantasy music hall packed with mechanical charm. A glass-roofed upper gallery showcases a guitar, pink keyboard, robots, flowers, framed music art, candles, books, and vintage decorations. The left side resembles a miniature instrument museum, where brass horns, gears, a sheep figure, phonographs, and musical devices fill layered platforms. At the center, curving stairs wrap around a mint-green mechanism with gauges and a glass robot chamber. The right side transforms into an ornate concert stage beneath a huge treble clef, complete with pink curtains, a golden harp, grand piano, drum, flowers, and string instruments. Below, Dreamy Room Level 826 finishes with a cheerful golden robot at the piano-themed reception counter, elegant rope barriers, flower-filled entrance steps, a utility cart, oversized records, and an open violin case. The result is an exceptionally dense but carefully organized celebration of music and imagination.