Dreamy Room Level 816
Dreamy Room Level 816 guide - Dreamy Room 816 Walkthrough & Solution.
Important Notice Regarding Level Numbering
Due to frequent changes in Dreamy Room's level numbering and differences between platforms (Android/iOS) – for example, level 816 on Android might not be the same as level 816 on iOS – the text guide below may not always match the images and video above. Please prioritize the image and video guides. If you find that the guide content doesn't match your current level, please visit the All Level Walkthroughs page to find the correct guide based on level images. Thank you for your understanding.
Dreamy Room Level 816 Walkthroughs & Guide
Step 1. Build the purple wizard tower and decorate the roof
Begin Dreamy Room Level 816 with the tall purple hotel tower in the upper-left portion of the scene. Position the steep purple tiled roof directly over the narrow tower structure, then place the cream-colored flagpole at the roof's highest point. The large waving purple flag extends toward the upper-right. Add the two small orange-framed windows to the front faces of the roof, with one facing toward the left/front and the second slightly farther right. Green ivy should curl around both windows and trail across the lower edge of the roof.
Next, add the dense green foliage behind the tower roof so it peeks outward from both sides. Small golden wall lamps sit beneath the roof overhang. On the far-left exterior, hang the blue Wizard Hotel sign from the horizontal brown-and-gold support bar. Its moon, stars, wizard hat, and lettering should face forward. In Dreamy Room Level 816, these large pieces establish the scale for almost everything that follows, so make sure the tower sits firmly toward the back-left before adding smaller decorations. Finishing this structure first makes the crowded upper areas of Dreamy Room Level 816 much easier to understand.
Step 2. Complete the upper balcony and the cozy room beneath it
The next part of Dreamy Room Level 816 is the small balcony immediately below the purple roof. Install the light beige balcony floor and dark brown railing along its exposed front and right edges. Place the large round green cushion or lounge seat near the back-right of the balcony. A small stacked decorative object with orange and green layers sits near the front of this cushion, partly surrounded by thick leafy vines. More ivy should spill across the balcony and the tower façade.
Now work underneath the balcony. Place the pink sofa against the back wall, underneath the exterior staircase. In front of it, set the low orange coffee table on the rectangular blue rug. The tabletop contains several tea-time items, including a plate or bowl of pastries, a green teapot-like container, and a small cup or dish. A leafy green plant occupies the right side of this little sitting area. Finally, position the cream staircase along the left side, climbing from the middle terrace to the upper balcony. The staircase is a crucial landmark in Dreamy Room Level 816, and getting it right prevents the balcony furniture from being shifted into incorrect spaces. Once completed, this portion of Dreamy Room Level 816 should look like a tiny elevated guest lounge.
Step 3. Arrange the left side of the middle terrace and the roped walkway
Move down to the large middle platform in Dreamy Room Level 816. Start on its left side by placing the enormous cluster of broad green leaves beside the staircase. The leaves overlap one another and fill nearly the entire outer-left corner. Near the lower edge of this foliage, place the short purple-brown tree stump. A pale little figure or ornament sits on the stump beside the orange jack-o'-lantern decoration.
Continue toward the center of the terrace. Put the small pink round pedestal table near the front-left section and place the tiny cup or potion-like item on top. Behind it belongs the unusual orange-and-yellow chair with the rounded red plush or cushion resting in the seat. The central walkway uses irregular brown stepping stones arranged in a loose curved trail. Surround the front and sides of this area with short wooden posts joined by pale rope, leaving the pathway visually open. Vines spill over the front edge of the terrace.
Correct spacing matters considerably in Dreamy Room Level 816 because the chair, pedestal table, stump, stepping stones, and rope posts all occupy a relatively small platform. Use the staircase and front railing as reference points. When this section of Dreamy Room Level 816 is correct, the terrace feels like a magical waiting area rather than a random collection of objects.
Step 4. Create the magical tree courtyard and welcome area
The spectacular pink tree is one of the strongest visual landmarks in Dreamy Room Level 816. Place it behind the middle terrace, slightly right of center. Its thick purple trunk rises from exposed curling roots, while several masses of pink foliage spread broadly across the upper-right background. The roots remain visible inside a short surrounding fence instead of being hidden underneath furniture.
Decorate the tree carefully. Wrap the blue magical cord or garland around the trunk, then suspend the strings of pink beads and yellow stars from the branches and surrounding railing. Several star ornaments hang at different heights, so avoid grouping them together. Immediately in front-left of the tree, place the pink Welcome sign on its curled golden stand, angled slightly toward the viewer. The brown stepping-stone path from the previous step should lead naturally toward this sign and the tree.
This area is especially important in Dreamy Room Level 816 because many similarly colored purple and pink pieces overlap. The tree belongs behind the terrace rather than on the lower hotel floor. The Welcome sign stays in front of the tree, not beside the ground-floor entrance. Once arranged correctly, this magical courtyard becomes the visual centerpiece of Dreamy Room Level 816.
Step 5. Set up the wizard, lockers, brooms, wands, and flying rabbit
Continue across the upper-right platform of Dreamy Room Level 816. Place the small wizard figure just to the right of the magical tree. The character wears a large floppy purple pointed hat and matching purple robe and holds a pale bluish accessory at the side. Behind the wizard belongs the tall lavender locker cabinet. Its multiple turquoise doors form a neat vertical grid and should stand against the rear edge of the platform.
At the far-right railing, install the wooden broom rack and hang the two yellow-bristled brooms from it. Directly in front of them is the low purple display or storage rack. Lay the collection of wands and magical objects across its top: several narrow brown wands point diagonally, while brightly colored pink, orange, blue, and tan magical pieces sit along the front. These small items are easy to misplace in Dreamy Room Level 816, so complete the rack before moving downstairs.
Finally, look above this platform. A flying rabbit belongs in the open sky at the upper-right, riding a broom horizontally. The rabbit faces left while its brown broomstick and yellow bristles extend behind and below it. This airborne object can be overlooked because it does not touch the hotel itself. Adding it is essential for matching the completed Dreamy Room Level 816 scene.
Step 6. Build the staircase, reception zone, and magical ground-floor entrance
The right side of Dreamy Room Level 816 contains a long lavender staircase descending from the wizard platform to the main floor. Place the stairs against the peach-colored wall and attach the dark purple handrail along the exposed edge. At the foot of the staircase, position the tall glowing turquoise oval mirror or magical portal on its small golden base. It sits immediately left of the lowest stair section.
On the back wall to the left, place the turquoise locker or cabinet doors. In front of them is the long reception counter. Put the closed blue book toward the left side of the counter and the golden service bell toward the right. The bear-like hotel worker in a purple cap and uniform stands in front of this area, pushing the little brown luggage trolley. Stack the larger green suitcase and lighter turquoise suitcase on top, with smaller luggage pieces stored below.
Closer to the entrance of Dreamy Room Level 816, add the turquoise Welcome mat, the ornate purple lamp post with glowing yellow panes, and the hanging wooden Hotel sign. Decorate the signpost with the small winged or bat-like ornament. These objects define the main entrance, so do not confuse the Welcome mat here with the pink Welcome board upstairs. Correctly separating these two areas is one of the placement challenges of Dreamy Room Level 816.
Step 7. Furnish the lower-left reading and fortune-telling lounge
The lower-left interior is the most detailed room in Dreamy Room Level 816, so place the large furniture before the tiny accessories. Hang purple curtains around the two orange-framed windows along the left and rear walls. Between the windows, place the small framed mirror or picture. Underneath it stands the narrow wooden mantel table. Arrange the gold three-candle candelabrum, pale blue vase, and small rectangular box across the mantel.
Set the turquoise floor lamp beside the round blue cushioned chair. The tall brown bookcase goes against the back wall to the chair's right. Fill its lower shelves with colorful books and place the shells, potion bottles, bowls, and magical containers across the top shelf. A short stack of red and green books rests on the floor beside the blue chair.
In the foreground of Dreamy Room Level 816, place the pink-and-purple upholstered chair on the rectangular purple rug. The low wooden desk faces it. Put the purple crystal ball, candle, and stacked books on the desk, then drape the long parchment scroll over its front edge. In the far-left corner, a vase of yellow-orange flowers stands on a green box pedestal. A fox- or squirrel-like character holding a tray stands between the desk and bookshelf. Each of these objects has a highly specific position, making this lounge one of the trickiest parts of Dreamy Room Level 816.
Step 8. Add the wizard coat stand, umbrellas, candles, and interior finishing pieces
Before leaving the lower level of Dreamy Room Level 816, complete the small magical accessories around the center. Near the low purple divider, position the stand holding the blue wizard hat and draped green cloak. Beside it sits the umbrella container, with the blue and pink umbrellas rising from the bucket. Several melted golden candles belong along the tops of the low purple walls: a larger cluster sits toward the left, while individual candles and smaller clusters continue toward the right.
The upper architectural beams should also be completed here. Place the long dark reddish-brown beam across the open left side above the lounge and allow green ivy to trail across its left end and down near the center. On the right building, similar dark beams run horizontally above and beside the orange-framed window. Two melted candle clusters sit on these right-side ledges, while thick green ivy drapes down from the upper beam.
These small objects give Dreamy Room Level 816 much of its magical personality, but they are also easy to attach to the wrong surface. Treat the beams, divider walls, and staircase as fixed anchors. If the candles, cloak, hat, and umbrellas match those anchors, the central portion of Dreamy Room Level 816 should line up correctly.
Step 9. Finish the exterior garden, pond, steps, vines, and spooky decorations
Complete Dreamy Room Level 816 by decorating the outer edge of the hotel. At the bottom center-left, place the irregular magical pond directly outside the lounge. Gray stones form its border, green plants grow around the rocks, and the water has a soft purple-blue appearance with a pale spiral marking in the middle. The main entrance sits to the pond's right and uses two broad purple steps leading up to the turquoise Welcome mat.
Fill the ground around the building with shrubs. Low green flowerbeds with glowing pink-orange blossoms run along the front-left and bottom-right edges. Ivy climbs the left support, crosses the upper beam, hangs from the right-side beams, and curls around the exterior architecture. On the far-right ground beneath the window, add the spooky bone arrangement: several pale skulls sit together with a crossed long bone.
Check the orange-trimmed windows on the purple walls, the cream building edges, dark wooden beams, and decorative diamond patterns as you finish. These background details frame the movable objects and help confirm alignment in Dreamy Room Level 816. The goal is to make the entire wizard hotel feel integrated into the blue grassy mound rather than placing decorative pieces randomly around it. When the pond, flowers, bones, vines, steps, and exterior walls all match the reference, the outer landscaping of Dreamy Room Level 816 is complete.
Notes and Precautions
The biggest difficulty in Dreamy Room Level 816 is determining the correct placement for each object rather than racing against a clock. Some objects appear visually similar because the whole level uses purple, pink, turquoise, gold, and green tones, so use location rather than color alone to identify them.
Pay particular attention to the two Welcome decorations: the pink Welcome board belongs beside the magical tree on the middle terrace, while the turquoise Welcome mat belongs at the ground-floor hotel entrance. Likewise, the upper sitting room has a pink sofa and orange coffee table, whereas the lower lounge contains the blue round chair, pink armchair, crystal-ball desk, and bookshelf.
Small objects in Dreamy Room Level 816 can become obscured after larger furniture is placed. Install shelves, counters, racks, railings, and tables first, then add potions, books, candles, wands, food, and cups. Also remember the flying rabbit, which sits completely away from the main structure and is therefore one of the easiest Dreamy Room Level 816 objects to miss.
Tips and Tricks from top player
A useful strategy for Dreamy Room Level 816 is to divide the picture into horizontal layers. Finish the roof and flag first, then the upper balcony, the middle courtyard, the right wizard platform, the staircase, the lower interior, and finally the exterior landscaping. This prevents objects from being mentally mixed between floors.
Use distinctive landmarks whenever you are uncertain. The Wizard Hotel sign anchors the upper-left, the enormous pink tree anchors the upper-right, the blue round chair and bookcase anchor the lower-left, and the long staircase anchors the lower-right. Once those four areas are established, most small items in Dreamy Room Level 816 have only one logical remaining space.
Another effective Dreamy Room Level 816 shortcut is to finish object groups together. Place the crystal ball with its desk, the teapot and dishes with the orange coffee table, the suitcases with the bellhop trolley, the wands with their purple rack, and the hat, cloak, and umbrellas beside the low divider. Grouping related pieces greatly reduces repeated searching and makes the final placement check in Dreamy Room Level 816 much faster.
Final Scene of Dreamy Room Level 816
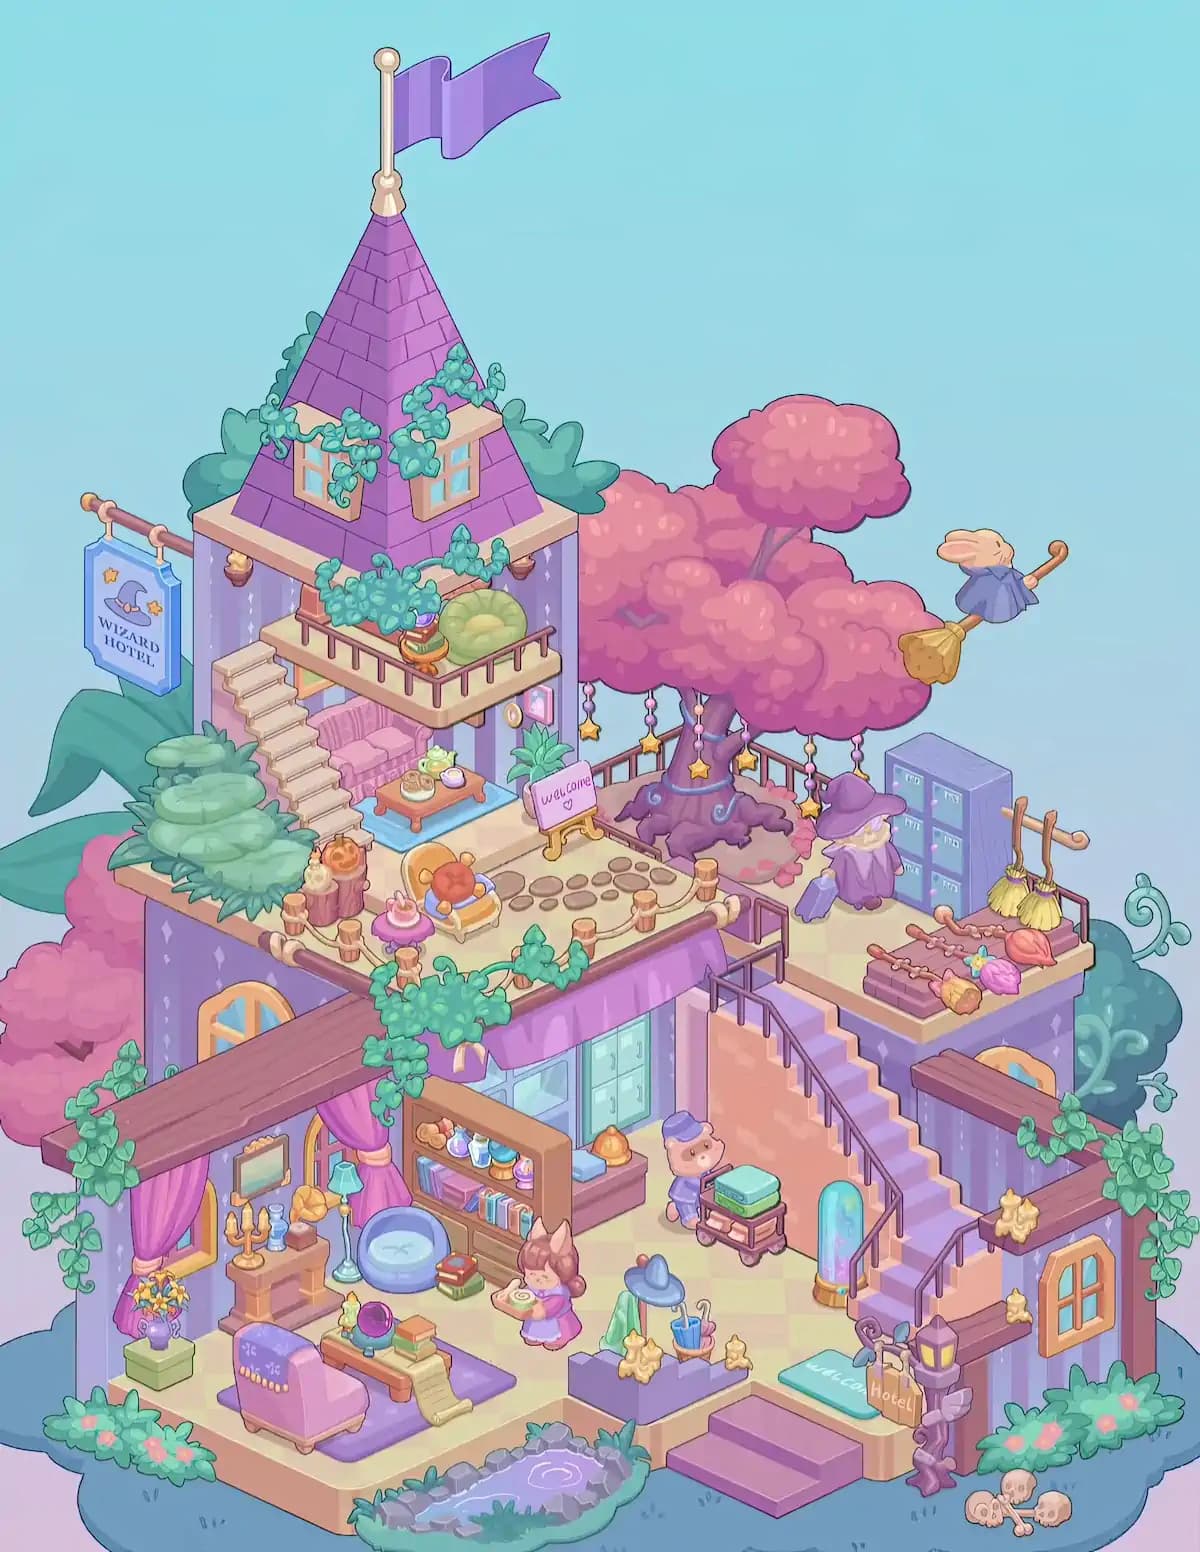
When Dreamy Room Level 816 is finished, the empty pastel landscape has become an elaborate enchanted hotel. A purple tower rises over the left side, crowned by a waving flag, ivy-covered windows, a Wizard Hotel sign, and a cozy balcony. Below it, roped pathways, tea furniture, stepping stones, and a pink Welcome sign lead toward a magnificent pink magical tree decorated with dangling stars. A purple-robed wizard waits beside lockers, brooms, and a rack of colorful magical equipment, while a rabbit flies overhead on a broom.
Downstairs, Dreamy Room Level 816 becomes a warm wizard lounge filled with curtains, books, potions, candles, a crystal ball, scrolls, flowers, and comfortable seating. A uniformed bellhop pushes stacked luggage near the reception desk, glowing portal, staircase, and hotel entrance. Outside, vines, flowerbeds, a purple magical pond, golden candles, and scattered skulls complete the charmingly spooky atmosphere of Dreamy Room Level 816.