Dreamy Room Level 860
Dreamy Room Level 860 guide - Dreamy Room 860 Walkthrough & Solution.
Important Notice Regarding Level Numbering
Due to frequent changes in Dreamy Room's level numbering and differences between platforms (Android/iOS) – for example, level 860 on Android might not be the same as level 860 on iOS – the text guide below may not always match the images and video above. Please prioritize the image and video guides. If you find that the guide content doesn't match your current level, please visit the All Level Walkthroughs page to find the correct guide based on level images. Thank you for your understanding.
Dreamy Room Level 860 Walkthroughs & Guide
Step 1. Build the suitcase structure and room extensions in Dreamy Room Level 860
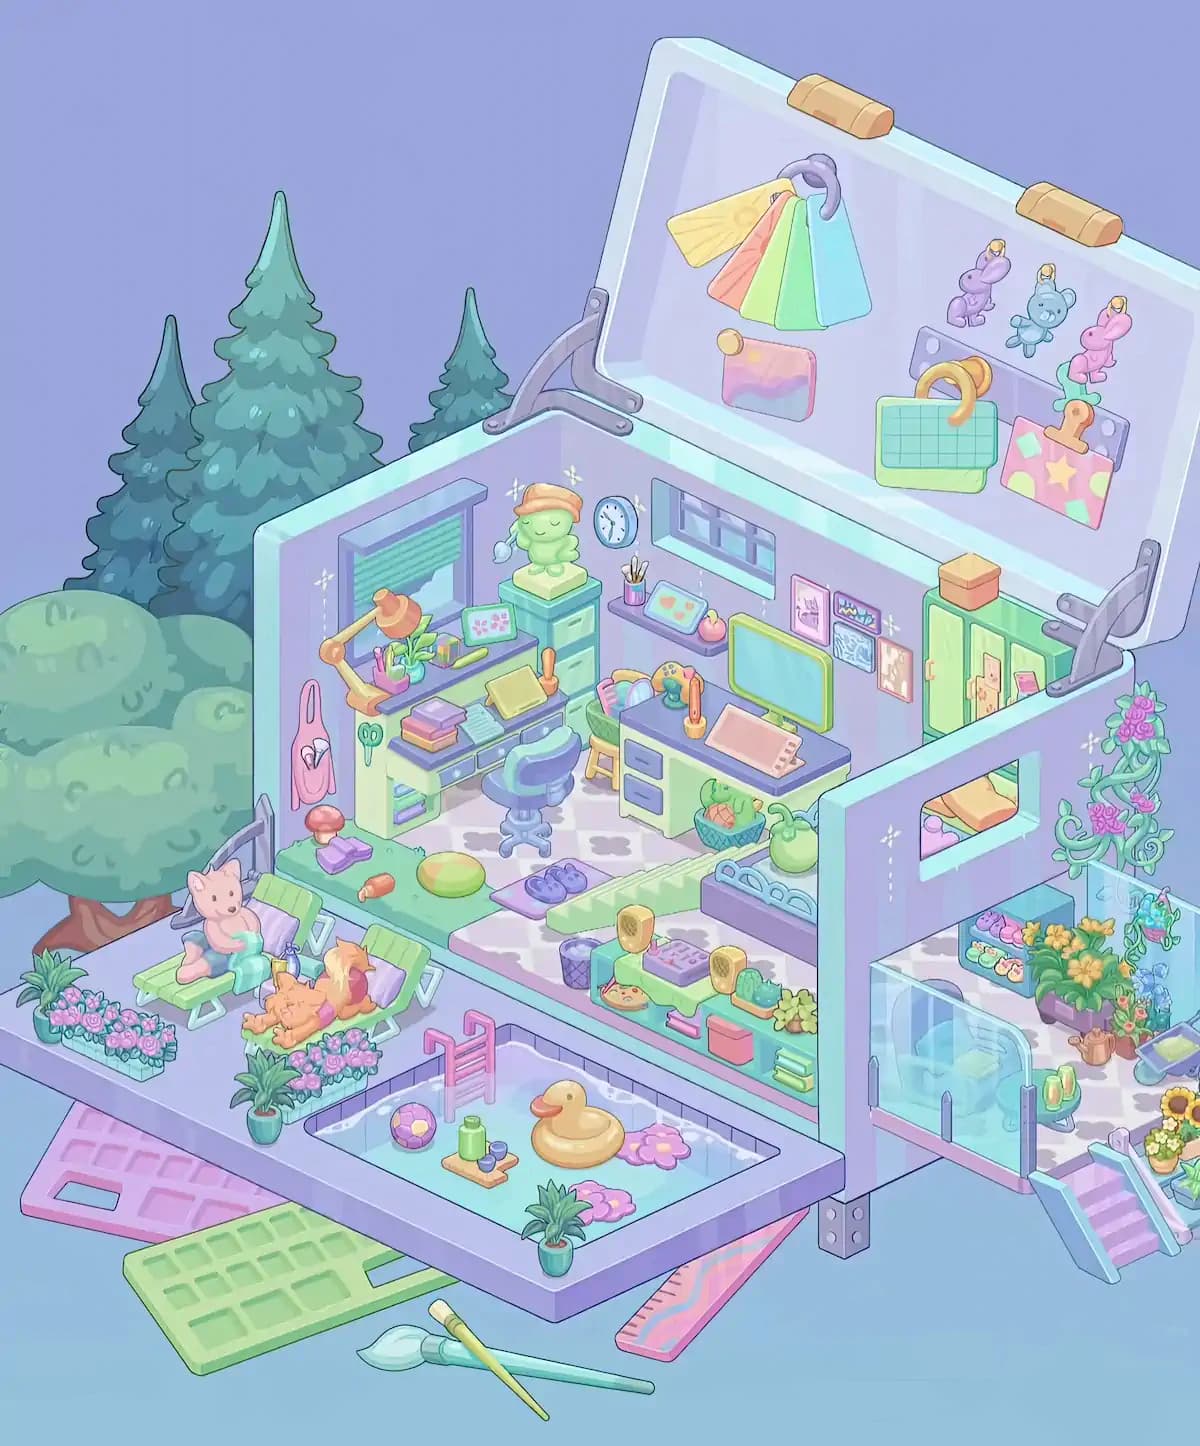
Begin Dreamy Room Level 860 with the largest structural components. Open the enormous pale-lavender suitcase lid upward behind the main room so it rises diagonally above the back and right walls. The lid should be supported by the curved gray-purple hinges on both sides, with two tan rectangular clasps along its upper rim. Keep the original striped lavender-and-mint room as the central workspace. Extend the open platform toward the front-left, create the recessed pool area along the lower edge, and establish the separate lower-right room beneath the tall right wall. That side section has a white-and-lavender patterned floor and a short mint-and-pink staircase at its front entrance. In Dreamy Room Level 860, getting these large pieces correct first is important because almost every small item is positioned relative to them. The completed Dreamy Room Level 860 layout should now resemble an opened travel case containing several miniature rooms.
Step 2. Decorate the raised suitcase lid in Dreamy Room Level 860
The inside of the lid becomes a display board for the travel accessories in Dreamy Room Level 860. Near the upper-left portion of the lid, hang the fan-shaped collection of pastel swatches from the lavender ring. The swatches spread downward in yellow, coral, light green, green, and aqua tones. Directly below them goes the small rectangular pink-and-lilac pouch with its round yellow detail. Across the upper-right half, arrange the three tiny hanging animal charms in a horizontal row: purple on the left, blue in the middle, and pink on the right. Beneath those charms, attach the mint-green checked handbag with its large golden circular handle. The pink decorated travel case or tag belongs immediately to its right, decorated with a yellow star, mint geometric patches, and a golden hook-like emblem. Correct spacing matters in Dreamy Room Level 860, so do not crowd these accessories together. Once finished, this section gives Dreamy Room Level 860 its distinctive oversized suitcase theme.
Step 3. Complete the left craft desk in Dreamy Room Level 860
Move into the main room and work on the left-hand workstation. In Dreamy Room Level 860, the mint desk sits against the back-left wall directly beneath the window with the teal horizontal blind. Place the articulated orange desk lamp at the far-left corner of the desktop, angling its shade inward. Arrange the small containers of pens, pencils, and craft tools nearby, together with the leafy plant, the small floral picture, and the long green stationery item. Stack the pastel books and papers on the lower and middle portions of the desk, and position the pale yellow open notebook or drawing board toward the right side. Hang the green scissors beneath the pink hanging bag on the left wall. The pink mushroom-shaped stool or ornament and purple block sit on the floor nearby. Finish this Dreamy Room Level 860 workstation by putting the blue-and-lavender wheeled office chair directly in front of the desk. This densely packed desk is one of the trickiest placement zones in Dreamy Room Level 860.
Step 4. Fill the rear wall, computer desk, and storage area in Dreamy Room Level 860
Next, decorate the rest of the back wall in Dreamy Room Level 860. To the right of the craft desk, place the tall mint drawer pedestal and set the sleepy green figurine wearing the orange cap on top. The round blue-rimmed clock belongs on the wall just to its right. Under the long horizontal window, attach the narrow purple shelf holding the cup of brushes, the small pastel picture tile, and the tiny pink object. Farther right, position the second mint desk with its dark-purple top. The large aqua monitor sits against the wall, while the coral-pink tablet or drawing pad rests diagonally on the desktop and the small upright orange tool stands near the opposite side. Behind the desk, tuck in the basket filled with colorful rolled materials. Complete this Dreamy Room Level 860 wall with the three small framed artworks above the monitor and the tall green wardrobe at the far-right corner. Put the orange storage box on top of the wardrobe. These landmarks make later Dreamy Room Level 860 placements much easier.
Step 5. Arrange the toys, cushions, and floor accessories in Dreamy Room Level 860
The center of Dreamy Room Level 860 contains many small pieces that are easy to confuse with desk accessories. Lay the patterned white-and-lavender floor area between the two workstations, leaving the front-left strip green. Put the round yellow-green cushion on that green section, with the small orange handheld object nearby. The purple mat containing the pair of blue slippers belongs closer to the middle. Stretch the long mint stepped or wedge-shaped piece diagonally through the central area toward the right. At the right edge, place the low purple rack with its row of rounded arches, along with the woven basket holding the orange item and the round green container beside it. Along the front interior ledge of Dreamy Room Level 860, arrange the two small green devices or seats with tan upright backs, the purple control pad between them, and the surrounding tiny decorative pieces. Store the coral box, pink accessory, and stacked green books directly underneath. Precise positioning here is essential because Dreamy Room Level 860 uses nearly every available patch of floor.
Step 6. Create the cat lounge and flower terrace in Dreamy Room Level 860
The front-left terrace becomes one of the cutest sections of Dreamy Room Level 860. Set two mint-green reclining lounge chairs side by side, angled toward the viewer. The pale pink cat sits upright on the left lounger with the aqua blanket or cushion draped around it. The orange cat stretches across the right lounger, resting beside the purple cushion and the warm coral-orange soft accessory. Surround this little relaxation area with the rectangular flower boxes full of pink blossoms: one runs along the far-left edge and another borders the front of the loungers. Add the small potted green plant near the lower edge. Behind the chairs, close to the main room wall, keep the tiny mushroom ornament and purple base visible rather than hiding them behind the furniture. Dreamy Room Level 860 relies heavily on layering, and this area demonstrates why. When correctly arranged, the lounge should feel connected to the workspace while remaining clearly separate from the pool below, giving Dreamy Room Level 860 a cozy indoor-outdoor atmosphere.
Step 7. Assemble the swimming pool in Dreamy Room Level 860
Fill the recessed rectangular section at the front with the pale aqua swimming pool. In Dreamy Room Level 860, the pink ladder attaches to the rear-left edge of the pool, while the purple-and-yellow beach ball floats nearby. Place the small wooden tray with the tall green bottle and two smaller containers in the left half of the water. The large yellow duck float dominates the center and should face toward the left side. Two pink flower-shaped floats decorate the right half and lower portion of the pool. A small potted leafy plant sits on the front rim rather than in the water. Keep the water accessories spread apart so that every object remains visible. The pool is an important visual landmark in Dreamy Room Level 860, and incorrect placement of even a tiny bottle or float can prevent completion. Once the ladder, ball, tray, duck, flowers, and plant are all correctly positioned, the entire lower-left portion of Dreamy Room Level 860 should match the finished arrangement.
Step 8. Furnish the flower room on the right in Dreamy Room Level 860
The lower-right chamber of Dreamy Room Level 860 is a bright garden-and-bathing nook. Place the large curved transparent glass enclosure on the left side, with the pale aqua basin and mint seat or cushion visible through it. Just outside the glass, set the tiny round mint table holding the pair of yellow-green bottles or containers. Along the rear wall, position the low blue shelving unit displaying the rows of pastel accessories. The rectangular opening above it should reveal the folded yellow, coral, and pink textiles stored behind the wall. Fill the right side with plants: a large purple planter overflowing with yellow flowers, smaller pots containing blue and orange blossoms, and the little copper-colored watering can on the floor. Add the hanging blue-green plant beside the glass panel. The tall curling vine covered in pink roses climbs the outer wall above this room. At the entrance, place the sunflower and white-flower planters beside the pink staircase. Dreamy Room Level 860 is especially strict here because many floral pieces look similar.
Step 9. Add the oversized craft pieces and final exterior details in Dreamy Room Level 860
Finish the exterior of Dreamy Room Level 860 with the unusual oversized craft objects scattered underneath the front platform. Slide the large pink keyboard-like panel out from beneath the left side of the terrace, with its rectangular cutout still visible. The matching green panel belongs below and slightly farther toward the center. Under the right portion of the pool, position the long coral-and-pink striped rectangular piece diagonally. At the very bottom, lay the enormous mint paintbrush horizontally, pointing from the lower-right toward the lower-left, and cross it with the thin yellow brush or stylus. These deliberately oversized objects make the entire Dreamy Room Level 860 scene feel like a tiny world built inside an artist’s travel case. The surrounding scenery also frames the result: the huge leafy tree rises behind the left terrace, while several dark mint conifers stand farther back. After these elements are visible and nothing important is hidden, compare the whole Dreamy Room Level 860 arrangement from left to right before attempting any final corrections.
Notes and Precautions
The biggest difficulty in Dreamy Room Level 860 is distinguishing objects that belong on furniture from objects that belong directly on the floor or walls. Start with structural pieces and large furniture, because small objects in Dreamy Room Level 860 often occupy narrow placement zones beside or on top of larger items. The craft desk, central floor, suitcase lid, and right flower room are the most crowded sections.
Watch the orientation of asymmetric objects. The orange desk lamp must point inward, the computer desk has a specific left-right arrangement, the pool ladder stays at the rear-left, and the large duck float has a definite facing direction. The cats also belong on different loungers. If Dreamy Room Level 860 refuses to register a nearly complete area, inspect these directional objects before moving everything else.
Do not mistake decorative background elements such as the distant trees for unpacked furniture. In Dreamy Room Level 860, concentrate on the objects that visibly occupy the suitcase, terraces, pool, and garden room. Most errors come from placing a correct object in the correct general area but on the wrong nearby snap point.
Tips and Tricks from top player
For a faster Dreamy Room Level 860 clear, divide the scene into zones instead of unpacking items randomly. Complete the suitcase lid first, then the left desk, rear wall, center floor, cat terrace, swimming pool, and finally the flower room. This prevents Dreamy Room Level 860 from becoming visually cluttered while you are still searching for placement points.
Use distinctive objects as anchors. The giant suitcase lid, orange desk lamp, sleepy green figurine, computer monitor, two cat loungers, yellow duck float, curved glass enclosure, and rose-covered vine each identify a specific region immediately. Once those anchors are correct, place smaller matching objects around them.
When an item seems impossible to place in Dreamy Room Level 860, test the vertical level as well as the horizontal location. Several tiny accessories belong on shelves, inside storage areas, or on the front display ledge rather than directly on the patterned floor. Keeping small objects until the corresponding furniture is already installed is one of the easiest ways to make Dreamy Room Level 860 considerably faster.
Final Scene
The completed Dreamy Room Level 860 looks like a magical pastel suitcase that has unfolded into an entire miniature retreat. The raised lid displays colorful fabric swatches, animal charms, bags, and travel keepsakes above a busy craft studio filled with desks, books, stationery, artwork, storage cabinets, and playful floor accessories. To the left, two cats relax on mint loungers surrounded by pink flowers beneath a huge leafy tree. Directly below them, a sparkling pool contains a beach ball, drink tray, enormous yellow duck, and flower floats. On the opposite side of Dreamy Room Level 860, a glass bathing enclosure opens into a lush flower room packed with blossoms, vines, sunflowers, planters, and a watering can. Giant keyboard panels and oversized brushes scattered underneath reinforce the whimsical scale. Together, every carefully positioned object transforms Dreamy Room Level 860 from an empty pastel shell into a cozy, imaginative combination of studio, vacation hideaway, garden, and miniature resort.