Dreamy Room Level 792
Dreamy Room Level 792 guide - Dreamy Room 792 Walkthrough & Solution.
Important Notice Regarding Level Numbering
Due to frequent changes in Dreamy Room's level numbering and differences between platforms (Android/iOS) – for example, level 792 on Android might not be the same as level 792 on iOS – the text guide below may not always match the images and video above. Please prioritize the image and video guides. If you find that the guide content doesn't match your current level, please visit the All Level Walkthroughs page to find the correct guide based on level images. Thank you for your understanding.
Dreamy Room Level 792 Walkthroughs & Guide
Step 1. Build the platform boundaries and dark wooden fencing.
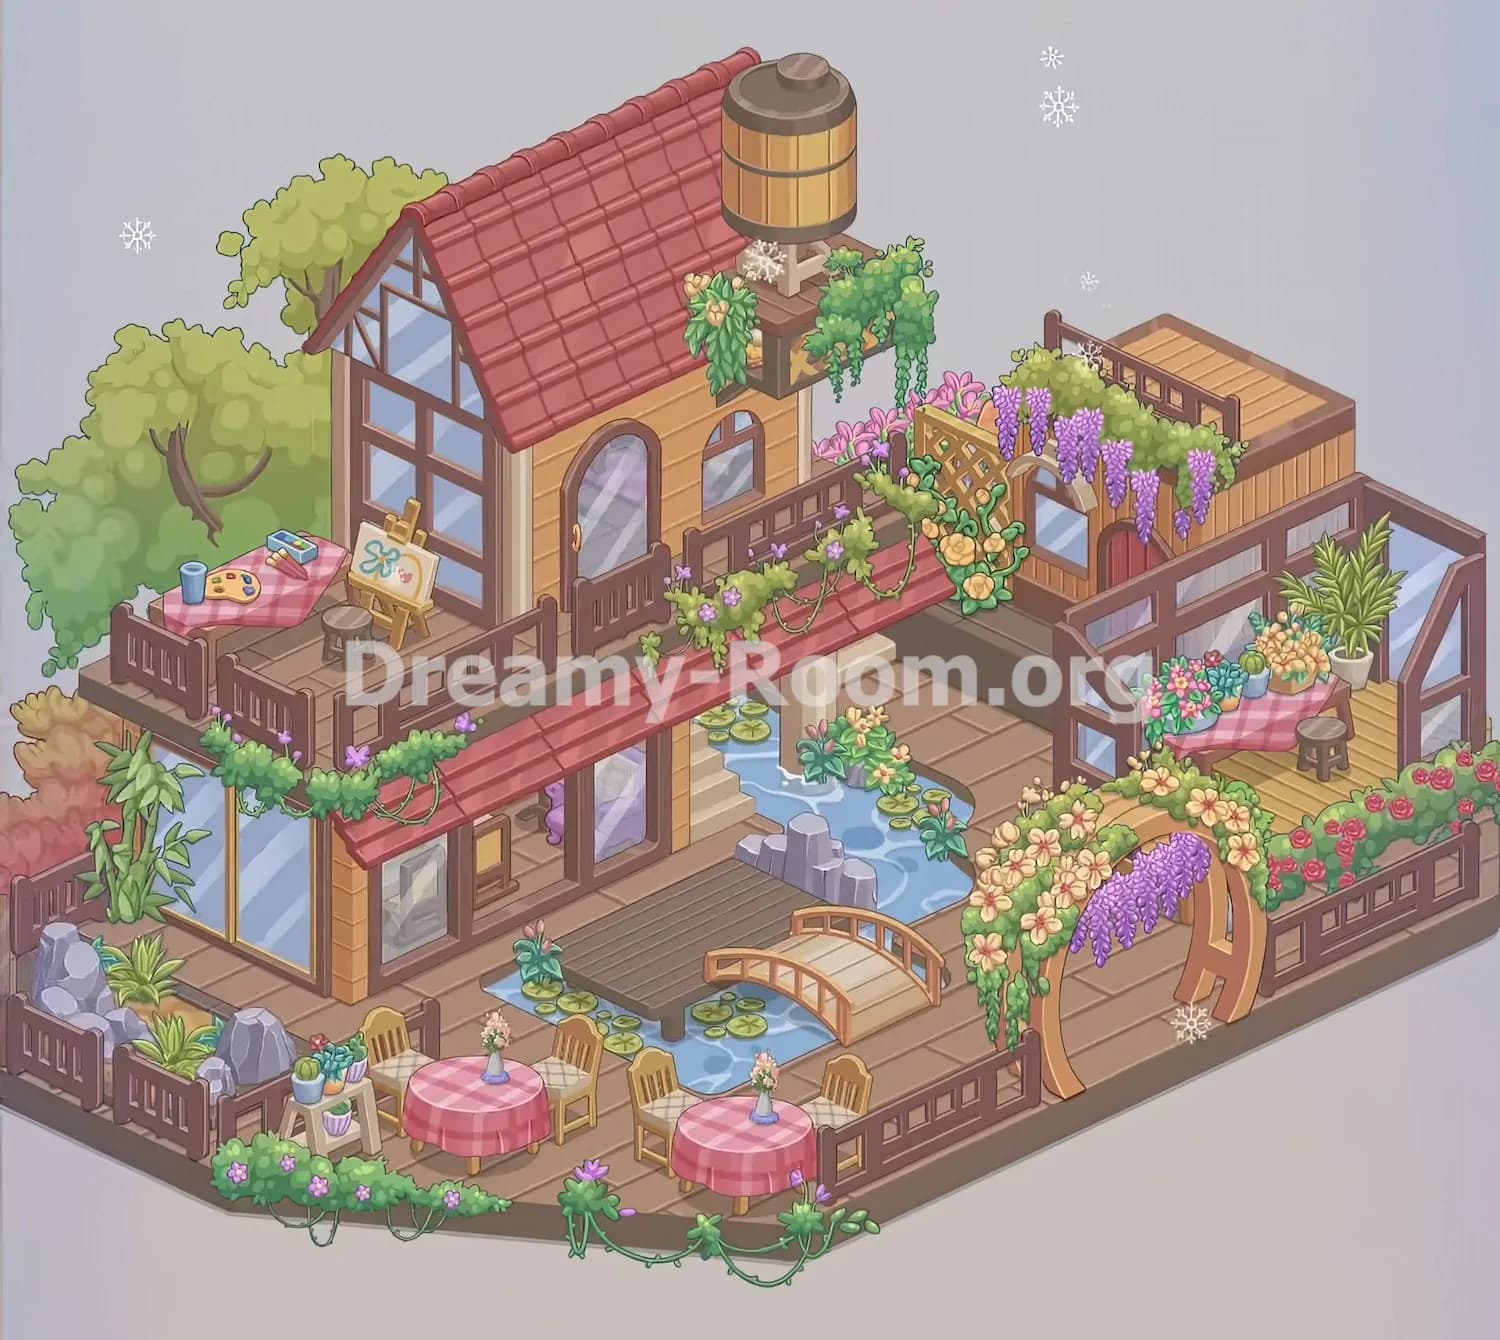
Begin Dreamy Room Level 792 by establishing the outline of the property on the empty plank platform. Place the dark brown wooden fencing around the left, front, and right edges, leaving the necessary openings for the walkways and decorative arch rather than forming one completely closed rectangle. The fence uses thick posts and inset rectangular panels, so pay attention to the direction of every section. Along the lower/front edge of Dreamy Room Level 792, the fence frames the café seating area, while the left fence surrounds the future rock-and-bamboo garden. Continue the same railing style around the right-side flower garden and greenhouse area.
This boundary is one of the most useful placement references in Dreamy Room Level 792 because almost every later object lines up with it. Do not fill the middle of the platform with small items yet. Instead, confirm the corners and fence segments first. Decorative green vines with small purple flowers eventually hang across parts of the lower fence, but save those for later. Dreamy Room Level 792 becomes much easier when the outer footprint is correct before the larger buildings are added.
Step 2. Place the main two-story house on the back-left side.
The largest structure in Dreamy Room Level 792 belongs slightly left of center, occupying most of the back-left half of the platform. Position the main house with its warm golden-tan horizontal siding facing the viewer. The lower floor has dark brown timber framing, broad blue-tinted glass panels on the far left, additional tall windows toward the middle, and a smaller framed wall section near the center. A small purple interior object can be seen through one of the lower glass openings, so do not accidentally cover that portion with exterior decoration.
The upper floor of Dreamy Room Level 792 contains the prominent tall glass wall on the left side, divided into rectangular and triangular panes by dark timber beams. On the front-facing upper wall, place the tall arched glass door near the center-left and the smaller arched window to its right. Both use dark brown trim. Dreamy Room Level 792 relies heavily on these architectural landmarks, so make sure the upper door, small window, lower windows, and timber framing all face the front before adding the roof or balconies.
Step 3. Add the large red tiled roof and upper balcony structure.
Once the house walls are secure, give Dreamy Room Level 792 its most recognizable architectural feature: the steep red tiled gable roof. Set the roof directly over the main left-hand house, with the ridge running diagonally toward the upper-right of the image. The roof should extend down over both sides of the triangular upper glass wall without hiding it. Its repeating red tiles make the orientation easy to verify; if the roof seems to cover the wrong windows, rotate or reposition it before continuing.
Next, construct the dark brown upper balcony railing across the front of the second floor. In Dreamy Room Level 792, this balcony begins at the far-left painting terrace and continues toward the arched upper door. Its square posts and repeating rectangular panels match the outer fence but sit one floor higher. There is also a longer red sloping canopy below this balcony, but that comes in a later step. At this stage, Dreamy Room Level 792 should clearly resemble a tall garden house rather than an empty deck, with the gable roof, glass façade, balcony floor, railing, arched door, and small arched window all aligned.
Step 4. Complete the rear scenery, trees, and elevated wooden water tank.
The background elements give Dreamy Room Level 792 much of its cozy garden atmosphere. Behind the left side of the house, place the large leafy trees so their trunks and crowns rise above and around the building without covering the façade. A broad green tree fills the far-left background, while a lighter yellow-green tree appears immediately behind the tall triangular glass wall. Lower reddish and ochre foliage fills the back-left corner closer to the platform. These trees belong behind the structures, so they are easiest to place before the foreground garden becomes crowded.
At the upper-right corner of the main roof, add the raised water-tank structure. The tank in Dreamy Room Level 792 is a large cylindrical wooden barrel with vertical golden boards, dark horizontal bands, and a rounded dark-brown lid. It sits high above the house on a small brown support tower rather than directly on the roof. Beneath it, add the pale support base and the surrounding leafy plants with yellow blossoms and hanging greenery. Dreamy Room Level 792 also includes a few white snowflake-like sparkle effects around this high area; treat these as finishing effects rather than structural objects.
Step 5. Furnish the upper-left painting and hobby balcony.
The far-left upper balcony becomes a tiny creative studio in Dreamy Room Level 792. First place the rectangular table against the left railing and cover it with the pink-and-red checkered cloth. On the tabletop, arrange the tall blue cup near the left side, the yellow painter’s palette with colored paint spots near the front, and the stack of colorful books or art boxes toward the rear-right. Small red and yellow drawing or painting tools rest beside the stack. Because these objects are tiny, Dreamy Room Level 792 may reject them if they are dropped on the wrong portion of the tabletop.
Immediately to the right of the table, position the wooden easel facing outward toward the viewer. Its canvas shows a simple colorful flower or butterfly-like drawing. Place the small round dark wooden stool in front of and slightly left of the easel. The railing should remain visible around all three pieces. Dreamy Room Level 792 uses this art corner as a distinct visual cluster, so avoid placing any of these items downstairs even though the stool and table may resemble other furniture used elsewhere in the level.
Step 6. Install the long red canopy and flowering balcony vines.
A long narrow red tiled canopy stretches across the middle of Dreamy Room Level 792, directly below the second-floor balcony and above the ground-floor windows. Place this sloping roof section from the left side of the house toward the open central garden. It creates a strong horizontal line that visually separates the upper balcony from the ground floor. A shorter continuation also runs toward the central-right side underneath the upper garden area.
After the roof pieces are positioned, decorate them with the green flowering garlands. Dreamy Room Level 792 places thick leafy vines along the upper edge of the canopy, dotted with small purple flowers. Several thin vines loop downward in loose curves before climbing back toward the foliage. Continue matching greenery along the left balcony edge. Near the right end, install the brown lattice trellis and train the curling green vine with large golden-yellow roses across it. Behind this trellis, Dreamy Room Level 792 includes a cluster of tall pink flowers. These plant layers overlap heavily, so the red roof should always be placed before the vines, flowers, and trellis.
Step 7. Build the elevated upper-right garden room and wisteria entrance.
The upper-right section of Dreamy Room Level 792 contains a separate compact wooden room. Place this structure behind the central courtyard and slightly higher than the greenhouse area. It has warm vertical wooden siding, a dark brown frame, a small upper deck or roof enclosed by dark railing, and a front-facing arched entrance. The red arched door sits on the right side of its front wall, while a blue-tinted arched window occupies the left portion.
Cover the roofline and entrance with the dense foliage shown in the completed Dreamy Room Level 792 image. A broad light-green hedge stretches across the top, and multiple long bunches of purple wisteria hang downward above the window and doorway. The flowers should descend at different lengths rather than forming a straight curtain. Dreamy Room Level 792 also places more pink blooms immediately to the left of this little room, connecting it visually to the rose-covered trellis from the previous step. A few white snowflake-like decorative sparkles appear near the upper railing. The correct placement is important because the room forms the high point of the right-side garden.
Step 8. Assemble the glass greenhouse and right-side plant display.
Directly below and to the right of the wisteria room, build the greenhouse-like garden enclosure. Dreamy Room Level 792 uses dark brown framing around large transparent blue glass panels, with a warm wooden plank floor inside. The enclosure sits against the far-right edge of the platform and has a tall triangular glass section at its outer-right end. Keep the interior open enough to show the furniture and plants.
Inside the greenhouse, place another rectangular table with a pink checkered cloth. Cover its surface with the dense assortment of flowering pots seen in Dreamy Room Level 792: pink blossoms, small red flowers, blue-green succulents, yellow-orange blooms, and several little pots grouped closely together. Place the large tall leafy plant in a pale pot at the table’s right-rear corner. A short dark wooden stool belongs on the floor immediately in front of the table. Outside the greenhouse, Dreamy Room Level 792 has a long raised bed of vivid red roses running along the right edge. Fill the bed evenly with green leaves and red flower heads while keeping the brown perimeter railing visible beneath it.
Step 9. Create the central stream, stairs, rocks, flowers, and lily pads.
The water feature is the heart of Dreamy Room Level 792. Start at the rear-middle area beneath the upper balcony, where a short set of pale stone steps descends toward the water. The blue stream begins beside these stairs and winds forward through the central garden. Place the upper water section first, then continue it toward the lower center. The stream does not follow a straight channel; its edges curve around plants, rocks, and the walking surfaces.
Add the gray rock cluster near the middle-left edge of the water, just beyond the bottom of the steps. Dreamy Room Level 792 scatters round green lily pads across both the upper and lower portions of the stream, including several grouped beside the stairs, beneath the dark deck, and around the bridge. Insert flowering aquatic plants along the edges: broad teal leaves with pink buds, clusters of pale yellow and orange flowers, and several green stems rising directly from the water. Dreamy Room Level 792 becomes visually busy here, so use the water’s shape as your guide and avoid confusing lily pads with the small potted garden plants used elsewhere.
Step 10. Place the central deck and arched wooden bridge over the lower stream.
At the lower-middle portion of Dreamy Room Level 792, place the dark brown rectangular wooden deck over the left side of the stream. It sits immediately in front of the house and extends toward the central water, with narrow horizontal floorboards and short supporting legs. Water and lily pads remain visible around its front and right edges. This deck must be positioned before the bridge because the two objects sit very close together and can otherwise obscure their placement zones.
Now add the light wooden arched bridge to the right of the deck. The bridge in Dreamy Room Level 792 curves gently upward over the stream and has railings on both sides made from warm orange-brown wood. Its pale plank walkway runs from the lower-central café side toward the central-right courtyard. Lily pads sit beneath and around it, particularly on the front and left sides. Dreamy Room Level 792 requires the bridge to follow the stream rather than the plank lines of the main platform, so use the water channel as the alignment reference. When correct, the deck and bridge form the main transition between the house, café, and right-hand garden.
Step 11. Finish the lower-left bamboo and rock garden.
The lower-left corner of Dreamy Room Level 792 is a compact planted garden enclosed by the dark wooden fence. Place the tall bamboo cluster against the left wall of the house, where several pale-green segmented stems and long pointed leaves rise almost as high as the upper balcony. Below it, arrange the gray decorative boulders against the outer fence. One rock cluster occupies the extreme left corner, while a larger upright gray stone sits closer to the front-center of this planted strip.
Fill the spaces between the rocks with the smaller yellow-green and bright-green leafy plants. Dreamy Room Level 792 also places a narrow walkway between this rock garden and the house façade, so do not push the stones too far inward. Near the café end of the garden, set down the small pale plant stand. Its tiers hold several colorful pots, including blue and green containers, a tiny cactus or succulent, and a lavender-colored hanging pot below. Dreamy Room Level 792 uses these tiny plants to connect the wild rock garden with the organized café area, so check the stand’s position against the first round table before moving on.
Step 12. Arrange the two front café tables, chairs, vases, and border vines.
The front edge of Dreamy Room Level 792 becomes a small outdoor café. Place two round tables across the lower portion of the platform, each covered with a pink-and-white checkered tablecloth that hangs almost to the floor. The left table sits just right of the plant stand, while the second table belongs farther right, close to the front fence and bridge approach. Place a slim blue-gray vase containing a small bunch of pale pink flowers at the exact center of each tabletop.
Arrange the wooden dining chairs around the tables according to the completed Dreamy Room Level 792 image rather than trying to create perfect symmetry. The left table has chairs tucked around its rear and sides, and the right table has additional chairs positioned beside and behind it, all using the same golden wood and light woven seat design. Finally, decorate the lower fence with low green shrubs, purple flowers, and trailing vines. Dreamy Room Level 792 has particularly noticeable looping vines hanging over the front edge below both tables, with several purple buds and flowers breaking up the greenery. These pieces are best placed last because their snap areas can be difficult to distinguish from the nearby chairs and fence posts.
Step 13. Complete the large flower arch and final right-side landscaping.
The final major landmark in Dreamy Room Level 792 is the tall orange-brown flower arch at the front-right corner. Position the two thick curved wooden supports on either side of the walkway between the café area and the greenhouse garden. The arch should frame the path without blocking the red rose bed behind it. Across the top and left curve, layer the abundant pale yellow and cream flowers, using green leaves to create a thick floral crown. Dreamy Room Level 792 also hangs a large cluster of purple wisteria from the upper-right portion of the arch, with additional long green tendrils dropping down the left side.
Continue the surrounding foliage so that the arch visually connects to the central water garden and the greenhouse. The right rose hedge should remain visible behind it, while the front fence ends immediately beside the arch opening. Dreamy Room Level 792 includes another small white snowflake-like sparkle near the lower portion of the right support. Once the arch, hanging flowers, roses, vines, and small sparkle details are all present, scan the entire Dreamy Room Level 792 scene for any leftover plant, chair, pot, lily pad, railing section, or tiny tabletop object.
Notes and Precautions
Dreamy Room Level 792 contains far more overlapping pieces than the empty starting platform suggests. The most important precaution is to avoid decorating too early. Large architecture, floor structures, fences, water, roof sections, and major garden rooms should always go down first. If a vine or flower cluster is placed before the object underneath it, Dreamy Room Level 792 can become visually confusing because the decoration may hide the exact snapping point needed for the structural piece.
Pay particular attention to similar-looking objects. Dreamy Room Level 792 contains multiple dark brown fence sections, several kinds of green vines, many flower pots, numerous lily pads, two pink café tables, and multiple stools or chairs. Their appearances are similar, but their intended locations are not interchangeable. The painting stool belongs upstairs, the dark stool belongs inside the greenhouse, and the dining chairs belong at the front tables.
The water area is another common trouble spot in Dreamy Room Level 792. Place the stream before the lily pads, rocks, aquatic plants, deck, and bridge. Likewise, complete the upper-right wooden room before adding its wisteria. There is no need to rush: the supplied Dreamy Room description specifically emphasizes relaxed play without a timer, allowing you to concentrate on the correct location for every item. Dreamy Room Level 792 rewards careful visual matching much more than speed.
Tips and Tricks from top player
For Dreamy Room Level 792, use the biggest objects as anchors. The main house, roof, outer fence, upper-right room, greenhouse, stream, and bridge define almost the entire scene. Once those are correct, each small object can be identified according to the space that remains around those anchors. This approach is faster than experimenting randomly with dozens of tiny decorations.
Another strong Dreamy Room Level 792 strategy is to follow the scene from back to front. Build the trees and rear architecture first, then the upper balconies, then the central water feature, and finally the café tables and foreground vines. The isometric perspective means objects near the front can partially conceal objects farther back, so reverse ordering often creates unnecessary placement problems.
Use distinctive colors to solve ambiguous pieces in Dreamy Room Level 792. Red tiles identify roofs and canopies; pink checks identify tables; purple hanging clusters identify wisteria; pale yellow flowers belong heavily around the right arch; red roses form the right-side hedge; and blue water pieces remain concentrated through the center. For tiny Dreamy Room Level 792 decorations, compare neighboring objects instead of the entire scene. A flower pot is easier to place when you first identify its table, and a vine is easier to place when you identify the exact railing or roof edge it follows.
Finally, leave the smallest loose items for the end of Dreamy Room Level 792. The palette, cup, art supplies, small pots, vases, flowers, lily pads, and decorative sparkles are much easier to position after the large scenery has established their exact visual context.
Final Scene of Dreamy Room Level 792
The completed Dreamy Room Level 792 is a lush multi-level garden retreat built around a warm timber house with a steep red tiled roof. Large trees rise behind the glass-fronted building, while an elevated wooden water tank overlooks balconies covered in flowering vines. The upper-left terrace becomes a charming painting corner with a checkered table, palette, art supplies, stool, and easel. Across the property, purple wisteria, golden roses, pink blossoms, red roses, bamboo, potted plants, and trailing greenery soften every railing and roofline. A winding blue stream filled with lily pads and flowers descends through the center of Dreamy Room Level 792, passing gray stones, a dark deck, and a graceful wooden bridge. Two checkered café tables occupy the front terrace, while the right side contains a glass greenhouse and spectacular flower-covered arch. Altogether, Dreamy Room Level 792 turns the bare platform into an intricate, peaceful garden home.