Dreamy Room Level 699
Dreamy Room Level 699 guide - Dreamy Room 699 Walkthrough & Solution.
Important Notice Regarding Level Numbering
Due to frequent changes in Dreamy Room's level numbering and differences between platforms (Android/iOS) – for example, level 699 on Android might not be the same as level 699 on iOS – the text guide below may not always match the images and video above. Please prioritize the image and video guides. If you find that the guide content doesn't match your current level, please visit the All Level Walkthroughs page to find the correct guide based on level images. Thank you for your understanding.
Dreamy Room Level 699 Walkthroughs & Guide
Step 1. Place the main blue shop structure against the back-right corner.
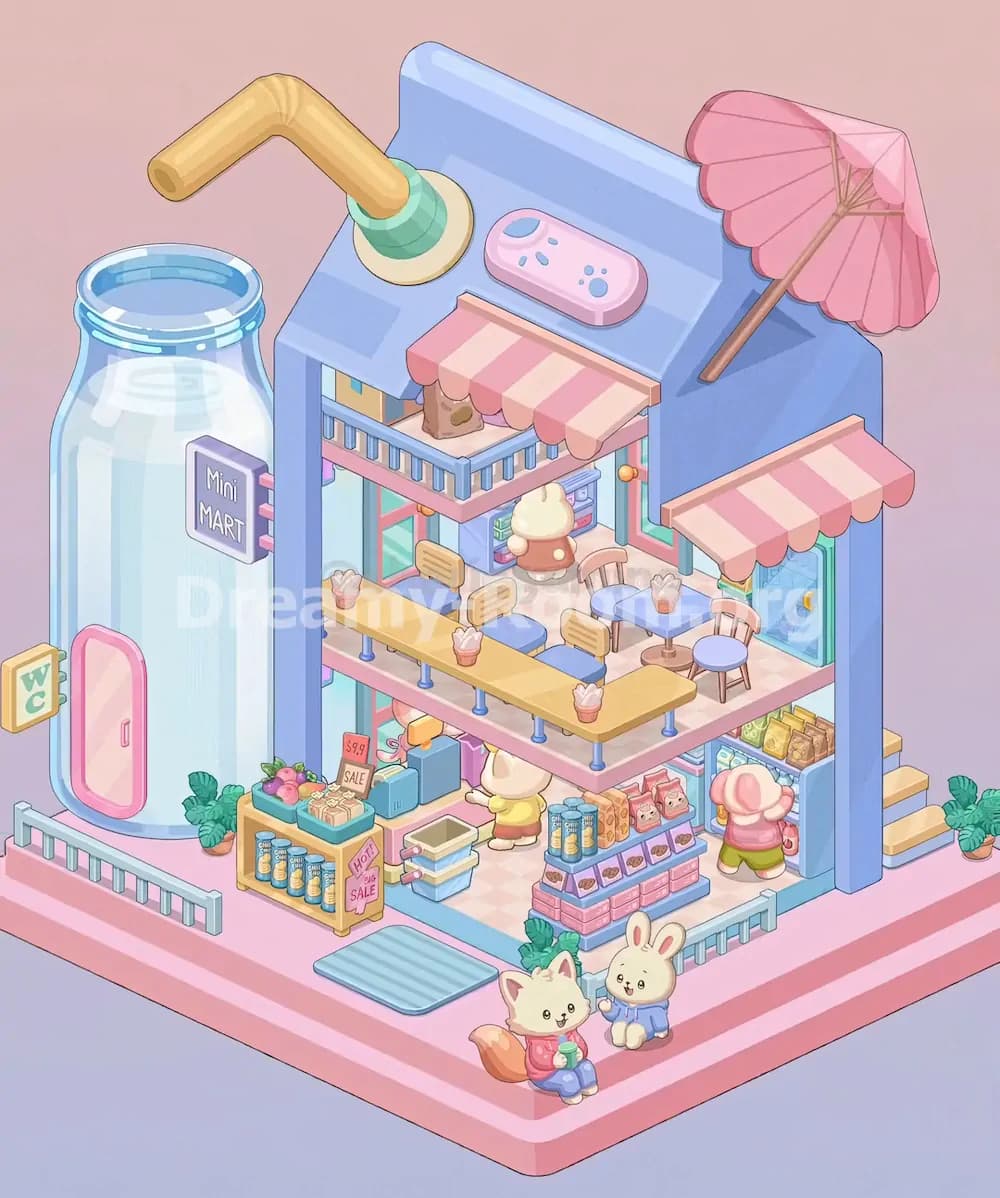
Start Dreamy Room Level 699 by anchoring the largest object first: the blue two-story shop frame. Place it tightly against the back-right corner of the empty room, using the tall blue walls as your alignment guide. The building should face diagonally toward the front-left, with the open storefront visible from the viewer’s angle. In Dreamy Room Level 699, this large structure determines where almost every later object belongs, so do not place smaller decorations first. The upper wall should rise above the second floor, while the right side should leave enough space for the outside staircase. Make sure the lower shop area sits directly on the pink checkered floor and that the open front edge lines up with the platform’s front border.
Step 2. Build the giant bottle feature on the left side.
Next in Dreamy Room Level 699, place the tall transparent bottle on the left side of the shop. It should stand outside the main blue building, almost touching the left wall area, with its rounded body rising higher than the first floor. The bottle contains pale blue liquid and acts like a themed exterior wall or drink container decoration. Attach the pink rounded door near the bottle’s lower-right side, facing forward. Add the small “WC” sign to the left of the door and the dark “Mini MART” sign on the bottle’s upper-right front. In Dreamy Room Level 699, the bottle is one of the easiest objects to misalign because it looks separate from the shop, but it must sit snugly beside the building rather than floating too far away.
Step 3. Add the rooftop drink pipe, control panel, and pink parasol.
Now work on the roof details of Dreamy Room Level 699. Place the curved yellow straw-like pipe across the upper-left roof. Its green connector and cream circular base should sit near the top-left roof surface, while the bent yellow tube points outward toward the upper-left corner. Then place the small pink controller-like sign on the roof’s center front area; it has blue paw-print-style buttons and should rest flat on the blue roof. On the upper-right roof, place the large pink parasol. Its pole angles downward toward the lower-left, and the fan-shaped umbrella canopy opens toward the upper-right. These rooftop items give Dreamy Room Level 699 its playful drink-shop identity, so check that they do not overlap the balcony awning below.
Step 4. Install the striped awnings and second-floor balcony railings.
For the next part of Dreamy Room Level 699, focus on the pink-and-cream striped awnings. Place the larger striped awning along the front edge of the second floor, just beneath the blue roof and above the balcony. It should project outward over the upper seating area. A smaller striped awning belongs on the right-side extension above the glass door area, also facing forward. After the awnings are in place, add the pale blue railings around the second-floor balcony. The railing should run along the front edge and wrap slightly along the left side, leaving the open café area visible. In Dreamy Room Level 699, this balcony line is important because it separates the upper dining floor from the lower shop floor and helps you judge the placement of tables and chairs later.
Step 5. Arrange the upper-floor counter, chairs, and dessert cups.
The upper floor of Dreamy Room Level 699 has a long yellow counter running horizontally across the open balcony. Place it along the front half of the second floor, supported by blue posts underneath. Several small dessert cups or drinks sit on top of the counter, spaced evenly from left to right. Behind and around the counter, place the wooden-backed stools with blue seats. Their backs should face the viewer at a slight diagonal, matching the isometric perspective. Add the small signboards on the counter seats where shown, keeping them upright and parallel to the counter. Dreamy Room Level 699 relies on tiny café details to make the scene feel alive, so take care not to hide the cups behind the railings or push the chairs too far into the walkway.
Step 6. Place the upper-right café table set and interior service area.
Continue Dreamy Room Level 699 by decorating the upper-right dining corner. Put the small square blue table near the right wall under the striped side awning, with a dessert cup on top. Around it, place the two pink wooden chairs, one near the back-right side and another closer to the front-right edge. The glass door or window panel with the crescent-shaped handle belongs behind this table area on the right wall. Inside the upper shop, place the vending cabinet or refrigerator against the back wall, slightly right of center. The cream-colored animal shopkeeper in a peach outfit should stand in front of this interior counter area, facing inward. In Dreamy Room Level 699, the upper level can become crowded quickly, so use the table and character as spacing references.
Step 7. Build the lower-left outdoor produce and sale display.
Move down to the ground floor of Dreamy Room Level 699 and place the yellow produce shelf outside the shop on the lower-left side. This display holds cans on the bottom shelves and fruit or vegetables on top, including green leaves, pink produce, and small packed goods. Add the red “SALE” sign behind the top products and the pink “HOT? BIG SALE” sign near the lower-right side of the shelf. The shelf should sit just outside the open shop front, slightly left of the entrance. In Dreamy Room Level 699, this display is a key foreground object, so it should not be tucked inside the building. Place the nearby small plants around it carefully, especially the leafy plant close to the bottle and the greenery near the front edge.
Step 8. Place the ground-floor shop counters, boxes, and central character.
Inside the main lower shop area of Dreamy Room Level 699, place the small counters, boxes, and stacked items in the center-left. A stack of blue and cream trays or baskets should sit near the middle of the floor, slightly toward the front. Behind it, arrange the rectangular blue boxes and the small yellow object that looks like a checkout or display piece. The cream animal character wearing yellow should stand near the middle of the ground floor, facing toward the shop shelves. This character belongs under the upper balcony, not outside the front platform. Dreamy Room Level 699 uses the character to show the scale of the mini mart, so keep it centered between the lower displays and do not cover it with the stacked trays.
Step 9. Arrange the lower-right product island and snack shelves.
The lower-right area of Dreamy Room Level 699 contains the most detailed product display. Place the pink brick-style island shelf near the front-right interior, angled with the room perspective. On top, arrange the blue cans in a row, small brown snack trays, pink packaged goods, and other tiny grocery items. Behind or beside it, add the shelf of yellow bags and brown paper packages near the right wall. The mushroom-like character in a pink-and-white hood stands to the right of the product island, facing the shelves as if shopping. In Dreamy Room Level 699, these small grocery items can be difficult to distinguish, but their locations matter: cans belong on the central island, bagged goods sit farther back on the right, and the customer stands just outside the shelf’s front edge.
Step 10. Add the right-side staircase, railings, and exterior greenery.
Now complete the right exterior of Dreamy Room Level 699. Place the short yellow staircase on the far right side of the blue building. It should climb upward from the front-right platform toward the side entrance, with the steps visible along the building’s right edge. Add the small pale blue railing sections along the front platform, one near the bottle side and another near the right-front area. Keep them low and close to the platform border. Place leafy green plants near the base of the shop, especially around the front-right corner and beside the stairs. Dreamy Room Level 699 uses these outdoor details to connect the shop to the pink base, so avoid placing the stairs too far from the wall or the railings too close to the characters.
Step 11. Set the front floor mat and two seated animal customers.
At the front of Dreamy Room Level 699, place the blue rectangular floor mat slightly left of center on the pink platform, just outside the shop entrance. It should sit below the produce display and in front of the lower interior. Then place the two seated animal customers near the lower-right foreground. The fox-like character with a fluffy tail sits on the left, wearing a pink top and holding a green drink. The bunny character sits to the right, wearing a blue outfit and also holding a drink. They should face slightly toward each other and toward the shop, creating a friendly scene. In Dreamy Room Level 699, these characters are foreground anchors, so they must remain outside the building, below the product island and near the front platform edge.
Step 12. Finalize small signs, food cups, door details, and alignment.
Finish Dreamy Room Level 699 by checking every tiny accent. Confirm that the “Mini MART” sign is attached to the bottle, the “WC” sign is near the pink door, and the sale signs are attached to the lower-left display. Make sure each dessert cup on the upper counter is visible, with one on the right café table and others spaced along the long yellow counter. Check the glass door on the right wall, the small round door handle, the balcony railings, the striped awnings, and the rooftop parasol. Dreamy Room Level 699 is mainly a placement puzzle, so the final challenge is not finding new objects but correcting small offsets. If an object refuses to snap into place, compare it to the nearest wall, railing, or platform edge.
Notes and Precautions
In Dreamy Room Level 699, always place the largest structures before the small decorations. The blue building, giant bottle, rooftop pieces, and staircase create the placement grid for everything else. Do not start with the cups, chairs, or product packages, because they are easy to misplace without the main frame. Watch the perspective carefully: most objects angle diagonally, so a shelf that looks slightly sideways may actually be correct. Dreamy Room Level 699 also includes many small items with similar pastel colors, especially cans, snacks, cups, and signs. Keep the lower-left produce shelf separate from the lower-right snack island. Keep the upper café furniture on the second floor only. The most common mistake in Dreamy Room Level 699 is placing foreground characters too close to the shop entrance instead of leaving them seated on the front-right platform.
Tips and Tricks from top player
For a faster Dreamy Room Level 699 clear, divide the scene into four zones: left bottle exterior, rooftop, upper café, and lower market. Complete one zone before moving to the next. Use the walls and railings as snap guides, because the correct position usually aligns with a strong edge. In Dreamy Room Level 699, the striped awnings are especially useful reference points: the long awning marks the upper balcony, while the smaller right awning marks the side seating area. Place characters late in the process so they do not block your view of shelves and counters. Another top-player trick for Dreamy Room Level 699 is to place repeated tiny objects, such as cups and cans, by spacing them evenly rather than guessing randomly. The game rewards precise placement, so zoom in mentally on object relationships rather than treating the room as one large picture.
Final Scene Description
The completed Dreamy Room Level 699 scene is a pastel mini mart café with a playful drink-shop theme. On the left, a huge transparent bottle filled with pale blue liquid stands beside a pink WC door, topped with a “Mini MART” sign. The blue two-story shop rises on the right, decorated with striped pink awnings, a yellow rooftop straw, a pink control panel, and a large pink parasol. The upper floor becomes a cozy café balcony with a long yellow counter, blue stools, dessert cups, and a small table set. Below, the ground floor is packed with produce, cans, sale signs, snack shelves, shopping baskets, and cute animal customers. Two seated friends enjoy drinks at the front, while other characters browse inside. Dreamy Room Level 699 feels cheerful, compact, and busy, proving that the real puzzle is finding the perfect home for every tiny object.