Dreamy Room Level 913
Dreamy Room Level 913 guide - Dreamy Room 913 Walkthrough & Solution.
Important Notice Regarding Level Numbering
Due to frequent changes in Dreamy Room's level numbering and differences between platforms (Android/iOS) – for example, level 913 on Android might not be the same as level 913 on iOS – the text guide below may not always match the images and video above. Please prioritize the image and video guides. If you find that the guide content doesn't match your current level, please visit the All Level Walkthroughs page to find the correct guide based on level images. Thank you for your understanding.
Dreamy Room Level 913 Walkthroughs & Guide
Step 1. Set Up the Wooden Partitions and Interior Layout
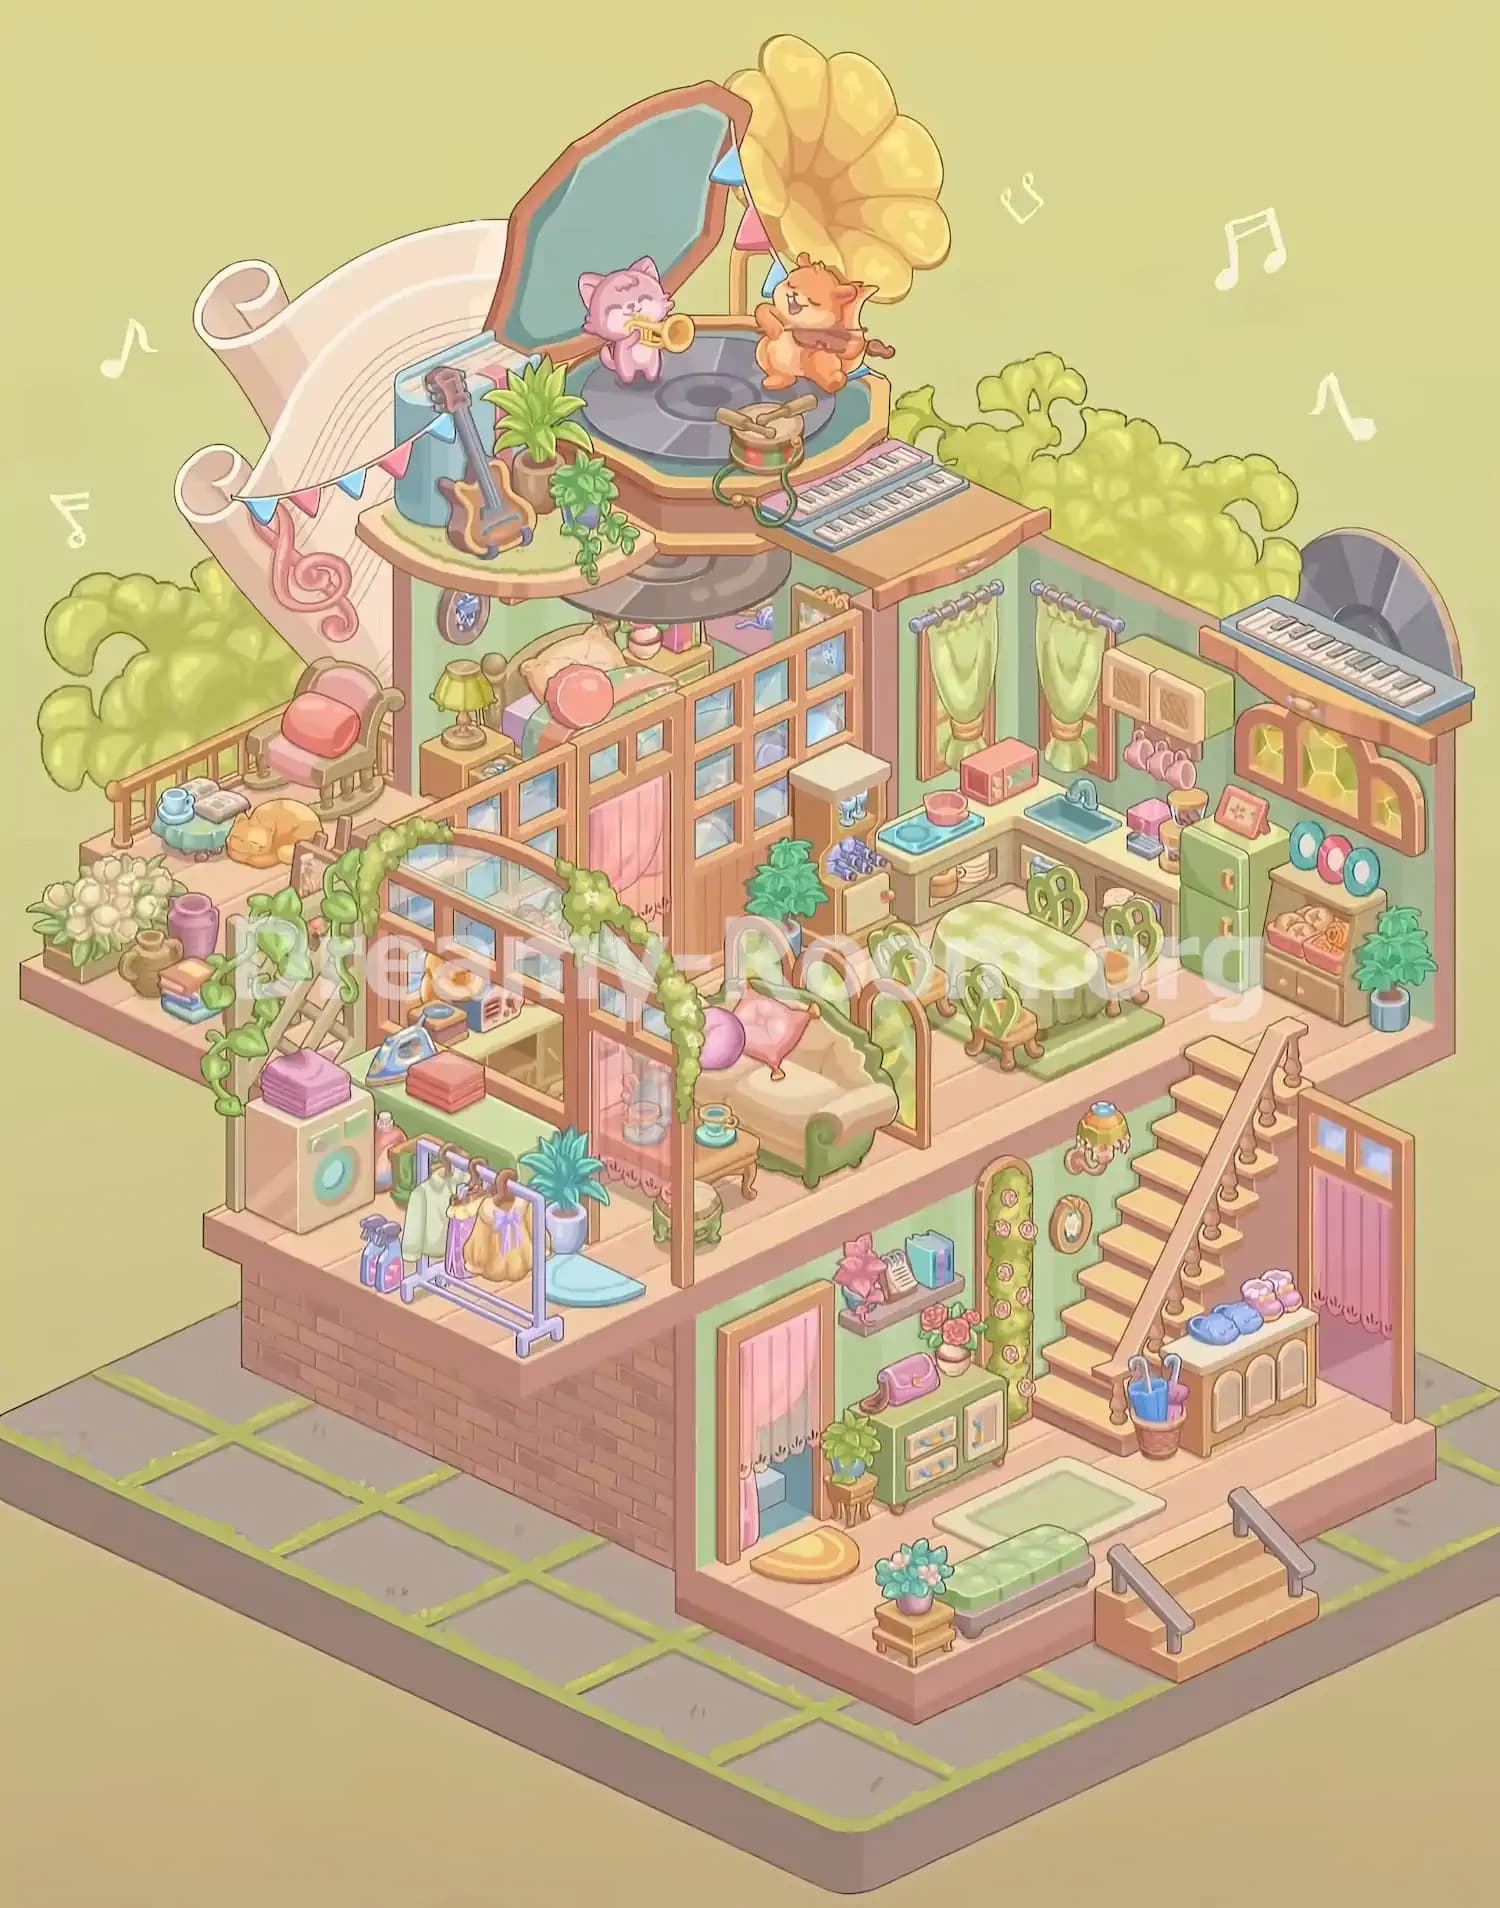
Begin Dreamy Room Level 913 by identifying the different areas of the empty building. The structure already features light wooden flooring, mint-green striped walls, pink trim, and a brick-patterned exterior along the lower-left side. The upper floor is the largest open space, while the lower-right extension serves as the ground-floor entrance.
Start arranging the wooden-framed glass partitions across the upper floor. Position the long partition diagonally through the middle of the building, separating the bedroom area at the back-left from the main living space. This divider contains numerous small rectangular glass panes and a pink-curtained doorway near its center.
Next, establish the curved, glass-paneled enclosure toward the front-left side of the upper floor. Its arched wooden frame creates a distinct lounge area beside the laundry section.
Keep the upper-right corner available for the kitchen and dining furniture. In Dreamy Room Level 913, these architectural dividers are essential because they establish the boundaries for nearly every larger piece of furniture.
Step 2. Install the Staircase and Ground-Floor Entrance
The staircase is one of the most important structural features in Dreamy Room Level 913 because it connects the lower entrance to the upper living space.
Position the wooden staircase along the right side of the building, rising from the lower-right entrance area toward the upper floor. The staircase should extend diagonally upward toward the back, with light golden steps and a matching wooden handrail running along its exposed side.
At the bottom-right of the staircase, place the tall wooden doorway with its pink curtain and two small blue-tinted windowpanes above. This doorway sits against the right exterior wall, directly behind the shoe-storage area.
Next, arrange the small shoe cabinet beneath the staircase, facing outward toward the viewer. Its light wooden body features several arched cabinet panels. Place the folded blue and pink slippers or soft shoes on top.
Finally, position the short exterior entrance steps at the front-right edge of the building. These steps feature gray handrails on both sides and connect the raised entrance platform to the tiled ground below. Check the staircase alignment before continuing.
Step 3. Decorate the Ground-Floor Hallway with Furniture and Accessories
Now complete the cozy entrance hallway of Dreamy Room Level 913. Start by placing the tall doorway with pink curtains on the left wall of the lower room. Set the small oval yellow doormat immediately outside this doorway, with a green potted plant resting on a short wooden stand nearby.
Next, install the low green storage cabinet against the back wall, underneath the decorative shelf. Place a pink handbag and a small vase of pink roses on the cabinet, while arranging the miniature framed pictures on its front.
Above the cabinet, position the floating shelf containing a pink decorative ornament, a small book or notepad, and a blue rectangular item. Attach the tall, narrow green floral wall decoration to the right, close to the staircase, and add the small round wall picture beside it.
Place the pale green rectangular rug in the middle of the entrance floor. Along its front edge, arrange the long green upholstered bench. Add a small wooden flower stand holding blue flowers near the bench's left end.
Finish this section of Dreamy Room Level 913 with the hanging decorative light near the stairs and the umbrella basket containing blue and purple umbrellas at the foot of the staircase.
Step 4. Build the Kitchen Along the Upper-Right Walls
The kitchen occupies the back-right corner of the upper floor in Dreamy Room Level 913. Begin by arranging the cream-colored countertops in an L-shaped layout, following the two mint-green walls. Keep the center of this corner open enough for the sink, appliances, and dining furniture.
Install two narrow windows along the back walls, each decorated with soft green curtains tied near the bottom. Position the small pink microwave on the left section of the counter, with a blue plate and pink bowl nearby. Place the blue kitchen sink closer to the corner.
Attach the two-section beige wall cabinet above the right-hand countertop. Hang the pink cups beneath this cabinet, and arrange the small kitchen utensils and containers below.
Next, position the tall green refrigerator against the right wall. Place a small framed decoration on top of it, then add the wooden food-storage cabinet immediately to its right. Fill the open shelves with bread and pastries.
Finish with the colorful plates on the counter, a small potted tree in the far-right corner, and the arched yellow-glass wall decoration above the refrigerator area.
Step 5. Arrange the Dining Table and Decorative Green Chairs
After completing the kitchen, move to the central-right portion of Dreamy Room Level 913 and create the dining area directly in front of the countertops.
Start by placing a rectangular green rug on the wooden floor. This rug should sit between the kitchen counters and the open space leading toward the staircase. It provides the foundation for the dining table and chairs.
Next, position the oval dining table in the center of the rug. Cover the tabletop with the soft green-and-white checkered tablecloth, allowing its edges to hang evenly around the sides.
Arrange the four matching wooden chairs around the table. Their backs feature distinctive green leaf-like patterns that resemble intertwined hearts or vines. Two chairs belong along the far side of the table, while the remaining two sit along the front edge.
Make sure the chairs face inward toward the table without overlapping the kitchen appliances.
In Dreamy Room Level 913, the dining area is relatively compact, so accurate positioning is particularly important. Check that the rug remains visible beneath the furniture and that the green chairs form a balanced arrangement.
Step 6. Furnish the Cozy Bedroom Behind the Glass Partition
The bedroom in Dreamy Room Level 913 is located toward the back-left of the upper floor, partially concealed behind the long wooden-framed glass divider.
Place the main bed against the back-left interior wall, underneath the elevated rooftop music platform. The bed features soft cream-colored bedding, green and pink accents, and a large round pink pillow resting near the headboard.
Position the small wooden bedside cabinet to the left of the bed. Set a yellow bedside lamp with a rounded shade on top, ensuring it remains visible above the partition.
Add the small decorative items beside the bed, including the colorful books and containers near the headboard. Attach the round blue-framed wall decoration to the left interior wall, beneath the rooftop platform.
The wooden-framed partition should stand in front of the sleeping area, with its pink-curtained doorway offering access to the bedroom.
Pay close attention to depth when arranging this section of Dreamy Room Level 913. The bed must appear behind the glass divider rather than in the central lounge. Its pillows and bedding should remain partly visible through the upper glass panels.
Step 7. Create the Left-Side Balcony with the Reading Chair and Flowers
Move to the exposed left-side balcony of Dreamy Room Level 913. This beautiful little corner serves as a relaxing outdoor retreat, featuring comfortable seating, greenery, and several decorative accessories.
Begin by installing the wooden railing along the far-left and back edges of the balcony. Place the pink cushioned armchair near the back-left corner, angled slightly toward the center. Its rounded cushions and warm wooden frame make it one of the most recognizable furniture pieces.
Next, position the small round blue-green tea table near the chair. Arrange a blue teacup and an open book on the tabletop. Add the curled-up orange sleeping cat on the floor beside the table.
At the exposed front-left edge, arrange the cluster of white flowers, the purple vase, and the smaller brown pottery containers. Stack the colorful books nearby.
Complete this outdoor corner by positioning the decorative climbing vines around the small wooden trellis. Their green leaves should extend upward and toward the adjacent glass structure.
This section of Dreamy Room Level 913 contains several closely packed items, so place the larger furniture first and add the smaller flowerpots and books afterward.
Step 8. Build the Central Living Room with the Glass Arch and Sofa
The central lounge is one of the most charming spaces in Dreamy Room Level 913. It sits toward the front-middle of the upper floor, surrounded by arched glass panels and decorative greenery.
Begin with the main cream-colored sofa. Position it inside the glass-enclosed area, facing toward the exposed front of the building. The sofa has rounded green armrests and a softly curved back, giving it a comfortable vintage appearance.
Add the pink square cushion and round purple cushion along the back of the sofa. Arrange them so the pink cushion remains closer to the middle and the purple one sits toward the left.
Next, place the small wooden side table at the sofa's front-left corner, with a blue teacup resting on top. Add the tiny round green stool near the table.
Install the arched wooden-and-glass frames around the lounge, with the taller curved arch positioned above the front-left portion. Decorate the upper edge with trailing green vines.
Finally, add the nearby leafy potted plants and make sure the wooden-framed glass doorway, including its pink curtain, aligns with the surrounding partitions.
The challenge in Dreamy Room Level 913 is preserving the layered appearance without covering important objects.
Step 9. Organize the Laundry Area and Clothing Display
The laundry area is positioned along the front-left edge of the upper floor in Dreamy Room Level 913, immediately outside the curved glass lounge.
Begin by placing the pale cream washing machine near the left-front corner. Its circular turquoise door should face outward toward the viewer. Stack the neatly folded lavender towels on top of the machine, keeping them aligned with its edges.
Next, position the freestanding lavender clothing rack along the front edge, just to the right of the washing machine. Hang the pastel garments from its horizontal bar, including the mint-green outfit, purple dress, and yellow dress with decorative bows.
Place the two colorful detergent containers on the floor beside the clothes rack. Add the light blue ironing board or folded laundry pad to the right of the rack.
Behind the washing machine, arrange the folded pink and coral towels on the low green surface. Add the small household supplies, the blue iron-shaped accessory, and the storage shelves visible through the adjacent glass frames.
Complete this section of Dreamy Room Level 913 with the blue-green potted plant between the clothing area and the lounge entrance. The finished laundry corner should appear tidy without obstructing the nearby seating area.
Step 10. Construct the Rooftop Music Studio and Giant Gramophone
Now comes the most distinctive part of Dreamy Room Level 913: the spectacular music-themed rooftop arrangement.
Begin by creating the elevated platform above the rear-left bedroom. The main circular music stage should occupy the upper-middle portion of the building, supported by the structure beneath it.
Position the large gramophone-style turntable on this platform. Its dark circular record surface should face upward, while the oversized blue-green hinged cover rises behind it toward the back-left.
Next, install the enormous golden gramophone horn behind the right side of the platform. The horn should rise prominently above the building, with its wide flower-like opening facing the viewer.
On the left, position the huge curved cream-colored musical score decoration. Its rolled ends extend outward, while the thin musical staff lines create a dramatic backdrop. Add the pink treble-clef ornament near its lower edge and the string of alternating blue and pink triangular bunting across the front.
Arrange the smaller circular gray record-like platform underneath the main stage. Place the wooden extension containing two rows of miniature piano keys toward the right.
In Dreamy Room Level 913, the rooftop has several overlapping layers. Position these large musical decorations before adding the small instruments and characters to avoid visual confusion.
Step 11. Add the Animal Musicians, Instruments, and Final Rooftop Decorations
Finish the rooftop of Dreamy Room Level 913 by placing the adorable animal musicians and their accessories.
Start with the pink kitten standing on the left side of the circular record platform. The kitten holds a small golden trumpet, with its bell pointing toward the right. Position the orange kitten on the opposite side, holding a brown violin and bow. Both characters should face slightly inward, creating the appearance of a cheerful musical performance.
Next, add the small drum with its crossed drumsticks near the front-right edge of the stage. Keep the colorful drum body visible beneath the sticks.
Place the brown electric guitar upright on the smaller wooden balcony to the left of the stage. Surround its base with leafy green plants, including a taller spiky plant in a brown pot and a trailing plant near the balcony edge.
Position the long miniature keyboard on the wooden extension to the right of the main platform. Another larger keyboard belongs on a separate shelf above the right kitchen wall, with a giant dark vinyl record standing behind it.
Finally, check the decorative bunting, the small colorful triangular ornaments behind the animal musicians, and the musical note decorations surrounding the scene.
Once these final pieces are in place, Dreamy Room Level 913 should match the completed musical house.
Notes and Precautions
Dreamy Room Level 913 contains numerous decorative objects spread across multiple floors, making accurate placement more challenging than the relaxed visual style might suggest.
- Pay attention to overlapping objects. The rooftop gramophone, musical platforms, and wooden-framed partitions overlap from the isometric camera angle. A piece can appear to belong to another area even when its correct location is farther behind.
- Place large furniture before accessories. Install the staircase, glass partitions, kitchen counters, bed, and rooftop music stage before arranging cups, books, flowers, and decorative ornaments.
- Keep the bedroom separate from the lounge. The bed belongs behind the long central glass partition, while the cream-and-green sofa sits inside the curved glass enclosure toward the front.
- Check the kitchen's L-shaped layout. The refrigerator belongs against the right wall, while the sink and microwave sit along the connected countertops.
- Watch the balcony boundaries. The pink armchair and sleeping cat are on the exposed left balcony, not inside the bedroom.
- Avoid confusing the keyboards. One keyboard arrangement extends from the main music platform, while another sits on the elevated shelf above the right kitchen wall.
- Use the completed scene as your placement reference. The screenshots show the intended final arrangement, but they do not establish the precise order in which the game presents individual objects.
The most important rule in Dreamy Room Level 913 is to focus on where each item belongs rather than simply filling available empty spaces.
Tips and Tricks from top player
A reliable way to approach Dreamy Room Level 913 is to divide the house into recognizable zones: the ground-floor entrance, the upper-right kitchen and dining area, the back-left bedroom, the left balcony, the central lounge, the laundry corner, and the rooftop music studio.
Start with the largest objects in each zone. They act as visual landmarks and make the correct positions of smaller decorations easier to identify.
When placing accessories, use nearby furniture as a reference. For example, the pink handbag belongs on the green entrance cabinet, the teacup belongs beside the lounge sofa, and the trumpet belongs with the pink kitten on the rooftop.
Another useful strategy is to complete one area before moving to another. This reduces the chance of accidentally mixing bedroom, kitchen, and laundry decorations.
For the rooftop, imagine the arrangement as three layers: the musical score and horn in the background, the circular stage in the middle, and the instruments and small plants in the foreground.
If an object does not seem to fit in Dreamy Room Level 913, compare its size, orientation, and color with the surrounding furniture. Small changes in placement can make the intended location much clearer.
Final Scene: A Charming House Filled with Music
The completed Dreamy Room Level 913 reveals a wonderful pastel-colored home overflowing with warmth, creativity, and musical charm.
At the top, two adorable kittens perform together on a giant record player, surrounded by a golden gramophone horn, miniature keyboards, a guitar, colorful pennants, and floating musical notes. Beneath the rooftop performance, a peaceful bedroom provides a cozy place to rest.
The upper floor features a bright green kitchen, a beautifully arranged dining table, and an inviting living room enclosed by elegant wooden glass panels. The left balcony adds flowers, a pink armchair, and a sleeping orange cat, while the nearby laundry corner displays neatly organized clothes and supplies.
Downstairs, a welcoming entrance features a wooden staircase, colorful accessories, fresh flowers, and comfortable seating.
Every detail in Dreamy Room Level 913 contributes to a joyful miniature world where music, home life, and adorable animal characters come together in perfect harmony.