Dreamy Room Level 127
Dreamy Room Level 127 guide - Dreamy Room 127 Walkthrough & Solution.
Important Notice Regarding Level Numbering
Due to frequent changes in Dreamy Room's level numbering and differences between platforms (Android/iOS) – for example, level 127 on Android might not be the same as level 127 on iOS – the text guide below may not always match the images and video above. Please prioritize the image and video guides. If you find that the guide content doesn't match your current level, please visit the All Level Walkthroughs page to find the correct guide based on level images. Thank you for your understanding.
Dreamy Room Level 127 Walkthroughs & Guide
Below is a comprehensive walkthrough for Dreamy Room Level 127, guiding you from the empty canvas to the fully decorated showroom. This guide draws on the cozy storytelling and mindful gameplay principles of Dreamy Room .
Step 1. Lay down the floor base and caution tape borders (Dreamy Room Level 127)
In Dreamy Room Level 127, the first challenge is establishing the foundational flooring and boundary markings that define the space. You’ll start by snapping the cool grey floor panel into place, taking care to align the edges flush with the corner walls. Next, select the black-and-yellow caution tape decals and apply them along the back and right wall edges to create the striking hazard stripes. This border treatment not only adds visual flair but also cues you into the space restrictions for Dreamy Room Level 127 design. Be sure to press each decal firmly so it adheres seamlessly to the floor overlay. Completing this step correctly ensures your Dreamy Room Level 127 starts smoothly by anchoring the layout in the correct proportions. The Dreamy Room Level 127 walkthrough emphasizes precision at every turn.
Step 2. Install the hexagonal raised platform in the center (Dreamy Room Level 127)
In Dreamy Room Level 127, the centerpiece of the exhibit is a sturdy hexagonal platform raised on metal pistons. To place this feature, open your inventory and select the six-segment platform piece. Align its front edge with the center grid marker on the grey flooring, making sure the pistons sit snugly in the indented spots. Press and rotate until the shape feels anchored. This hexagon becomes the visual anchor for Dreamy Room Level 127’s vehicular display, so precise centering is crucial. If the platform wobbles, adjust its rotation by half a notch to ensure stability. With the platform installed correctly, you’re ready to park the red truck and sports cars, moving seamlessly into the Dreamy Room Level 127 décor sequence. This step cements your Dreamy Room Level 127 progression.
Step 3. Position the red truck and sports cars on the floor (Dreamy Room Level 127)
In Dreamy Room Level 127, the next task is to position three vibrant vehicles on and around the hexagonal stage. First, select the red off-road truck model from your garage tab and hover it over the platform’s center. Lower it until its tires sit flush on the pistons, then lock it into place. Next, choose the yellow sports car and the blue roadster, aligning them side by side to the right of the platform on the grey floor. Refer to the grid lines to maintain even spacing; spacing accuracy is vital in Dreamy Room Level 127 to avoid overlapping objects. If any car overlaps the caution tape boundary, nudge it slightly back. Proper car layout is crucial for Dreamy Room Level 127 success. Mastering vehicle placement is a core mechanic in Dreamy Room Level 127.
Step 4. Hang the motorcycles on the left wall (Dreamy Room Level 127)
In Dreamy Room Level 127, attention shifts to the left wall displays where two motorcycles await hanging. Pick up the green chopper from the inventory and drag it toward the metal hooks mounted halfway up the wall. Make sure its front wheel hooks onto the upper peg and that the body is parallel to the grey floor. Next, grab the orange cruiser and repeat the process on the lower hook. These angled mounts showcase the bikes prominently in Dreamy Room Level 127 and free up floor space below. Confirm both motorcycles sit level by adjusting their rotation handles until they read zero degrees. Accurate suspension placement makes or breaks the aesthetic harmony in Dreamy Room Level 127.
Step 5. Assemble the reception desk and floor characters (Dreamy Room Level 127)
In Dreamy Room Level 127, ground-floor character interactions begin with assembling the reception area. Drag the sleek grey desk into the left center space just below the mezzanine supports. Rotate it so that a small pink gemstone lays between the laptop and the desk edge. Place the pastel laptop on top and align the screen with the back wall. Then select the white bunny character and drop it in front of the desk facing the laptop to simulate a curious visitor. Nearby, place the green-haired round creature beside the bunny for company. Scatter a small potted plant on each side of the desk. These character and décor placements enrich the narrative and are essential for Dreamy Room Level 127’s immersive charm. This configuration fulfills an objective in Dreamy Room Level 127. Don’t overlook the plant placement in Dreamy Room Level 127.
Step 6. Construct the mezzanine structure with stairs and lighting (Dreamy Room Level 127)
In Dreamy Room Level 127, constructing the second-floor mezzanine defines the space’s vertical dimension. Begin by placing the four grey column supports in each corner of the platform, ensuring they align with floor grid points. Next, attach the flat balcony floor panel, connecting it precisely to the column tops. Secure the metal railing sections on all sides by snapping them into the balcony edges until you hear a click. Then, add the right-side staircase by aligning the staircase base under the balcony’s right gap and elevating it upward. Finally, position two spotlight fixtures beneath the mezzanine, angled toward the floor display. Accurate assembly of these features is mandatory for Dreamy Room Level 127 structural integrity and aesthetic coherence. Your careful execution here ensures Dreamy Room Level 127’s second floor remains sturdy. Don’t rush this step or your Dreamy Room Level 127 build may appear unpolished.
Step 7. Decorate the mezzanine and walls with furniture, characters, and displays (Dreamy Room Level 127)
In Dreamy Room Level 127, the final décor layer brings warmth and personality to the showroom space. Start by placing the brown bear plush sofa on the mezzanine’s left side, aligning the sofa legs with the railing posts for Dreamy Room Level 127. Position the bear character seated centrally on the sofa, holding the open book prop. Next, place the small white egg-shaped character with glasses to the right of the sofa, standing beside a round coffee table with two cups and a pastry plate. Tuck two potted plants into either mezzanine corner for a balanced look. Above the mezzanine, float the cylindrical “SHOW ROOM” sign using its golden supports, ensuring the text faces front. Then mount three pink bottle displays, the black spool wheel, and the metallic screw plaque on the right wall panels. These placements complete the narrative and satisfy the final objectives of Dreamy Room Level 127. Be sure to double-check every item position against the Dreamy Room Level 127 reference to avoid misplacement.
Notes and Precautions
When following this Dreamy Room Level 127 walkthrough, pay close attention to object alignment and attachment points to prevent stuttering or snapping errors. Always rotate items slowly to match grid orientation, as a misaligned sofa or staircase can break the layout in Dreamy Room Level 127. Avoid placing vehicles too close to caution tape borders to prevent collision triggers that may force you to restart placements in Dreamy Room Level 127. If decals refuse to stick, revisit the floor step from the Dreamy Room Level 127 guide and reapply pressure on each segment. Keep an eye on the hardware displays, as hooks have limited capacity; mounting too heavy an object could detach the display in Dreamy Room Level 127. Finally, save your progress frequently to safeguard against accidental resets in Dreamy Room Level 127. Remember, Dreamy Room is designed for leisurely decoration and reflection .
Tips and Tricks from top player
- Plan your layout before placing items to maximize efficiency in Dreamy Room Level 127: sketch the vehicle and furniture arrangement lightly on the grid overlay.
- Utilize the rotate function’s fine-tune feature to adjust each element minutely; this trick helped me nail the sofa angle in Dreamy Room Level 127.
- When hanging wall displays, place lighter objects first to gauge spacing, then add heavier pieces like the spool; this strategy prevented accidental detachment in Dreamy Room Level 127.
- Leverage the copy-and-paste shortcut for repeated objects—potted plants are perfect candidates for quick duplication in Dreamy Room Level 127.
- Finally, save after each major step to create restore points if you need to backtrack during Dreamy Room Level 127.
Final Scene
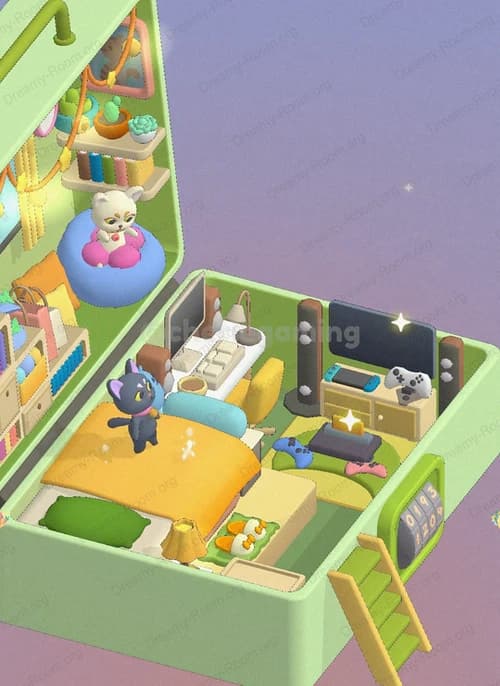
The final scene of Dreamy Room Level 127 reveals a showroom filled with vibrant collectibles and characters. A pale blue background sets a soothing tone, while pink gradient walls frame a bustling space. In the foreground, a hexagonal raised platform supports a red model truck, flanked by yellow and blue sports cars parked side by side. To the left, two motorcycles hang from hooks, their green and orange bodies gleaming. Below, a friendly bunny and a small creature inspect a laptop and colorful stone at a reception desk. Above, a cozy mezzanine houses a brown bear reading on a sofa beside a white character with glasses enjoying tea. Potted plants dot corners, and spotlights cast illumination. Architectural details like the “SHOW ROOM” sign, staircase, protective railings, and wall displays of pink bottles, a spool, and a screw complete the intricate layout, celebrating the playful spirit of Dreamy Room Level 127.