Dreamy Room Level 224
Dreamy Room Level 224 guide - Dreamy Room 224 Walkthrough & Solution.

Important Notice Regarding Level Numbering
Due to frequent changes in Dreamy Room's level numbering and differences between platforms (Android/iOS) – for example, level 224 on Android might not be the same as level 224 on iOS – the text guide below may not always match the images and video above. Please prioritize the image and video guides. If you find that the guide content doesn't match your current level, please visit the All Level Walkthroughs page to find the correct guide based on level images. Thank you for your understanding.
Dreamy Room Level 224 Walkthroughs & Guide
Step 1. Place the Zoo Entrance Gate in the lower-left corner
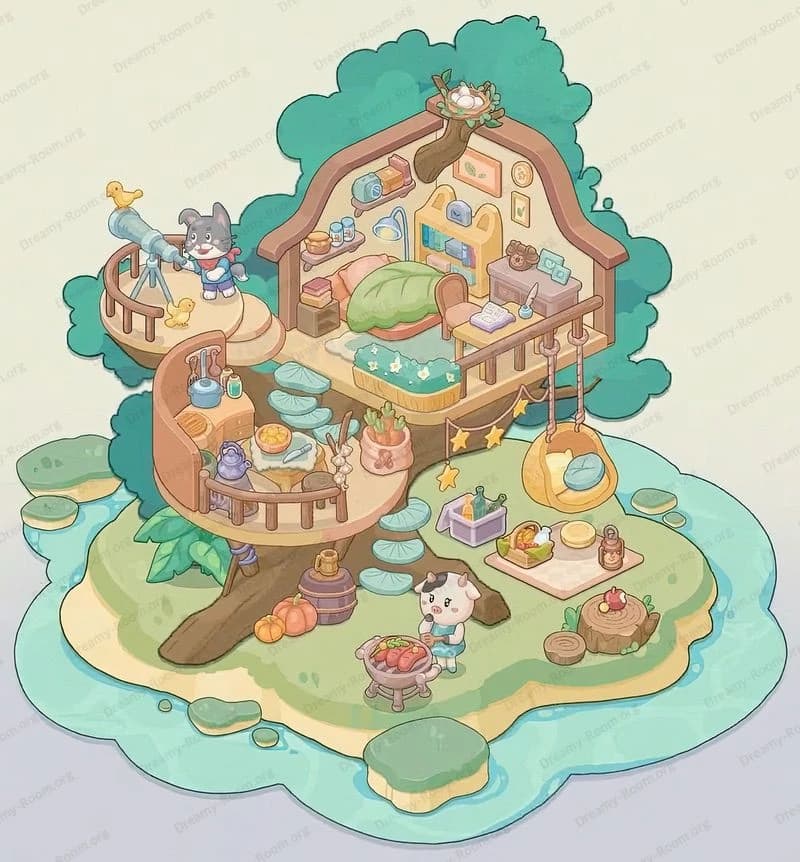
At the start of Dreamy Room Level 224, you are presented with a green grassy platform and a stone-paved zone in the bottom-left. To kick off your Dreamy Room Level 224 transformation, open your décor menu and select the thatched-roof “Zoo Entrance” gate. Drag it onto the stone pavement so that its twin pillars align perfectly with the pavement’s edge and its thatch slightly overlaps the grass border. In Dreamy Room Level 224, this entrance anchors all subsequent placements, so ensure the “Zoo” sign faces inward along the path. Be mindful: the main challenge of Dreamy Room Level 224 is determining the correct placement for each object, and this iconic gateway sets the tone for your entire layout. Remember that in Dreamy Room Level 224, visitors will mentally “enter” through this gate, so it must appear inviting and well-centered.
Step 2. Place the Monkey Enclosure and Monkeys by the curved walkway
Proceed to the monkey exhibit in Dreamy Room Level 224 by selecting the circular enclosure from your object list. In Dreamy Room Level 224, this purple-tinted cage belongs just above and to the left of the curved stone path that extends from your entrance. Position it so its base touches the grass and its railing hugs the curve of the path without intruding on the water channel. This placement puzzle in Dreamy Room Level 224 tests your alignment skills—if the cage overlaps either the path or water, it won’t “snap” correctly. Once the cage is locked in place, grab the two monkey figurines and place one on the left branch and the other on the right limb of the central tree trunk. Each monkey must face inward toward the trunk; otherwise, Dreamy Room Level 224 will register an incorrect drop.
Step 3. Place the Zebra Pen with Zebras, Hay Bale, and Trough
Next in Dreamy Room Level 224 is the zebra corral. Select the wooden pen from your menu and align it along the central stone walkway directly above the monkey cage. In Dreamy Room Level 224, the pen’s rope fences must be flush with the path edge, and the gate opening should face toward visitors on the pavement. After anchoring the pen, place the two zebra figures inside: one near the bundled hay bale at the back left, and the other closer to the front right beside the trough. Then drop the golden hay bale at the rear corner and position the small rectangular water trough at the pen’s front. The main challenge of Dreamy Room Level 224 is determining the correct placement for each accessory so your striped friends look cozy and well-fed.
Step 4. Place the Bird Aviary, Nest, and Blue Parrot in the upper-left
To continue your Dreamy Room Level 224 setup, select the semi-circular bird aviary with its vine-covered supports. In Dreamy Room Level 224, place this yellow-roofed canopy on the grassy area above the zebra pen, directly left of the water channel’s bend. Align the supports so one foot rests on grass and the other just touches the water’s edge, ensuring a perfect snap. Next, pick the pale blue-egg nest and set it on the central branch inside the aviary. Finally, place the vibrant blue parrot on the leftmost branch. Precise alignment in Dreamy Room Level 224 is crucial: if the nest or bird overlaps, the game won’t recognize completion of this cheerful aviary exhibit.
Step 5. Place the Tiger Enclosure, Walls, Catapult, and Trees on the upper plateau
At this point in Dreamy Room Level 224, you’ll create the tiger habitat. Select the three large stone wall segments with wooden log shutters and place them side by side on the top-right grassy terrace. In Dreamy Room Level 224, the log faces must point outward toward the water channel for proper orientation. Next, choose the apple-launching catapult and situate it directly in front of the middle wall segment—this position ensures your virtual tigers can “interact” with it. Then, add one tiger figure reclining atop the left wall and the second standing in front of the right wall. Finally, plant the two leafy green trees behind the walls to frame your feline friends. Remember that the main challenge of Dreamy Room Level 224 is determining the correct placement for each enclosure element to complete this roaring display.
Step 6. Place the Giraffe, Rock, and Purple Agave Plant on the right bank
Continue your Dreamy Room Level 224 design by selecting the tall giraffe figurine and moving it onto the grassy plot sloping toward the water on the right side. In Dreamy Room Level 224, align its front hooves just above the water’s edge to capture a natural grazing pose. Next, select the mossy gray rock and tuck it behind the giraffe’s hind legs, ensuring it touches the base of the platform. Then place the spiky purple agave plant adjacent to the rock, keeping a slight gap so it fans out without intruding on the water. The placement puzzles in Dreamy Room Level 224 demand exact spacing; even a one-grid-square error can block pathways or break the scenic flow.
Step 7. Place the Elephant and Additional Plants on the mid-right area
Continuing through Dreamy Room Level 224, pick the gentle elephant statue and position it on the grassy strip beside where the footbridge will go. In Dreamy Room Level 224, orient its trunk toward the water channel for a lifelike pose. Next, choose the lush green fern cluster and set it behind the elephant’s rear legs, making sure it snaps to grass not water. Then add the tall purple flower stalk next to the fern, aligning its base with the shoreline grid. Accurate spacing in Dreamy Room Level 224 is vital: the main challenge is determining the correct placement for all foliage so each plant looks rooted in its natural habitat.
Step 8. Place the Wooden Bridge and Directional Signpost over the water channel
Now that most exhibits are in place for Dreamy Room Level 224, it’s time to connect them. Select the wooden footbridge and align its beams across the narrow water channel just beneath the giraffe’s patch. In Dreamy Room Level 224, ensure both ends rest flush on grass without clipping the water graphic. Next, pick the colorful three-arrow signpost and dock it on the grassy ledge immediately left of the bridge entrance. Proper placement in Dreamy Room Level 224 will have each arrow pointing toward a different exhibit, guiding visitors through your zoo’s flow. The main challenge of Dreamy Room Level 224 is determining the correct placement for every path connection to maintain a seamless visitor journey.
Step 9. Place the Pig Fountain and Informational Signboard by the zebra pen
As you near completion of Dreamy Room Level 224, grab the charming pig-shaped fountain and position it at the right edge of the zebra pen. In Dreamy Room Level 224, its spout must pour directly into the adjacent waterway, so align the base with the stone pavement border. Then select the wooden signboard and stand it next to the fountain, orienting its panel toward both the bridge and the zebra exhibit. Placement precision in Dreamy Room Level 224 is essential—misaligned water flow or a tilted sign will break immersion and prevent level validation.
Step 10. Place the Bear Floatie and Palm Tree in the lower-right water pool
In the final decorative puzzles of Dreamy Room Level 224, select the bear-shaped raft and drop it into the bottom-right water basin. Ensure the floatie sits squarely on the water’s surface without touching the green edge. Next, choose a medium palm tree prop and plant it beside the pool so its trunk lines up with the tile border and its fronds hover above the floatie. Correct alignment in Dreamy Room Level 224 creates a serene vignette where the bear can gently “drift” among the palms. Mistakes in this step can cause the floatie to clip or the palm to overlap, so take your time.
Step 11. Place the Off-road Vehicle and Traffic Cones on the stone-paved area
Closing in on victory in Dreamy Room Level 224, locate the safari-style off-road buggy and drop it onto the stone-paved platform just left of your entrance gate. In Dreamy Room Level 224, rotate the vehicle so its grill faces the central path, giving a sense of readiness for adventure. Then select the two orange traffic cones and place them directly behind the buggy’s rear wheels. Proper positioning in Dreamy Room Level 224 ensures the cones align with the bumper rather than floating on the ground—a common pitfall that can hinder level completion.
Step 12. Scatter Remaining Palm Trees and Decorative Foliage; Final Alignment
For the grand finale of Dreamy Room Level 224, add any leftover palm trees and shrubs to fill empty patches of grass without blocking walkways or water edges. Position one palm near the monkey cage and another behind the zebra pen, using slight offsets to cast realistic shadows. Place small leafy clusters along the aviary and beside the elephant to balance color and scale. Finally, zoom out and nudge any objects that appear misaligned so each prop “snaps” precisely to its grid slot. Remember, the main challenge of Dreamy Room Level 224 is determining the correct placement for every item—this final review seals your flawless, professional zoo tableau.
Notes and Precautions
- In Dreamy Room Level 224, always double-check the grid alignment before confirming each placement. Misaligned props can block pathways or cause visual glitches that prevent completion in Dreamy Room Level 224.
- Be cautious when rotating objects in Dreamy Room Level 224; even a slight angle too far can misregister the placement, causing Dreamy Room Level 224 to flag an error.
- When you place tall items in Dreamy Room Level 224, like the giraffe or palm trees, ensure their bases are flush with the terrain grid to avoid clipping.
- Avoid overlapping multiple decorations in Dreamy Room Level 224, as overlapping can create shadows or occlusion, negatively impacting your score in Dreamy Room Level 224.
- If Dreamy Room Level 224 fails to register a correct drop, try nudging the object one grid square at a time; patience is key for Dreamy Room Level 224 success.
- Always save your progress before placing the final objects in Dreamy Room Level 224 to prevent losing your arrangement due to misclicks.
- Remember that the main challenge of Dreamy Room Level 224 is determining the correct placement for each object, so take your time with spacing and orientation before finalizing in Dreamy Room Level 224.
Tips and Tricks from top player
Before diving into the steps of Dreamy Room Level 224, top players recommend these strategies to streamline your progress in Dreamy Room Level 224:
- Plan your layout ahead of time in Dreamy Room Level 224 by visualizing each exhibit footprint, avoiding backtracking in Dreamy Room Level 224.
- Use the swap tool in Dreamy Room Level 224 to exchange similar props without manual placement—this speeds up decorating in Dreamy Room Level 224 by up to 30%.
- Master snapping points in Dreamy Room Level 224 by practicing with small plants; flawless alignment there translates to larger builds in Dreamy Room Level 224.
- When nearly finished in Dreamy Room Level 224, zoom out for a bird’s-eye check in Dreamy Room Level 224 and catch misaligned objects that disrupt flow.
- Save early and often in Dreamy Room Level 224; saving at milestones prevents lost progress due to accidental drags or deletions in Dreamy Room Level 224.
- Familiarize yourself with the undo button in Dreamy Room Level 224—it’s a lifesaver when you misplace a key prop in Dreamy Room Level 224.
Final Scene Description
Dreamy Room Level 224 final scene features a zoo on a grassy platform bordered by water. A Zoo Entrance anchors the bottom-left pavement and opens onto a winding path. To the left, a circular monkey cage holds two primates. Beside it, a wooden zebra corral shelters zebras next to a hay bale and water trough. Above, an aviary displays a blue parrot and a nest of eggs. On the terrace, stone walls with shutters enclose tigers under trees and beside a catapult. To the right, a giraffe grazes by a purple agave and rock while an elephant stands near ferns beside a footbridge. A signpost marks the bridge. Nearby, a pig fountain pours beside an info board, and a bear floatie drifts in a lower-right pool. Finally, a safari vehicle and orange cones rest on the pavement among palms. This arrangement embodies the placement puzzle of Dreamy Room Level 224.