Dreamy Room Level 100
Dreamy Room Level 100 guide - Dreamy Room 100 Walkthrough & Solution.
Important Notice Regarding Level Numbering
Due to frequent changes in Dreamy Room's level numbering and differences between platforms (Android/iOS) – for example, level 100 on Android might not be the same as level 100 on iOS – the text guide below may not always match the images and video above. Please prioritize the image and video guides. If you find that the guide content doesn't match your current level, please visit the All Level Walkthroughs page to find the correct guide based on level images. Thank you for your understanding.
Dreamy Room Level 100 Walkthroughs & Guide
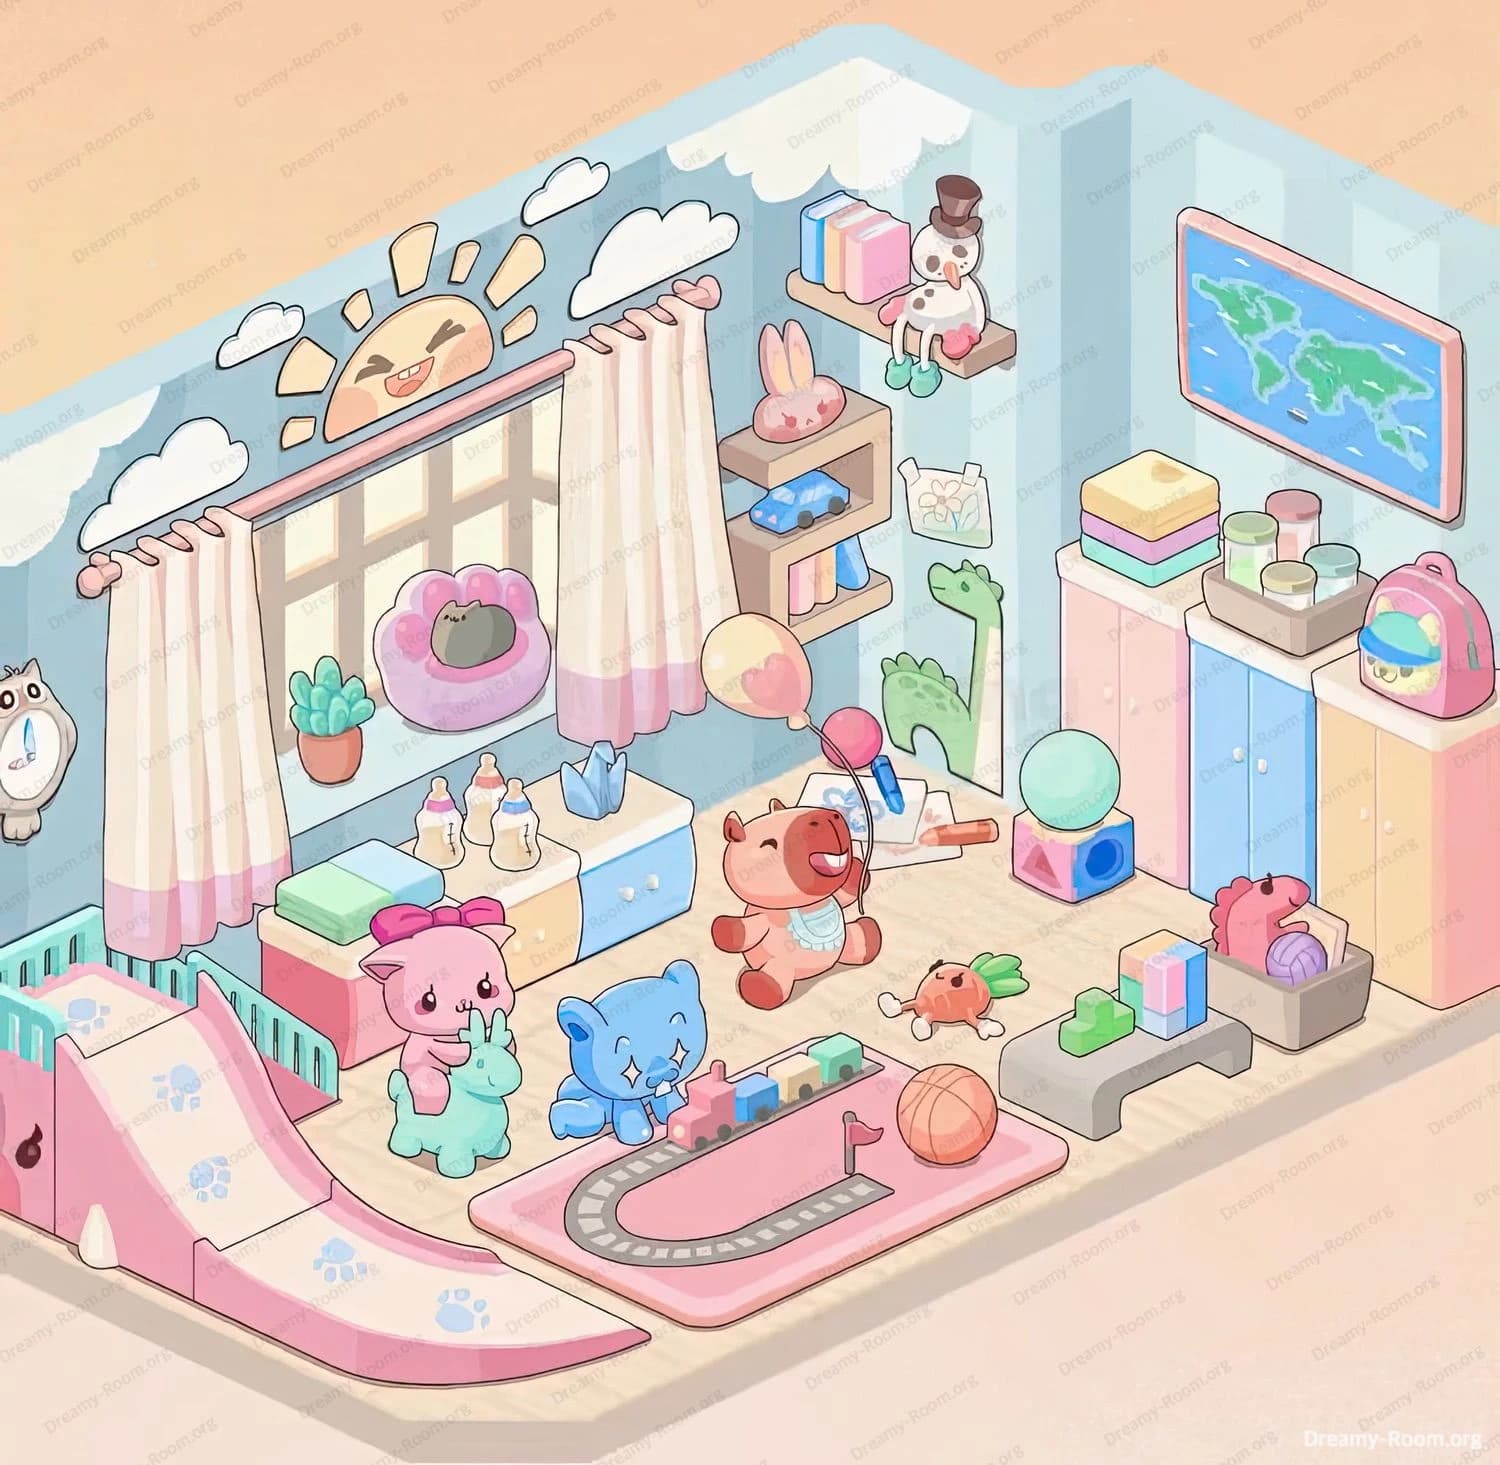
Transform the empty pastel corner into a cozy, toy-filled haven in Dreamy Room Level 100. This guide will walk you through every placement, from curtains to plushies, ensuring your Dreamy Room Level 100 turns out exactly like the completed scene. Remember, the core challenge of Dreamy Room Level 100 is finding the perfect spot for each item. Let’s begin!
Step 1. Place the curtains and sky decals on the window wall
In Dreamy Room Level 100, your very first task is to bring life to the blank walls with the window framing. Select the pair of floor-length curtains featuring a gentle pink gradient and hang them from the pastel-pink rod centered on the left wall, precisely three floor tiles above the wooden platform. Once the curtains are neatly draped symmetrically, locate the happy sun decal with a smiling face and small triangular rays. Affix it snugly above the curtain rod, aligning its peak with the wall’s highest point. Finally, choose three fluffy cloud decals and arrange them around the sun—one to the left, one to the right, and one slightly below—creating a cheerful sky motif. This foundational arrangement in Dreamy Room Level 100 sets a bright, whimsical tone and demonstrates the main challenge: discovering the exact placement for each object in Dreamy Room Level 100.
Step 2. Arrange the windowsill decorations
Now that your sky backdrop is complete in Dreamy Room Level 100, it’s time to dress the windowsill. Begin by selecting the small terracotta pot with a green succulent and position it on the left edge of the sill, ensuring it sits flush against the wall corner. Next, pick up the lavender flower-shaped cushion and gently place it toward the right side, leaving a little breathing space in between. Nestle the tiny grey cat figurine snugly in the center of that cushion, so the cat’s tail curls toward the curtain. As you arrange these, keep the distance consistent from the window frame to maintain symmetry. This precise placement challenge is at the heart of Dreamy Room Level 100, requiring patience and a steady eye to align both the plant and the whimsical cat in Dreamy Room Level 100 just so.
Step 3. Set up the cabinet under the window
The lower wall beneath your window houses a blue-front cabinet that needs its top dressing in Dreamy Room Level 100. First, select the folded pastel towel stack—green, yellow, and pink—and lay it on the left side of the cabinet top, aligning its edge two grid units from the window. Immediately to its right, place the pair of baby bottles, standing upright and side-by-side, so each label faces outward. Then, pick up the tissue box with its blue decorative pattern and center it on the cabinet, directly under the curtain’s midpoint. Finally, position a second pink towel to the right of the tissue box, leaving one grid tile before the cabinet’s edge. These careful placements in Dreamy Room Level 100 emphasize the game’s challenge: finding that precise spot for each keepsake in Dreamy Room Level 100.
Step 4. Mount the right‐wall corner shelf and decals
On the right wall of Dreamy Room Level 100, you’ll install a two-tier wooden corner shelf and a festive snowman figure. First, choose the corner shelf unit and anchor it flush against the right wall, its base three tiles above the floor. On the top tier, place the pink bunny plush head with long ears facing forward. On the lower tier, set the small blue toy car so its wheels align parallel to the floor. Next, select the mounted flat shelf and attach it above the corner shelf, ensuring it’s level with the top of the corner unit. On this shelf, arrange three pastel books—pink, blue, and yellow—from left to right, then situate the snowman plush wearing a brown top hat and green boots to the right of the books. Finish by placing a small floral drawing on the wall just beneath this shelf as a personal touch in Dreamy Room Level 100.
Step 5. Apply the dinosaur decal and hang the map
Continue enhancing the right wall in Dreamy Room Level 100 by adding two large decals. First, select the friendly green dinosaur silhouette and affix it at knee height, two grid tiles left of the corner shelf, oriented so its head points toward the center of the room. Then, take the framed world map and hang it on the upper right area, three tiles from the ceiling and one tile from the right corner, making sure it’s straight. These bold decals not only inject character but also showcase the placement precision challenge integral to Dreamy Room Level 100.
Step 6. Install the wardrobe and stack the top accessories
The back right corner of your room in Dreamy Room Level 100 holds the pastel wardrobe unit. Drag the two-door cabinet into the corner, aligning its right edge flush with the wall and the front edge three tiles from the front floor boundary. On top of the wardrobe, arrange the three cylindrical storage tins in pastel pink, green, and blue—largest to smallest from left to right. Beside these tins, set the small pink and yellow lunchbox, centering it on the wardrobe surface. This step in Dreamy Room Level 100 underscores the game’s core challenge: recognizing the correct grid positions for each item.
Step 7. Position the pink slide ramp and two plush toys
Shift focus to the left foreground in Dreamy Room Level 100, where a pink ramp with paw print decals awaits. Click and drag the ramp so its base aligns flush with the room’s left edge and its incline faces inward at a 45° angle. Once set, select the pink llama plush and place it at the top of the ramp, facing down, as if gliding. Directly in front of the ramp, position the green alpaca rocker, ensuring its feet are on the floor grid and its head toward the center. This precise pairing in Dreamy Room Level 100 highlights the importance of orientation and spacing when decorating.
Step 8. Lay out the train track and cat plush
In the center‐left area of Dreamy Room Level 100, you’ll build the toy train setup. First, drag the grey track piece with four straight rails onto the floor, forming a rectangle that’s centered two tiles from the left wall. Place the pink train mat underneath to frame the tracks’ shape. Next, select the pastel train engine and attach it to the front section of the track. Finally, position the blue cat plush with starry eyes beside the train tracks, ensuring the toy’s paws slightly overlap the track’s edge. This sequence in Dreamy Room Level 100 emphasizes the challenge of aligning multi-tile objects precisely.
Step 9. Add the bear plush with balloons and the carrot plush
Your room’s heart in Dreamy Room Level 100 is the cheerful brown bear toy holding balloons. Pick up the bear and place it center-floor, two tiles from the front wall, ensuring its front paws rest on the train mat’s edge. Next, attach the heart-patterned balloon to the bear’s right paw and the round teal balloon to its left, so both strings hang naturally. Lastly, add the small orange carrot plush on the floor just in front of the bear, angled toward its belly. These careful placements reinforce the main challenge of Dreamy Room Level 100: finding exact grid coordinates for each whimsical companion.
Step 10. Arrange the puzzle bench, blocks, horse box, and ball
Complete the floor scene of Dreamy Room Level 100 with the final playset elements. First, drag the grey puzzle piece bench into the right foreground, positioning it two tiles from the right wall. On top, stack three cube blocks—pink, green, and blue—from left to right. Place the orange basketball directly in front of the bench. Finally, select the small cardboard box containing the pink horse plush and purple yarn ball; position the box to the right of the bench so the horse’s head peeks outward. This last step in Dreamy Room Level 100 is the pinnacle of the placement challenge: every piece must align perfectly on the grid.
Notes and Precautions
- The primary challenge of Dreamy Room Level 100 is recognizing each item’s exact grid coordinates and orientation before placement.
- Always rotate or flip objects (where allowed) to ensure decals like the dinosaur and sun face the correct direction in Dreamy Room Level 100.
- If an object seems “stuck,” try nudging it one tile at a time rather than dragging quickly—this precision helps in Dreamy Room Level 100.
- Avoid overlapping items on the same grid cell; the game will reject placements that conflict in Dreamy Room Level 100.
- Save your progress frequently—while Dreamy Room Level 100 has no timer, accidental moves can occur.
- Use the undo button sparingly; reusing it too often may interfere with the final perfect layout in Dreamy Room Level 100.
Tips and Tricks from top players
- Grid Preview: Enable the subtle grid overlay in Dreamy Room Level 100 to see exact tile boundaries before locking objects in place.
- Snap Assist: Activate snap-to-grid in the settings—this built-in aid keeps every cushion, plush, and book perfectly aligned in Dreamy Room Level 100.
- Batch Placement: Group similar items (like the three pastel books and cylindrical tins) and place them in one go to maintain consistent spacing in Dreamy Room Level 100.
- Start from the Walls: As demonstrated, decorators begin with decals and curtains on the perimeter and work inward—this strategy is golden for Dreamy Room Level 100.
- Rotate with Keyboard: Use keyboard shortcuts to rotate sprites by 90° increments quickly when arranging the ramp or track in Dreamy Room Level 100.
- Mirror Mode: For perfect symmetry, place one item, then mirror-duplicate it across the room when possible in Dreamy Room Level 100.
Final Scene Description
In this fully realized Dreamy Room Level 100, the soft pastel palette and playful décor converge into a heartwarming tableau. The left wall hosts billowing pink curtains beneath a cheerful sun and drifting clouds, while the windowsill holds a green succulent and a sleepy cat in a lavender blossom chair. Below, neatly folded towels and baby bottles rest on a blue-trimmed cabinet. On the right, a wooden corner shelf displays a bunny head and toy car, topped by pastel books and a dapper snowman. A friendly dinosaur decal stands beside a framed world map. The left foreground features a pink slide with llama and alpaca toys, while the center-left train track curves around a starry-eyed cat plush. A smiling brown bear with heart and teal balloons stands guard beside a carrot companion. To the right, a puzzle-shaped bench hosts colorful blocks, with a basketball and a horse plush in a box completing the ensemble. Every detail of Dreamy Room Level 100 reflects the meticulous placement challenge that makes this level unforgettable.