Dreamy Room Level 566
Dreamy Room Level 566 guide - Dreamy Room 566 Walkthrough & Solution.
Important Notice Regarding Level Numbering
Due to frequent changes in Dreamy Room's level numbering and differences between platforms (Android/iOS) – for example, level 566 on Android might not be the same as level 566 on iOS – the text guide below may not always match the images and video above. Please prioritize the image and video guides. If you find that the guide content doesn't match your current level, please visit the All Level Walkthroughs page to find the correct guide based on level images. Thank you for your understanding.
Dreamy Room Level 566 Walkthroughs & Guide
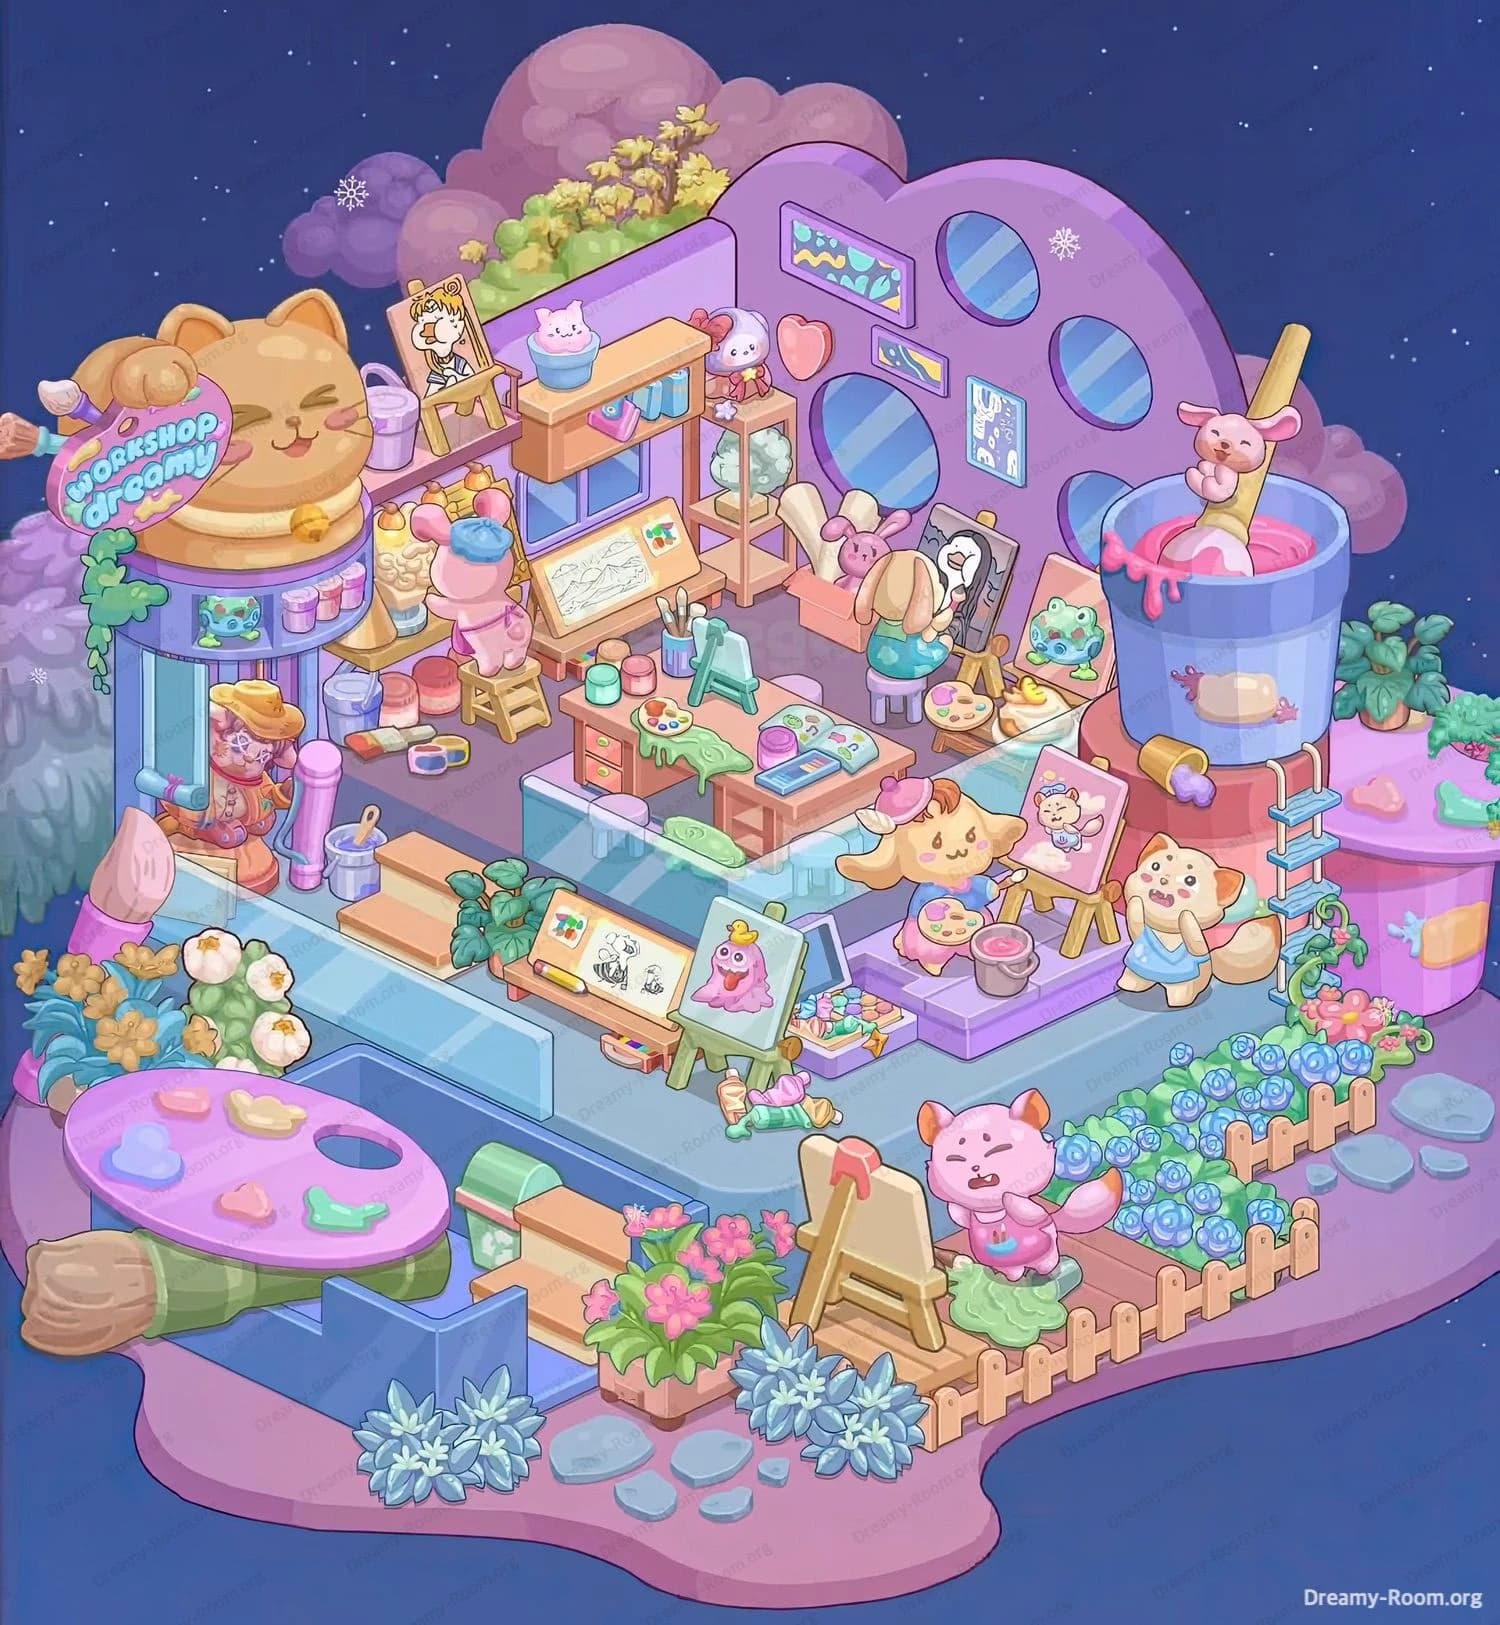
Step 1. Build the foundation of Dreamy Room Level 566
Begin Dreamy Room Level 566 by turning the empty stacked platforms into the base of the floating art workshop. The lowest pink island already exists; leave it visible around the edges as the shoreline of the studio, with the small grey stones kept in the front-centre as a path. On top of this, keep the big light-blue block exactly where it is to act as the indoor floor. Push nothing off its edges; every later object in Dreamy Room Level 566 will sit on or just in front of this block. The smaller mauve mattress platform stays centred at the back, touching the lilac wall and the tall heart-shaped panel on the right. These walls will later hold windows, paintings and shelves, so do not cover them yet. Think of this step as locking in the spatial rules of Dreamy Room Level 566 before any decoration begins. As in the broader Dreamy Room experience, the calm layout is your canvas.
Step 2. Place the left “Workshop Dreamy” tower and glass front
Next, transform the left edge of Dreamy Room Level 566 into the cat-themed entrance tower. On the front-left corner of the blue floor, place the cylindrical glass shop front so that its transparent wall drops down the pink cliff, giving a full-height window. Attach the pastel purple roof ring neatly on top of this cylinder, and then set the huge orange sleeping cat statue above it, facing right. The “WORKSHOP dreamy” sign with a palette shape must sit in front of the cat’s body, tilted slightly forward toward the player. Under the cat, line up the stacked paint cans along the tower’s right side. In front of the glass wall, position the giant painter’s palette platform on the pink island, with its thumb hole to the left and coloured blobs on top. Finally, slide the enormous paintbrush so that its bristles poke out from under the palette, pointing left. This cluster firmly defines the creative entrance of Dreamy Room Level 566.
Step 3. Add exterior plants, paths and island details
Now decorate the outdoor edges of Dreamy Room Level 566 so the studio feels alive. At the far left beneath the glass tower, tuck a dense patch of yellow-white flowers surrounded by dark green leaves. Continue this greenery along the cliff, letting vines trail up the tower. On the front edge of the blue floor, just right of the palette, place a low planter box overflowing with bright pink flowers and a couple of tiny butterflies above them. Scatter pale blue shrubs around the planter’s base on the pink island to soften the edge. At the far right border of the island, build the wooden fence in a shallow curve, and plant the row of blue and purple hydrangea-like flowers inside the fence line. Keep the three grey stepping stones in front of the fence, forming a path from the central floor. These outdoor elements set the whimsical garden frame that makes Dreamy Room Level 566 feel like a floating art paradise rather than a bare platform.
Step 4. Construct the back walls, clouds and sky decorations
With the ground set, upgrade the vertical backdrop of Dreamy Room Level 566. Along the top of the mauve back wall, place the fluffy pink and purple clouds so they peek up above the roofline into the starry sky. Nestle the yellow and green bushes between the clouds to create a soft horizon. On the interior side of the heart-shaped right wall, install the three circular porthole windows in a vertical line toward the curved edge, leaving space for a framed artwork to their left. Below the circles, hang a long rectangular picture showing colourful brush strokes, and beneath it add a smaller framed bunny illustration. On the left wall, inside the tower area, place a small horizontal sign or framed pattern above the upper shelves so it aligns with the top of the main room. These pieces anchor the eyes to the back of Dreamy Room Level 566 and ensure later furniture aligns naturally under the artwork and windows.
Step 5. Place shelves, sofa and back-row plush friends
The rear mid-level of Dreamy Room Level 566 belongs to storage and comfy seating. Against the centre of the back wall, just in front of the bushes, position the tall double-level shelving unit. On its top shelf, arrange the small pink cat head figure, a cream bottle, and pastel containers; on the middle shelves, fit books, jars and tiny decor in a tidy horizontal row. To the right of this shelving, place the peach-coloured sofa directly against the heart wall, slightly angled toward the centre of the room. Seat a large beige bunny plush on the left side of the sofa and a smaller pink bunny plush beside it, both facing forward. In front of the sofa’s right edge, set a small side table with brushes or tools if available. This back-row combination of storage and plushies gives Dreamy Room Level 566 its cosy, lived-in feel and frames the central workspace that you’ll create next.
Step 6. Build the central desks, drawing stations and sewing area
Now focus on the functional core of Dreamy Room Level 566: the multi-level workbenches. Starting from the left, place the long L-shaped counter along the blue floor, its front edge parallel to the screen and its shorter side pointing toward the back wall. Near the left part of this counter, set a tilted drawing desk with a large sketch sheet showing character outlines, and drop a round paint palette with multiple colours on its corner. Slightly to the right, install the mint-green sewing machine on the main counter surface, adding rolls of fabric, thread spools and a small pincushion nearby. Continue right with another flat desk surface that holds an open sketchbook or colour chart plus more paint tubs. Under the counter, slide in storage drawers and a tiny stool. Place a simple green stool in front of the sewing area, ready for a worker. This layered workstation is the productive heart of Dreamy Room Level 566, tying drawing, sewing and colouring together in one continuous creative bench.
Step 7. Position the easels and interior artists
Dreamy Room Level 566 thrives on little artists at their easels, so place them carefully. Inside the glass-front left area, put a wooden easel on the blue floor facing slightly right; mount a canvas with two black-and-white sketches, and drop scattered tubes of paint plus a knocked-over green blob on the floor. Just behind this, leaning on a ladder, position the pink bear artist in a beret, painting a tall portrait canvas that rests on the counter edge. At the centre-right, on a slightly raised lavender platform, place two more easels: the front one showing a star-shaped character painting, and the back one displaying a cute creature portrait. Sit the yellow star character on a round stool in front of its easel, holding a palette, while a fluffy cream dog artist sits behind, similarly painting. Finally, on the pink island in the very front-right, set a large easel and stand the pink cat painter on the green puddle-shaped mat, facing inward. This clear ring of easels around the room is essential to solving Dreamy Room Level 566.
Step 8. Add major characters, ladders and the big paint-mixing bucket
The right side of Dreamy Room Level 566 features a dramatic paint-mixing scene. On the raised circular platform attached to the main floor’s right edge, place the huge blue bucket filled with bright pink paint. Inside the bucket, drop the small pink puppy character, happily stirring with an oversized wooden spoon that rests diagonally across the rim. Attach the narrow pastel ladder to the outside of the bucket, reaching down to the lower level. Directly in front of the lavender platform with the interior easels, seat a tan dog character wearing a dress on a low stool, facing slightly left as if chatting with the star painter. On the lower left, under the glass front, place the standing cat artist with a hat and scarf, one paw on its hip, the other holding a brush. Add the small wooden step ladder beside the counter where the pink bear is climbing. These animated figures are what bring Dreamy Room Level 566 to life and help you distinguish each functional zone.
Step 9. Scatter tools, paints and tiny decorations
To complete the puzzle logic of Dreamy Room Level 566, you must correctly distribute all the small accessories instead of dropping them randomly. Around the cat tower roof, line three or four paint jars and bottles in a neat arc in front of the cat statue. On the floor beside the leftmost interior easel, place paint tubes, a brush and a small cup of water. Spread circular paint dishes on the counter near the sewing machine and the right-side easels, making sure each artist has a reachable palette. Put a small stack of canvases or sketchbooks on the shelf above the sofa and a heart-shaped wall decor between the windows. On the right of the big bucket, attach a rounded purple side tank with a tiny glowing door pattern. Each object must align with a plausible working position: if a palette or brush has no nearby character or canvas, it is usually in the wrong place in Dreamy Room Level 566.
Step 10. Refine foreground plants, fences and floor clutter
The final building step for Dreamy Room Level 566 is all about polish. In front of the central planter box, slightly to its right, position a wooden chair facing the pink cat painter; this suggests another seat for future artists. Along the wooden fence on the right, adjust the spacing so each post lines up behind a flower clump, forming a rhythm of wood and blossoms. Tuck a dark green bush under the glass overhang near the middle to hide the structural join. Make sure the few blobs of spilled paint on the floor—green near the front cat, pink near the bucket—sit exactly under brushes or palettes, not floating alone. Double-check that all stones on the pink island remain visible and not covered by characters. When everything feels balanced and readable from top to bottom, the placement challenge of Dreamy Room Level 566 is complete and the room will snap into its fully decorated state.
Notes and Precautions
In Dreamy Room Level 566, nearly every piece has a strong visual clue that hints at its correct location, so watch for colour matching. Pink items almost always gravitate toward the right paint bucket or the front cat painter, while mint and teal objects belong near the sewing and drawing desks. Be careful not to hide interactable items behind tall structures like the cat tower or the bucket; the game may allow technically incorrect stacking, but it will not register the level as solved. When moving characters, rotate them so their gaze points toward a canvas or workstation; a character facing empty space is a sign of wrong placement. Finally, remember that surfaces have limited capacity: if a shelf or counter looks overcrowded, some items are probably meant for the floor or another table in Dreamy Room Level 566.
Tips and Tricks from top player
Experienced players of Dreamy Room Level 566 recommend building from the back to the front and from big to small. Placing major architecture first—the tower, bucket, sofa and desks—creates natural “slots” for the characters and tools. Another strong tip is to group by activity: set all drawing elements (sketches, easels, pencils) first, then all painting elements (palettes, jars, brushes), and finally fabric-related pieces around the sewing machine. Use the characters as hints: each one usually stands near objects whose colours match its outfit. If you are stuck, temporarily remove all small clutter and reintroduce them one by one, always asking what that item logically belongs to. This tidy, layered approach dramatically speeds up solving Dreamy Room Level 566 and reduces random trial-and-error dragging.
Final Scene Overview
When Dreamy Room Level 566 is finished, the once-empty platforms have turned into a glowing night-time art workshop floating among the stars. The left side is dominated by the cheerful orange cat tower and its “WORKSHOP dreamy” sign, candles of paint glowing above a glass wall that reveals busy artists inside. The centre is a humming studio: desks overflow with sketches, threads and colour charts while a pink bear climbs a ladder to perfect a tall portrait. Behind them, shelves of trinkets and a sofa full of bunny plushies add warmth. To the right, a huge bucket of pink paint bubbles around a puppy stirring with a giant spoon, watched by star and dog artists at their easels. Outside, a pink cat paints by the fence, surrounded by flowers, hydrangeas and stepping stones. The whole of Dreamy Room Level 566 becomes a playful island where every object, plant and character has found its perfect creative place.

